DIY wooden gazebos: a selection of ideas and detailed assembly instructions
A gazebo is something that a home craftsman can build with a minimum of carpentry skills.And building a gazebo with your own hands from wood will become more accessible if, at the planning stage, you get acquainted with the drawings and diagrams and watch suitable videos. Is not it?
Next, we will tell you how to correctly draw up a gazebo project, calculate the required amount of materials for construction and independently build a stylish wooden gazebo.
The content of the article:
Selecting a construction site
The construction site must be chosen where there is a good view. Much depends on the size of the site and the functional purpose of the building. It can be done in a secluded corner, away from gate, where nothing will disturb you during your vacation.
Sometimes they are erected where it is planned to build a barbecue and there is access to water, in order to turn this structure into a kind of place for a summer dining room.

If there is a swimming pool at the dacha, then it is reasonable to build a gazebo next to it. On the site of a country house, where there is “wild nature” in the form of birch or pine trees, spruce trees, then it is better to do a light construction in this place, but not among the beds. It is better to separate the vegetable garden from it with a hedge of bushes and tall flowers.
If you are used to arranging your own plot yourself, then you will probably be interested in reading the article about arranging garden shower.
Design of wooden gazebos
The gazebo should be an architectural whole with the country house, this is especially important if it is built next to it. In other cases, it is not necessary that it copy the main structure in the choice of walls or in the shape of the building. It is enough that one of the elements is combined, for example, the roof structure or the details of the openings.
If the gazebo is located quite far from the house or under the canopy of trees, then you can deviate from this rule. If you are planning to build it near a fence, then you also need to think about the combination of elements.


Depending on the functionality of the gazebo, you need to take care of the need for removable screen frames that will help protect from bad weather or trellises for climbing plants. You need to think in advance about whether there will be lighting in the gazebo, as well as what material to make the path from.
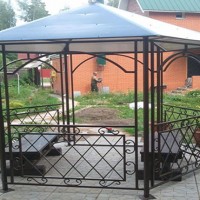
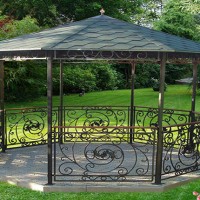
The shape of the gazebo can be round, rectangular, hexagonal or octagonal.The rectangular or quadrangular shape is the most popular when building a wooden gazebo. Such projects are easier to implement.
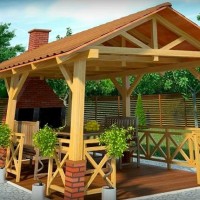
The roof is most often hipped; for multifaceted versions, it depends on the number of edges. The simplest option is a single-pitched one. It is not difficult to make a gable roof, but you can also make a structure with four slopes. It provides better protection from bad weather.
Home craftsmen often do not stop at simple solutions and approach the construction of wooden gazebos with imagination. They use different designs and materials, ranging from reeds and willow twigs to intricately curved tree trunks. Let's look at some ideas for wooden gazebos from such skilled craftsmen.


At the design stage, you need to find and download or draw simple drawings and diagrams of the gazebo yourself. Based on them, you can calculate the amount of materials needed. It is always necessary to buy them with a small reserve, so that in case of shortage you do not have to stop work.
Interesting: Do-it-yourself gazebo with a pitched roof.
Selection of materials for construction
A wooden gazebo can be made from logs or timber; it looks especially beautiful if the house itself is also made of this material. This design looks harmonious against the backdrop of pine and spruce trees.
You can use rounded logs or beams as support pillars for the gazebo. The remaining cladding and decorative elements can be made of lighter material:
- block Hausa;
- linings;
- tongue and groove board;
- slats of different widths;
- wooden balusters;
- picket fence elements.
As you can see, the choice of materials for construction is quite large, which makes it easy to build the gazebo of your dreams.
Useful: How to make a gazebo from a profile pipe with your own hands.
Pre-treatment of lumber
An open-air gazebo is constantly exposed to the destructive effects of water, snow, sun, fungus, mold, and insects can settle in it. To protect the wood, pre-treatment of materials is necessary.
Special mixtures have antiseptic and water-repellent properties. Before applying them, the lumber must be well dried.

Final painting or varnishing can be done after construction is completed.
Construction of a foundation for a wooden gazebo
Lightweight gazebos with a wooden roof can be built without a special foundation. This is especially true for those structures where the roof and rafter system do not have much weight. This option is also suitable where there are no plans to make a floor - you are going to leave it earthen or fill it with sand.
First, you need to level the construction site by removing the surface nutrient layer. Next, you can fill the area with gravel, preferably so that it has an elevation towards the center. This will prevent water from seeping under the floor.
Holes are dug under the wooden support pillars. The number of pillars is determined by the size and shape of the gazebo. For a square gazebo measuring no more than 3x3 m and with a sandy floor, four supports are sufficient. For large structures or for those where a complex rafter structure or roofing made of natural tiles or other heavy material is planned, intermediate supports will be needed. Also, intermediate supports are needed for laying lags.

The diameter of the logs must be at least 200 mm. Particular attention should be paid to antiseptic treatment of the underground part of the support. It can be covered with varnish or, in extreme cases, burned over a fire. Holes about one meter deep are dug under the support beams. Gravel, fragments of brick, etc. are poured onto the bottom.mixed with sand.
The layer of such a compacted cushion should be about 20 cm. After the support is installed in the hole, the gap between it and the soil is filled with sand and gravel mixture and compacted. Such a foundation can last 15 years.
For a longer service life, you need to make a columnar foundation with a shallow depth.
Stages of constructing a columnar foundation for a gazebo:
- In the places of support, holes are dug half a meter deep.
- A gravel-sand mixture is poured onto the bottom.
- Formwork measuring 400 x 400 mm and a height of 150-200 mm is installed around the perimeter.
- For pouring, concrete is used in the following proportions: cement + sand + gravel - 1:2:2.
- Before pouring concrete, you need to install reinforcement. The concrete hardening time is 2 days.
- This foundation can be completed on top with brick columns, so that there is an elevation of two bricks above the soil level, or the columnar foundation can be completely made of brick.
In a quadrangular gazebo, supports are made in the corners, in the middle of each side and one in the center of the gazebo.
As a base you can also do slab shallow foundation. First, the entire perimeter of the site goes deep by 10-15 cm and formwork is installed around the perimeter. Next, the surface is backfilled and gravel and sand are leveled. The mixture can be compacted with water from a hose.
Reinforcement is laid on top and a concrete platform is poured. It can already serve directly as a floor or as a base for ceramic tiles, but you can lay wooden floorboards on it on the joists.
Article for you: We make a gazebo from scrap materials with our own hands.
Making the lower and upper trim
A frame made of timber with a profile side of 150 or 200 mm is laid on the foundation. The harness can be fastened with a mustache when the corners at the junction are cut at an angle of 45 degrees; this is important if the gazebo is rectangular in shape.
You can use the half-tree method, when part of the wood is removed and the beams are inserted into each other or joined end-to-end.

The frame beam is attached to the foundation columns using metal corners. You can immediately make the top frame so that after installing the pillars, you can lift it and install it on the supports. It simply copies the bottom trim.
Fastening the support pillars and the top trim
The corner support posts are attached to the harness. They can be secured in different ways. Let's consider one of them. First, the support is attached to the harness with metal corners. Then it is leveled and temporarily secured with an oblique strip on both sides.

The top trim is also attached to metal corners. For greater reliability, you can drill holes through the trim into the support post and screw in a 250 mm screw.
At this stage, you need to install entrance posts or additional posts for railings if the gazebo is more than three meters long.
Flooring and railing construction
The basis of the floors are logs and black floor from boards. The logs are laid on a concrete base or timber frame. As insulation, it is necessary to use roofing felt bedding.The subfloor is installed with small gaps.
For the floor, use a board of 20 mm or more. You need to leave a small gap between the boards. This is done so that water from rain and melted snow does not stagnate on the floor and goes into the cracks.
The railings can be fixed to metal corners. This can also be done in another way: first, attach to the support pillars self-tapping screws slats. Place railings on them and secure them. Install one beam diagonally, it will add additional rigidity.
During full stitching At the bottom of the gazebo, they will be attached to this beam with boards. It can also be an additional decorative element in the half-timbered style, if you add two more short bars to give it an X-shape.
Roof of a wooden gazebo
The roof that will crown the gazebo can be: single-pitched, gable, hipped or multi-pitched.

For a hipped roof, during installation of the top trim, you can make a cross using the connection methodhalf a tree. To give the structure greater rigidity, wooden blocks 40 x 40 mm are attached in the center.
A block with an octagonal profile is attached to the center of the cross. You need to make it yourself from timber with a side of 100 mm and secure it in the center of the cross. A cut is made in it from above to attach the first pair of rafters. They must first be fastened into half a tree, and then inserted into the cut of the block.
We place another pair of rafters, perpendicular to the first pair, on the octagon and attach it. We do the same with the rest of the rafters.Their ends should lie on the upper harness, falling below them by about 30-40 cm.

Next you need to make the sheathing. Depending on the choice of roofing material, it can be continuous or sparse. The roof should be made identical to the house for a harmonious combination.
In addition to the usual roofing materials: natural tiles, metal tiles, metal profile, flexible tiles, slate, etc. you can use boards, shingles. There are rarer materials, such as wooden shingles.
These are small planks and shingles. The shingle is attached with an overlap onto the sheathing and looks very original, it is environmentally friendly material. Another natural material is reed. Mats are made from it, which should be treated with a fire retardant to prevent fire. The lathing for such a roof is not made continuous, but in increments of 35 - 40 cm.
Finishing of the building
To decorate the gazebo, you can use different types of materials. Many people even make the railings themselves from the same timber, but ready-made wooden railings with beautiful balusters will look much more beautiful. To attach them, holes are made in the lower bar using a “feather” attachment.
Each part is inserted into the prepared hole. To temporarily fix them to the support posts, you need to nail a rail. Next, a railing strip is placed on the top of the balusters and secured with self-tapping screws. Glue is applied to the bar and to the underside of the railing where the recess is. PVA. The railing is pressed against the bar. For strength, they need to be secured to the posts using corners.

You can also make lattice screens to close the inside of the gazebo from prying eyes. You can make such slatted trellises yourself.
First you need to make a frame from bars, connecting them with a mustache or end-to-end. Markings must be made on the frame. The first rail will go diagonally, the rest will run parallel to it with a certain step in both directions to opposite corners. Fastening is done self-tapping screws.
In the same way, the slats are attached in the second row to create a lattice. The slats do not have to be cut exactly to size first. They can be aligned along the edge of the frame after fastening. Such a trellis can be secured between the railings and support pillars of the gazebo. The frame will face inward, and the grille mounting points will face outward. If you cover the top of the mounting points with slats of the same width as the frame bars, then the whole structure will look neater.

Some craftsmen use natural materials found in the forest for railings and balusters: tree trunks and branches, cleared of bark and varnished.
If you plan to make the gazebo warm, so that you can stay there in cooler weather. Then the lower part needs to be completely covered with a board. At the top of the gazebo, a lintel beam is attached to the support posts.
Such jumpers are installed parallel to the railings, 200 - 300 mm below the top point of the support pillars. This upper gap also needs to be covered with boards.Special double-glazed windows are installed between the railings and the upper lintel for the cold period of time. For insulated gazebos, a lightweight panel door should be installed.
In places where there is often wind, one of the walls of the gazebo can be completely sheathed with boards. You should also do this if the neighboring area is close, and you want to isolate yourself from prying eyes.
Upon completion of construction, in addition to antiseptic treatment, the wooden gazebo must be painted or varnished. This will protect the building and give it a more noble appearance. The painted surface is easy to clean and easy to care for.
For you: We build a modern gazebo with a barbecue for the dacha with our own hands.
Conclusions and useful video on the topic
Video instructions for building a rectangular wooden gazebo:
Video with instructions for building a hexagonal gazebo:
Building a wooden gazebo is not that difficult. To do this you will need tools: a circular saw, screwdriver, drill, chisels, plane, grinder. Some skills in working with wood, free time and the desire to decorate your site with a new functional and beautiful gazebo will also come in handy.
You can ask questions about the topic of the article or share your own experience in building a wooden gazebo. The communication block is located immediately below the article.