Do-it-yourself Vodomet pump repair: review of the most popular breakdowns
Owners of country houses and dachas have to independently organize water supply for their own plots.Agree, this is a very difficult task. And without a well pump it becomes simply unsolvable. Many homeowners, having studied the offers on the market, opt for Vodomet centrifugal well pumps produced by the Russian company Gilex.
These devices do an excellent job of supplying water from various structures, but from time to time they still break down. The fastest way to solve the problem is to repair the Vodomet pump yourself. This task cannot be called simple, but many home craftsmen cope with it more than satisfactorily.
We will talk about how the Vodomet pump works and how it works. We will also talk about the most common equipment breakdowns and their causes. The material contains thematic videos that will help you repair the pump yourself.
The content of the article:
How does Vodomet work?
Centrifugal pump designWater cannon“slightly more complicated than the vibration one”Baby" or "Brook" At the bottom of the unit there is a sealed oil-filled engine, on the shaft of which unique cups are placed - elements with floating working wheels.
Depending on the power of the pump, there may be more or fewer such glasses. The top cover of the pump presses against all these elements and keeps them in the correct position. From this cover comes an electrical cable, a pipe for supplying water to the water main and eyelets for hanging the pump.
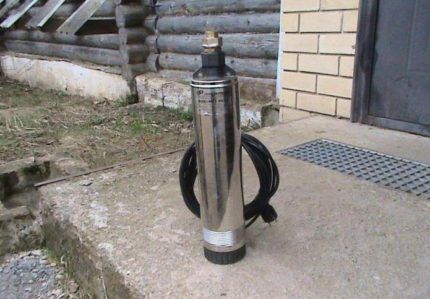
Floating impellers are the highlight of this unit. At the very beginning of work, they are ground into the structure by grinding off the plastic collar. As a result, a minimum gap is formed between the static and moving elements of the device. This design ensures high pump efficiency.
Another advantage of floating pump wheels is the ability to pass sand particles that fall into the well during natural sanding processes. Models of the “Water Jet A” type pump are designed in a similar way.
They are additionally equipped with a float switch, which is designed to turn off the device in the event of an emergency. For example, if the water in the source has dried up for some reason (low flow, flooding, etc.).
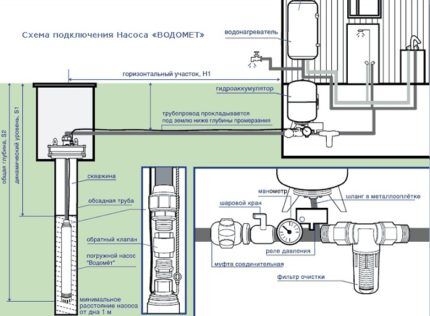
The “Vodomet” borehole pump, despite the lack of such protection, works quite well, but it is very important to do it correctly install it in a well. It can be turned on/off every three minutes without compromising the integrity of the structure.
To prevent a “dry running” situation, which is detrimental to any pump, you should choose the right model, hang it at the right height, etc.
An additional element extends the life of the device, but requires additional space for placement. For this reason, Vodomet A” is usually used not in wells, but in wells. But this model has to be repaired in approximately the same way as a well pump.
Another feature of the Vodomet submersible pumps is the lower water intake. The design allows the pump to be used in a semi-submerged state. If you need to completely empty the container, the “Water Cannon” will do the job perfectly.
But placing a pump in a filter well in this way is not always useful. The device will constantly pick up sand from the bottom. This negatively affects both the quality of the water and the condition of the impellers of the device.
To prevent a problem of this nature, homemade nozzles are placed on the bottom of the pump to prevent sand from penetrating into the device.
The unit must be positioned in the well so that there is at least 1 m between the bottom of the excavation and the bottom of the pump. The Water Cannon can be immersed so that there is no more than 30 m between the water surface and the top of the device.
The water jet is designed for pumping water with temperatures from +1 to +35 °C. It is not recommended to violate the temperature regime for its normal operation. And you can’t turn on the unit more than 20 times a day.
In order to prevent premature wear and tear, the Vodomet cannot be operated without water. The device must be grounded. It is necessary to include an RCD in the network that turns off the device if current leakage exceeds 30 mA.
How to disassemble the pump?
The design of the Vodomet pump cannot be called completely simple and understandable. Before starting disassembly, it is recommended to familiarize yourself with the features of its design in as much detail as possible. It doesn’t hurt to record the correct position of each element: write it down, photograph it, shoot it on video, etc.
You should also pay attention to the correct position of each part in relation to the concepts of “top” and “bottom”.If the wheels were installed incorrectly after repair, the pump will still work, but not very efficiently.
Problems may also arise after rewinding the motor. Not all pump owners remember the correct location of the contacts.
Before disassembling, the pump, of course, should be disconnected from the power supply and removed from the well. To make the work easier, it is better to disconnect the water supply pipe from the pipe and remove the metal cable.
When the pump is in operating position, its washed motor is in the upper part, and the pumping part, consisting of impeller wheels and cups with lids, is in the lower part. But when disassembling the pump, it is more convenient to hold it “upside down”, i.e. engine down.
The first step in disassembling the pump is to unscrew the bottom cover. This operation is performed using a sufficiently long screwdriver threaded through the eyelets for hanging the cable. You need to unscrew it counterclockwise.
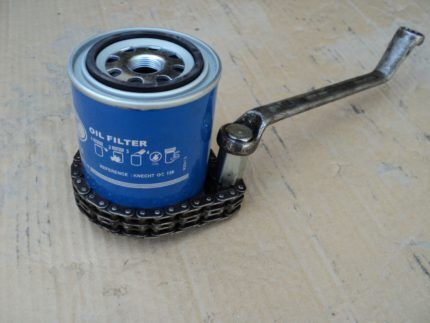
It may be more convenient to use other devices, for example, gas wrench number three. A device for removing the oil filter cover, well known to motorists, or its equivalent made from a strip of durable fabric with a lever for twisting it, is also suitable.
After this, you need to carefully remove the chambers with lids and impeller wheels from the pump housing. The lids of the glasses are numbered from 1 to 3. Usually all the glasses with the number “1” are put on the shaft first, then with the number “2”, then with the number “3”.
When disassembling the water jet pump, these elements will be removed in the reverse order.It is better to write down the numbering order of the glasses to avoid mistakes during assembly.

It wouldn’t hurt to immediately clarify the direction of movement of the shaft. To do this, the pump with the wheels removed is simply turned on for a few seconds. The wheel should be positioned in such a way that water is sucked in from the bottom center, and water flows upward to the outer part of the ring.
In the correct position, the ring with the blades should be installed with the wide part towards the engine, i.e. protrusion down and smooth side up.
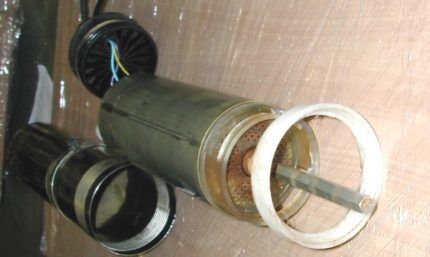
The pump shaft is not twisted, as in similar models, but is fixed with two clips. If it needs to be removed, tighten the clips with pliers and remove the shaft. When the cups with impellers are removed, it may be necessary to also remove the electric motor. This will require some effort, since it is pressed into the body quite tightly.
To avoid bending the shaft, place the pump housing on a support with a hole into which the shaft can be inserted. After this, you should carefully knock the engine out of the housing using a hammer and a piece of wood. They hit the end with a hammer, and the board acts as a shock absorber.
When the position of the motor in the housing changes, you must first remove the ring-shaped retaining gasket. It needs to be rotated 90 degrees inside the case, squeezed a little and removed so as not to damage it on the internal threads of the case.You can immediately pay attention to the position of this gasket.

It should be facing the engine with the side from which the chamfer is removed. After this, you can remove the engine from the housing. It is closed by the top cover of the pump, which is secured with two strong sealing rubber bands.
To remove the cover, you need to lay the engine on its side. Then the cover is carefully knocked out of the engine housing by hitting it with a wide screwdriver and a rubber mallet. You can use other suitable tools for this. There is a capacitor under the cover. Sometimes this element fails, but it is not difficult to replace.
Be careful when handling the pump housing. Sometimes it becomes necessary to fix the device in a vice. First, it is recommended to wrap the body at the fixation site with shock-absorbing material. The force should be moderate so as not to deform the product.
Reassembly process
After the repair is completed, it is necessary to properly reassemble the pump. If you make mistakes at this stage, the device will need another repair.
When performing reverse assembly, you need to follow these steps:
- Reinstall the capacitor.
- Carefully lay the wires inside the motor housing.
- Press in the top pump cover.
- Insert the motor into the pump housing.
- Press in the assembled motor in such a way as to ensure its tight fit into the end of the housing.
- Insert the ring-shaped retaining gasket and push it until it stops using a suitable tool.
- Place the white impeller on the shaft with the smooth side facing the motor, i.e. down.
- Place the white gasket on the shaft, and then the assembled glass with the lid “bottom” (i.e. this lid) down.
- Put on the blue washer.
- Reinstall the impeller, white washer, glass, blue washer.
- Repeat until all elements are installed.
- Cover the stack of glasses with a lid and carefully tighten it using a gas wrench or other device.
To make it easier to press the motor into the housing during reassembly, the edge of the housing can be treated with silicone grease. During the installation process, you must pay attention to the numbering of the glasses and strictly follow the sequence of their installation. A pressure gasket is installed on top.
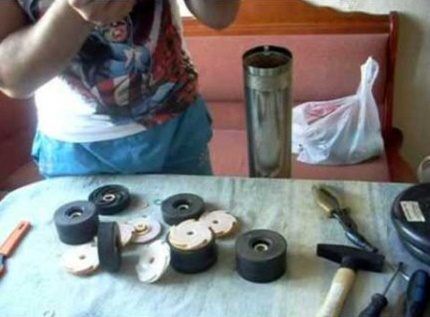
In order to prevent further damage, it is recommended that in case of severe wear, replace this element with a new gasket. Typically, a new gasket can be purchased from the manufacturer or picked up at specialized retail outlets. After the pump repair is completed, you need to check its operation.
You can immerse it in a container of water, such as a bucket, to ensure that the device turns on and is able to pump water. But it is impossible to have an idea of how good the pressure the pump will provide in the system.
You can check the operation of the pump for pressure at a service center, but first it is better to check whether this is possible.
Another test option is possible if the pump owner has a large capacity container at his disposal. Of course, you can check the characteristics of a repaired pump directly in the well, but if problems are discovered during the test, the device will have to be removed from a fairly large depth. A preliminary check on the surface will help to avoid this.
Typical faults and repairs
If the Vodomet pump is under warranty, the easiest way is to solve all problems at a service center. But when the deadlines have passed, owners usually prefer to save money and carry out the repair work themselves. Some operations, such as replacing worn out impeller rings, are easy to perform.
But if you need to rewind the motor, it is better to entrust this task to specialists.As for spare parts and components, they can be purchased without any problems and at a very reasonable price.
The Gilex company willingly sells spare parts for its products. They are sold in specialized stores and service centers. You can also contact the manufacturer directly.
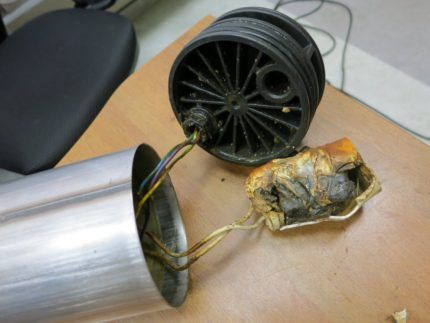
Based on the nature of the device failure, you can roughly judge what kind of repair work will be needed.
Here is a list of typical problems that owners of Vodomet pumps have to face:
- The device does not turn on.
- The pump body is electrified.
- The water pressure in the system has noticeably decreased.
- The pump operates unevenly, making sounds uncharacteristic of normal operation.
Here is a list of malfunctions that are typical for these symptoms and ways to eliminate them:
- The motor winding burned out. It will have to be completely replaced.
- The contact has come loose or the wire has been broken. It is necessary to open the motor housing, restore the connection with the contacts and/or the integrity of the electrical cable.
- The integrity of the engine housing is compromised. As a result, the capacitor is wet and should be replaced with a new analogue.
- The impellers are worn out. It is necessary to disassemble the pump and replace them with new elements.
Of course, if the pump is already removed from the well for repairs, it makes sense to conduct a full diagnosis of the unit. The pump is disassembled, gaskets, washers, cups, impellers and other elements are inspected. If signs of wear are noticeable, you should immediately take care of replacing such elements.
Then it makes sense to disassemble the engine, test the condition of the contacts and the supply wire. If necessary, locate the cable damage and restore the connection. Sometimes it is worth replacing the power cord completely.
Problems with a damp capacitor are usually obvious even from their appearance. Soldering a new capacitor is usually not difficult, but during reassembly the cause of the malfunction must also be eliminated, i.e. ensure sufficient tightness of the engine housing.
A burnt motor winding, as already mentioned, will be difficult to repair correctly at home. This operation can be ordered at the factory, and all other work can be done independently. This will make repairs cheaper. In some cases, it is easier and more reliable to replace the engine with a new device.
When the engine depressurizes, a situation is observed that experts characterize with the word “emulsion.” This means that water has entered the engine housing and mixed with the oil, turning it into an emulsion. The oil must be drained and completely replaced.
Under no circumstances should this fluid be replaced with any ordinary machine oil. The only suitable lubricant for Vodomet pumps is pure glycerin. The fact is that in the event of a breakdown, oil can get into the well and significantly spoil the quality of the water. It is very difficult to get rid of such pollution.
Popular causes of breakdowns
There are only two main reasons for breakdowns of Vodomet pumps: errors made during the manufacture of the device and difficult operating conditions. The pump owner is powerless to influence the first situation.
If you are so unlucky that you received a defective unit, you need to set up a long-term cooperation with the service center within the framework of the warranty.
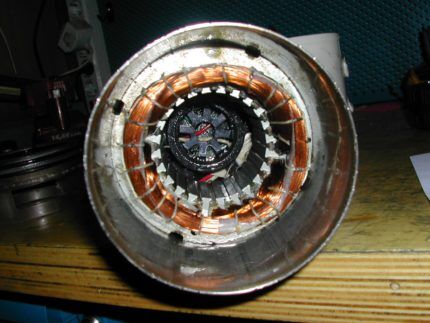
Careless handling of the device or its incorrect installation are quite common. Do not pull the pump by the electrical cable, this is the weak point of the pump. If handled carelessly, small cracks may form at the point where it enters the motor housing, so it is important to properly remove equipment from the well.
Over time, they expand, moisture penetrates into the housing and the engine becomes unusable. Contact can be broken in the same way. Cable breaks can be caused when installing the pump if the wire is broken or accidentally broken.
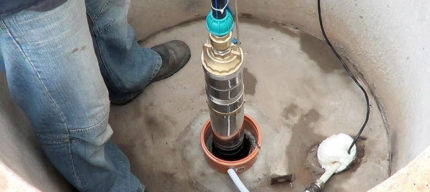
Impeller wear can be caused by prolonged contact with sand-contaminated water. The manufacturer, of course, does not recommend using a Vodomet to pump water containing up to two kilograms of sand and clay suspension for every cubic meter of water in the well.
However, the instructions do not say how contaminated the water can be and how long it can be transported without damaging the pump design.
Practice shows that Vodomet pumps can only be used in one capacity. Either to supply water to the water supply, or to remove sand from the well.
After pumping the sand-covered structure, the pump owner is surprised to observe the uneven operation of the pump. The reason is simple - the impellers are worn out and require replacement.
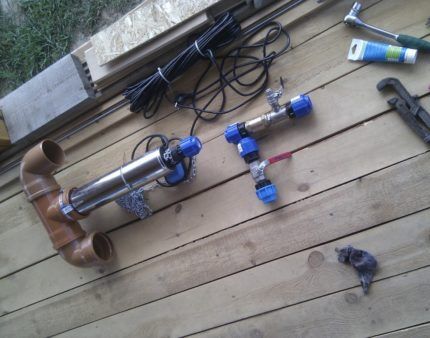
It's not difficult to fix the situation, but pump a contaminated well or you can swing it after drilling in a more effective way: using a submersible vibration pump of the “Baby” or “Rucheek” type. Such equipment is cheaper and easier to repair.
Another reason for breakdowns of the Vodomet pump is improper suspension of the pump. If the immersion depth of the device exceeds the figure specified by the manufacturer, the device operates under increased loads for which it is not designed. Often in such situations, depressurization of the engine is observed.
Conclusions and useful video on the topic
The following material very clearly shows how to properly disassemble a water jet pump, as well as the process of reassembling one of the models:
Disassembling and repairing Vodomet pumps requires attention to detail and some skill. Over time, the task becomes quite feasible and familiar. Many DIYers service and repair these pumps with complete success.
Have questions about the topic of the article, found inaccuracies, or have information that you would like to share with visitors to our site? Please leave your comments in the block below.


Good afternoon My 55/75 water cannon removed all the rings, but the engine itself does not go further, it is hampered by an o-ring that cannot be reached because of the spare part in front of it. Maybe you have encountered such a problem, please tell me.
Good afternoon.I have the same problem (water jet pump 55/75), I can’t get to the O-ring because of the plastic part, I knocked it out almost to the edge, 1 cm remained and does not go further. Have you figured out how to remove this plastic part? In my pump, the stopper on the rod flew off, I’m wondering how to stop it, everything is made of plastic.
Good afternoon. Did you somehow manage to resolve the issue of disassembling the 55/75 water jet pump? How do I get this O-ring that is covered by another plastic part?
My mechanical seal housing (Jilex water jet pump 40/50) also burst, resulting in oil leaking out. The cracks are barely noticeable, but when assembled, under the action of the pressure spring of the mechanical seal, they increase and all the oil flows out.
Vladimir, knock out the O-ring almost to the thread, pour boiling water over it and turn it 90 degrees and install it the same way. I first broke it, pulled it out, and then it dawned on me how smart I am...
The Vodomet is a good pump. However, due to the design of the lower water intake, problems arise with the ingress of suspended matter and fine sand into the unit itself. I was immediately warned about this when I was still looking for a suitable pump. After the first cleaning, I installed a homemade cover with a fine mesh on the Vodomet, which helps eliminate clogging of the pump.
I don’t know about Vodomet, but other manufacturers, for example, the same domestic Belamos, have different models. What I mean is that you need to first conduct a chemical analysis of the water before installing pumping equipment.If the well has a high sand content, then you need to select a well pump that will work without problems in such an environment. The same goes for water with a high iron content and so on.
I often notice that many people use a pump that is not designed for use in water with the current chemical composition, and then they are surprised by the accompanying breakdowns.
My 60/52 A water jet pump runs for about 10 seconds and turns off. Then it apparently cools down and turns on again for 7-12 seconds. I rang the winding immediately after disconnecting (via the plug), it didn’t ring, but after a minute it started ringing. Apparently it's cooled down. Please suggest possible reasons. Thank you
Since when did the Chinese Belamos become domestic? Call it also Belarusian.
There cannot be a good pump with a 1 year warranty.
Not so good with a three year old either. It works exactly three times and burns out, only for replacement.
What is the rotation speed of the motor shaft?
When you open the water tap, the VODOMET 40\50 pump does not turn on, but turns on after turning off and plugging the plug back into the socket. Please explain the cause and method of troubleshooting
Most likely the dry running protection is activated automatically. When the impellers wear out and the pump can no longer pump up the set pressure to shut down the pump, protection is activated. In order for the pump to turn on itself, you need to lower the pressure threshold.
The third time I turned it on, the pressure disappeared. The engine runs smoothly. No external damage.. What etr? Shoulder blades fall off???? What kind of quality is this??? One Italian pump has been working for 8 years and there are no noises or complaints.
Greetings to all! On the Gilex 50/55 submersible pump, liquid leaked out of the motor and water got inside, so the machine was knocked out. In general, I took it apart, wiped what I could, dried it, put it back together and it worked. What kind of liquid should I use and how many grams? If it’s glycerin, as the master wrote above, is the pharmacy grade suitable and still give me an indication of the quantity, please! Thanks in advance!
My Gilex 60\32 worked honestly for 12 years. Probably discontinued for this reason. The more often equipment breaks down, the more often it is replaced.