How to lay sewer pipes in a private house: laying diagrams and rules + installation stages
It is unthinkable to consider water supply to a residential property without installing a wastewater disposal system.Therefore, even before construction, you need to decide where and how to lay sewer pipes in a private house, and how to arrange the external pipeline.
We will tell you how to lay sewer pipes within the building and around the site. We will show you how to assemble the system and fasten it sanitary fittings. The article we propose provides installation rules and building codes, and describes the technology for performing internal wiring.
The content of the article:
Highlights of sewer construction
Without preliminary preparation system wiring diagrams sewage drainage is out of the question for construction. A carefully thought-out, drawn up scheme will allow rational use of capital investments.
In addition, thanks to the preliminary drawing up of the building's sewerage diagram, more opportunities open up for achieving the required efficiency of the system.
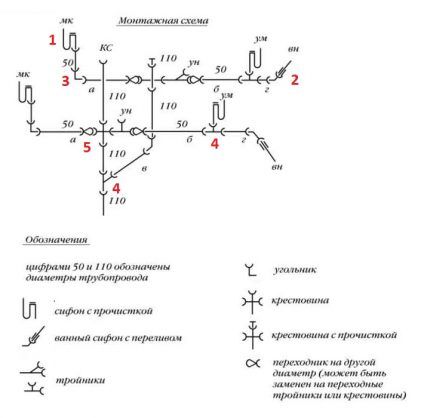
The main criteria for drawing up a diagram are usually considered to be:
- the number of people on the territory of a residential property;
- proposed technology for processing (purification) of sewage waste;
- wiring of external wastewater disposal lines;
- layout of internal collection and drainage lines.
Having decided on the main points of construction, they calculate the number of system components, including the footage of sewer pipes, and draw up a sketch of the project.
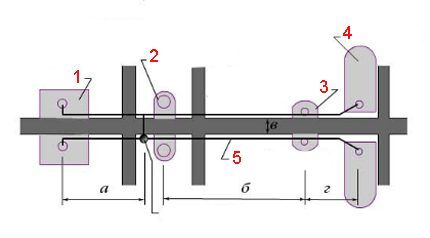
Pipe layout for a one-story house
Considering the availability of lightweight polypropylene pipes and a complete set of installation fittings, it is quite affordable to build a sewerage system in a private house yourself. However, without consulting specialists and referring to established standards, it is not easy to build a high-quality sewer system.
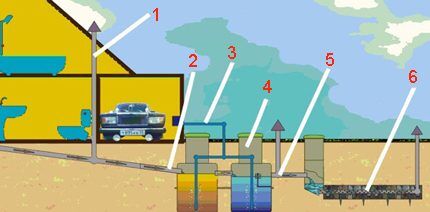
The classic sewer scheme in general contains:
- sewer riser;
- pipes connecting the internal components of the system;
- external pipeline discharging general waste;
- receiver system.
According to existing standards for the layout of a one-story building, the areas closest to the external point of drainage are the plumbing fixtures of the kitchen and sanitary unit.
The wall separating these two rooms of the house is considered the installation site for the riser pipeline. The area of the lower point of the riser pipe is diverted to the external main, and the upper point is diverted to the roof.
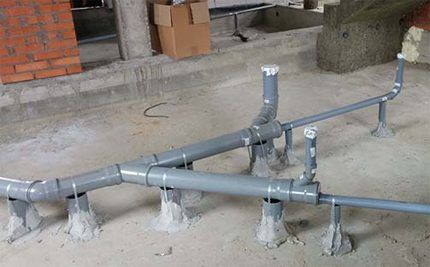
The most remote plumbing fixture in the utility area is connected to the riser by a pipeline of smaller diameter and taking into account a slope towards the riser of 1.5-2º. Formation rules sewer pipe slope are given in our recommended article.
The laid line is used to connect other plumbing fixtures in the utility and technical area. The closest appliance to the riser is traditionally the toilet.
Thus, a gravity flow scheme is created sewerage distribution one-story private building. However, not in every case of installation of a plumbing network it is possible to organize a gravity circuit. Then the problem is solved by introducing additional equipment into the circuit - a pump.
Pipeline in a 2-3-story building
The structure of a private house on two or three floors is characterized by the arrangement of several economic and technical zones. Moreover, the arrangement of such zones is provided for on each of the existing floors. Respectively, sewerage installation in such conditions it seems like a somewhat more complicated schematic option compared to the first one - a one-story house.
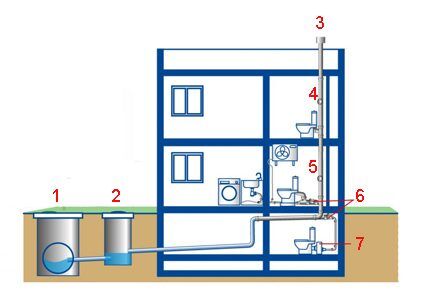
Standards and rules for the construction of multi-storey buildings regulate the construction of premises of the same type in terms of functionality at a single vertical level.Therefore, the sewerage scheme in this case, for example, concerning toilet rooms, provides wiring for rooms located one above the other.
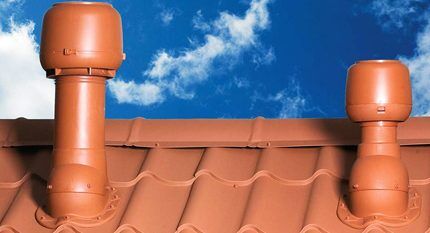
Riser pipe designed for sewer ventilation multi-storey buildings, passes through all floors and is brought to the roof level, taking into account an additional rise of 0.3 m and higher if the roof is not in use.
For the option with a used roof, this parameter is at least 1.5 m. For pitched roofs (a popular design for private houses), the riser outlet is made to a height of 0.5 m from the level of the roof ridge.
Also the device diagram fan boner multi-storey buildings involves the use of compensating elements at the points where the pipeline passes through the ceilings.
Accordingly, transitions through the ceilings are made waterproof and sound-absorbing, equipped with special fire-proof cuffs.
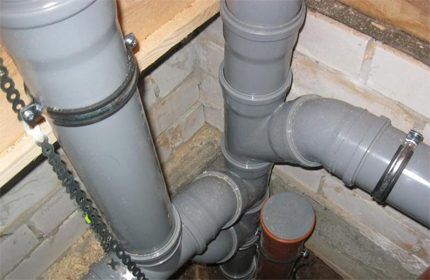
The riser pipe is fixed directly to the wall using metal clamps with rubber linings. Guidelines for choosing sewer pipes for internal wiring are given here, we advise you to read useful information.
The fastening is carried out without tight tightening - overhead, to ensure natural free movement of the pipe vertically.The lower part of the riser is led through an outlet to the external sewer line.
What you need to know about pipe laying?
Traditionally, drainage lines from plumbing fixtures such as sinks, bathtubs, and utility sinks are made using pipelines with a diameter of 50 mm. Toilet discharge channels require a larger pipe diameter - 110 mm.
At the present stage, polypropylene pipes are traditionally used for the construction of internal sewer lines. However, depending on the specific project and the load (throughput) capabilities of the sewer network, different diameters of linear pipelines and risers can be used.
The table below shows the possible options.

Gravity pipelines of horizontal lines with a diameter of 40-50 mm are installed, observing the norm of a uniform slope equal to 0.03 m per 1 m of length.
Gravity pipelines with a diameter of 85 and 110 mm are laid, observing a uniform slope norm of 0.02 mm per 1 m of length. The maximum permissible slope angle is not more than 0.15 mm for the entire length of a separately installed sewer section.
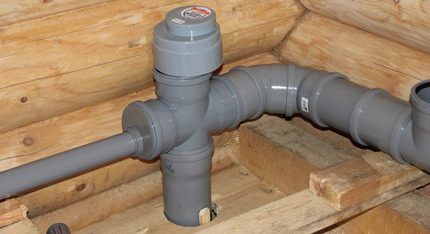
Direct connections between the outlet lines and the riser are made using tees and crosses at angles of 45º or 60º. Executing the scheme in this way allows you to avoid clogging of pipelines during operation.
Scheme country house sewer and apartments, it is mandatory to introduce inspections (cleaning) at points in the line where there is a high risk of blockages.
For a circuit in a private house, the location of such circuit elements is shown in the table below:
| Pipeline, mm | Distance between elements on a line, m | Item type |
| 50 | 12 | audit |
| 50 | 8 | cleaning |
| 110, 150 | 15 | audit |
| 110, 150 | 10 | cleaning |
| 200 | 20 | audit |
Sewerage construction procedure
Let us briefly consider the main stages of constructing a sewer pipeline in a private home. Even if you do not decide to carry out the work on your own, you will be able to control the hired specialists.
Stage #1 - installation of a yard network
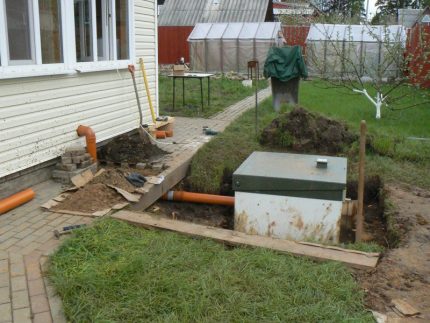
The creation of a sewer system begins with the stage of constructing an external (yard) network. If the length of the yard network to the existing manhole more than 12 meters, an additional inspection well is installed. In this case, the minimum permissible distance from the wall of the house to the inspection well is 3 - 5 m.
He will familiarize himself with the methods of constructing the outer part of the pipeline and the rules for laying sewer pipes in the ground. next article, which we highly recommend reading.
In laying external sewer lines they are now mainly used polymer pipes, attractive with light weight, excellent performance characteristics and affordable price. When laying a route above the seasonal freezing level, use insulation materials, protecting lines from the formation of ice plugs.
Often, owners of private buildings have to deal with the lack of a centralized sewerage network. In this case, an autonomous system for collecting and filtering wastewater is installed (septic tank). However, the principle of the “external internal network” connection remains the same.
Stage #2 - construction of the house entry point
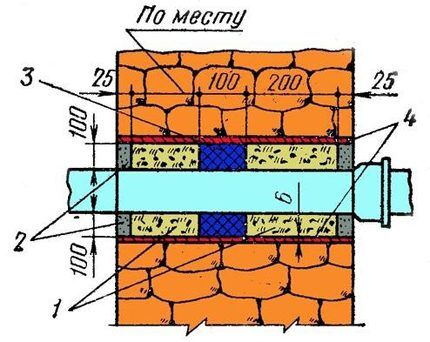
Next, you need to build an input unit directly in the structure of a private house (foundation, basement wall). The construction of the unit is carried out taking into account possible deformations, for example, due to subsidence of the structure.
The input unit and the external pipeline are reliably insulated.
Stage #3 - installation of risers and bends
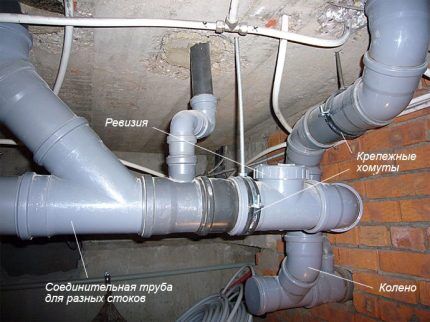
At the next stage, the installation of riser pipes of the internal network is carried out. It is recommended that these circuit components be assembled and pre-installed in assembled form without fastening or with partial fastening.
Full fastening is carried out after final assembly of the entire system. Having completed the installation of riser pipes, horizontal sewerage drain lines are built taking into account the required slopes.
Stage #4 - connecting plumbing
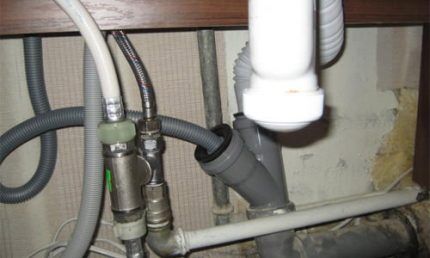
At the final stage, installation of plumbing fixtures and connecting each device to the corresponding outlet through a siphon pipe.
Additionally, it is worth noting: provided the building height is less than 10 meters, the internal sewer system can be built on the basis of free-flow pipes. At higher altitudes, pressure pipes are used.
Conclusions and useful video on the topic
Below is a video demonstration of the practice of laying out and laying a pipeline network, taking into account the construction of a private house. Full installation cycle, including testing the system using the simplest methods.
Knowing the procedure for arranging a system for draining wastewater from a house, you can try to build a sewer system yourself. True, at the stage of laying the pipeline from the outside, assistance will be required to bury the pipes in the ground.
If in doubt, it is better to contact a company with a good reputation and positive recommendations from your friends. Then the sewer system will be designed correctly and will serve your family for decades.
Please leave comments in the block below. Share useful information, photos and your own experience gained in the field of installation or repair of a sewer pipeline. Ask questions about controversial, interesting or unclear points.


Indeed, following such detailed instructions, it is not difficult to install a sewer system in a new house. But much more often, people are faced with the need to install sewerage into an existing private house. From my own experience, I know that the greatest difficulty is caused by the pipe exiting the house to the street. If you put it under the foundation, then the pipe will enter the septic tank at a depth of 100 cm. But it’s scary to drill into the foundation, in case it weakens it. What would experts advise in this case?
In general, in such cases there is no choice but to drill holes; you yourself find yourself in such a situation. You should not be afraid of this procedure, but you still need to be extremely careful, after all, this is the foundation of the entire house and you are unlikely to want to see cracks in it.
It is very bad when the technological window is not provided for in advance. Arm yourself with a hammer drill and a concrete bit, measure carefully (this is exactly the case when “measure 7 times, cut once”) and drill.
Hello! Why are you afraid of the entrance of the pipe into the septic tank below 1 meter? Manufacturers of septic tanks recommend placing the sewer pipe entry no higher than 0.6-1 meters, or better yet, below the freezing depth, i.e. for central Russia - 1.2-1.5 meters. In this case, the pipe outlet can be made under the foundation, if its design allows and the volume of excavation work is not intimidating.
In any case, it is absolutely forbidden to make technological holes, especially of such a large diameter, in the foundation of the house! This will certainly lead to a violation of its integrity - the house may sag or lean.
If it is impossible to remove the pipe under the foundation or it is too troublesome, then it is better to do this: make an exit hole in the wall of the house, and after removing the pipe, bury it outside. In this case, consider 2 nuances:
1) the pipe must have a slope of at least 5 degrees; if this is not possible, you will need a sewage pump;
2) the section of the pipe that is exposed to the street must be insulated.
It will look something like the attached photo.
Note.In the paragraph: “Gravity pipelines with a diameter of 85 and 110 mm are laid, observing a uniform slope norm of 0.02 mm per 1 m of length. The maximum permissible slope angle is no more than 0.15 mm for the entire length of a separately installed sewer section.” — there may be typos in the slope value, the correct one would be “Gravity pipelines with a diameter of 85 and 110 mm are laid, observing a uniform slope norm of 2 mm (or 0.02 m) per 1 m of length. The maximum permissible slope angle is no more than 15 mm (or 0.15 m) for the entire length of a separately installed sewer section.”
Natalya, trying to correct an inaccurate mistake, made a mistake themselves.
I think it would be correct to indicate: “...observing the norm of a uniform slope equal to 20 mm (or 2 cm or 0.02 m) per 1 m of length.”