Do-it-yourself sewerage in an apartment: rules for internal wiring and installation
The quality of the home sewer system should not be inferior in reliability to the water supply or electrical network.If the sewage system in an apartment is installed efficiently with your own hands, it will last for decades, provided that installation standards are followed and high-quality consumables are used.
Do you doubt your abilities and are afraid to make mistakes? We will help you competently design and install a sewer system. The main thing is to take into account all the basic requirements, choose the right pipes and adhere to the installation technology described in the article.
The content of the article:
How to arrange a sewer system in an apartment?
Before you select the pipes and everything you need, before starting work you need to understand the principles of operation of the sewer system, including observing the angles of inclination so that the pressure in the riser is slightly higher than atmospheric.
Otherwise, atmospheric air will squeeze out unpleasant sewer gases directly into the apartment. If the internal pressure is too high, waste gases may be released from the siphons.
Let's take a closer look at all the nuances of the sewage system in the apartment.
The slope of the pipes is an important condition for the functioning of the system
When laying the highway, you must maintain a horizontal angle, which must be within certain limits. Inadequate sewer pipe slope will not allow wastewater to flow normally into the riser. If the slope is too great, the water will drain quickly, leaving contamination on the walls of the pipe.

The paradox is that with high “fluidity” the sewer system will become clogged.
Dependence of the pipeline laying slope on the pipeline cross-section:
- 30 mm/m at 50 mm;
- 20 mm/m at 110 mm;
- 8 mm/m at 160 mm;
- 7 mm/m at 200 mm.
Thus, the maximum slope should be within 150 mm/m. Exceptions are bends up to 1.5 m long for some plumbing fixtures, for example, a toilet.
Sewer pipes can only be connected at right angles in a vertical orientation using the waterfall principle.
Friendship with neighbors is half the success
In order for the replacement of the internal sewage system in an apartment to be successful and with minimal hassle, good relations with neighbors above are necessary. They must refrain from using the sewer during installation. To be extra safe, it is better to turn off the cold and hot water supply riser in the basement.
Based on this, all work should be carried out promptly, preferably on a weekday during the daytime, when most of the residents of the house are at work.
Precautions during operation
Sometimes a warning about the inadmissibility of sewer use by neighbors may be ignored by some residents.

You need to be prepared for an emergency situation and use the following protective measures:
- tape up the walls and the floor with film, securing all joints with tape;
- prepare the bathroom - clean the room and dismantle the toilet;
- use protective equipment - raincoat, helmet with glass, rubber boots.
A helmet is required, because... you will have to work with a heavy cast iron pipe hanging over your head.
Fixing the main waste riser
The lion's share of success in reliable sewer installation is a securely installed upper part of the riser. You should not rely on the remaining fasteners, because... over time they become unusable.
A cast iron pipe can burst due to vibrations from a power tool. All this can cause a serious accident for which you will have to pay.
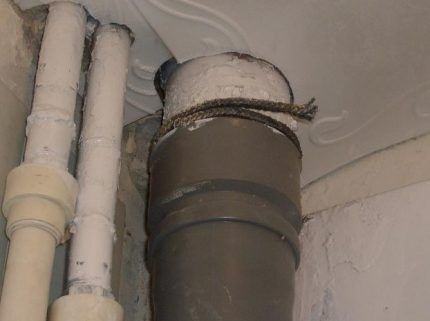
Sequence of actions when fixing the riser:
- mount two crutches with a diameter of at least 12 mm on both sides of the riser under the ceiling itself;
- fixation is performed using a solution or a pin with a metal collet;
- the pin must protrude beyond the middle of the pipe by at least 40 mm;
- secure the riser using half-clamps.
You need to place thick rubber gaskets under the half-clamps (you can use one from an inner tube). Holes are drilled in the eyes of the half-clamps for installing studs. Each bracket is attached to a stud with a nut. They need to be tightened one at a time to prevent lateral forces from appearing on the pipe.
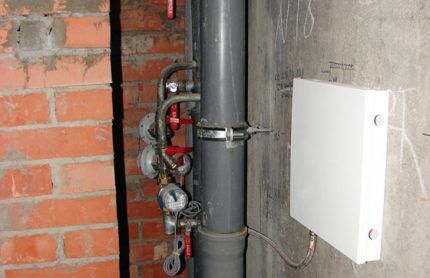
You cannot attach the riser to the wall using one bracket or only one clamp. If the pipe fits tightly to the wall, then you need to hollow out a small groove under it to insert the clamp. Remember that cast iron is very fragile, so you need to be extremely careful.
How to choose pipes?
There's no point in talking about the benefits plastic pipes over cast iron, but the former vary in cost and composition.
Possible options:
- Propylene. Withstands up to +130°C, allows cleaning with a plumbing cable, as well as the use of active chemicals with the exception of alkalis and acids, has a rough inner surface, which increases hydraulic resistance.
- PVC. An inexpensive option that has the smoothest surfaces. Allows wastewater temperatures up to 80 degrees; it is inferior in strength and chemical resistance to propylene, but has lower hydraulic resistance. Cleaning with a plunger or ultrasound is allowed.
- Polyethylene. Cheap and unreliable.It is subject to deformation, does not seal well and has low heat resistance.
We choose PVC or propylene, taking into account their technical and operational qualities.
The characteristics of different types of sewer pipes are described in detail in the articles:
- Silent sewerage: design principles + installation examples
- Pipes for sewerage in the house: which pipes are best to use for installing an internal sewer network
How to choose pipe diameter?
A minimum diameter of 32 mm when laying sewerage is used when the system has separate risers, as well as when the common extreme point of the drain is located at a distance of no more than 7 m from the riser. Under any other conditions, you need to choose pipes with a diameter of 40-50 mm.
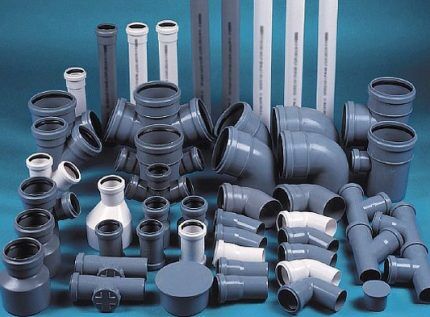
Regarding the riser, its diameter must be at least 110 mm. In some cases, a pipe of 160 and 200 mm is used. The appropriate fastening to the wall is selected according to the diameter.
Example: if the kitchen has only one drain (sink), then a 35 mm pipe can be laid to the bathroom. Already with a bathtub, the drain must have a diameter of at least 40 mm.
Procedure for sewer installation
To maximize productivity and efficiency, it is recommended to adhere to the following order:
- We determine the location of all plumbing fixtures if we plan to add new equipment or change the old layout.
- We draw out the entire sewer wiring diagram using chalk or a pencil. The diagram should indicate pipe routes, lengths, diameters and slopes for each section.
- We dismantle the old wiring system.
- We calculate the number of pipes, consumables and fittings, and sealant.
- We purchase all the elements, including transition couplings from a cast iron riser to a plastic one.
- We install the system in free space, trying on the pipes.
- We dismantle old equipment.
- We install the pipeline and adjust it to the joints.
- We connect the pipes and seal the joints.
- We install and connect plumbing fixtures.
- We connect the system to the riser.
- When the sealant hardens, we check the system for leaks.
Now let’s look at the key stages of the work more carefully, finding out some of the subtleties.
Drawing up a sewerage diagram
If installing a new sewer system simply comes down to replacing toilet pipes and bathroom, then there is no need to come up with some new scheme. Everything is done exactly as it was.But if there were problems with the old sewer system and it is planned to add new plumbing, then it is necessary to accurately maintain all diameters and slopes.
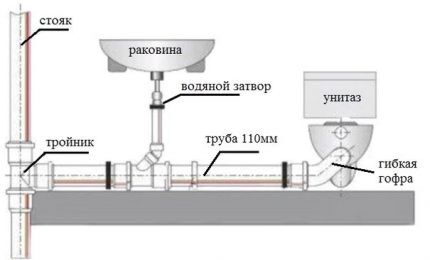
To make sure that the sewerage diagram in the apartment is correct, it is better to have it checked by specialists. This is significantly cheaper than ordering a compilation from scratch.
The diagram should indicate the following elements:
- all rooms where the sewer pipe will pass;
- arrangement of elements for each room, indicating distances from the wall, indicating the length of each section, as well as the total length of the pipeline;
- a full set of fittings, including inspection and cleaning outlets;
- the place where the central riser is located.
The diagram should be as detailed as possible so as not to forget anything and not disrupt the technology.
Dismantling the old system
It is necessary to analyze the old wiring to select the appropriate dismantling method. If the plastic is changed, then, as a rule, it is simply pulled out of the connections while twisting at the same time.
Sometimes cast iron pipes can be dismantled in the same way, but you need to knock out the sealing joints with a chisel.
In all other cases, which are the majority, you need to cut the cast iron pipe with a diamond wheel from different sides. A wedge is inserted into the resulting hole, which must be struck several times with a one-kilogram hammer until the pipe is divided into two parts.
You should start by disconnecting the pipeline from the riser, and direct dismantling is carried out starting from the farthest section of the sewer. You need to warn your neighbors, turn off the water in the riser and begin dismantling.
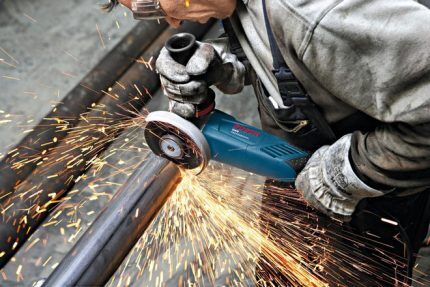
We disconnect the riser pipe that is adjacent to the riser. This is done through two cuts at a distance of 150 mm from each other. First, a fragment of the pipe is broken out from the side of the apartment using a wedge, and then a piece from the side of the riser.
Next, you need to hammer the old seal near the riser outlet to remove the remaining fragment of the pipe. The holes must be plugged tightly with rags. Now you can allow your neighbors to use the water supply while you dismantle the rest of the pipeline in the apartment.
Then we again introduce a ban on the use of sewerage. Lastly, we cut off the old riser to proceed to its replacement.
Replacing a sewer riser
This is an extremely important task that is best entrusted to seasoned specialists, otherwise the cost of an error may be too high.
If you are confident in your abilities, then you will need the following set of tools and consumables:
- two cuff adapters - plastic/cast iron and cast iron/plastic;
- two pipes of appropriate length and diameter;
- two plastic 45-degree turns;
- compensator for plastic pipes;
- metal clamps with studs for fastening;
- plastic cross with a 50 mm bend in the required direction;
- plastic insert with inspection hatch.
First you need to strengthen the old riser at the very top. Make two cuts in the middle of the cast iron pipe at a distance of 150 mm from each other. Insert two wedges into the bottom cut on both sides of the pipe at an angle of 45° to the horizontal.
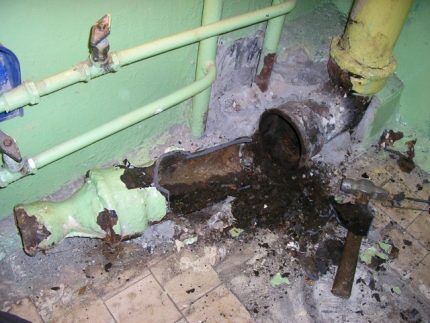
By tapping you need to get the pipe to break off. This operation requires significant experience, since if done incorrectly, the entire pipe string may collapse.
Insert the wedges into the upper cut and release another section of pipe in the same way. In this case, assistants must be sure to hold the upper part of the pipe. Next, use a chisel to remove all the old caulking at the top.
With slight rocking you need to release the pipe from the joint. Now repeat for the lower joint, removing the seal and removing the pipe by shaking.
We assemble a new riser according to the diagram, starting at the top and ending at the bottom:
- pipe;
- adjusting tap;
- compensator;
- inspection compartment;
- pipe;
- cross.
The lower and upper parts must be connected to the cast iron riser using cuffs.
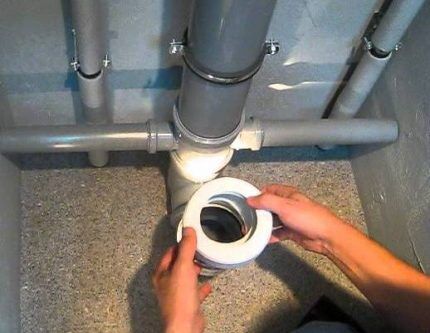
We adjust the dimensions of the lower pipe during the rough assembly process. Then we carry out final installation using sealant, connect the lower wiring and installing a toilet. We fix the riser using crutches with pins at four points, including each adjusting bend, as well as at 1/3 of the length from the lower and upper edges.
Calculation of materials and fitting
It is necessary to calculate the amount of materials in such a way that during the work you have to cut the pipes as little as possible, because These are all additional costs. Pay attention to the length of the sections. In an ideal situation, trimming will only have to be done for one pipe.
Once you have everything you need on hand, you need to figure out a few things by trying it on.
Firstly, you need to understand how the couplings will be placed, whether pipe tails will hang behind the walls, and whether there is enough space to install the couplings. You also need to mark the locations of the crutches and determine their number.
Secondly, it is necessary to identify difficult places where installation can be complicated and think through its sequence.
Rough installation of pipeline
Preliminary connection of pipes is carried out without sealing. The ends of the pipeline are connected to each other only with complete pipes. Next, cut the pipes from the free end.
It is impossible to cut from the side of the pipe, as this will disrupt the design and tightness of the connection in the future.
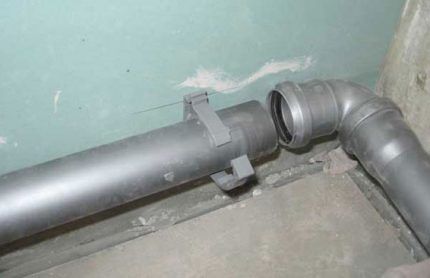
Trimming is done with a hacksaw for metal strictly at right angles.All burrs must be removed with a knife, including chamfers. If this is not done, the remaining fibers will serve as a point of clogging. All rotary splitters must be immediately turned to their operating position.
Finish installation and sealing
Starting with the riser outlet, we connect the entire system in sections. Special attention should be paid to the reliability of sealing - for this they use pipe sealant.
The composition should be neutral - it is better to use polyurethane or silicone. Sealant must be applied to each plastic gasket. There is no need to apply anything to the rubber seals.
You need to lubricate the outer part of the pipe, which will be in contact when connecting, as well as the inner part of the pipe. We connect each section separately. After the sealant has hardened, you need to check the entire system for leaks by running water into the drain from all plumbing fixtures, including the bathroom. In this case, there should not be a drop of water on the floor.
Conclusions and useful video on the topic
Installing a sewer system in an apartment is a labor-intensive process, but knowing the intricacies will help you complete a competent installation. Use video tips to expand your knowledge and watch professionals at work.
Now you know how to plan and install sewerage in an apartment. The process of dismantling and installing equipment is accompanied by many professional nuances, so if necessary, it is better to contact specialists.
Do you have experience in solving similar problems? Or do you still have questions about arranging sewerage in your apartment? Please share your opinion and leave comments. The communication block is located below.


Still, for installing sewerage in an apartment, I would advise using silent polypropylene pipes rather than PVC pipes. Now quite a few companies produce them. And accordingly, special silent clamps. Or, if you still use PVC pipes, insulate them using pipe insulation, which is also now widely available. Well, or hide it in a special box. I would also pay attention to the passage of pipes through load-bearing structures - walls or partitions. The transition must be through sleeves and not rigidly caulked, for example, with mastic. And for the mandatory presence of an audit on the riser.
I absolutely disagree with you! PVC pipes practically do not fit polypropylene, but the cost is 2 times cheaper. And their roughness inside is really a plus for the sewer system; they will clog twice as quickly! What is insulation for in sewers? Especially if it is sewn into the wall? And a box with an audit - there is absolutely no need to install them in the apartment! This, of course, is my personal opinion!
When comparing PVC and PP pipes, it is worth considering not only the price issue, but also such indicators as the ability to withstand external influences, as well as interaction with the biological environment, tightness and wear resistance. The service life itself, which is built into the products, is also very important.
First of all, it should be noted that PP pipes are designed for a longer service life than PVC. In addition, due to the smooth surface of PP pipes, they allow substances to pass through much better, which means that the likelihood of blockages is several times less.
Also, PP pipes relative to PVC can be characterized as neutral regarding the effects of biological factors. PP pipes also have a molecular structure that allows them to restore their original shape after slight deformation.
Considering all these points, you can overpay for PP pipes. An inspection of the riser will not be superfluous; if something happens, you can break through the blockage immediately, and not do it through your neighbors.
“Propylene allows cleaning with a plumbing cable, as well as the use of active chemicals with the exception of alkalis and acids.”
How is that? Can I blow it with pure oxygen? "Mole" is kind of like lye. What can you use to clean it with, distillate?