Installing a water well with your own hands: how to properly arrange a water source
To protect the well and equipment from external pollution, atmospheric phenomena and vandals, it must be properly equipped.Agree, comfort when using a water intake, servicing equipment and pipelines is as important as its safety. How to protect while ensuring ease of use?
For those who want to install a water well with their own hands, we will tell you how to do it correctly. We'll tell you which option is best to choose for your source. Here you will learn how to independently build a caisson for a well head, how to install an adapter, and also where to place the hydraulic accumulator.
A detailed description of methods and technologies for equipping a personal hydraulic structure is based on regulatory documentation and the experience of well owners. The information presented for review is supplemented by visual diagrams, photo selections, and video tutorials.
The content of the article:
- Why do you need to build a well?
- Selection and installation of equipment for water supply
- Well protection from atmospheric influences
- Dimensions of the well protection structure
- Ensuring the tightness of the casing pipe
- Using a Downhole Adapter
- Tips for constructing a well
- Conclusions and useful video on the topic
Why do you need to build a well?
After the well is drilled and before the water supply in the house is supplied from it, the source is arranged, the water supply equipment is selected and installed.
What problems does the installation of a water intake well solve:
- Ensuring the purity of the source. Do not allow contamination from the surface to enter the well: dust, rain or melt water.
- Protecting the water supply source, equipment and pipelines from freezing.
- Formation of conditions for connecting and servicing equipment.
Water supply equipment (except for a submersible pump) can be installed both in the house and next to the well. In the latter case, it is necessary to have a technical room of sufficient area at the wellhead where this equipment will be installed.
But even when installing it in a house, having a small room at the outlet of the pipeline from the well is very convenient, it greatly facilitates pump installation and its maintenance. The insertion of a water pipe into the well, as well as the supply of power to the submersible pump, is also carried out at the construction stage.

Selection and installation of equipment for water supply
Equipment for individual water supply consists of the following elements:
- Pump, it can be submersible or located on the surface.
- Automation, which controls the operation of the pump and protects it from overloads.
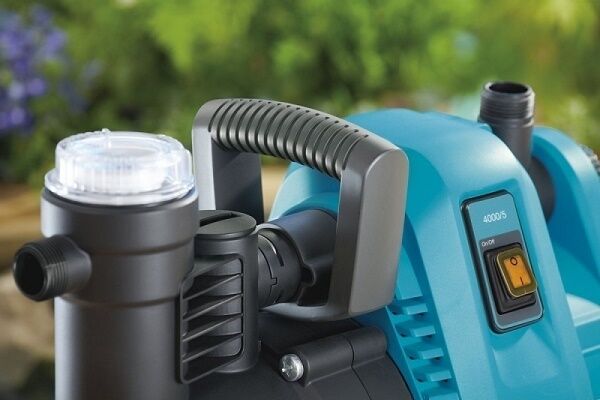
- Hydraulic accumulator, open or closed (membrane tank). The latter is preferable, it ensures stable pressure in the water supply.
An open water storage tank must be installed at the highest point of the water supply system, in the attic or under the ceiling of the upper floor. A closed container has no restrictions on the installation location.

The nature of the well arrangement is largely determined by the type and location of installation of the water supply equipment. Let's consider the main options for equipping the source with equipment.
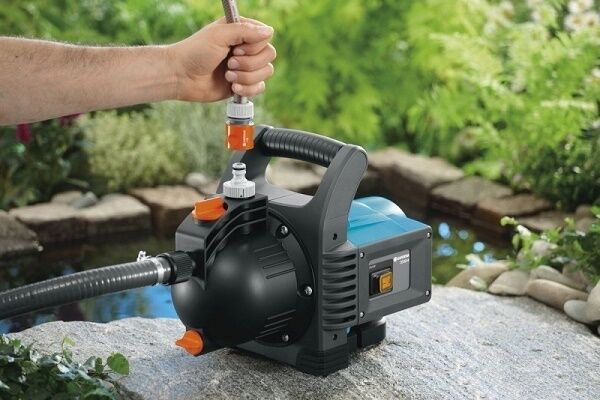
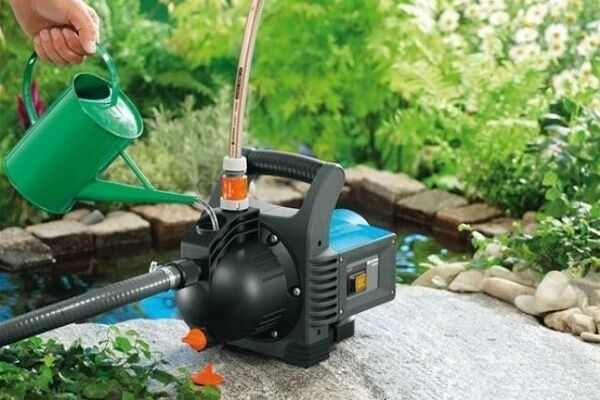
Surface pump for shallow well
Surface pump significantly cheaper, easier to install and maintain than submersible. The most rational and economically viable option is a three-in-one complete pumping station, which includes a surface pump, a relatively small (20-60 l) membrane tank and all the necessary automation.
Only the suction hose is lowered into the well. Thus, the construction of the well and pump maintenance are simplified. In addition, the hose has a small diameter, which allows it to be used in so-called “Norton wells” (Abyssinian wells), where the submersible pump simply will not fit.
Pumping stations have only one, but very significant drawback.A surface pump is not able to lift water from great depths; for most models the limit is 8-10 m. This limits the scope of application of pumping stations to wells and shallow wells.
Due to the low lifting height, pumping stations with an overhead pump often have to be installed as close as possible to the wellhead. Otherwise, you will have to additionally overcome hydraulic resistance from the water source to the place in the house where the pump is installed.

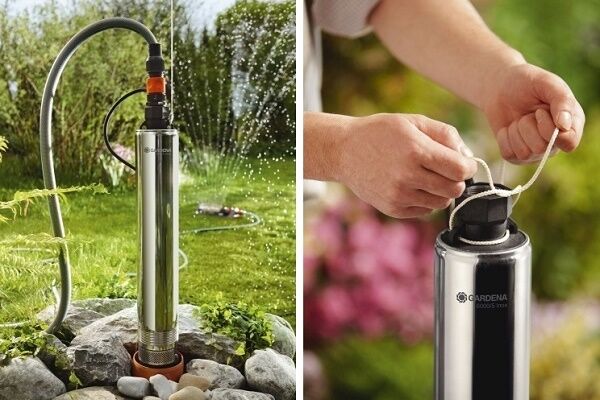
Submersible pump for deep well
To lift water from wells more than 10 m deep, submersible pumps must be used. Choosing the right pump and determining its suspension height in the casing is a separate and rather difficult issue.
Within the scope of the article, we only need to understand what additional equipment the pump is equipped with, how it is mounted and connected.
As we have already mentioned, the mandatory elements of water supply equipment for an individual home are: hydraulic accumulator and control automation. In the case of a submersible pump, the lift height of which is several times greater than that of a surface pump, there are no restrictions on the installation location of the closed hydraulic accumulator.
The membrane tank and control can be placed quite far from the wellhead; the distance to the source has little effect on the operation of the system. An excellent place to place equipment is a dry and clean technical room in the house, in the basement or first floor.

Well protection from atmospheric influences
To protect the source and equipment from atmospheric influences and precipitation, around the wellhead build a protected room, placing it above the ground level or below the ground surface:
Option #1 - above-ground “house”-pavilion
At first glance, the easiest way is to install a small “house”-pavilion over the water intake structure. It can be deepened a little, like the entrance to a free-standing cellar, sprinkled on the sides with soil, making a kind of heap. This will reduce heat loss.
Similar pavilions are built over industrial wells. But you rarely see them in a private yard. The “house” takes up space on the site and clutters it up, which is also questionable from an aesthetic point of view. In addition, it is not easy to effectively insulate an above-ground pavilion.

Option #2 - placing the source inside the building
An infrequently used, but quite rational technical solution for arrangement water well - placement of a water source in the basement of a residential building or inside an insulated utility building, winter greenhouse, greenhouse. By the way, this was a very popular technique in the old days for the construction of stone buildings.
The well and equipment under the roof are reliably protected from all atmospheric influences, thieves and vandals. Installation and maintenance work are simplified as much as possible. The equipment does not create vibrations; the noise consists of soft clicks when the relay is activated. But they are practically inaudible outside the technical room when the door is closed.
However, placing a well in a house or an insulated outbuilding is rare. This is explained by the fact that to implement this option, you must first drill a well and then build a house over it. In our country, the vast majority of developers do the opposite.

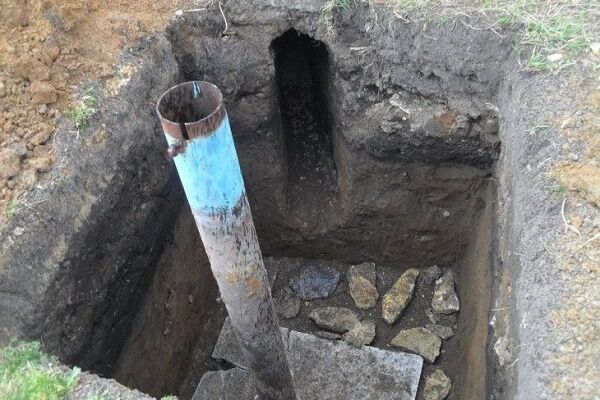
Option #3 - underground caisson well
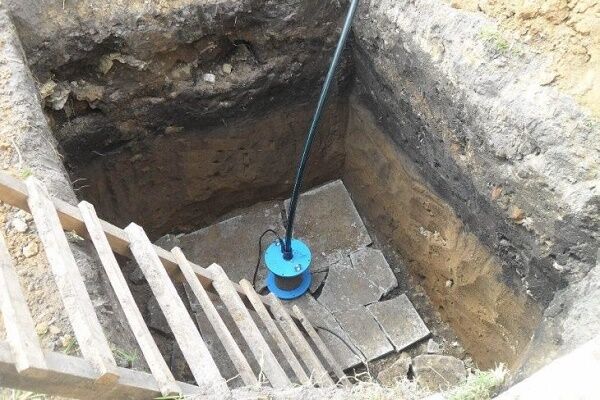
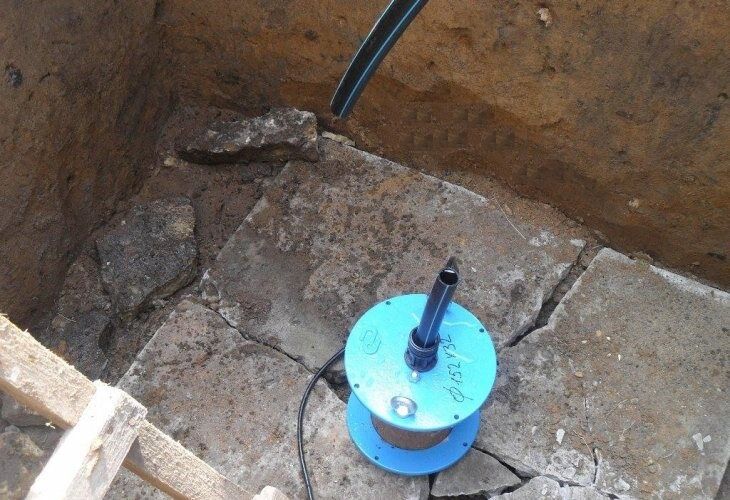
The most popular option for a protective room over a private well is a well. It would be correct to call it a caisson; this is an adequate technical term. Caisson installed in the ground The good thing is that it does not clutter up the area; on the surface we will only see a small hatch located level with the ground.
It is much easier to insulate an underground room than an above-ground one; moreover, its lower part, located below the freezing depth, is in the positive temperature zone in winter, receiving a certain amount of heat from the ground. The only problem is waterproofing.The caisson can be purchased ready for installation or built independently.
The factory caisson is completely ready for installation. All you need to do is dig a pit and lower the tank to the desired level. The caisson already has the necessary technological holes; all that remains is to insert communications into them through sealed cuffs: a water pipe and an electrical cable.

Finished caissons are made of steel or polymer materials. Metal containers are stronger, are not afraid of frost heaving, shock, and can be installed in problematic soils that are prone to displacement.

Plastic caissons are not subject to corrosion and almost do not form condensation on the inner surface. Unfortunately, factory caissons are not cheap. But they can be installed in a few hours, and waterproofing issues are reliably resolved.

It’s possible to build a caisson yourself. Most likely, it will cost significantly less than the factory one. Perhaps it will be stronger. However, you will have to spend a lot of time and effort. The simplest option is to bury a couple of reinforced concrete well rings in the ground, covering them with a lid and a hatch with a neck.
The bottom will have to be concreted. It is quite difficult to make reliable waterproofing reinforced concrete caisson. If you do it outside, it is better to use rolled bitumen material or high-quality mastic. However, you will have to dig a pit that is too large to have access to the walls of the well.
You can make insulation from the inside by carefully caulking the seams and coating the internal walls, bottom and “ceiling” of the caisson with a polymer-cement composition.

You can build a caisson on your own not only from factory rings. The structure can be monolithic, brick (you need well-burnt red brick), or you can use small-sized concrete blocks. A discontinued steel barrel will also work.
Dimensions of the well protection structure
What should be the dimensions of the caisson above the well? This depends on where the equipment will be installed. If in a house, dimensions of 80x80 cm are enough for the installer to “turn around” when lowering the pump.

When placing a pumping station or a separate membrane tank in a caisson, we recommend adding 50 cm to the dimensions of the equipment on both sides (relatively front and side). It would be better, of course, if there was more space for servicing.
If we talk about concrete wells: the diameter of typical reinforced concrete rings is 90, 150 and 200 cm. 90 cm is the minimum possible size for a caisson without equipment, 150 cm for a structure with equipment of moderate dimensions.
A round two-meter well can easily accommodate a fairly large individual pumping station or a 200-liter hydraulic accumulator.The height of the caisson is the height of a person or two standard concrete rings.

Let us also mention that in areas with severe winters, the bottom of the caisson should be located at least 15 cm below the freezing depth of the soil. It’s even better if its entire lower third is located in a non-freezing zone.
Insulation of the upper part is necessary; it is better to do it from the outside, but it can also be done from the inside. Any thermal insulation material that does not suffer from moisture will do; extruded polystyrene foam is ideal.
Ensuring the tightness of the casing pipe
Neither dust nor condensation formed in the caisson, nor, especially, rain and melt water, should get into the casing pipe of the well that supplies the house with drinking water. If this happens, harmful microorganisms from the surface may enter the clean underground source and “treating” it will be difficult and expensive.

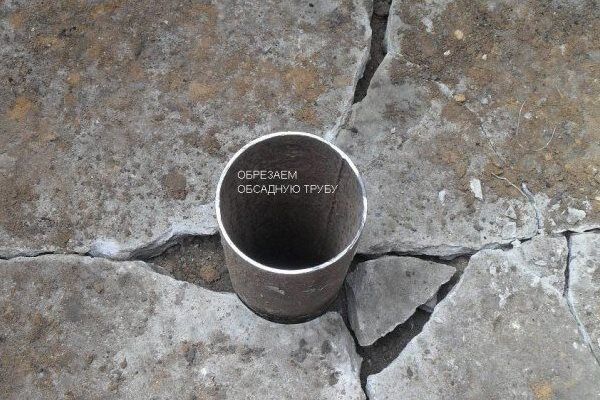
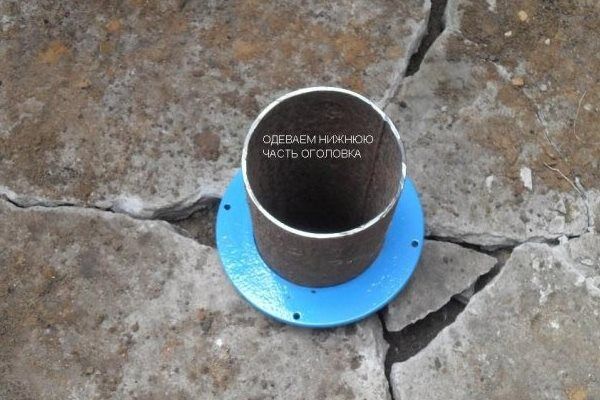
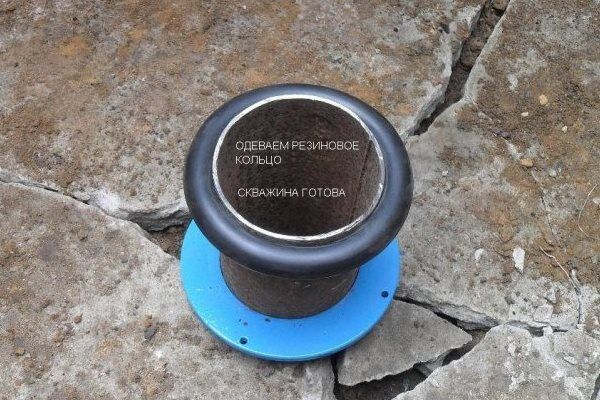
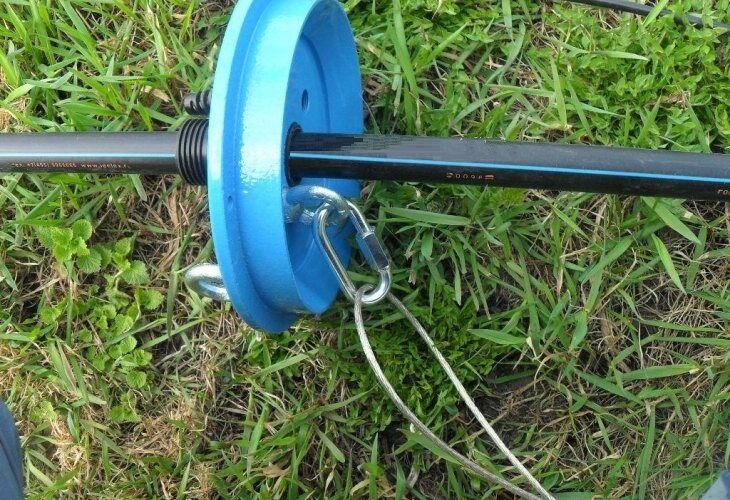
To protect the source it is used borehole head — a special steel cover equipped with technological holes for passing communications and a reliable hook for hanging the pump. The head is selected according to the diameter of the casing; it has a rubber crimp collar that seals the casing pipe. The water pipe and electrical cable are also inserted through hermetic seals.
We do not recommend cutting the casing close to the caisson floor. It is better to leave a section 25-40 cm high above the concrete surface. Firstly, it will be more convenient to install a pump with a head.Secondly, if the caisson is slightly flooded, water will not enter the wellbore.
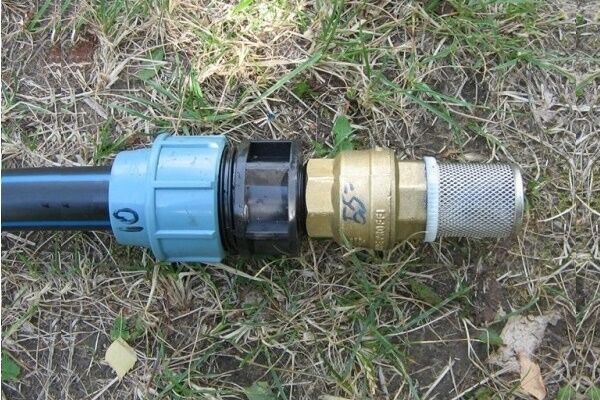
Using a Downhole Adapter
A pavilion or caisson provides the best protection for the water supply. However, both of these solutions are by no means cheap. If we are talking about a solid country house and a large plot of land, the significant financial costs of developing a well are undoubtedly justified.
But what should a developer who does not have an endless budget do and is building a poor rural house or a modest dacha? There is an economical alternative solution for installing a well in a dacha - borehole adapter.
With its help, a water pipe coming from the house can be inserted directly into the well casing. No caisson is needed. True, if maintenance is necessary, the adapter will have to be dug up, because it is located in the ground. But the need for this rarely arises.
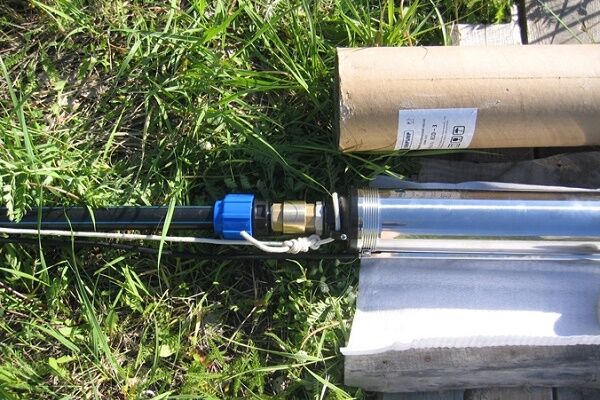
The downhole adapter is a collapsible fitting consisting of two parts: external and internal. The outer part is located outside the casing and serves to connect to the water pipe going into the house.
The pipe from the pump is connected to the corresponding internal part. Both parts of the adapter, connecting on the casing, have a radius shape that follows the diameter of the barrel. The elements are connected through a double hermetic seal.

The adapter must be placed below the freezing depth of the soil and installation must be carried out with special care. The casing remains on the surface of the ground, it is left protruding slightly above ground level. A cover is mounted on top into which an electric cable is inserted to power the submersible pump.
In severe frosts, the cold will penetrate into the well through the casing pipe. Therefore, if winter temperatures drop below -20 °C, we recommend covering the well for the winter with spruce paws, straw, or insulating it in another way.
The only significant advantage of the adapter over the caisson is its low cost.Among the disadvantages: the difficulty of servicing the equipment, poor protection from mechanical damage to the electrical cable, less reliable pump suspension (it is not supported by a cable, but only by a water pipe).

And yes, water supply equipment can only be installed in the house. You can mount the adapter yourself, but you will need a special wrench with a long attachment, some technical skill and a lot of patience.
In conclusion, let’s say that the “cheap and cheerful” downhole adapter is really cheap. However, it cannot always be used and does not provide the same level of source protection and durability as a caisson.
Tips for constructing a well
We hope that from the above it is generally clear how you can equip a well with your own hands.
Let us give our readers some useful tips:
- If the groundwater level in the area is high and located above the freezing depth of the soil, it is better to locate the protective room on the surface rather than underground. Or use an adapter.
- In a house with year-round use, try to place water supply equipment in the main building: plenty of space, warm and dry. It is convenient to maintain, the equipment will last longer.
- It is better to place equipment for a home with seasonal residence in an underground caisson. An unheated house will freeze, but the temperature in the caisson will remain positive. By the way, you need to remember to drain the water in your country house for the winter if you will not live in it for more than a week.
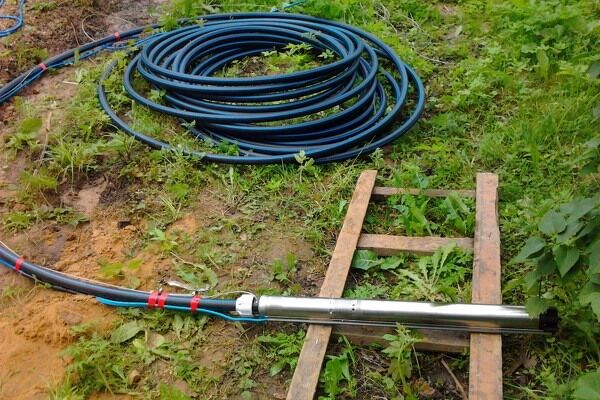
- In problematic soils (heaving, with inclusions of crushed stone with sharp edges, in quicksand), it is advisable to run the water pipe from the house to the caisson or adapter in a protective casing. Always place the electrical cable in a protective HDPE pipe.
- It is best to connect hydraulic equipment to the system through shut-off valves with detachable connections. If necessary, it will be easy to service or replace.
- Do not forget that, regardless of the type of equipment, the connection diagram must include a check valve after the pump and a coarse filter before the accumulator.
Among other things, during operation it is necessary to monitor the pressure level in the pneumatic element of the membrane tank. Check monthly and refill if necessary.
Conclusions and useful video on the topic
Finally, videos clearly showing the process of developing a source of underground water.
Video #1. The process of self-construction of an insulated caisson from concrete rings and introducing water supply into the house:
Video #1. Economical well development - self-installation of a well adapter:
Proper arrangement of a source of individual water supply guarantees excellent water quality and eliminates problems with repair and periodic maintenance of well equipment.
Those wishing to talk about their personal experience in constructing a well outside a suburban area are invited to leave comments in the block below. Here you can share useful information on the topic and ask questions.


I'm just about to build a house on my site.I was really interested in the option of placing a well inside the house while I have the opportunity. There is no basement in my house, but there is a separate room for the boiler room. A water well in it will be very useful, especially since I expect to install full automation for the water supply to the devices.
I do not recommend placing a well under the house - after a few years of operation it may become silted and then it must be purged with high pressure. In this case, sludge and water are released onto the surface; mud in the basement of the house will be knee-deep...
Thank you! very sensible article.
Hello. Please help me choose a well pump. Well depth - 90 m. Dynamics - 27 m. Statics - 15m. Level drop - 12m. Productivity - 2.5 cubic meters/hour