Construction of a well with a caisson: step-by-step instructions + analysis of technical nuances
Installing a well near a house solves the problem of uninterrupted water supply.But for this source to work normally, the entire process must be properly organized - from drilling a well to equipping it and putting it into operation.
If you live in a house permanently, the most reasonable solution is to install a well with a caisson. This version has a lot of advantages, which you will learn about from our article. It will also discuss the step-by-step implementation of the project.
The content of the article:
Advantages of a well with a caisson
When using a well year-round, it is impossible to do without installing a caisson at its mouth. This enclosing structure is a waterproof chamber located in water-saturated soil. From the point of view of ease of maintenance and operation, a well with a caisson is the best option.
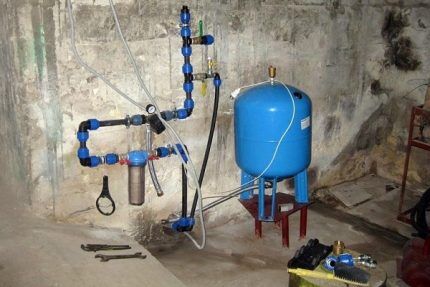
In addition to the caisson, the integral elements of a water well are hydraulic accumulator, surface pump or submersible type, pipes, shut-off and control valves, if desired by the owners and the head.

This solution has a number of advantages:
- All plumbing equipment is placed compactly in the chamber and there is no need to allocate a separate place in the house for it.As in the case of central water supply, only a pipe will need to be brought into the house, as well as a power cable for the pump.
- If the house is intended exclusively for summer living, then to remove water from the water supply for the winter you just need to open the drain valve located in the caisson.
- When you need to supply input to several points on a site, this idea is very simple to implement by removing the required number of pipelines from the caisson. The process is controlled by valves.
- A winch mounted in the upper compartment of the chamber will simplify the process of removing the pump from a deep well if it needs to be repaired or replaced.
- The chamber will protect the downhole equipment located in it from freezing. If the caisson is installed correctly, you don’t have to worry about the safety of its filling even at a temperature of -35°C.
Thus, if there is a caisson, unfavorable external factors will not affect the quality in any way water supply at home.
The main requirement for a caisson is tightness. If this condition is violated, dirty water from the chamber may enter the aquifer through the casing pipe. Contamination of the aquifer is unacceptable, so the well head and caisson must always remain dry.

When calculating the height of this structure, one should proceed from the depth of soil freezing. To ensure that the caisson is below this point, the size is taken to be two meters. For ease of work inside the caisson, the diameter of the internal space should be within 1–1.5 m.
The chamber is made of metal, plastic, brick or reinforced concrete rings. In its bottom there is a place for fixing the structure on the casing. The outlets for pipes and cables are located in the walls. To provide convenient access to equipment, the caisson is often equipped with a ladder. The chamber is closed with a sealed lid.
Step-by-step instructions for arrangement
It all starts with choosing a location for a well and selecting arrangement method source of water.
The technology for arranging a water supply source consists of a number of sequential and responsible steps:
- Well. The first stage is drilling the well itself.
- Caisson. The second step is to begin the process of installing the caisson.
- Insulation. The third stage is to fill the pit with earth right up to the lid, then insulate the hatch.
- Installation of equipment. Stage four - after completion of the work, they begin to install equipment that should ensure an uninterrupted and efficient supply of water to the house and site.
The process of installing a caisson structure also consists of several operations.
Let's consider the main ones:
- A hole is made in the bottom of the caisson with some offset from its center for subsequent installation of the sleeve under the casing. The diameter of the sleeve must exceed the corresponding pipe parameter, measured along the outer contour, by 10-15 millimeters.
- Nozzles for water pipes and cables are welded into the side walls of the caisson.
- A pit is dug in such a way that the neck, after installation is completed, rises above the ground by no more than 20 cm. For ease of joining the chamber with the casing pipe, the diameter of the pit should be 0.2-0.3 m larger than its own corresponding size.
- The casing is cut at ground level.
- Supports in the form of beams are laid on the foundation pit. A caisson is placed on them.
- The casing pipe is joined to the caisson sleeve, the structure is adjusted horizontally, and then welded hermetically.
- The bars are removed from under the chamber and lowered into the well.
- Pipe and cable are inserted into the corresponding nipples.
The water in a newly drilled well is always dirty, so to clean it you should carry out pumping. Drillers advise not to use equipment purchased for permanent use for this purpose. The cheapest temporary pump will do the job just fine, and when the well is pumped up, you can start a permanent one.

It should be noted that the installation of such a protective tank as a caisson is not always necessary. It happens that a room suitable for placing equipment already exists in the area where the well is located.
In this case, a more rational solution would be to use it for its intended purpose and save on installing the caisson.
Features of equipment selection
The basic elements of well equipment are:
- pump;
- hydropneumatic accumulator;
- head.
The main type of equipment is a pump. Both surface and submersible pumps are suitable for wells. The first type of equipment is used for wells of relatively shallow depth - up to 10 m, the second - for deeper ones.
An important point is setting up the automatic operation of the well equipment. It is performed in tandem from pressure switch and hydraulic tank.Operating pressure parameters are taken according to factory settings or made by relay adjustment according to the owners' requests.

Let us consider in detail each of the main devices, their role in the circuit and assigned functions.
Step No. 1 - select the optimal type of pump
Surface pumps are designed for surface installation. In the case of a well with a caisson, they are placed directly in the chamber. There are no difficulties with the installation of such equipment; such pumps are also easy to maintain.
Depending on the design, surface pumps are vortex and centrifugal. The first of them are used to lift water from shallow depths, and the second can handle 10 m.
Outdoor pumping equipment usually goes on sale already equipped with automatic equipment that controls its on and off. Availability in the water supply network pumping station provides stable working pressure.
When choosing a surface pump, you should check whether there is such a function as dry running protection. Otherwise, if the water level in the well drops, the pump may fail.
Submersible pumps are lowered directly into the well. They make it possible to extract water from great depths.Manufacturers sometimes equip such units with float switches, which insure them against breakdown if the water surface in the well drops very low.

Expensive versions of surface-type equipment have special filters, so they can pump water that contains solid impurities.
When choosing a deep-well pump for your water supply, you must not lose sight of such a parameter as its diameter. There are different models, some can be used with a fairly large well diameter, but then they simply will not fit into a well with a small cross-section.
The cost of equipment in this category is quite high, but there is a price range here too. Models with a stainless steel case are more expensive, while those with a plastic case are cheaper.
Submersible pumps have the best performance, but in addition to this parameter, you also need to take into account the length of the drain. The larger it is, the higher the pressure in the system.

The size of the well pump is also important. The cross-section of the cylinder should be 2-3 cm smaller than the corresponding size of the casing. Therefore, you need to select a pump so that it meets the power requirements, but at the same time does not go beyond the permissible dimensions.
Step No. 2 - hydraulic accumulator for the well
The purpose of the hydraulic accumulator is to smoothly start and stop pumping equipment as water is needed. In addition, this equipment maintains a set minimum of water circulating in the system and prevents water hammer.
This device in the water supply system performs the same role as the compensation tank in the heating system. In its normal state there is always a certain amount of water under stable pressure. Its presence in the system guarantees slower wear of the pumping equipment, since it is turned on less often.
The material from which the accumulator casing is made, as well as its individual elements, does not react with water, and therefore does not affect its quality in any way. At the core operating principle of the hydraulic tank is the use of compressed air. It is pumped under a pressure of 1.5–2 atm into the gap between the casing and the rubber membrane.
The workflow consists of the following steps:
- air under pressure acts on the membrane when the water tap is opened;
- the membrane contracts and displaces liquid through the outlet valve;
- the inlet valve opens when the water volume reaches its minimum and the cavity begins to fill with water again;
- the process is repeated from the zero position.
There are two types of this equipment according to the installation method: vertical and horizontal.If you have to choose between these two types, you should know that the valve for releasing excess pressure in a vertical unit is located at the top. The whole process happens automatically.

To remove air from a horizontal structure, an auxiliary pipeline equipped with a drain or ball valve is required. This requires human intervention.
Step No. 3 - head in the well design
This well element (head) belongs to the protective equipment. Mount it at the top of the end part of the well pipe.
Its task is to protect the wellhead from foreign objects and contamination. It also serves as a support for hanging pumping equipment. Some devices are also placed on it.

The protection is made of plastic or metal - steel or cast iron. A plastic head can withstand a load of up to 0.2 tons, a metal head - up to 0.5 tons.
Typically, the heads of wells up to 50 m deep experience a small load. For deep wells, powerful pumping units, wires and heavy steel cables are used. To accommodate all this, you need a metal head.
With rules and technology installation of a well head The article we recommend will introduce you with your own hands.
Important points when arranging
Taking into account some technical nuances, you can significantly save on the construction of a well equipped with a caisson. For example, use factory-made caisson.
If you place the well closer to the house, then:
- the volume of earthworks will be reduced;
- fewer pipes will be required;
- you will need a pump of small power, sufficient only to raise water to the surface.
You can also save money when choosing a drilling method. To make a well for personal use, you can do the work using a hand drill. Sometimes they use electric tools and percussion devices.
Point #1 – choosing a well drilling method
When choosing a specific tool, you need to proceed from the characteristics of the soil. With independent drilling a well the manual method will require considerable effort, but under favorable conditions you can reach the aquifer lying at a depth of up to 15 m.
It is recommended to make no more than five turns of the drill in one pass, otherwise it will be difficult to remove it.

A shallow well can also be drilled using an auger. Its rotation is carried out both manually and using mechanisms. In any case, a tower in the form of a tripod is built over the future well to facilitate lifting the tool. When choosing the second method, you will also need an electric motor of suitable power.
The shock-rope method is also used to cut a well. The working tool here is a pipe, the edges of which are sharply sharpened (a driving glass with a strong edge along the lower edge).Due to its considerable weight, it crashes into the ground with great force, then it is removed using a system of ropes and freed from the ground.

The casing (pipe) is taken with a slightly larger diameter than the pipe section called the sleeve. It should be placed strictly in vertical position. This is important for any drilling method. If this nuance is neglected, the soil may collapse.
Experts advise using PVC pipes with a cross-section of 12.5 cm. The first pipe is lowered after passing one meter. Further, the length of the casing is added as it goes deeper. The sections are connected using threads at the ends of the pipes.
Point #2 – secrets of drilling a well
You can drill a well in any season, but the labor intensity of the work will vary. The worst option is spring. During this period, groundwater is at its highest level. Under such conditions, it is difficult to determine the location of the main aquifer.
Installing a well in summer is considered the best option, because... The water level stabilizes and its location is easy to determine. In autumn, the best month for carrying out this work is September. At this time, the rainy season usually has not yet arrived; it is possible to determine the aquifer without difficulty.

In winter, you can drill a well as long as the temperature does not drop below -20°. Due to freezing of the soil, the walls of the well are protected from collapses. Groundwater is at a minimum level.
Point #3 – optimal material for the caisson
There are several types of caissons:
- from reinforced concrete rings;
- metal;
- plastic;
- brick.
Reinforced concrete rings and bricks. This type of caisson practically does not provide tightness for a long time. This threatens the equipment with flooding and subsequent loss of performance.
Metal. If all requirements were met during the manufacture of metal caissons, they will have good tightness.
The earth is an aggressive environment in relation to metal, so the enclosing structures of such chambers are susceptible to oxidation, which can result in depressurization.
Plastic. Caissons made from polymer materials are comfortable, light in weight, and easy to install and operate. The probability of depressurization is quite small, because the material is not subject to corrosion. Plastic caissons last much longer than metal ones.
Conclusions and useful video on the topic
Construction of a well with a concrete caisson:
Visual aid for installing a caisson and equipment for a well:
Constructing a well with your own hands is a responsible and labor-intensive process. The work can be completed competently only if you have certain knowledge and skills. But nothing is impossible; the key to success is the right approach and careful preparation.
It is necessary to adopt a key rule: there are no secondary components in the construction of a well. If any point is problematic for you, entrust the issue to specialists so that you don’t have to build a new well later.
Tell us about how you built a caisson over the wellhead on a suburban plot with your own hands. Share technological nuances that will be useful to site visitors.Please leave comments in the block below, ask questions, post photos on the topic of the article.


Does anyone know which hydraulic accumulator is better to take? I’m just looking at the volume, but I would like the price to not be too expensive. From the text I understood that the material of the accumulator does not play a role, but what about the volume? Which option would be the best? And it’s difficult to decide on the material of the caisson, although I still think I’ll go with plastic.
I will try to answer your questions in as much detail as possible. As for the volume of the hydraulic accumulator, in this case a tank of at least 20 liters is required. I think that this volume will be enough for the hydraulic accumulator to correctly perform its functions: water supply, reducing the number of pump starts/stops, protection against water hammer. If you need a larger supply of water, then there is an option to consider tanks of 40 liters or more.
This is if we are talking about buying a hydraulic accumulator, but no one is stopping you from welding the expansion tank yourself from metal plates. This way, you will save on your purchase and get the required volume. Metal is the most optimal material for a hydraulic accumulator.
For a caisson, the main requirement is tightness; this must be monitored carefully at the installation stage. You may well use products with molded plastic housings for these purposes.
I would also pay more attention to the casing coupling. I used to get groundwater into my well through it.Now we have installed a caisson made of Bio-S plastic - the coupling in it has a collet clamp design, with a rubber ring in a conical recess. You clamp it, and the rubber band along the cone seals the connection. The coupling is sealed and holds.
Good afternoon. We are planning to install a hydraulic accumulator. The water in the caisson is divided into irrigation + bath and input into the house. Question: should the watering diversion be done after the hydraulic accumulator or before it, how will this affect the operation of the system.
Good afternoon. Please tell me I have a caisson made of reinforced concrete rings; the bottom of the caisson should be filled with concrete or simply covered with sand. Thank you.