Do-it-yourself hydraulic accumulator: device, principle of operation, installation features
A hydraulic accumulator is an extremely useful device, both for organizing autonomous water supply and for improving the characteristics of a system connected to a central water supply.
A master with at least minimal experience in plumbing work will easily install the hydraulic accumulator with his own hands and connect it to the water supply system.
Agree, the key to successful completion of work is an understanding of the structure and operating principle of the equipment. We will help you understand these issues, and also describe and illustrate step-by-step technology for installing a hydraulic accumulator.
Information about connecting, setting up and carrying out routine repairs of the storage tank will be useful during its operation.
The content of the article:
How does a hydraulic accumulator work?
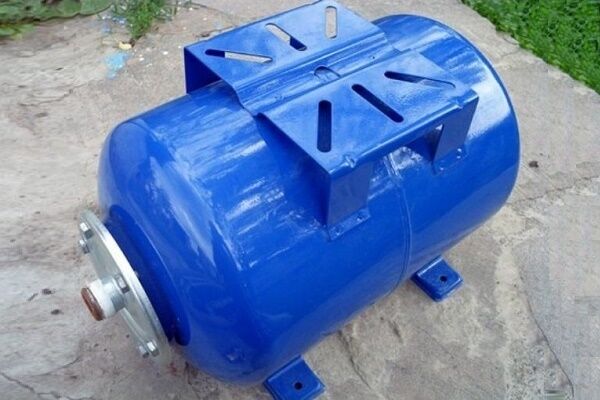
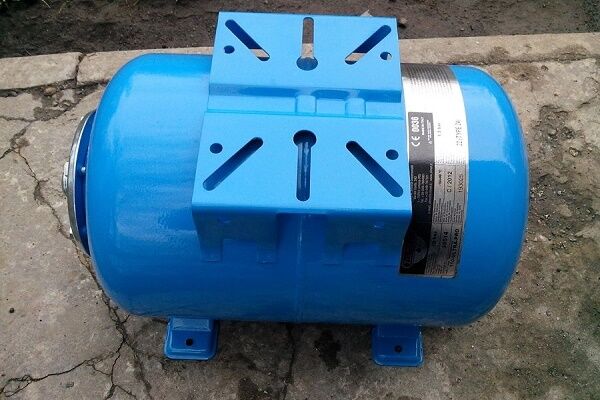
Principle hydraulic accumulator devices simple, like everything ingenious. A rubber gasket of conical, pear-shaped or other shape is inserted into the body of the metal tank.
The gasket or membrane is most often made of butyl, which has a significant margin of strength and is resistant to constant stretching and exposure to water.
This material is also characterized by high antibacterial properties and meets all hygiene standards. The water entering the container is retained by this gasket and does not come into contact with the walls of the metal body.
A nipple is installed on the back of the housing, which allows air to be pumped into the container.
Water and air are separated by a gasket. By pumping or bleeding air, you can regulate the pressure it exerts on the water. As a result, water enters the system under pressure, and this provides the necessary pressure.
A mandatory element for a hydraulic accumulator is a pressure gauge, which is used to control the current pressure in the tank. The optimal pressure in the air compartment of the hydraulic accumulator is considered to be 1.5-2.0 atmospheres.

Wherever good pressure is needed, installing a hydraulic accumulator will be more than relevant. And the requirements for good pressure are constantly increasing.
For example, for normal operation of an automatic washing machine or dishwasher, at least 0.7-2 atmospheres may be needed. A shower cabin with hydromassage or the famous bathtub with a jacuzzi will work normally only at four atmospheres.
It’s worth noting right away that excess pressure in the plumbing system is not the most useful phenomenon, since this creates an additional and completely unnecessary load on the structure.
This reduces their service life and leads to leaks, breakdowns and other problems. Although during pressure testing of the system the pressure can reach even 10 atmospheres, performance indicators are best left at 4-5 atmospheres.

Even if the house does not have modern household appliances that are sensitive to water pressure in the water supply, a hydraulic accumulator can still come in handy. On the upper floors of high-rise buildings, the water pressure in the water supply can be very, very weak. A hydraulic accumulator can effectively solve this kind of problem.
The capacity of the hydraulic accumulator can vary between 5-100 liters. Of course, these are very modest numbers to store water. If there is a need to always have a solid supply of water, it is better to use a storage tank of sufficient volume.
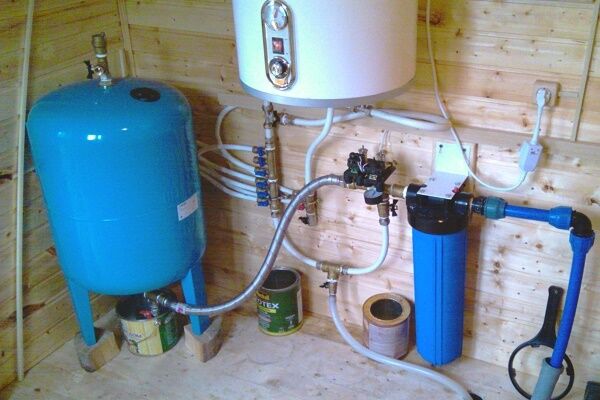
When organizing autonomous water supply, a hydraulic accumulator is used in combination with a surface or submersible pump. The device pumps water into the tank until the pressure reaches a certain, predetermined level. After this, the equipment turns off automatically.
The water decreases, the pressure decreases, and reaches a minimum level. At this moment, the pump turns on again and runs until the previously emptied container is filled with water.
To regulate the operation of such a system, use pressure switch. This allows you to reduce the number of switches on/off of pumping equipment to a minimum, which significantly increases its service life.
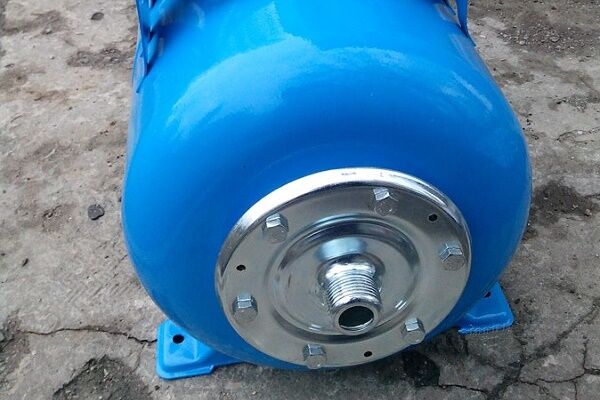
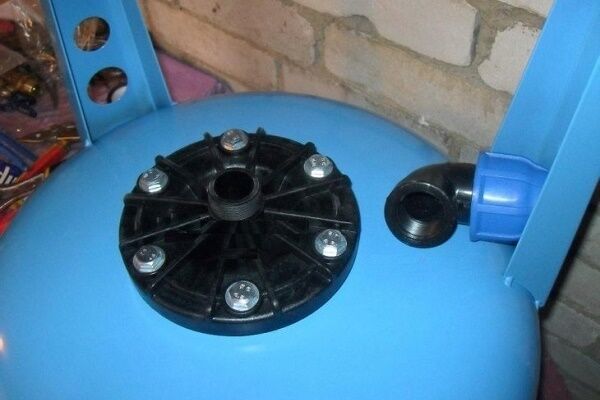
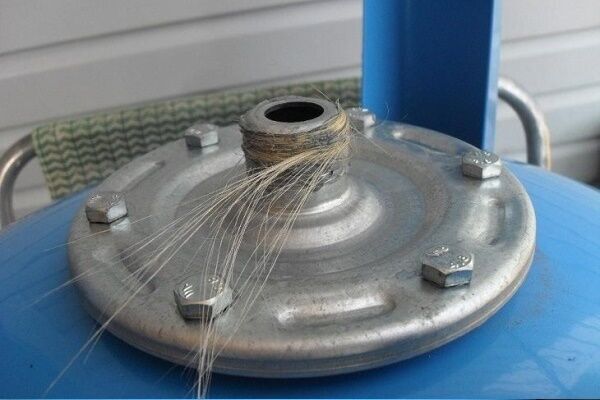
The inlet for supplying water to the accumulator is equipped with a special pipe, which is installed on a threaded connection.
Modern models are relatively easy to disassemble and then reassemble, performing the necessary maintenance, replacing parts or other types of repairs. If the accumulator is installed correctly, then for its maintenance there is no need to drain water from the water supply system.

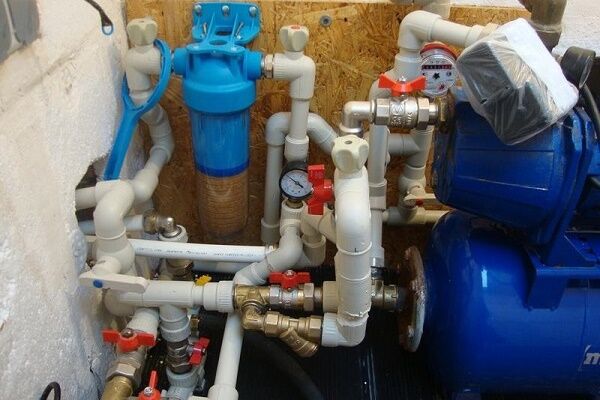
At choosing a hydraulic accumulator, you should pay attention to the diameter of the pipe and compare it with the dimensions of the water pipe.Experts assure that the more accurate these indicators are, the less hydraulic losses there will be in the system. If the diameters of the structures do not match, you will have to use an adapter.
Water tends to evaporate, which can affect the pressure readings in the device. To bleed off such excess air, a valve is installed on large-capacity hydraulic accumulators - about 100 liters.
Small volume models do not have such a device. It is recommended to install a valve or tee in the system, which will shut off the water supply to the water supply and allow excess air to be removed.
Installation, connection, configuration
Understanding how the hydraulic accumulator works and works will allow you to install it correctly, competently connection and fine tuning.
Water is taken from this device and pumped throughout the day. As a result, the unit is constantly influenced by the operating process, during which it makes noise and vibrates. This point should be taken into account when choosing a place to install it.
Rules for installing a hydraulic accumulator
First you need to choose the most suitable location. It should be spacious enough, especially if a large volume tank is used.
After installing the container, there should be enough space around it so that the technician can freely inspect the hydraulic tank, carry out maintenance and repair activities, and, if necessary, dismantle and disassemble the unit.
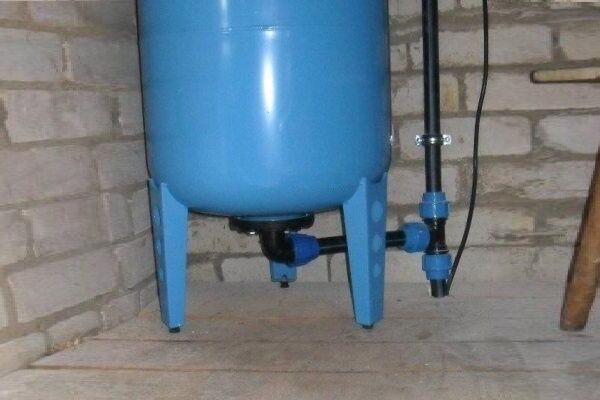
To dampen vibration, the accumulator should be installed on a solid foundation, for example, on a concrete slab. The mounting base should be carefully leveled. Rubber gaskets are placed between the base and the body of the hydraulic accumulator, which should partially dampen vibration.
How to connect the device
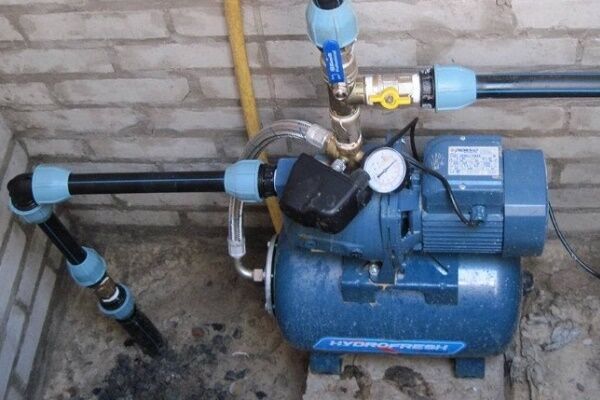
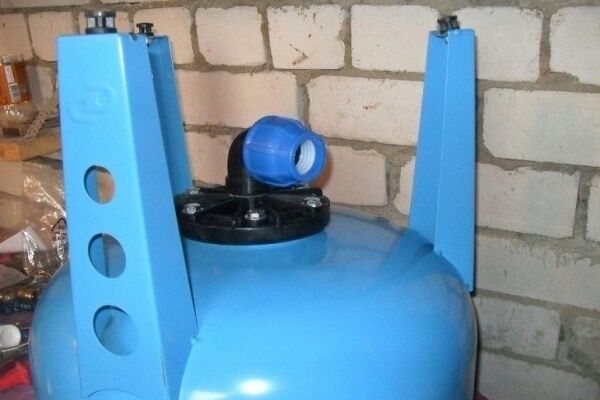
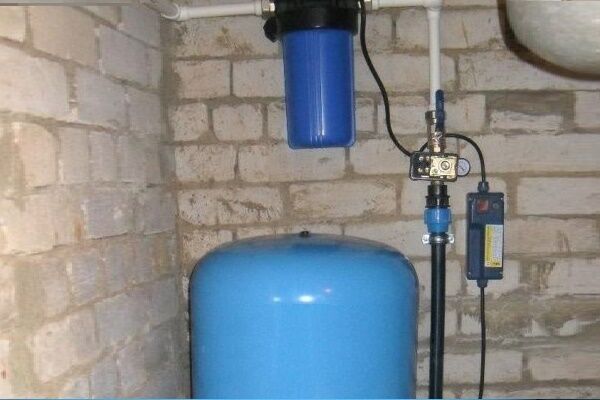
The hydraulic accumulator is connected to the water supply through a special fitting with five outlets.
It is through this element that the remaining elements of the system will be connected to the hydraulic tank pipe, namely:
- water pipe;
- source of water intake (for example, submersible pump);
- pressure gauge;
- pressure switch.
The fitting can be installed either directly on the hydraulic tank pipe or on a transition element in the form of a rigid hose. The decision should be made based on where the hydraulic tank is installed and how convenient it is to connect other communications to it.
The pressure gauge, pressure switch and other elements are connected using threaded connections. Of course, they all must be well sealed and sealed using linen thread, FUM tape or other suitable material.

The pressure switch should also be connected to the network and to the pump that is used to supply water. For this purpose, there are two pairs of contacts under the device housing cover. They are usually labeled “pump” and “network”.
If there are no such marks, and the technician who connects the relay has no experience in electrical installation work, you should ask a professional electrician for advice.
When checking the operation of the hydraulic tank, all threaded connections are checked for leaks. To do this, just feel the fitting pipes and make sure that they remain dry. If a leak is detected, repeated sealing and sealing work should be carried out.

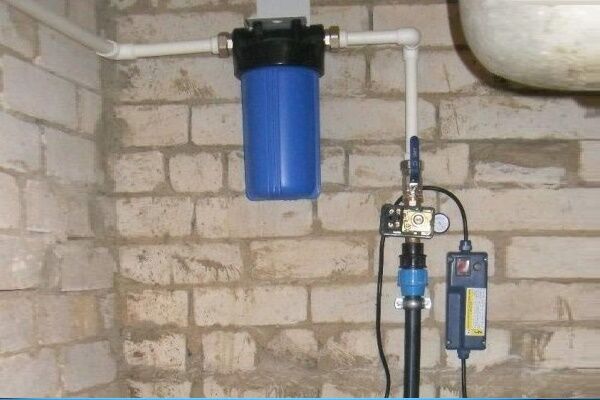
A hydraulic accumulator in combination with a surface pump is most often used as a complete pumping station. This is an almost ready-to-install unit, including the hydraulic accumulator itself, a pressure switch, a surface pump, and a pressure gauge.
All that remains is to connect the pump to the water source, and the hydraulic tank to the water supply system of the house. After this, it is necessary to provide the pumping station with power supply, as well as competently configure the pressure switch.
Schematically, the connection of the pumping station can be represented in the following steps:
- Prepare a solid base in a suitable location for installation.
- Install the pumping station on the base.
- Measure and adjust the air pressure in the empty hydraulic accumulator.
- Install a fitting with five outlets onto the outlet pipe of the hydraulic accumulator.
- Connect the pipe of the surface pump to the outlet of the fitting.
- Connect a water pipe to the other outlet.
- Install a pressure gauge and pressure switch.
- Fill the accumulator with water.
- Check the presence/absence of leaks at the threaded connections.
- Set up the pressure switch.
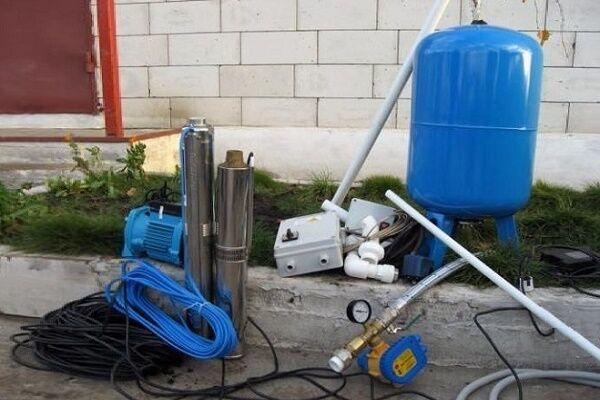
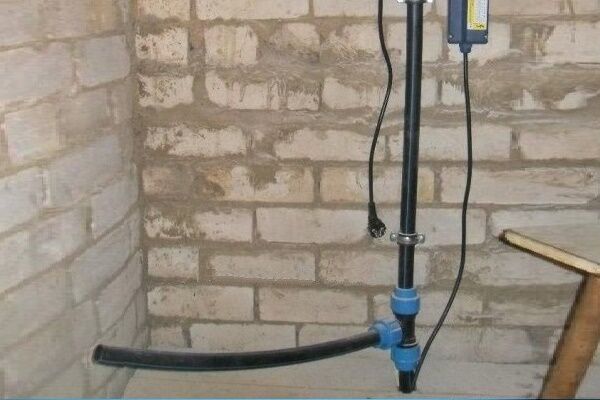
A surface pump is not always used in the autonomous water supply system of a private house. Owners of deep wells have to use special submersible pumps.
The process of connecting a hydraulic accumulator to a water supply system with deep well pump performed according to the following scheme:
- Lower the submersible pump prepared for operation into the water source (well, well, etc.)
- Connect the pressure hose or water supply pipe of the pump to the fitting with five connectors.
- Connect the accumulator pipe to one of the fitting outlets.
- Install a pressure gauge and pressure switch.
- Connect the accumulator to the water supply system of the house.
When connecting a hydraulic tank to a submersible pump, it is necessary to ensure the installation check valve, which will prevent water from flowing into the well when the pump is turned off.

A few important nuances
To connect the hydraulic accumulator, special flexible adapters are used. This helps reduce the effect of vibrations on the plumbing system.
It should be taken into account that in this area, between the water supply and the hydraulic accumulator, it is unacceptable to reduce the clearance of the connecting structures, since this will worsen the hydraulic characteristics of the system.

The initial filling of the tank with water must be done very slowly. The fact is that during long-term storage, the rubber membrane, made in the shape of a pear, could simply stick together.
A sharp flow of water can tear the gasket, but with low pressure it will straighten out neatly. Another really important point is that before supplying water to the accumulator, air should be completely removed from the part into which water will be pumped.
Immediately after unpacking the purchased battery, and/or immediately before connecting it, you need to measure the pressure of the air that is pumped inside. This figure should be 1.5 atm, this is how hydraulic accumulators are pumped during manufacture.However, during storage in a warehouse before sale, leakage of some of this air is a completely natural phenomenon.
The most reliable option for such measurements is a regular car pressure gauge with a suitable gradation scale that allows measurements to be taken with an accuracy of 0.1 atmosphere. As practice has shown, it is not worth using cheap Chinese plastic models for these purposes; their accuracy is highly questionable.
Electronic models are sensitive to environmental conditions, and this is too expensive an option for a conventional accumulator.
What should the air pressure be in a hydraulic tank filled with water? It all depends on the situation.
A pressure of 1.5 atmospheres will provide quite decent water pressure in the plumbing system. But it should be remembered that the higher the pressure, the smaller the volume of water stored in the tank. If you need both a solid supply of water and good pressure, it makes sense to look for a large-volume tank.

It is recommended that the operating parameters of the air pressure in the hydraulic accumulator be less than the minimum pressure that causes the pump to turn on, by approximately 0.5-1.0 atmospheres. Sometimes they do things differently.
The air pressure in the accumulator is left at 1.5 atmospheres, as set at the factory, and the value of the minimum pressure or switching pressure is calculated as 2.0-2.5 atmospheres. Thus, to the air pressure in an empty tank - 1.5 atmospheres - add this difference of 0.5-1.0 atmospheres.
Excessive pressure does not have a very good effect on the integrity of the hydraulic tank elements, but low air pressure in it is not beneficial either. If you reduce this indicator to a level of less than one atmosphere, the membrane will touch the walls of the tank. This will lead to its deformation and rapid failure.

After the system is installed and connected, it is necessary to configure the pressure switch. For this purpose, there are two adjusting nuts with springs under the housing. The procedure for adjusting the pressure switch is usually described in detail in the instructions that come with the device.
Rules of operation and repair
Connecting and setting up the accumulator correctly is only half the battle. In order for the device to operate for a long time, it must be properly operated and periodically performed preventive inspection and maintenance.
Instructions require medical examinations to be carried out twice a year, but practice shows that this is not enough. The condition of the hydraulic accumulator should be checked every three months. At the same frequency, it is advisable to monitor the pressure switch settings in order to correct them if necessary.
Incorrect operation of the relay creates additional loads on the entire system, which can also affect the condition of the accumulator.
If during inspection dents or traces of corrosion are found on the device body, these damages must be repaired.It is best to do this as early as possible, otherwise corrosion processes will develop, which can lead to damage to the integrity of the accumulator housing.
An important preventive measure is checking the pressure in the hydraulic tank itself using a pressure gauge. If necessary, the required amount of air should be pumped into the device or excess air should be vented.
If this does not help and the new pressure gauge readings do not correspond to those expected, it means that either the integrity of the accumulator body is compromised or its membrane is damaged.

Some craftsmen manage to detect and repair areas of damage to the body, but such repairs are not always durable and reliable. The rubber liner or membrane is the weak point of the accumulator. Over time it wears out.
You can replace the membrane with a new element at home, but to do this you will have to completely disassemble and reassemble the hydraulic accumulator.

If a home craftsman doubts his abilities in this area or does not have sufficient experience, he can cause even more damage to the device than the previous breakdown. In such a situation, it is better to contact a service center.
Conclusions and useful video on the topic
An overview of the operation of a 50-liter hydraulic accumulator is presented in the following video:
This video clearly demonstrates the procedure for adjusting the pressure in the hydraulic tank and setting the pressure switch:
The advantages of using a hydraulic accumulator are obvious, so this device is increasingly being used both in private houses outside the city and in metropolitan apartments. If the unit is installed and connected correctly, it will work for many years without breakdowns or interruptions, providing the family with high-quality water supply.
Do you have experience in installing and connecting a hydraulic accumulator yourself? Please share information with our readers, tell us about the features of setting up and operating the hydraulic tank. You can leave comments in the form below.


We live in a cottage-type village. The houses are economical, but all are connected to the central water supply and, what is especially nice, to the gas supply. The only thing that didn't suit me was the water pressure at a minimum level. There was enough pressure for a washing machine and dishwasher, but for a Charcot shower in a hydrobox it was not at all enough. The hydraulic accumulator solved the problem, I was able to connect it myself.
We live in an old wooden house with no running water! Installing autonomous communications is expensive, we don’t have such means! There is no well either; we carry water from a pump, which is 300 meters from us. My husband says that you can buy and install a pumping station with a hydraulic tank. He plans to place it near a large storage tank with water, from which he wants to run pipes to the kitchen. He says that you don’t need to dig a well for this! Tell me, is your husband right? Is it possible to provide water supply in a private house this way?
Alena, hello. Unfortunately, the question is not entirely clear.If you have a water pump 300 meters from your house and there is no other source of water supply, then how does your spouse plan to get water? The hydraulic tank is a hydraulic tank, but it must be filled with liquid from somewhere. Most likely, you misunderstood your spouse and he plans to drill to the water carrier.
I plan to organize watering using a homemade hydraulic accumulator. I have a garden ejector pump, and in order not to constantly have to run around turning it on and off, I plan to install a check valve with a filter in the tank and weld a fitting with a screwed-on pressure switch to the pump outlet. The idea is that when you turn the watering gun on/off, the pump turns on/off automatically.