Installation of open electrical wiring: review of work technology + analysis of the main errors
Electrical wiring is laid in two ways - closed and open. In the first case, communications are disguised, and the likelihood of their damage is minimal.Installation of open electrical wiring is simpler, cheaper and less labor-intensive, but it is necessary to protect the cables from moisture and mechanical damage.
In this article, we will look at existing methods of laying electrical wires, focus on the features of external installation, and provide recommendations on how to choose the appropriate option.
The content of the article:
What do electricians think about exposed wiring?
Open (external) electrical wiring has much more disadvantages than hidden (internal) wiring.
Cables covered with plaster are not damaged, do not interfere with repairs and are completely invisible. Open wiring does not have such advantages, and in the event of a short circuit, it is more likely to catch fire than hidden wiring. The open method of installing electrical wiring is often chosen for wooden houses.

The open installation method still has some advantages:
- Simplify installation. When laying electrical cables, you do not have to cut walls. This reduces labor costs and the amount of work. After installation there is practically no construction waste left.
- Reduction in price. Here we are talking about saving on electrician fees.
- Possibility to change the cable layout. If your future plans include redesigning the wiring, then it is better to choose an open installation method.
When choosing an open method for laying electrical wires, you should take into account that they will have to be masked and protected from external influences. There is always a chance of moisture or accidental damage.

If the house is residential, you need to weigh everything three times. It is advisable to consult with an experienced electrician, and during installation it is necessary to take into account the increased risks and especially carefully monitor compliance with safety measures.
Features of external laying of electrical cables
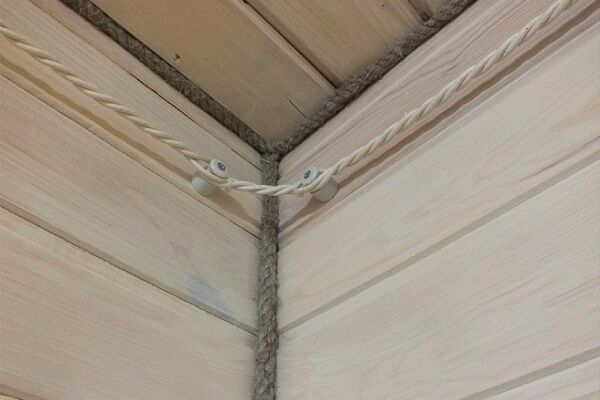
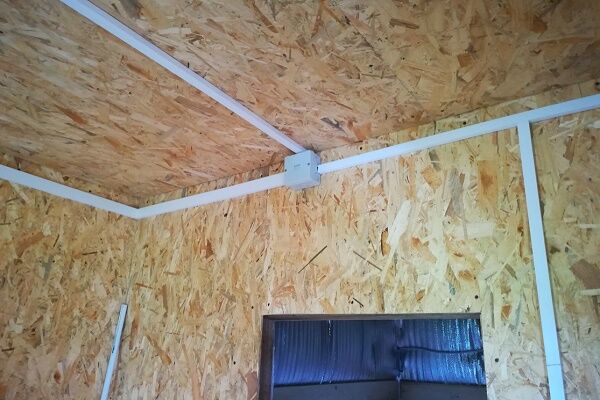
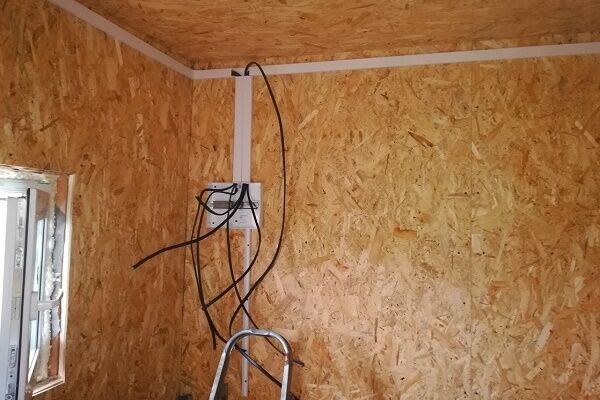
External installation is suitable if you need to lay electrical cables in the corners of the room, at the junction of the ceiling and walls, or along the baseboard.
Most often, difficulties arise when installing open wiring in houses with suspended ceilings. Cables cannot be run along such ceilings; they have to be fixed to the walls.

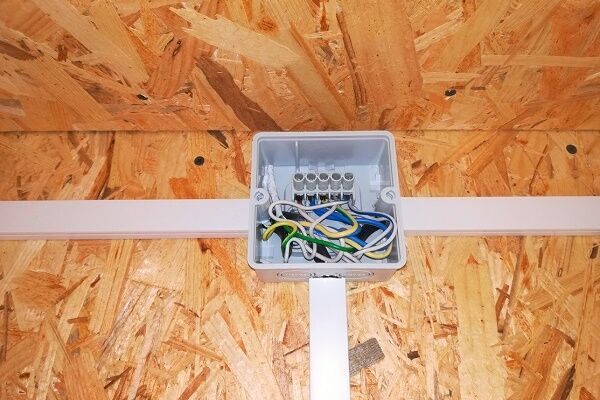
If there are a lot of wires, it is better to lay them in throughput channels. When developing an installation diagram, you need to carefully select the places where the branch and connecting connections will be connected boxes. Free access must be maintained for inspections and possible repairs of communications.
Open wiring methods
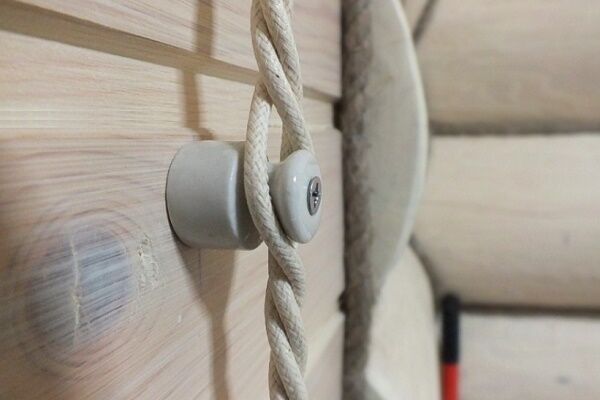
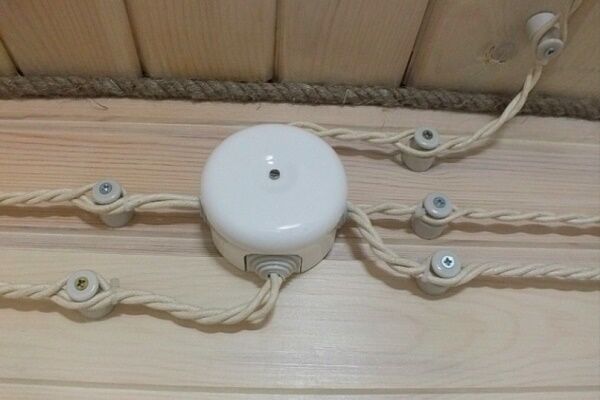
Initially, the only open installation method was to lay twisted electrical wires along the walls and ceiling. They were mounted on ceramic insulators.
Some houses built about a century ago are still wired this way. Relatively recently, a similar montage has again gained popularity. This is due to the fashion for antiques.

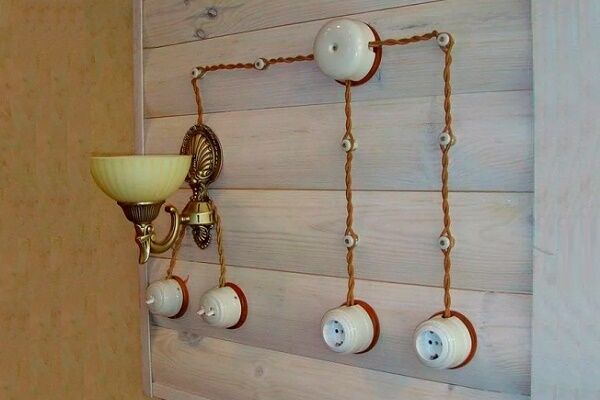
When decorating premises in a retro style, problems often arise with finding materials. Some manufacturers produce ceramic insulators, sockets, and antique switches, but such luxury is very expensive.
Suitable materials for decorating retro-style wiring can be found not only in expensive stores. They are often purchased from junk dealers, purchased from owners of houses built at the beginning of the last century, and cables are made independently by twisting stranded copper wires.

Interior fashion is changeable, so you should seriously consider whether you need to design the wiring in a retro style. It is better to choose a more popular and reliable option. Then, in case of repair, you will not have to deal with electrical installation work again.
We offer a detailed look at the popular methods of laying open wiring and choose the technology that is most suitable for your home.
Method 1 - mounting wires on brackets
For connecting sockets and switches choose electrical wires cross section 2.5 mm.sq., and for lighting devices - 1.5 mm.sq. Sometimes thicker cables are required. If the wire thickness is 1.5-6 mm2, they can simply be attached to the surfaces of walls and ceilings with staples.
When purchasing cables, you should give preference to quality products. If the choice is made in favor of cheap wires, then non-flammable gaskets are installed under them to reduce the risk of fire in the event of a short circuit.
Their choice should be taken extremely carefully, because the future functionality and safety of the home electrical network depends on them. We recommend that you look at the information on how calculate wire cross-section for home wiring.
Most often, strips of metal or asbestos are used.They are fixed so that the non-flammable gasket protrudes beyond the cable by at least 1 cm on each side. As for the material, it is better to choose metal, because... asbestos is harmful to human health: its connection with cancer has been proven.

Bracket mounting is a cheap and easy way to install electrical wiring. The downside is that it is unsafe and ugly. If several cables are laid, they are noticeable and spoil the impression of the interior. In a residential building, it is better to lay the wires in cable channels.
Method 2 - features of installation in pipes
Modern industry produces special electrical pipes. They can be made of metal or plastic and provide good protection against fire, accidental mechanical damage and electric shock.
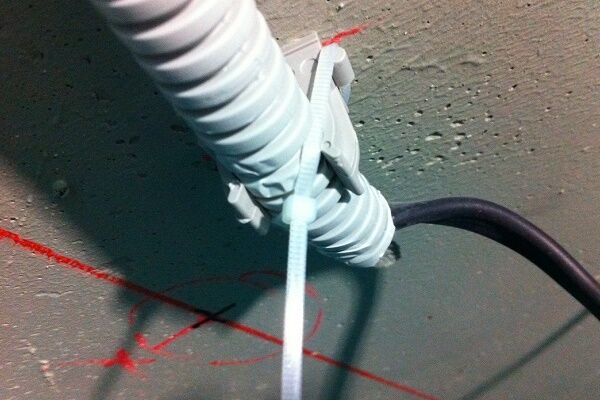
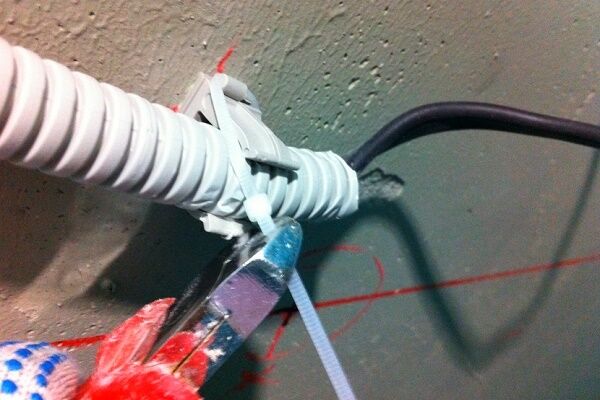
For installation it is most convenient to use corrugated pipes. They are flexible, so when mounting them on walls there is no need to further level the surfaces. Wiring in a corrugated pipe is an ideal option for wooden log houses. It is convenient and looks much neater than separate wires.
Due to the dubious aesthetics of corrugation, it is not often used in residential buildings, but it is perfect for laying cables from overhead power lines. Sometimes, in order to improve the appearance of exposed electrical wiring inside rooms, colored corrugated pipes are used.

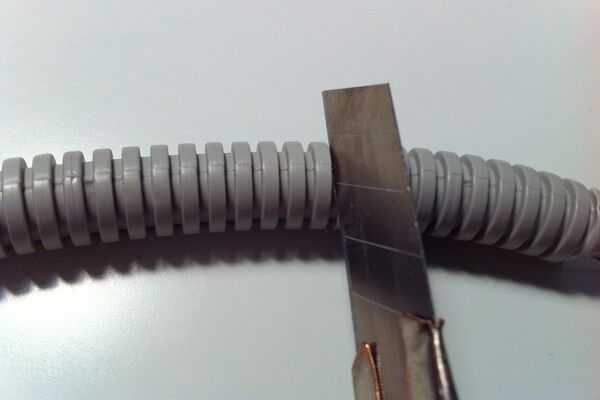
When calculating the diameter of the corrugations, they are guided by the total thickness of all the wires that will be laid in it. This figure is multiplied by 2, since with a smaller cross-section of the pipe it will be difficult to lay cables into it.
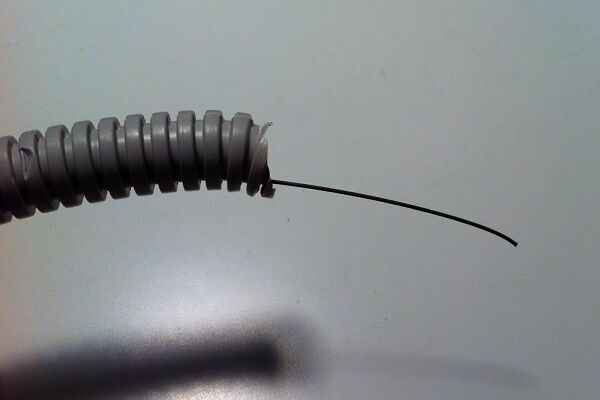
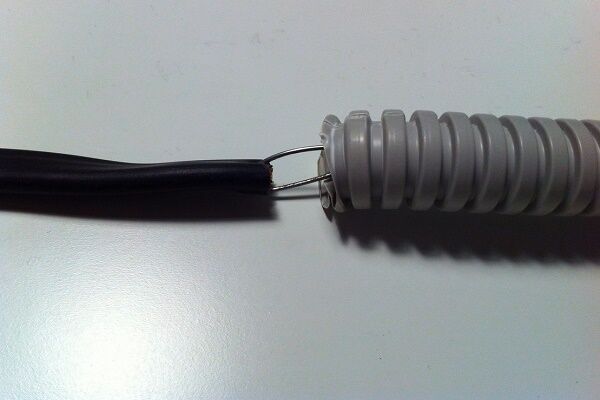
To facilitate installation, corrugated pipes with a special probe (wire used to pull cables) are used. Wires are attached to the probe and pulled through the pipe, holding it firmly in your hands.
If you need to lay a relatively small piece of wire, you can do without a probe, but for large sections it is better to use special devices.
The wiring arrangement in the polymer corrugation is carried out in the following order:
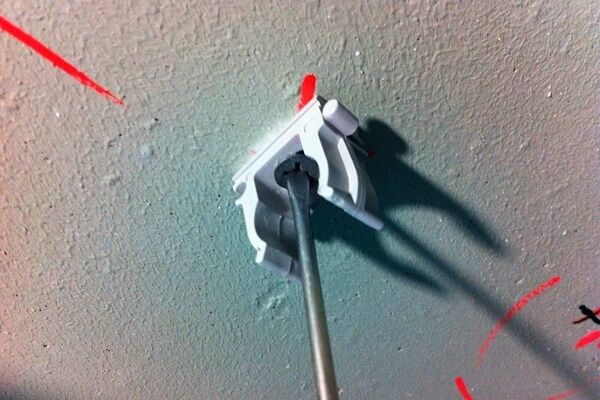
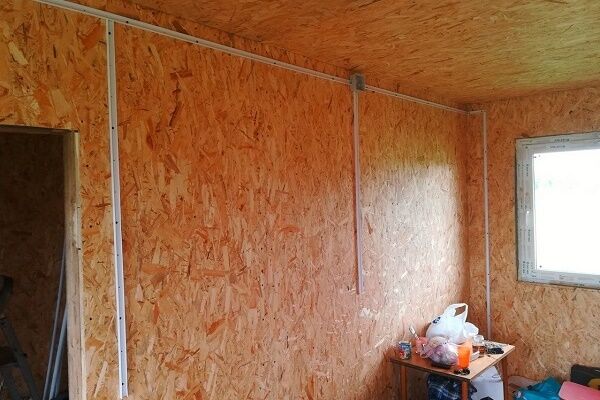
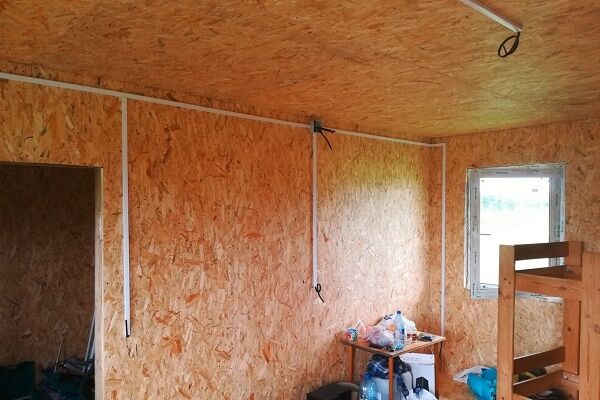
Corrugated electrical pipes are attached to the walls with screws, dowel-nails or plastic clips. The distance between the attachment points is calculated depending on the diameter and, accordingly, the expected weight. If the diameter of the corrugated pipe is 16 mm, then the fasteners are placed at a distance of 30–40 cm, and for pipes 32–40 mm this distance is already less – 20–30 cm.

The clips are mounted on the walls, and then the corrugated pipe is simply inserted into them. This method of fastening is convenient because when dismantling, all you have to do is pull the pipe towards you, and the clips will easily detach.
Method 3 - laying in boxes
Rigid electrical boxes are used for laying wires, cable channels, baseboards. These devices are made of metal or non-flammable plastic. Unlike corrugated pipes, rigid structures cannot be installed on uneven walls, because surface defects only become more visible.

Boxes, channels, and plinths are equipped with snap-on covers that can be easily removed, which is convenient for installing additional wires. If you need to upgrade your wiring, the entire process will take a few minutes.
There are other advantages:
- Design. Boxes, cable channels and baseboards are available in different colors, which allows you to decorate the room. You can always choose the appropriate option.
- Easy installation. Laying cables in boxes does not require much effort. The main thing is to properly secure the protective structures themselves.
- Convenient installation of sockets and switches. You can mount sockets on the boxes, and they will not spoil the overall appearance.
Installation work begins with drawing up a drawing diagram with an outline of the walls. It is needed to accurately calculate the required materials, the number of fasteners, and accessories.
To select a channel according to its standard size, you should determine in advance the cross-section and number of cables. The finished plan must be accurate, without errors in measurements and calculations.

Technology for installing external electrical wiring in cable ducts:
- Drafting. It is necessary to determine the number, types and location of sockets, switches, boxes and think through cable layout diagram bypassing gas and water pipes and the sewer system.
- Selection of materials. After designing, you can begin selecting and purchasing materials. If you plan to lay several cables, you should choose a box with partitions. Accessories must match the channel in color and size. It makes sense to buy protective boxes with devices for installing sockets.
- Fastening boxes. Plastic structures can crack if they are immediately attached to the wall, so first make holes in the frames of the boxes, and only then screw them to the base. The cable channels are joined together, and the excess material is cut off.
- Wiring. The cables are laid in channel housings, covered with lids and snapped into place. All that remains is to check the fixation of the covers - and the structure is ready.
Electricians advise paying attention to the base material, because... The choice of fasteners depends on this. So, the boxes are attached to a wooden wall using ordinary screws. Dowels are used for brick, concrete and stone surfaces. And for panels, slabs made of composite materials and plywood, it is better to choose butterfly fasteners.

Each installation method has its own advantages, and it is rarely the case that one method is sufficient. It is often necessary to combine cable ducts with corrugated and/or metal pipes and fasteners with brackets.
The construction of electrical wiring using cable channels includes a number of standard steps:
When developing an electrical wiring project, you should take into account the layout of the room and the features of cable routing in each area - be it the bedroom, kitchen or bathroom.
10 common mistakes made by electricians
The open method of laying electrical cables is simpler than the closed method, but there are still nuances that cannot be taken into account until there is some practice.
We offer an overview of typical mistakes made when installing wiring:
- Lack of schema. Wiring is often installed according to the designer’s principle: first they make wiring in each room, and then combine the cables. This dramatically reduces the reliability of the entire system as a whole.
- Saving on materials. Poor quality wires, devices and accessories are a direct and short path to a fire. It is better to overpay for products from a reliable brand than to solve problems with short circuits and fires.
- Posting calculation without reserve. The cross-section of cables and their number should be 20% larger than the calculated one. Otherwise, you cannot avoid unnecessary twists and the risk that the network will not withstand the load.
- Connecting powerful devices through an outlet, rather than using a separate cable from the switchboard. Even a high-power socket does not solve this problem, because... There is always a risk that the cable will not cope with serious additional load.
- Connection of high and low voltage cables in one box. In this case, problems with the operation of equipment throughout the house are almost guaranteed.
- Extra twists. To connect the wires it is better to use special terminals.
- Connection of copper and aluminum cores. The contact points become overheated, which can lead to problems. For connections, you should use terminals, and it is better to avoid aluminum wires altogether and lay only copper ones.
- Neglect of safety precautions. Safety rules were written based on the bitter experience of many unsuccessful electricians, and yet there are still brave souls who work under voltage.
- Incorrect placement of junction boxes. They should be 20 cm below the ceiling. Otherwise there is a risk of accidental damage. The boxes must be accessible for inspection and repair.
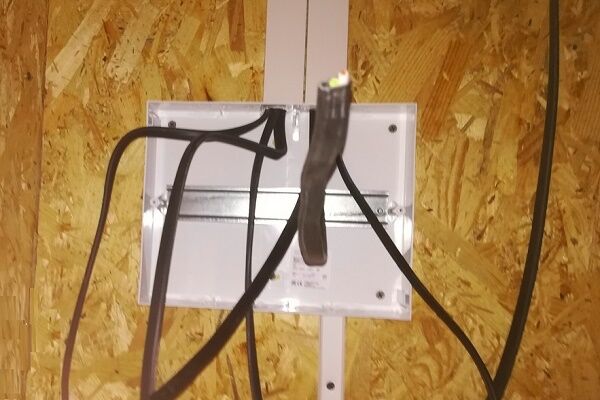
- Errors when installing the ground loop and connecting the RCD. These devices protect the electrical network, so you should be especially careful when installing them.
Novice electricians make other mistakes. We have listed only the most common ones.
It is important to remember that installing electrical wiring involves many risks, so you should carefully study the technology before starting work.
Conclusions and useful video on the topic
We have selected useful video materials that will help you avoid common installation mistakes and correctly organize external electrical wiring in your home.
Instructions for installing electrical wiring in a cable channel:
Useful tips for installing sockets:
The main mistakes made when connecting an RCD:
In theory, the technology for arranging open wiring looks simple and understandable. But when it comes to practice, many home owners make a lot of mistakes.
Only undertake DIY installation if you have the necessary knowledge to develop and implement the project. If not, then do not risk your life and entrust this work to electricians.
Are you well versed in the theory of open wiring installation and have practical experience in performing electrical work? Perhaps you would like to supplement the material we have presented with clarifications or useful recommendations? Write comments in the block below the article, share your experience with beginners - many users will be grateful to you.


I made a mistake at the time, I confess, I decided not to change the wiring from the previous owners during the repair. Now I know for sure that unreliable floors, wiring and sewerage are the first items to check and replace. The problem of having additional outlets in the kitchen and power lines for the exhaust fan became urgent. I plan to supplement the existing electrical circuit by installing a cable from the box in the hallway to the kitchen using an open method.
I want to hide the 2.5 section in a small plastic protective box, which will be attached to the corner of the junction of the ceiling and the wall; I think I will cover the box itself with a ceiling plinth. The descent to the sockets can be achieved by making a channel in the tiled covering of one of the kitchen walls with further sealing. In my opinion, this is the easiest and safest installation method if there is a ready-made repair. I do not consider installation through the floor plinth due to the risk of moisture ingress.
They write here that exposed wiring is more at risk of fire. But, when the wiring is closed in the wall, in the event of a fire, its specific place is not visible, and you can break half the wall until you find the damage.I had such a case. Now there is only open wiring so that it can be quickly replaced if something happens. Naturally, I will not mount it in boxes myself. Yes, there will be difficulties during repairs, etc., but all these problems can be solved - I want all the wiring to be visible and for everything to be easy to get to.
It was necessary to install an additional outlet. I connected the wiring to it to an existing outlet, ran it down to the baseboard in the groove, and then laid it openly along the baseboard.
What are the general advantages of open wiring? Do you need any special permits for this? Should there also be special wires?