Junction box for external and hidden wiring: types, classification + installation instructions
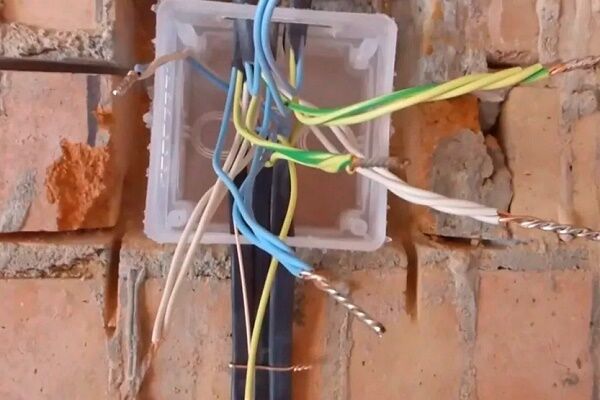
A traditional element of electrical networks is a junction box for external and hidden wiring, protecting current-carrying conductors (cables) at their connection points. It has a simple design and does not cause installation difficulties, the main thing is to choose the right accessory. But this issue deserves special attention.
When choosing an electrical element, it is necessary to take into account a number of important parameters. Among them: the type of electrical wiring, the material of the walls and the junction box itself, as well as other factors.
We will tell you how not to get confused in the variety of offers, help you choose the best option and perform competent installation.
The content of the article:
Classification of junction boxes
Structures of different configurations are suitable for installation on different types of materials - brick, concrete, plasterboard, etc. This type of electrical accessories is actively used in installation of home electrical wiring, which ensures electrical and fire safety.
Based on their purpose, electrical distribution boxes should be divided into two types:
- Soldering. Their purpose is protection wires and cables from a humid environment and mechanical damage during operation of a household power supply circuit.
- Installation. They are used to create convenient communications when performing installation work related to the installation of electrical equipment.
Both types of products can be used in ambient temperatures from –25 to +40ºС.

The advantages of using junction boxes are obvious:
- wide choice for power networks of different capacities;
- reliable protection of electrical wiring connections;
- convenience and ease of installation;
- variety of body materials;
- variety of decorative designs.
The design of the products is simple and is usually represented by boxes of rectangular, round or other shapes, which are closed with lids. Tight fit and fixation of the covers is ensured by latching locks of various configurations.

All existing forms of boxes are manufactured for hidden or open installation. Fastening of junction boxes for external installation is carried out in a standard way - with screws, dowels, self-tapping screws.
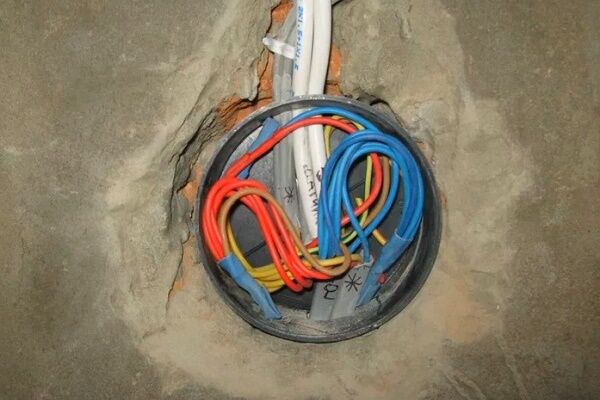
Fixation of junction boxes for hidden wiring is done by inserting them directly into the structure of the building structure (walls, partitions, ceilings) and then filling them with mortar.
Designs for open wiring
Execution of junction box for installation of open wiring, usually rectangular or round.Material of manufacture – polypropylene, ABS plastic in white, gray or black. The number of side holes for wire (cable) entries is from 4 to 10.

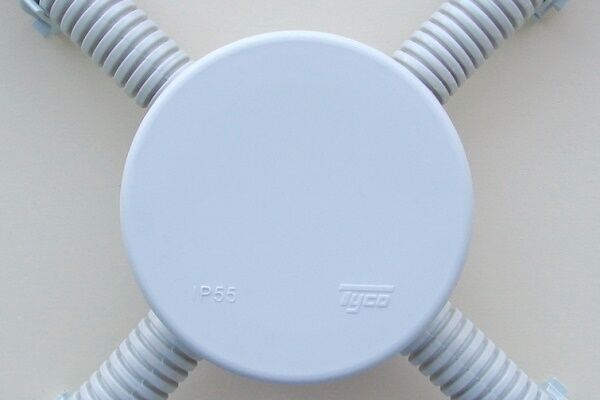
As an illustrative example of an open wiring box, consider the AP9 model, designed for installation in rooms with high humidity. The product body is made on the basis of two-component casting and is equipped with membrane cable entries.
The upper body part (lid) of such distribution boxes, made for external installation, has a special groove on the inside along the entire perimeter. A PVC seal is placed in this groove, reliably blocking the paths of penetration of moisture and dust into the product.
The lid is “tied” to the body with a flexible leash - additional convenience during maintenance.
Despite their simple design, the design features of boxes like AP9 provide such products IP degree of protection 55. The design is supplemented with accessories - fuses, terminal blocks, which ensures a more convenient and reliable connection of conductors.
Hidden type products
Junction boxes for hidden wiring actually have the same technical parameters and qualities as those noted for externally mounted products. They are also mainly made from polypropylene and polystyrene. Moreover, polypropylene, as a rule, is used to make the body, and polystyrene is the material of the lid.

For installation in the body of brick and concrete walls, distribution boxes are produced with a protection class of IP20 - IP30. The shape of the products is predominantly round or rectangular. Body colors – white, blue, black. The lids are traditionally white or light gray.
The coupling and fixation of the cover with the body is usually carried out using a pin lock. There are grooves on the body where the plastic pins of the cover are inserted.
Installation box - socket box
There is a variety of wiring structures - installation boxes. Their main purpose is installation inside hollow or solid walls of buildings (brick, concrete) with subsequent installation of electrical switches, sockets and other elements of electrical networks. The installation distribution boxes are made to IP20 protection class.

Branded products are made of good quality plastic with high strength and dielectric protection characteristics.
Installation boxes can be mounted in ambient temperatures from -5ºС to +60ºС. The operating temperature range is within the range of -25ºС/+40ºС. There are two types of products: for installation in hollow walls or in solid walls.
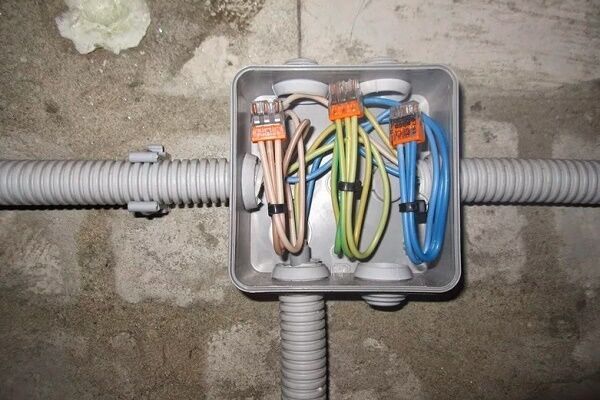
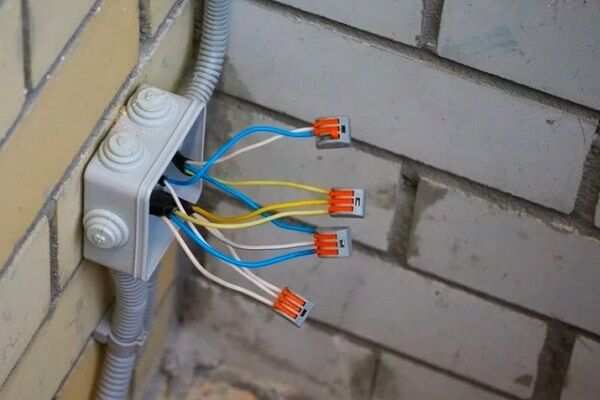
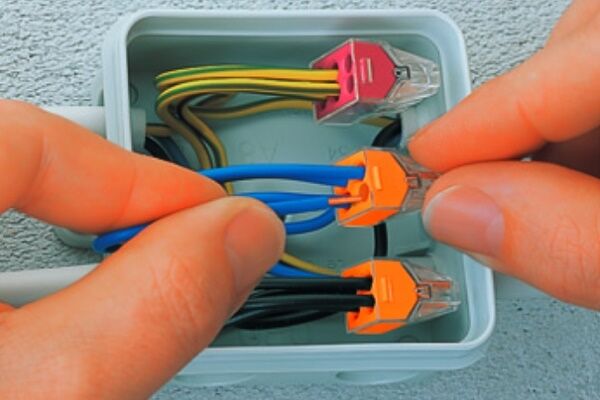
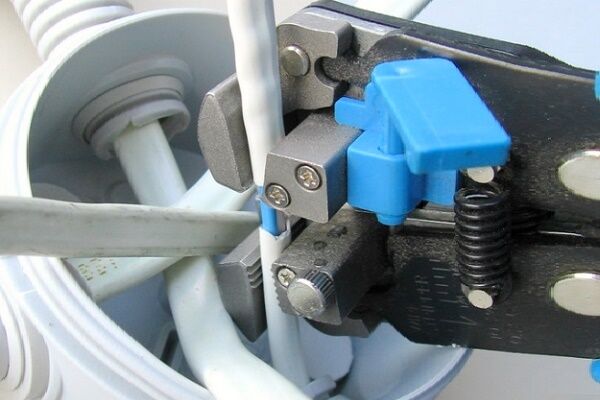
Connections inside the junction box are simpler, better, and faster made using spring terminals:
The designs differ from one another in the fastening technique:
- fastening with support feet;
- fastening with mounting dowels or screws.
More information about installing sub-divisions is written in this article.
There are also differences in the degree of body rigidity and coloring. For solid walls, structures usually have a more rigid body and are painted red.
What is the difference between metal products
Cable connection points for lighting wiring, as well as power lines designed for voltages not exceeding 1000 W, are often organized inside metal junction boxes.

The metal configuration is a kind of universal option for such products.
These boxes can be used not only for AC or DC networks, but also for networks:
- telephone;
- television;
- computer;
- informational.
Metal boxes are manufactured based on alloys that are chemical and corrosion resistant. The outer surface is coated with a special epoxy resin, which provides additional mechanical strength and ultraviolet protection. The housing may have from 2 to 6 inputs with threaded fittings.
When closed, the entry of foreign matter into the metal box is prevented due to the high-quality sealing of the lid and cable entries. Installation of boxes of this configuration is permissible indoors and outdoors.
They are usually installed in combination with rigid metal pipes that act as cable ducts. Product protection class IP66 – IP67.
DIY installation instructions
When purchasing products for installation, you should keep in mind: each branded product is usually packaged and accompanied by a product label.

The product label indicates: technical information, product barcode, certification mark.
Tools and materials for installation
To perform installation work, an electrician will need a standard set of tools in such cases:
- pliers;
- flat-head screwdriver;
- knife with a thin sharp blade.
Set of mounting accessories:
- insulating tape;
- electrical terminals;
- DIN rails;
- fasteners - screws, screws, dowels, etc.
Please note: installation work related to the laying of electrical networks and related fittings may only be carried out by persons with the appropriate knowledge and qualifications.
As a last resort, you can install the boxes yourself, lay cable channels. But connections, connections, and testing on electrical networks, according to the instructions, are allowed to be carried out only by persons with permission.
Installation of various types of fittings
Outdoor installation:
- On the body of the junction box, cut off the plugs of the sealed inputs with a sharp thin knife. The cuts are made along the marking lines on the plug in accordance with the diameter of the cable channel or the cable itself.
- Tubular channels - corrugated or straight plastic tubes - are inserted into the holes formed after the cuts.
- The ends of the wires are led into the junction box body through the channels.
If necessary, install a terminal block in special guides and connect the conductors according to the diagram. To finish, close the junction box with a lid, pressing it with some force until it is completely secured with locks.

Instructions for installing an external universal box for cable duct:
- Make cuts using a knife according to the standard marks on the box body to the size of the rectangular cable channel. Standard tags are designed for joining with cable channels with a cross-section of at least 10*7 mm, maximum 40*25 mm.
- Carefully break off the notched part of the plastic housing, thus obtaining an opening for the cable channel.
- Attach terminal blocks to the base of the universal box for mechanical connection of electrical conductors.
Having laid the electrical wiring through the cable channel, connect the ends of the conductors according to the diagram on the terminals.
When the work is completed, install the box cover and secure it with a fastening screw.

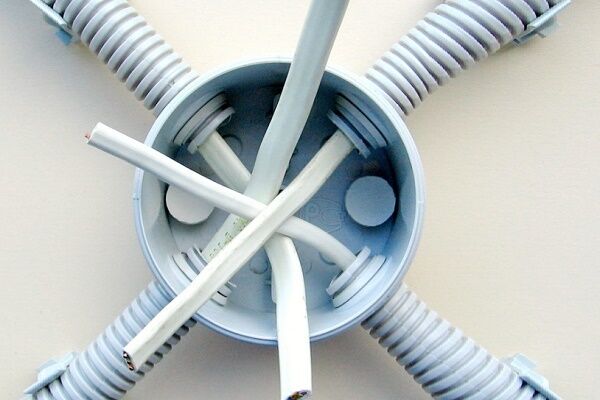
Installation procedure for the installation (hidden) box:
- Prepare the product by first preparing the required number of input holes in the housing. Holes are created by breaking the edges of the finished stencil. Up to 11 stencils for inlet holes can be placed on the body of the installation box.
- Make a mounting hole in a hollow wall, for example, in plasterboard, using a cutting bit to match the diameter of the product. Or use a ready-made mounting hole in a solid wall.
All that remains is to connect the cable channels with the wire, combine them with the box, bring the ends of the wiring under the connections and fix the box body by spreading the fastening legs with screws (for drywall) or fill it with solution.

Having connected the conductors of the hidden main in accordance with the wiring diagram, close the box(es) with a lid. Externally, this design fits well into the existing interior.
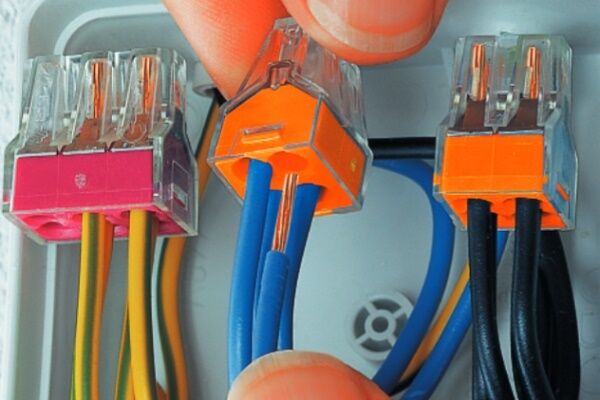
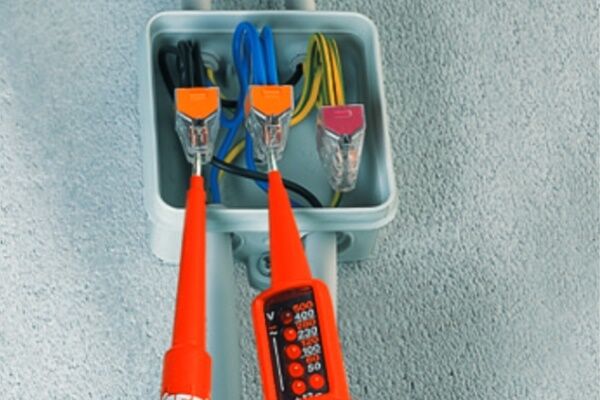
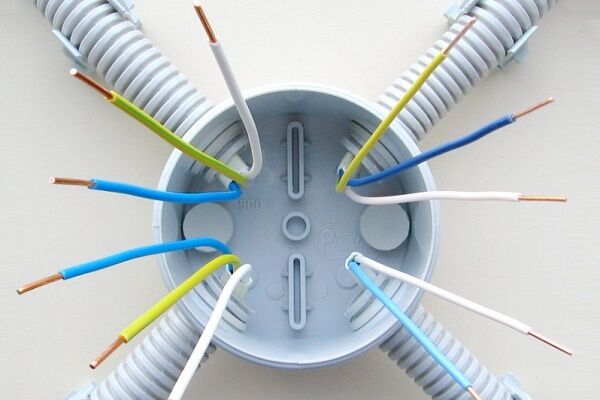
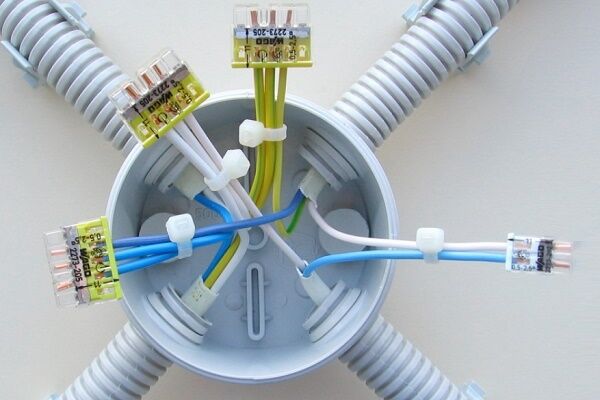
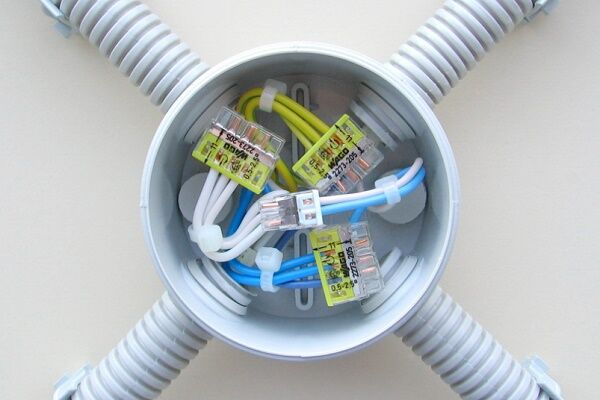
The following selection of photos will present the steps for assembling a Wago brand junction box:
Installation of a metal junction box
The design of metal junction boxes provides only for external installation of such products.
Therefore, the instructions in this case are simple:
- Bring tubular channels with wire to the entry points.
- Mechanically thread the pipes to the walls of the housing and lead the cable ends into its internal area.
The box body is secured to the wall with screws through the holes intended for fastening. Then connect the cables according to the diagram, cover the box and secure the cover with screws.

This is roughly how the installation of distribution modules with different designs is carried out.
More examples of installation can be seen in the video.
Conclusions and useful video on the topic
Visual instructions for installing a junction box:
It is not possible to cover all existing design variations of distribution boxes in one review. But the design principle and installation features for all existing products are almost the same.
Therefore, the instructions given can be considered universal for installing many models of junction boxes.
Those interested in the selection and installation of junction boxes are encouraged to leave comments, ask questions and participate in discussions. The feedback form is located in the lower block.


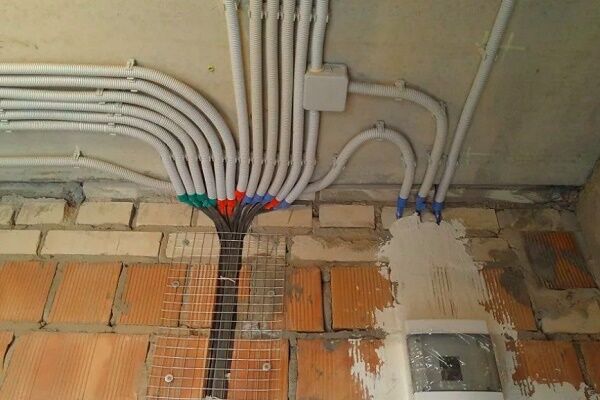
In my practice, I use all the beneficial factors that come with electrical installation of junction boxes. An important, in my opinion, nuance is very briefly indicated here: the selection of the shape, material and color of the box to match the interior design. I definitely discuss such things with clients. Corrugated boxes are most often used in production facilities.
If a highly branched wiring diagram is being designed in a customer’s house, then such boxes will greatly help in the work. They can even be placed near the pool. Even in this case, there is no risk of fire. But I like more that the boxes are easy to place inside the partition. After connecting the wires, you do not have to treat them with non-flammable material: clay or plaster, as was the case in the Soviet years. Even though their design is simple, they help avoid so many problems!
Good day, Sergey.
In the Soviet years, junction boxes were always used in the construction of houses - there were no electricians “processing the connection of wires” with clay or plaster. I, of course, understood that you did not have enough professional terms.
By the way, there really weren’t enough such products to repair. The solution was found like this: they made a recess in the wall under a suitable tin can and sealed the side voids with plaster (preliminarily, they cut out holes through which the wires were inserted). Some craftsmen, when the solution set, pulled out the jar - a cylindrical cavity was obtained for connecting the wires.
Do I understand correctly that in the photo “Steps for assembling a Wago brand junction box: Step 5: Fixing the connected wires with clamps” the lower right line is the connection between zero and phase, that is, a short circuit?
No. This is a cable with two conductors, most likely coming from the switch. “Tears” the phase