Electrical wiring in a wooden house: design rules + step-by-step installation
Wooden houses are chosen as housing for many reasons: some people are contraindicated from living in concrete “boxes,” while others like beautiful log houses. However, living in them is closely related to the concept of safety. That is why electrical wiring in a wooden house is considered one of the key aspects.
We will talk about how to properly install electrical wiring in a wooden house. We will tell you what diagrams, consumables and electrical installation products are used in laying lines along walls made of timber or logs. With our advice, you can create a secure and trouble-free network.
The content of the article:
Electrical supply project for a wooden house
Even if all logs, beams and boards are treated with fire retardants, they remain vulnerable to accidental fire. For this reason, the stages of constructing an electrical system - from design to installation of sockets and switches - need to be known to both skilled “do-it-yourselfers” and owners who supervise the work of hired builders.
According to the legislation of the Russian Federation, for residential buildings with a power consumption of no more than 15 kW, drawing up an electrical network design is not required.But the company supplying electricity must provide a diagram and data on the total power consumption. This is necessary for calculating the allocated power on the line and installing a meter.

In the process of developing a project, you need to take into account all the nuances: the exact location of electrical installations, the choice of cable and wiring method, the need for grounding, etc. Let’s look at how the project is drawn up and preparation for installation work in more detail.
Step #1 - drawing up a diagram and work plan
You can do the design yourself if you have experience in such work, or with the help of specialists by concluding an agreement with a design organization.
A professionally drawn up document contains the following points:
- electrical panel diagram;
- electrical installation plan;
- calculations for installing a ground loop;
- outputs outside the house, if any - autonomous sources of electricity;
- equipment installation plan with specifications;
- if approval is required, a package of permits;
- explanatory note.
But first you should contact Energosbyt to obtain specifications - technical conditions, which are signed in accordance with SNiP.
Owners who apply for a connection with a power of less than 15 kW will have to collect the least amount of paperwork. They need to write a list of electrical appliances and calculate their total power. If the power consumption is more than 35 kW, a linear power supply circuit is required. For 380 V networks, a three-phase circuit is drawn up.

In the kitchen, 1-2 sockets are not enough, as in the bedrooms, you should definitely plan installation of socket blocks. The location of power points is not strictly regulated by either the PUE or building codes. Socket mounting height justified only by ease of use.
It is rational to use in corridors pass-through switches, in the rooms there are ordinary 2-3-keyboards. They are installed at a height of 90 to 160 cm.

The location of the electrical panel should be planned so that it is easily accessible, but only for adults - that is, it is better at a height of 150 cm.
All rules regarding the project apply to any houses, not just wooden ones. But the risk of accidental fire due to improper planning or installation of networks is higher in buildings made of wood.
Step #2 - study the rules and requirements for electrical wiring
If activities are carried out independently and questions arise regarding the use of certain materials, as well as cable laying technologies, you should rely on the rules and regulations for connection electricity in a wooden house, set out in the PUE and SNiP.

For example, one of the requirements is to use only copper wires, the cross-section of which is selected according to the network load. They are more expensive, but have better conductivity and mechanical strength, last a long time and are easy to install.
A few more requirements, the fulfillment of which will protect a wooden house from harm:
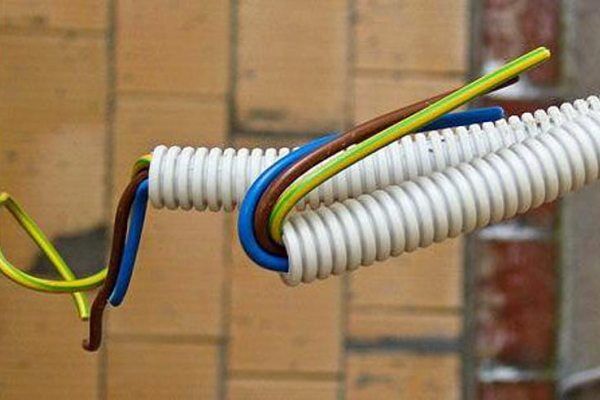
- To protect against damage, condensation, and contact with dust, the cable is placed in metal pipes, metal flexible hoses or plastic boxes.
- The joints of protective pipes or boxes must be carefully sealed.
- It is prohibited to lay electrical wiring through ventilation shafts and ducts.
- Before purchasing a cable, you must correctly calculate its cross-section, which must correspond to the current load.
- For closed wiring, it is recommended to use only metal pipes; flexible and self-extinguishing hoses are not suitable.
- One of the conditions for complete protection is a properly assembled electrical panel with a set circuit breakers And RCD.
It is also not recommended to save on materials and buy cheap products from unverified manufacturers. If you have no experience in electrical installation of closed wiring, it is better to make an open one - there are many ways to safely install and decorate.
Step #3 - preparing materials and tools
Before making an estimate, you need to determine which tool will be useful and how much installation material you need to purchase. A pre-drawn diagram indicating all electrical installations and cable runs will help with this.
For installation you will need both hand and power tools:
- hammer;
- Screwdriver Set;
- voltage indicator (tester);
- pliers;
- construction knife.
A distinctive feature of tools for electrical work is their insulated handles. In addition, you should prepare protective gloves and shoes with rubber soles. Materials are selected taking into account the load, installation method, and subsequent decorative finishing. The basis of the electrical network will be the following products:
In addition, it is necessary to purchase insulating materials for wiring - metal hoses, ducts or cable channels, mounting clips, self-tapping screws, aluminum tape for insulation, metal pipes for adapter sleeves. It is recommended to buy the cable with a margin of 10-15%.
After drawing up the project, calculations, approval (if necessary) and preparation of materials, you can begin to work.
Stages of electrical installation in a wooden house
The process of equipping electrical networks includes not only the installation of wires, everything is important here: entering the power cable into the house, installing a grounding loop, filling the electrical panel. Some difficulties are associated with planning and arranging hidden wiring. Any activities must be carried out in accordance with the norms and requirements of SNiP and PUE.
Stage #1 - supplying electricity to the building
Over the past decades, electricity consumption has increased, and along with this, the requirements for arranging the entry of power lines into the house.
There are two ways to enter cables:
- aboveground or aerial, implemented using high supports;
- underground or trench.
The first method is traditional - power communications are pulled from the power line directly to the house. To do this, use insulated polyethylene SIP wire, which is called self-supporting. It does not require the installation of an additional cable and is supported by its own load-bearing capacity.

The underground method of entering the power line is more modern. The wires are laid in a trench with a depth of 0.8 m or more. The security zone on the ground surface is marked with signs. Underground wires, additionally insulated and placed in a metal pipe, are maximally protected from moisture, damage and stress.
The wire is inserted into a wooden structure using a metal sleeve, which can be made from a piece of thick-walled pipe. The main purpose of the sleeve is to prevent contact between the cable and the wooden parts of the house.
Stage #2 - installing a ground loop
There is an old proven method of grounding for a private home. Not far from the point where the power cable enters the house, a triangular hole 0.5 m deep is dug in the ground. Metal rods - pins, fittings - are driven into the corners of the resulting triangle, and they are connected with thick wire or a corner.

Then a metal conductor is drawn from the circuit to a pole or wall, the end of which is connected to the grounding bus in the electrical panel. The circuit also includes a lightning rod. The underground structure is covered with soil.
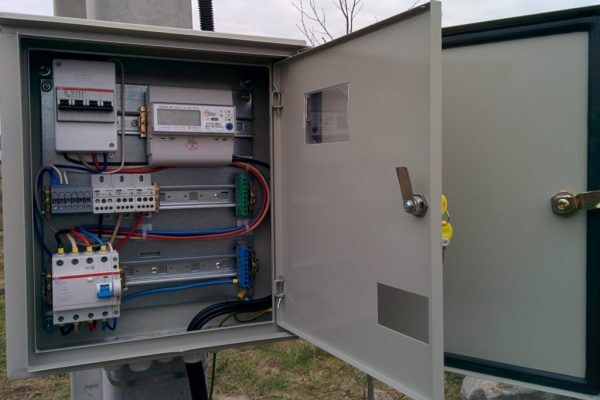
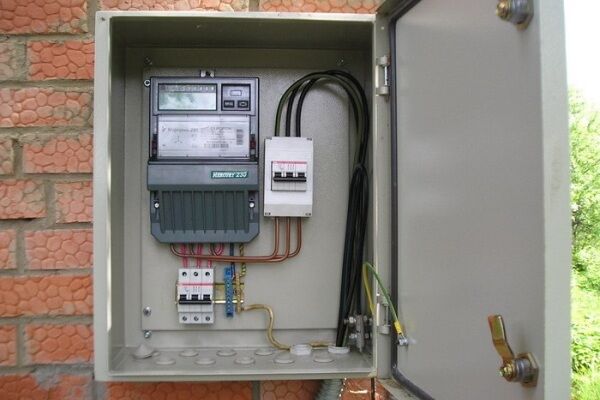
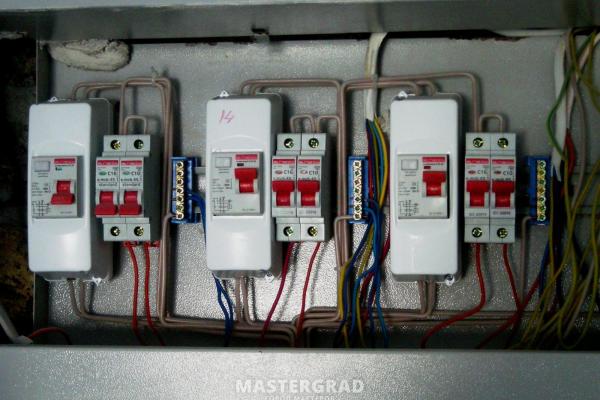
Stage #3 - setting up an electrical panel
The electrical panel of a wooden house is the “brain” of the electrical network, on which the operation of the system and the safety of residents depend.
In order for it to function correctly, a number of important rules must be followed:
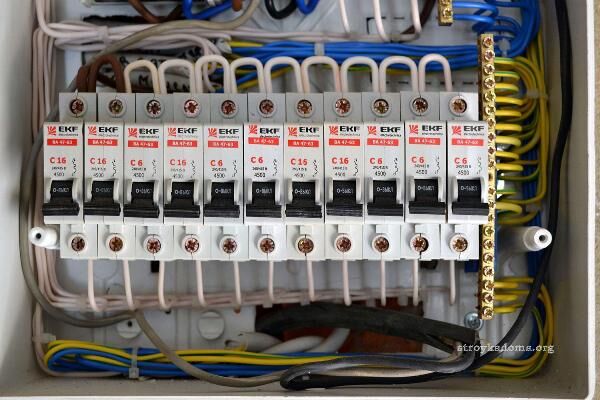
- shield sizes are selected according to quantity RCDs and automatic machines, but with a reserve - free spaces on DIN rails;
- in addition to automatic machines and RCDs, it is necessary to allocate places for the electric meter, grounding and neutral busbars, and connected wires;
- if the shield is placed outdoors, it must be protected from precipitation;
- installation height is at least 1.5 m so that children or animals do not have access.
The denomination of the machines, as well as wire cross section, depends on the current load. The input parameters of the machine are focused on the electricity limit from the supplier.

To connect or connect wires, it is recommended to use more efficient and replaceable terminals; twisting is not suitable, and soldering takes a long time and requires practiced skills.
Stage #4 - install the wiring correctly
Option 1. Installation of hidden wiring. Before starting installation work, you should decide on the type of electrical wiring.The fact is that without protection it is impossible to fix the cable inside wooden elements: beams, logs, etc.
According to PUE-6, it is possible to install hidden wiring, but using a metal pipe.

Hidden wiring is risky and difficult to do on your own: each wire will have to be placed inside a metal pipe, and the junctions of the two pipes will have to be hermetically sealed together.
Firefighters do not recommend using this method, but if it is still important for home owners to disguise the wires under the cladding, they should follow the following instructions:
- Prepare grooves in logs/beams.
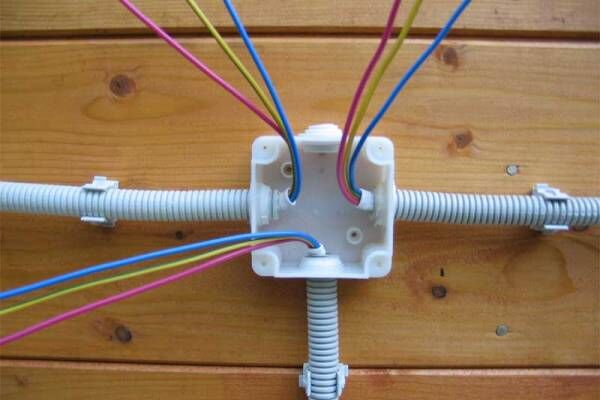
- Install distribution boxes so that they can be accessed even after finishing work.
- Drill holes in the walls and partitions and insert pass-through sleeves with machined edges into them.
- Also install metal mounting “glasses” in the places where switches and sockets are attached.
- Select the diameter of the pipes so that the wires occupy no more than 40-50% of the internal space.
- The ends of the pipes, as well as the sleeves, should be sanded or protected with plastic rims so that the wires do not bend or break.
- Secure the pipes to the ceiling or walls with clamps, to metal sleeves using the flaring method.
- Route the wires according to the diagram inside the pipes.
- Connect the wires in the junction boxes, connect them to electrical installations and the electrical panel.
After this, you can cover the wooden surfaces with clapboard, plasterboard or other material.
To protect the metal from corrosion, galvanized or stainless steel pipes are chosen. Plain steel is coated with anti-corrosion paint. If high humidity is noticed, the pipes are laid at an angle to drain condensate.
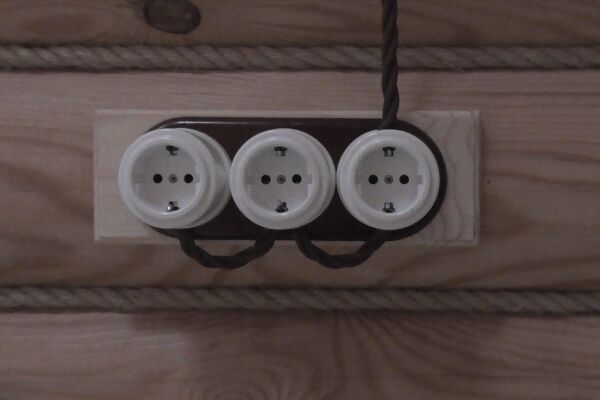
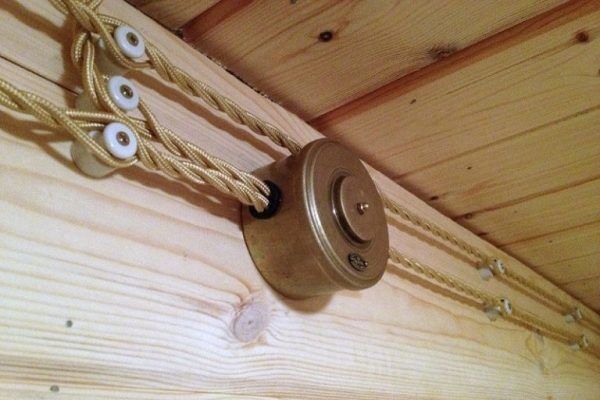
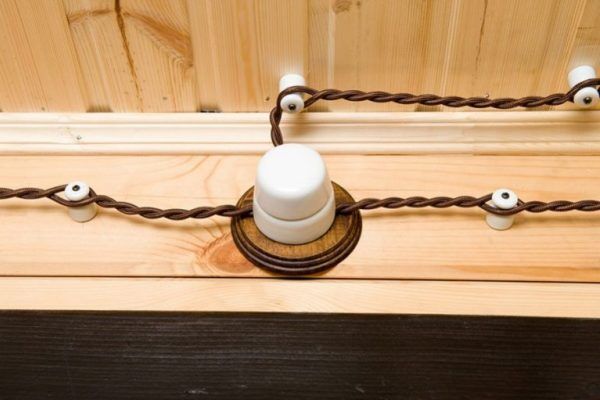
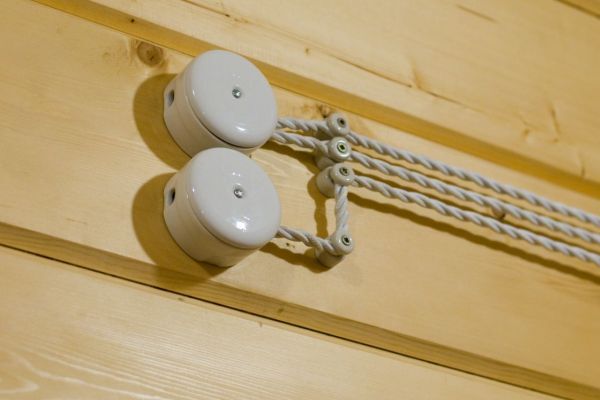
Option #2. Installation of open wiring. Exposed wiring is in plain sight, mounted on top of wooden surfaces, so it should look attractive.
Used for camouflage corrugated pipes, hard plastic boxes and baseboards made of non-flammable material. But many people don’t like the “office” design, and they use retro wiring specifically designed to create the internal electrical network of a wooden house.
If your budget is small and retro wiring is too expensive, boxes made of self-extinguishing plastic will do. You can choose the color that best suits the wall cladding: white, brown, beige, wood-look.
Electrical installation instructions:
- Select cable channels and baseboards that match the diameter of the wires.
- Remove the top part - the cover, and fix the base on a wooden surface with self-tapping screws.
- At joints and corners, install distribution boxes for connecting wires.
- Install sockets and switches in accordance with the rules for installing electrical installations in wooden houses.
- Place the wires in the cable channels.
- Connect all lines.
- Attach the upper parts - the lids, and snap them into place.
Protection is considered complete when the wires do not contact the wooden surface anywhere and do not protrude outward.
Stage #5 - install switches and sockets
Installation overhead electrical points is carried out according to general rules, with one exception - an additional insulating non-combustible material, for example, aluminum or asbestos, is placed under each device.
Switches are mounted on the same principle as sockets.

For accurate installation, wood overlays and inserts are often used. To reduce the risk, they must be treated with a fire retardant - additional protection will not hurt.
Conclusions and useful video on the topic
Video #1. Risks of incorrect installation and recommendations for correct installation:
Video #2. General rules for electrical wiring devices:
Video #3.Review of electrical installation results in a log house:
Even if you know the basics of electrical work, do not start installing wiring in a wooden house yourself without the appropriate education, skills and experience.. There are a number of nuances and rules known only to qualified installers.
Please write comments in the block below. Ask questions about unclear or interesting points, post photographs related to the topic of the article. Share useful information that may be useful to site visitors.


In a wooden house, the main attention should be paid to safety. It is necessary to correctly calculate all cable sections and correctly select protective equipment. Safe electrics are, first of all, a balanced system, where each element fits the other. The cross-section of the wires must correspond to the power consumption. You need to take good cables and circuit breakers from well-known manufacturers; you should not skimp on this. And of course you need to avoid various kinds of twists, wrapped in electrical tape and other unsafe connections.
I completely agree with Ivan’s opinion. The most important thing in a wooden house is fire safety. According to statistics, most fires in wooden buildings occur due to faulty electrical wiring. Experts categorically do not recommend laying wires in PVC pipes, as they are a flammable material.
PVC is neither flammable nor even FLAMMABLE - you are delusional, and at the same time illiterate... or vice versa.
You're the one delusional. PVC pipes are G2 at best. Mostly G3 or G4.And even G1 is not a non-flammable material.
For the delirious:
Flammability group G1 consists of low-flammable materials that do not burn in the absence of a fire source. Under combustion conditions, they can emit flue gases whose temperature reaches 135°C. In this case, damage along the length caused by fire does not exceed 65%, and complete destruction cannot reach more than 20%.
Flammability group G2 is a moderately flammable building material that, after extinguishing the fire, can continue to burn for no more than half a minute. The nominal temperature of the generated flue gases is 235°C. Materials with flammability group G2 can be damaged by a maximum of 85% along their length and up to 50% by weight.
Flammability group G3 - these are normally combustible materials that can burn for up to 5 minutes after the source of fire is eliminated. When they burn, flue gases are formed that have a temperature of no more than 450°C. Damage indicators for materials in terms of length and weight are the same as for materials in the previous group: 85% and 50%, respectively.
I'm going to install wiring in a new country house made of timber. Unfortunately, it is difficult to verify the proper qualifications of an electrician found in a specialized company via the Internet. What questions should you ask him to understand how competent he is? And I have no idea and can’t find anywhere what the place where the wiring enters the house from the outside should look like. The wire will be stretched from the pole to the house, and then? How should it be connected to the internal one? What is used for this and how to do it correctly? Since I have not found such information, I ask for your professional help. Thanks in advance for your answer
I found the information, I'm removing the question.
It's great that you found answers to your questions, but it would be nice to share such useful information with other readers. I think that this data will be useful to many, so I will write about the main points. Call an electrician from a trusted company that provides a guarantee for the work done and the relevant documents afterwards.
Further. At the moment, there are several ways to conduct electricity from a pole to a house:
— by air;
- underground.
Here the choice of method depends on the current supply and the electrical wiring project in the house as a whole. For clarity, I am attaching a general view of the connection and a real wiring project for a residential building.
Guys, aren't you tired of debating cable cross-sections? In reality, there are only two of them for a house and apartment, 1.5 for light, and 2.5 for power, a rare exception is a larger cross-section if there is an electric boiler, or in the workshop there are machines, and machines are now mostly up to two kW, about the same with automatic machines, 10 and 16, that’s all your calculations, only with ouzo can you pretend that you are calculating it..