How to make a cooler bag with your own hands: step-by-step instructions
A cooler bag is an amazing invention that allows you to keep food fresh and chilled during travel, picnics or walks.But many ready-made options are expensive or do not always meet individual needs. In this case, you can make a cooler bag with your own hands.
The content of the article:
What you need for a cooler bag
Making a cooler bag with your own hands is a fun project that will require some materials and tools. Below is a list of the main components that will be needed for work:
- Thermal insulation material. The choice of thermal insulation material depends on preferences and financial capabilities. Foil foam insulation or thermal packaging may be a good option.
- External material. Choose durable, waterproof fabric for the outer shell of your cooler bag. Polyester or nylon with a water-repellent coating are ideal.
- Plastic or metal cavities. To create compartments where the refrigeration element will be placed, cavities made of plastic or metal will be required. You can use containers or boxes with lids.
- Refrigerant. These can be refrigeration batteries, frozen gel packs or special refrigeration blocks.
- Carrying straps or handles. To make it easier to transport the cooler bag, it is recommended to provide straps or handles. You can choose the option with Velcro fasteners. Durable nylon or leather handles are also suitable.
- Scissors, thread, needles, glue, tape.To assemble and attach materials, get various tools and materials to sew a cooler bag.
Making such a product is a creative process; it is worth preparing for it mentally.
Do it yourself
It’s worth figuring out how to make a cooler bag at home for a car, carrying food and drinks manually.
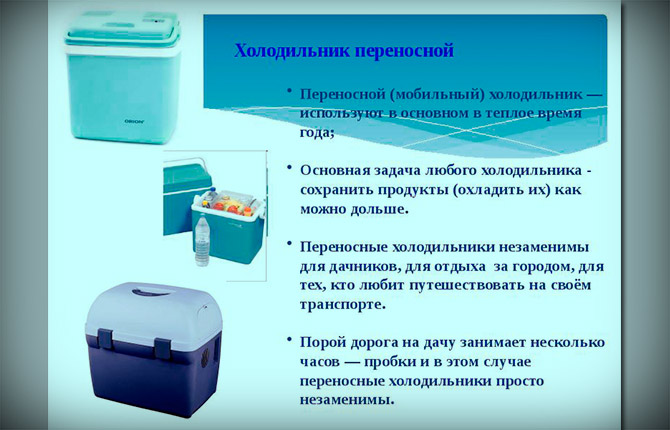
For auto
A cooler bag for a car is a convenient accessory for traveling, long trips, or simply for storing food while moving. The table describes step-by-step instructions for creating a refrigerator with your own hands.
| Stage | The essence |
| Choosing a bag or box | Choose a durable plastic box that is large enough to fit in the trunk of your car. The best option is a model with a tight-fitting lid. You can take a durable bag instead of a box. But it must be large in volume so that it can be filled with products. |
| Insulation | Cover the inside of the box with thermal insulation material. It is recommended to use foil foam insulation, which retains the cold well. |
| Refrigeration elements | Insert the cooling elements into the cooler bag. You can use commercial cold accumulators that are designed specifically for cooling in a car. Place them inside the product so that they distribute the cold evenly throughout the space. You can also choose frozen gel packs or special refrigeration blocks. |
| Straps or handles for securing | Provide straps or handles to secure the cooler bag in the trunk of your car. This will ensure a secure fit and prevent movement while moving. |
| Connection to car cigarette lighter | If you used cold storage batteries, then you need to connect the cooler bag to the cigarette lighter. This will help keep you cool. Make sure your car is equipped with a constant power cigarette lighter function so that the cooler bag can work even while driving. |
| Pre-cooling, installation | Before traveling or using the refrigerator in a car, pre-cool it by connecting the batteries to power. If using frozen gel packs or refrigeration blocks, place them in the sides of the product after refrigerating them. Then place the chilled food. Place the thermal carrier in a convenient place so that it does not get in the way while driving. |

It is recommended to place lighter, softer objects on top so that they do not put pressure on more fragile products or cold accumulators. You can use separate containers or bags to prevent smells from mixing.
To maximize the cooling time of foods, you can use ice packs or frozen water bottles. They will help maintain a low temperature even during long trips.
You need to make sure that the cooler bag is securely closed to minimize the penetration of warm air.
Option with foam
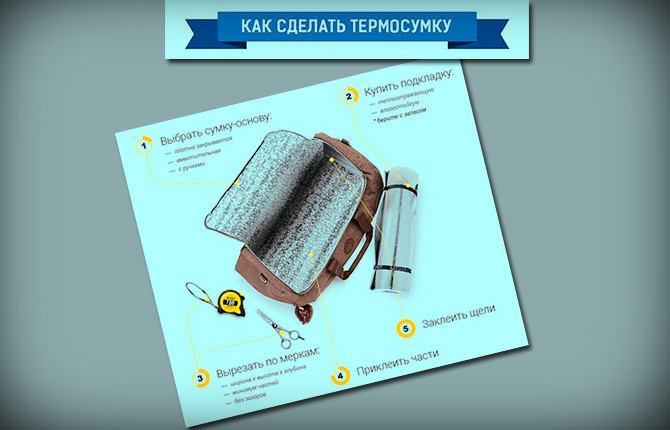
You can make your own cooler bag from polystyrene foam. The steps are described below step by step:
- Preparation of materials. You can purchase polystyrene foam from hardware stores or retailers that specialize in craft supplies. You will also need a thick material to cover the product (waterproof fabric or plastic shell), a zipper or Velcro to close the bag.
- Manufacturing of the body. On the foam board, mark and cut two identical flat pieces that will serve as the base for the top and bottom of the cooler bag. Also cut four strips of foam for the side walls.
- Assembly. Using glue or other suitable fastening materials, connect the side walls to the base of the structure to create a rectangular shape. Check that the connections are strong and reliable. Then attach the top, making sure it fits well against the sides. Give the adhesive or fastener time to dry or cure completely.
- Thermal insulation material. Wrap the foam box with layers of insulating material such as foil or insulation. To keep it in place, you can glue it with tape to the overall structure. Place the cooling element inside the cooler bag, ensuring even distribution.
- Upholstery. Choose a material that will resist moisture and provide additional insulation. Cut it according to the size of the product, secure it to the body of the bag using glue or sewing supplies. First you can create a pattern.
- Creating a cover. Cut another flat piece of foam that will serve as the lid of the cooler bag. It should be the same size as the upper body. Then wrap this flat part with upholstery material. Make sure the lid fits snugly on the top of the bag.
- Clasp. Choose a convenient fastening method for your cooler bag. This could be a zipper or Velcro. If possible, attach the clasp to the sides of the bag and the lid. This will allow you to easily open and close the bag while maintaining its internal temperature.
- Testing.Before using a cooler bag, it is recommended that you test it to ensure its effectiveness. Place a small amount of food in the bag and check how long it stays cool. If additional insulation is needed, you can add a layer of foam or other insulating materials.
The effectiveness of a cooler bag may depend on the thickness of the foam and the quality of the insulation materials. You can also use penoplex.
For carrying by hand
The carry cooler bag is handcrafted in the same way as the product for car use. The key is to choose durable and waterproof fabric for the outer shell. Polyester or nylon with a water-repellent coating have proven themselves well.
If a person plans to take the bag with him to carry it manually, then he should worry about the quality of the handles or straps. They should be comfortable.
Recommendations regarding sewing handles:
- determine the optimal location on the side walls of the bag, take into account your preferences;
- use strong thread;
- if you want to create adjustable straps, you can use buckles or other fasteners;
- Check how well the straps or handles are sewn onto the product, especially if it will be used to transport heavy items or large amounts of food.
If you have difficulties, you can watch the video with the master class.
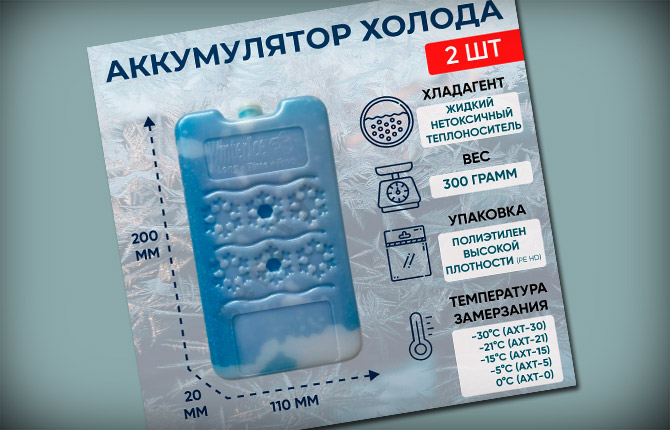
Cold storage batteries - which one to choose?
When choosing a cold accumulator for a cooler bag, there are several important factors to consider:
- Cooling time. Cold accumulators have different cooling durations.Some can maintain a low temperature for several hours, while others can maintain a low temperature for up to several days. Consider your needs and planned usage time to choose the right battery.
- Size, capacity. Cold generators are available in different sizes and volumes. Consider the dimensions and capacity of the cooler bag to choose a battery that will fit and provide sufficient cooling inside the bag.
- Battery type. There are several types of cold storage batteries. Some are gel-based, others contain liquid that is frozen. Consider the different types, study their characteristics.
- Durable, rechargeable. View information about battery life, rechargeability. Some models may be rechargeable, which may be more beneficial.
Do-it-yourself cold accumulators
If you want to save money or create a unique cold storage battery, you can try making it yourself. One popular method is to use frozen gel packs. In this case, you need to follow these steps:
- Place the gel packs in the freezer compartment of your refrigerator. Leave them there for a few hours until they are completely frozen.
- Once the gel packs are completely frozen, place them inside your cooler bag. Distribute them evenly over the entire area.
Ready-made frozen gel packs can be used as cold accumulators in a cooler bag. They will maintain a low temperature inside the bag and keep food fresh for a certain time.
Frozen gel packs gradually melt as they are used. This way, it will not be possible to keep the cold inside the cooler bag for a long time.
How to use it correctly
Simple rules for using thermal transfers made at home:
- Before placing food in the cooler bag, pre-cool it. Place the cold accumulators in the carrier and give them some time to cool.
- Place food in such a way as to ensure even distribution of cold. Avoid overcrowding to allow air to circulate freely inside the bag.
- Make sure the cooler bag is completely closed. This will help prevent warm air from entering and keep the cold inside.
- Try to avoid opening your cooler bag frequently. Every time you do this, warm air gets in, causing the temperature to rise, reducing cooling efficiency.
- If possible, additionally insulate your cooler bag, especially if you plan on long trips. Use thermal covers or blankets to keep the cold inside.
- Regularly check the cold accumulators for damage and follow the instructions for their use. Proper handling of them will help extend their life.
- If you use a refrigerator in your car, make sure the cigarette lighter provides constant power. Turn on energy saving modes to optimize the performance of the thermal transfer.
- If you can, pre-chill the food you plan to put in your cooler bag. Placing already chilled food inside will help lower the temperature and keep it cold for a longer time.
- Try to avoid direct exposure of the cooler bag to sunlight. High temperatures from the sun can negatively affect cooling efficiency. Place the bag in the shade or use a heat-protective cover to prevent heat build-up.
- Remember to follow food storage rules.
Regardless of whether you choose the foam option, create a bag for the car or for carrying by hand, it is important to pay attention to the quality of materials, insulation, and strength of connections. Thanks to your own thermal carrier, you can enjoy fresh food and drinks even on the road, on a picnic or during outdoor activities.
Interesting: How to make the right birdhouse with your own hands
Have you already tried to make a cooler bag with your own hands? What difficulties did you encounter? Tell us about your experience or share your ideas, tips in the comments below. Add this useful article to your bookmarks and share with your friends on social networks.


I decided to somehow make a cooler bag with my own hands so that I could always have cool drinks on hand.I looked for master classes on the Internet, collected all the necessary materials and got to work. It was fun and exciting! The result exceeded all my expectations: the bag turned out to be stylish and functional. Now I can enjoy fresh drinks anytime, anywhere!
I decided to save money and make my own cooler bag. Unfortunately, everything did not go as I had planned. The materials turned out to be not cheap, and during the manufacturing process we had to cope with some difficulties. The final cost turned out to be higher than just buying a ready-made cooler bag. So, friends, if you are not very experienced handicraftsmen and money is not the main thing, then I would recommend that you take a closer look at the ready-made options on the market.
In our small town, such bags are not sold anywhere, so I decided to take the initiative into my own hands. I'm very glad I did it! The bag turned out great: spacious, beautiful and very easy to use. On my last beach vacation, she simply saved me - I enjoyed cool drinks all day. I recommend it to anyone who loves creativity and functional solutions!