Why does condensation appear on the toilet tank and how to get rid of it
One of the annoying surprises in the toilet and in the combined bathroom can be the appearance of condensation on the toilet cistern.Agree, this is not just a minor nuisance - this is a real problem that not only reduces the level of comfort, but can also negatively affect the health of all family members.
And any repair made with the highest quality materials will fail in the fight against the consequences that arise after prolonged exposure to condensation.
Everyone knows that preventing a problem is much easier than dealing with it later. And you can do this on your own, without resorting to the services of specialists. To do this, you need to understand why condensation appears on the toilet tank and how to eliminate the root cause of its formation.
We will help you determine the reasons for “precipitation” on your plumbing, and also describe possible ways to solve the problem. We have supplemented the material with videos and photo instructions that clearly demonstrate how you can get rid of this unpleasant phenomenon yourself.
The content of the article:
Why does condensation appear on the tank?
Condensation that appears on the tank is classified as a household problem. To learn how to deal with it effectively, you have to understand the reasons for its appearance in a particular room.
Only after this will it be possible to choose the most optimal option to combat it.
Nature of condensation formation
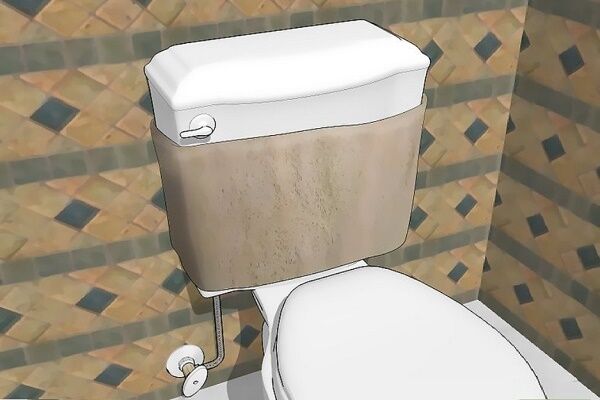
First of all, you need to understand the nature of the occurrence of “precipitation” on the drain tank.Condensation is drops of water falling from the air. They are formed from a sharp temperature change and appear on the surface of objects.

Condensation on the drain tank is water formed from the influence of cold water at a temperature of 7-15 ° C on the inner walls of the earthenware container and warm air at a temperature of 25-32 ° C acting on the outside.

Reasons for the appearance of condensation on the tank
The appearance of condensation on the drain tank indicates the presence of a problem that needs to be identified and measures taken to eliminate it.
To understand who is to blame for this, you need to pay attention to the following factors:
- cold water consumption;
- ventilation in the bathroom;
- condition of the tank fittings;
- humidity level.
When the drain tank is frequently filled, a large amount of condensation forms - cold water does not have time to warm up to room temperature.
Condensation can also be a symptom of a second problem - a broken ventilation system. Especially if the room with the toilet has a ventilation hole removed, there is a threshold at the entrance, and the doors fit tightly.
This is quite dangerous for users of combined bathrooms - without proper ventilation, you can simply suffocate.

Another reason for a wet cistern is a broken shut-off valve. When gaskets leak or the float is out of order, then increased water consumption and, as a result, excessive condensation on the outer wall of the earthenware container cannot be avoided.

An increased level of humidity in the bathroom may be a consequence of the circulation of excessively humid air entering this room from other rooms of the house/apartment.
Or because the owner of a small apartment constantly dries clothes in the bathroom combined with a toilet. The same problem occurs if wet laundry hangs in the kitchen adjacent to the bathroom.
Whatever the reason that causes the formation of condensation on the drain tank, it must be clearly identified and only then can it be eliminated. After successfully solving the identified problem, the condensation will also disappear.
Condensation cannot be removed
It is up to the owner of the bathroom to decide where exactly to place the comma in this sentence. It all depends on the specific situation and the attitude of all household members towards it.
First option. The toilet tank fogs up a little, but in the intervals between visits to the bathroom/toilet, everything has time to dry. Here you can do without radical methods to solve the issue of condensate removal.

Second option. If the drain tank is constantly wet, streams of condensation continually flow onto the floor and nothing has time to dry. The solution here is clear - we need to fix the problem.
Drops flowing down the outer surface of the earthenware container form puddles that need to be wiped off every now and then. Sometimes the situation is completely deplorable - within a day a whole lake forms in the bathroom. This not only causes inconvenience when visiting the premises, but also makes you very nervous.

Constant condensation deposits on the drain tank not only cause trouble at the current time, but also threaten even greater problems in the coming years.
Firstly, drops of condensation may remain in small crevices and in areas that are difficult to reach. Over time, the water will stagnate and begin to smell unpleasant.
Secondly, constant condensation increases the level of humidity in the bathroom. Especially if it is combined. This situation will certainly provoke the growth and active reproduction of mold and mildew.

Third, the outer surface of the cistern, being under the constant influence of water drops, will not last long - in the next 2-3 years a network of small cracks will appear, in which mold and mildew will also begin to form.
Fourth, due to high humidity, all wooden interior items in the toilet or combined bathroom will begin to rot. Especially if it is a wooden floor, parquet board made of solid oak/beech or other wood species.
Fifthly, metal parts of furniture, water supply pipes and other items will begin to suffer from corrosion. Even a mirror can be damaged - a whole colony of black mold will grow on its inside.

As a result, the constant appearance of condensation will result not only in a deterioration of the microclimate in the bathroom, but also in the loss of working condition and loss of appearance of many interior items. After 5-6 years, a major overhaul of the combined bathroom or toilet may be required.
Methods for getting rid of condensation
Condensation found on the toilet cistern is not encouraging at all - the owners of the apartment/house immediately try to get rid of it by all possible methods. Towels, jars, saucers and other items that do not belong next to the toilet are used. However, the formation of “dew” on the tank is much easier to prevent than to constantly collect and clean.
In the fight against drops settling on the tank, the following methods are used:
Method #1. Tank modernization
After removing the puddles under the cistern and identifying the cause of condensation, you can begin to eliminate it, choosing the appropriate option depending on the type of problem.

Most often, the problem of condensation is solved by carrying out various manipulations with the toilet cistern:
- Repair of shut-off valves located inside the drain tank.
- Insulation of the internal walls of earthenware containers.
- Installation inside a plastic liner.
- Replacing the toilet tank a new, more expensive option with a condensation protection function.
Failure of the fittings can lead to an endless flow of cold water into the tank and its random leakage. As a result, the water in the container does not have time to warm up and the sharp contrast with the air temperature causes endless condensation.
If a breakdown occurs, you should turn off the water supply, disassemble the cistern and remove the fittings, replace the broken part, or buy a new mechanism and carefully install it in place, not forgetting to put all the gaskets.
During installation, you should follow the recommendations specified by the manufacturer in the instructions in the section on equipment installation.
Additional information on eliminating water leaks in the toilet and repairing fittings is presented in this article.
The second option is to insulate the walls of the tank from the inside. For these purposes, tepofol, foamed polyethylene, polystyrene foam and other types of insulation are used. Depending on the type of material chosen, you may also need glue and sealant.

Using a heat insulator is a very effective option for eliminating condensation on the tank. The main thing is to take material up to 1 cm thick, otherwise the internal volume of the container will be significantly reduced.
Having carefully glued the insulation to the entire inside of the container according to pre-made blanks, you need to treat the joints with sealant. Then wait until the applied composition hardens and cut holes for installing fittings and attaching the tank to the toilet shelf.

Also, some home craftsmen use polyurethane foam as an insulator. Moreover, it is recommended to apply it in 3-4 stages to ensure an even layer.After application, you will have to wait until the mounting compound has completely hardened and only then carefully cut off the excess outside and inside using a knife.
It is important to leave a layer inside, the thickness of which is no more than 1 cm. After this, install it back and adjust the fittings cistern. Once the work is completed, the water supply can be resumed.

Another option for treating the inside of the reservoir is a mixture of sealant and glass microspheres, sold in car tuning departments.
This mixture should be applied in a layer of 0.3 cm and left until completely dry, the time of which depends on the brand of sealant and is indicated on its packaging.
A simpler option for manipulating the tank is to buy a plastic container suitable for placement inside a earthenware one. Moreover, between these two tanks inserted into each other, there should be a gap of a couple of mm. You must remember to use rubber or silicone gaskets as a seal.
The most expensive option is to purchase a new tank with a condensation protection function. Moreover, it is not sold separately, only together with the toilet. These are monolithic compact models with a double monolithic tank.

A double tank is good for everyone - installation is simple, does not require maintenance, and replacement of fittings, if necessary, can be easily done on your own. One significant drawback is the high cost.

Method #2. Changing the microclimate of the room
Among the measures aimed at eliminating condensation in the toilet room or combined bathroom, the option of changing the microclimate is used. This includes getting your ventilation system working again and using a dehumidifier.

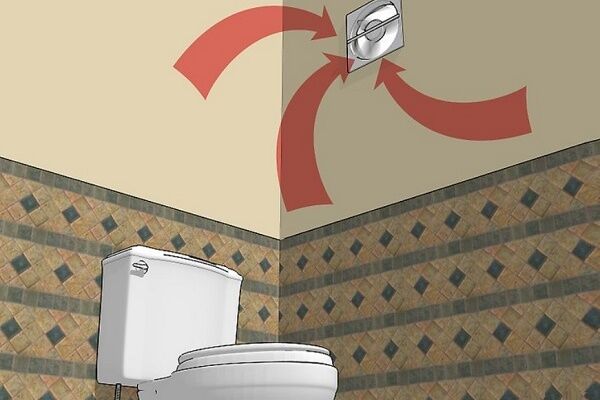
If there is a gap between the floor and the door to the combined bathroom or toilet, then you don’t have to worry about the influx. Need to check the functionality of the ventilation duct, designed to remove waste air masses. To test traction, you can use a lighter, a lit candle, or a small piece of paper.
If there is no traction or it is very weak, you need clean the ventilation shaft. When this is not enough, the best solution is to install an exhaust fan.

Owners of private houses, even at the design stage of the premises, need to take care of effective bathroom exhaust ventilation. The main focus is on the calculation of air ducts, their location and fan power.
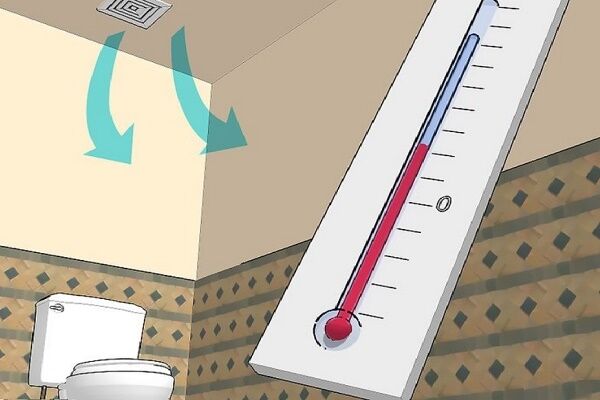
Another measure to reduce indoor humidity levels is to install a special device called a dehumidifier.It is able to remove excess moisture by collecting it in a container designed for this purpose.
A dehumidifier removes water from the air in a room until the desired humidity level is reached. The device is guided by the readings of a hygrometer installed inside.

Method #3. Heating the working fluid of the tank
To get rid of condensation on the drain tank, the idea of heating the water entering the tank is often used. In general, everything is simple - if there is no sharp difference between the supplied water and the air temperature in the bathroom/toilet room, then there is no condensation.
In practice, the following options can be used to implement this technique:
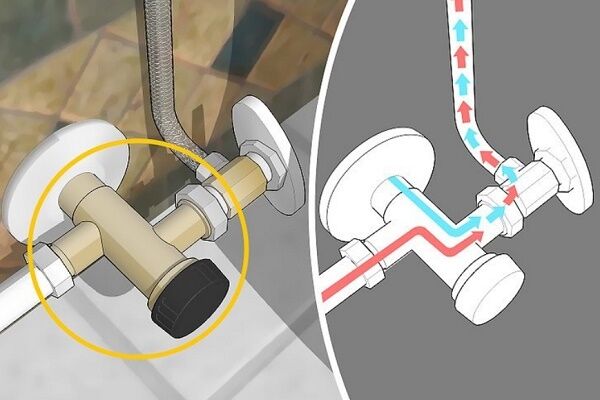
- connect warm water to the drain tank instead of cold;
- insulate pipes;
- build a heat exchanger using a riser to supply heat to the apartment;
- install a boiler;
- set up a half flush so that part of the heated water from the container is diluted with cold water.
The first option is suitable only for consumers who do not have a hot water meter installed.

Insulation of pipes allows you to heat the water by 2-3°C. Sometimes this is enough to get rid of condensation.

The option of constructing a heat exchanger is suitable only if the heating riser passes next to the pipe supplying water to the toilet flush tank. For these purposes, a copper tube is used, which is wrapped around a hot riser 5-6 times and cut into a flexible water supply pipe into the tank.
The copper coil is insulated on top with a layer of mineral wool or other insulation.
Setting up a half flush is not difficult; to do this, you just need to adjust the shut-off valves accordingly.

Conclusions and useful video on the topic
The toilet tank can be insulated from the inside using heat-insulating material. This option can be seen in action in the video:
The video clip demonstrates how the simplest 10 mm insulation inside a toilet cistern will behave after a year:
How to effectively get rid of condensation by supplying heated water to the toilet cistern in the video:
In addition to insulating the cistern, it would not be superfluous to take care of the pipes supplying cold water to the apartment/house. About this in the video clip:
Having figured out the reason for the appearance of condensation on the drain tank, you can choose the most appropriate option for getting rid of it, based on specific conditions.
This could be a budget solution, which is easy to implement with your own hands, or the purchase of a modern model of a plumbing product with a tank that has a condensation protection function.
Share with readers your experience in eliminating condensation from a toilet tank. Please leave comments on the article and ask questions that interest you.The feedback form is located below.


We had such a problem, and after calling a plumber, we could not solve it with “improvised” means. The fact is that the ventilation on the technical floor was practically “clogged” with dirt and debris. After everything was cleaned and the outlet pipe was extended, the condensation disappeared, it became easier to breathe, and the unpleasant odors from the sanitary unit disappeared in a few minutes.
Yes, sometimes condensation is a real problem. It would seem that small droplets from the temperature difference between the outside and inside of the tank can cause so much trouble. It is necessary to check the ventilation system in the bathroom and toilet, and if possible repair it if this is the reason. And remember, the more often we flush the water from the drain barrel, the more condensation there is. Craftsmen also insulate the toilet cistern from the inside. Well, those richer people buy modern equipment with condensation protection.
We had such a problem in our new apartment, and at first it was almost imperceptible, but over time more and more condensation began to accumulate, the tank was constantly wet. At the same time, mold began to appear on the ceiling, so suspicions about the ventilation immediately arose. And indeed the problem turned out to be her. There was some construction debris in the canal. After cleaning the problem resolved itself.
If you live in your house with a crawl space, place a closed container or receiver there. Pass the water to the toilet through it. And you will be happy, verified.
A lot of useful advice is a plus.But there is (admittedly, a little) bad advice, and the fly in the ointment... then you yourself know :) For example, insulate the inner surface of the tank with polystyrene foam, foam rubber, polyurethane foam, etc. - not a very good idea, because... a heat insulator that absorbs water loses its thermal insulation properties.
Hello. Nobody removed waterproof polyurethane foam from production :)
“Mounting foam as insulation provides good protection against condensation, but does not look very presentable!” How, in fact, will the reinforcement react to this foam? How long will it take for the foam to begin to fall apart and clog the technical holes and interfere with the normal operation of the drain?
The option with polyurethane foam has only one advantage - blow it out and it’s ready, it’s a matter of a couple of minutes. But you are right to worry about the consequences, and they will happen. Polyurethane foam in water is microorganisms. The foam will not dry out and there will be mucus and maybe algae. If you do not blow it out with foam carefully, you can create obstacles to the normal operation of the fittings. To replace any parts in the future, you will need to completely clean the tank of foam. For one plus there are a lot of disadvantages.
It is better to use penofol for insulation; a double tank is also an excellent solution. As for penofol and other insulation materials, here on the website and on YouTube many people only wrap the walls, but do not put the insulation on the bottom of the tank. I consider this a mistake, since in this case condensation will form on the bottom. You'll have to tinker with the cutouts for the reinforcement, but it needs to be done.
The Polish toilet is 19 years old with original fittings. There was never any condensation.I installed Czech Alkaplast fittings with one button with two modes. Condensation flows like a stream. What to do? The reason is definitely in the fittings.