Water-heated floors under tiles: step-by-step installation instructions
These heating systems do not have the easiest installation method, and they are not acceptable everywhere.Water-heated floors under tiles are most often installed by the owners of private houses and cottages. This is a convenient and aesthetic option for heating a home, which can be used as a main or additional heating method.
The article we have proposed describes in detail the rules for the design and construction of floor heating systems with water coolant. We will tell you how to install the heating system itself, and then lay floor tiles on top of it. Taking into account our advice, the result will be perfect.
The content of the article:
Specifics and principle of operation
A water heated floor consists of narrow pipes laid in a screed according to a certain pattern. The pipes are connected to a manifold, and the manifold is connected to a heating device, usually a boiler. Hot water flows through the circuit, which heats the floor covering, and then the air in the room.
The peculiarity of a water heated floor is that its installation usually requires “wet” construction work, i.e. filling the screed. In addition, technical standards categorically do not recommend installing such systems in multi-story buildings. But for owners of private housing construction, this option may be very attractive.
Despite the difficulties with installation, the cost of operating a water floor, if properly calculated and implemented, will be noticeably lower than for electric analogues. The water in such a system should not be heated too much, to about 30-40 degrees.At the same time, the room warms up evenly, and heat loss is minimal.
Design and calculation rules
Like any construction work, installation of a water heated floor should begin with a project. A regular notebook sheet with a checkered pattern is suitable for this. It is recommended to maintain as accurately as possible the scale of each room in which such a system will be installed.
First, you should draw the outline of the room, marking the doorway, windows, external wall and other similar elements. If the room is large and decompression joints are planned, they should also be reflected on the plan.
The underfloor heating pipe should not coincide with such a line. If there is an intersection, the section of pipe on this section should be hidden under a piece of protective corrugated pipe. It is placed on top of the heated floor pipe.

After this, the plan indicates the installation location of stationary pieces of furniture that fit tightly to the floor. It makes no sense to install a heating circuit in these places. This may even create unnecessary stress on the heating circuit.
The plan should be saved and used every time the room is renovated or furniture is rearranged. Now you should choose a convenient place to place the manifold cabinet.
After this, you need to decide on the pipe layout and draw it on the plan, taking into account some requirements:
- The length of one circuit, i.e. the pipe connected to the collector should not be more than 100-120 linear meters.
- The length of individual circuits connected to a common collector should be approximately the same, the difference should not exceed 15 m.
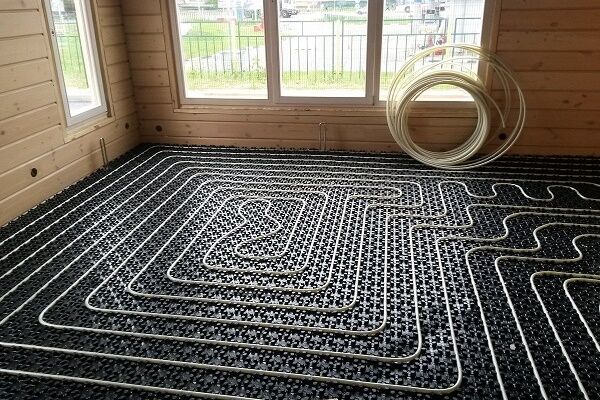
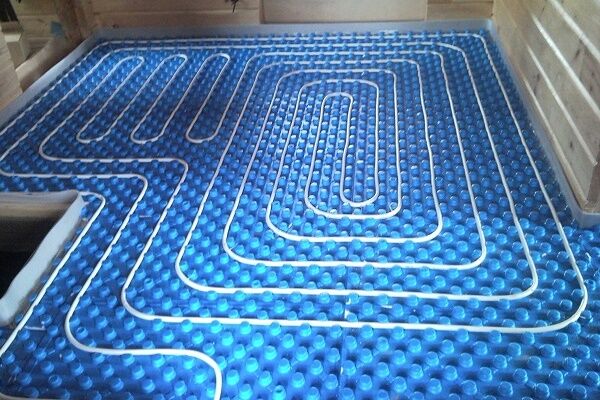
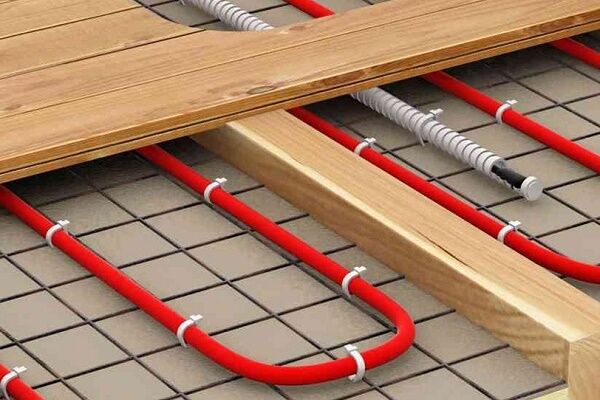
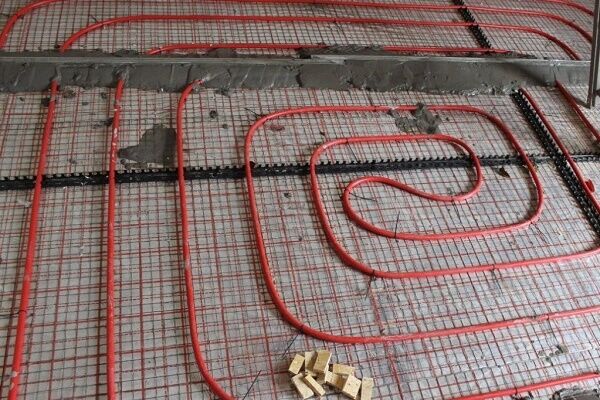
- The distance between the circuit pipes should be 150 mm, but for areas with harsh winter climates, the pitch can be slightly reduced to increase the heating intensity.
- You should not lay the pipe directly along the wall; you need to make an indent of approximately 150-300 mm.
- The circuit must consist of a solid pipe; ties, twisting, soldering and any other connections are unacceptable.
Calculation of the number of pipes and drafting can be entrusted to a professional engineer who will take into account not only the features of the system, but also the characteristics of the heating equipment. An easier way is to use a special program or online calculator designed specifically for such purposes.
These programs use a certain reference version of a water-heated floor as a sample, and correct it using correction factors depending on specific parameters. You will need to enter information about the diameter and material of the pipes, the pitch of their installation, features of the floor covering, screed, etc.

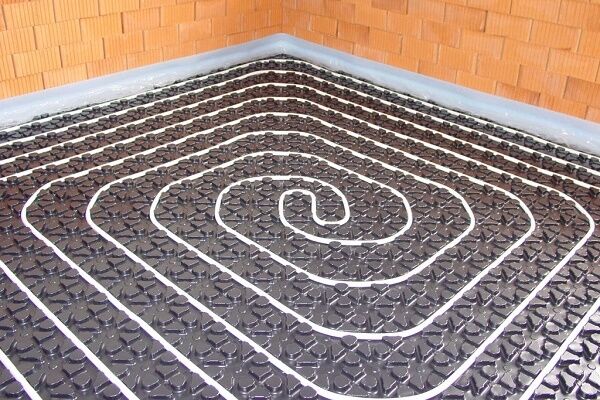
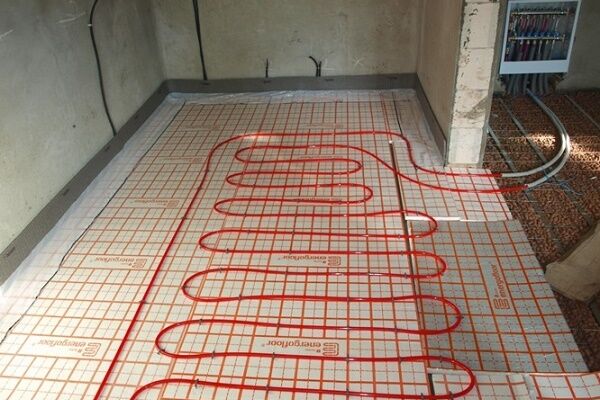
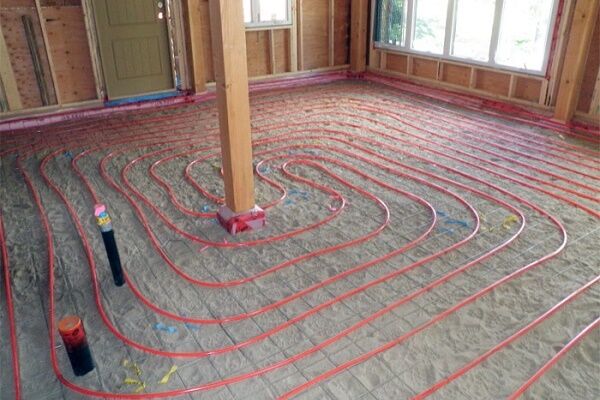
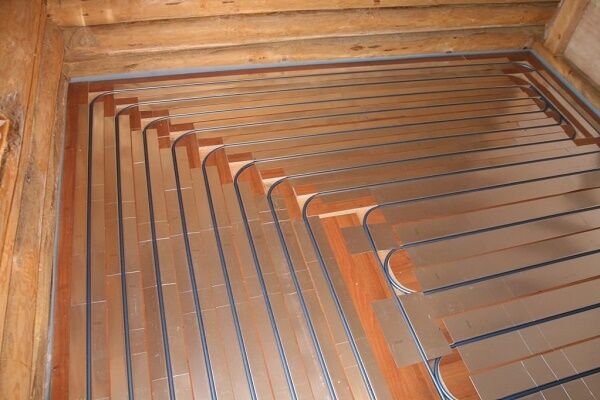
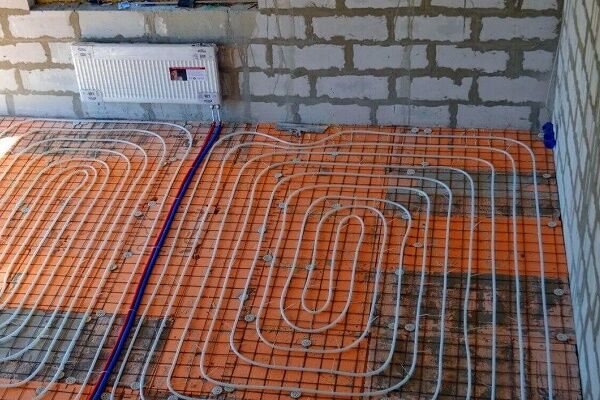
The layout of underfloor heating pipes is carried out according to two main schemes: “snake” or “snail”. “Snail” is preferred. In this case, the pipes through which hot water enters the system are laid parallel to the pipes through which the cooled coolant moves. As a result, part of the heat from hot areas is transferred to the cooled part of the circuit, which ensures more uniform heating of the room.
“Snake” is a sequential pipe laying scheme; it is more suitable for rooms with a small area. Sometimes both layout schemes are used: in large areas - a “snail”, and in small areas, for example, in a short corridor, in a bathroom, a “snake” is used. It also makes sense to clarify the characteristics of the boiler from which the coolant will be supplied.
The heated floor should not be heated more than 30-40 degrees; this is approximately what the temperature of the heating medium should be. Some boiler models are designed for higher temperatures. The equipment may need to be adjusted or completely replaced.
With rules for calculating pipes, choosing material and determining the laying step read the article, entirely devoted to the design of water underfloor heating systems.
System installation steps
Typically, work on laying water heated floors is carried out in the following order:
- Removing old flooring.
- Cleaning and leveling the base.
- Installation of damper tape.
- Laying thermal insulation.
- Installation of reflective film.
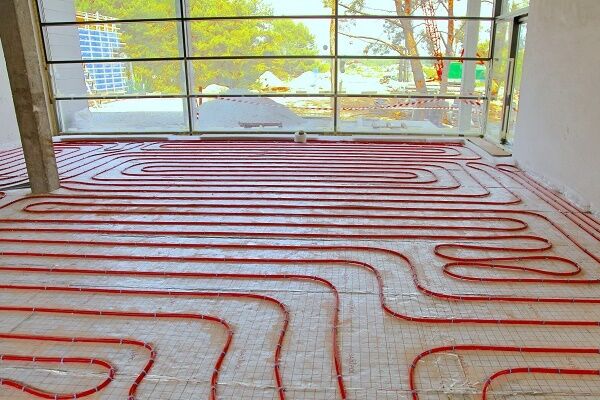
- Laying pipes in accordance with the previously drawn up diagram.
- Pouring concrete screed.
- Laying flooring.
Reason for installation of water floors It’s not difficult to prepare for tiles. It is necessary to remove all unnecessary layers if we are talking about dismantling the old floor. After this, the surface must be leveled, for example, the depressions and cracks must be sealed with repair mortar. After this, dust and other contaminants are removed: stains of grease, paint, etc.
Of course, the results of the work will not be visible after installing the heated floor system, but still the preparation of the base should be leveled as best as possible. Unevenness and dirt can impair the quality of subsequent installation.
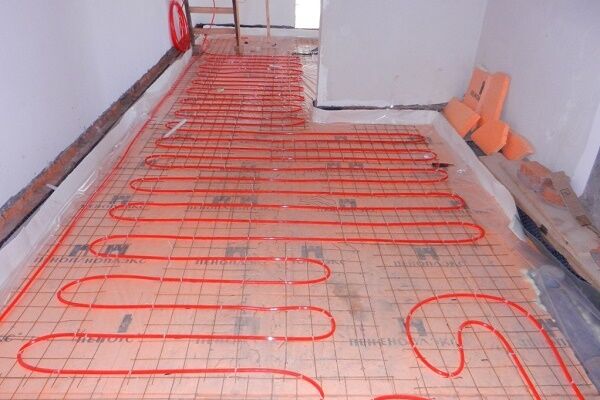
A special damper tape is laid along the walls.Some inexperienced craftsmen simply lean the material against the wall, hoping that subsequent pouring will firmly press it to the surface.

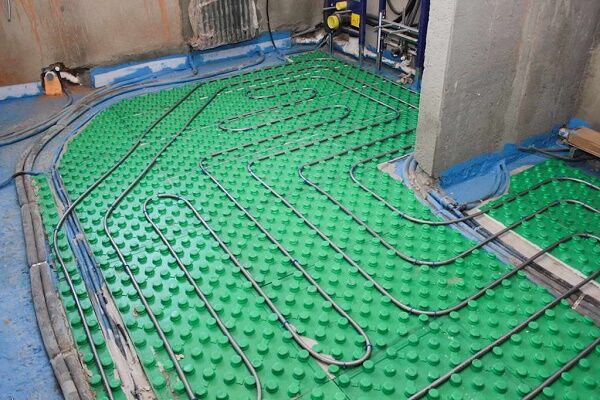
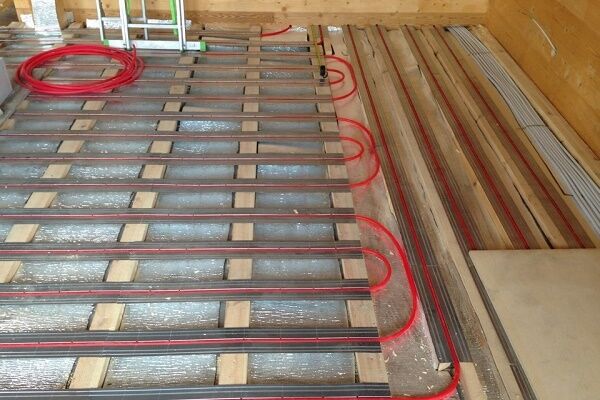
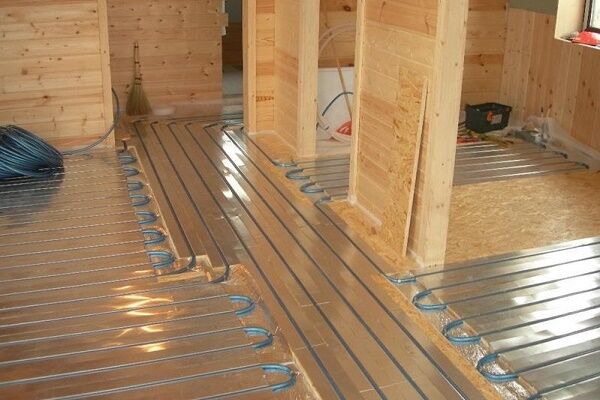
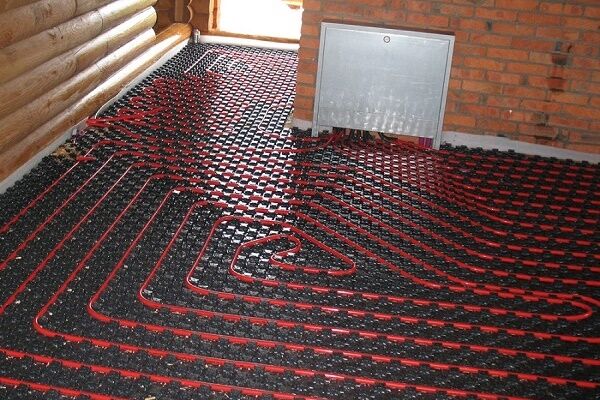
This tactic does not justify itself; voids form between the tape and the wall and the material becomes deformed. The tape should be attached to the wall with self-tapping screws so that it fits tightly and maintains the correct position. Extruded polystyrene foam is often used as a thermal insulation material.
This is a reliable material that comes in the form of slabs with convenient joints. If the base on which the slabs are laid is level, they will not wobble after laying. A reflective film is placed on top. It is very convenient if it is equipped with markings that will make laying out the pipes easier.
Can be used more modern insulation options, designed specifically for laying heated floors. On the surface of such materials there are special recesses that significantly facilitate the laying of pipes. No film is required for such insulation.

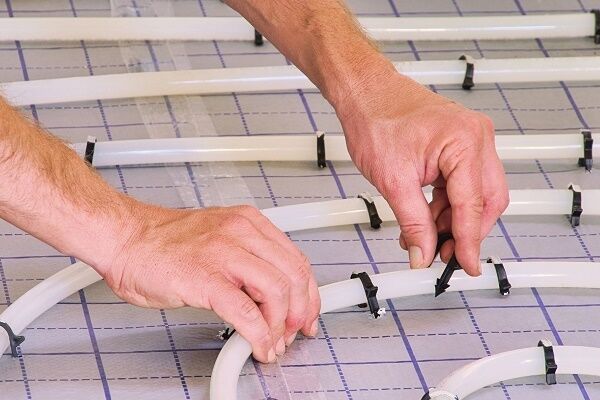
Do not cut the film flush with the wall. The material is tucked under a layer of thermal insulation material so that it is slightly stretched and does not move. You need to lay a mounting grid on the film, after which you can begin laying the pipes.
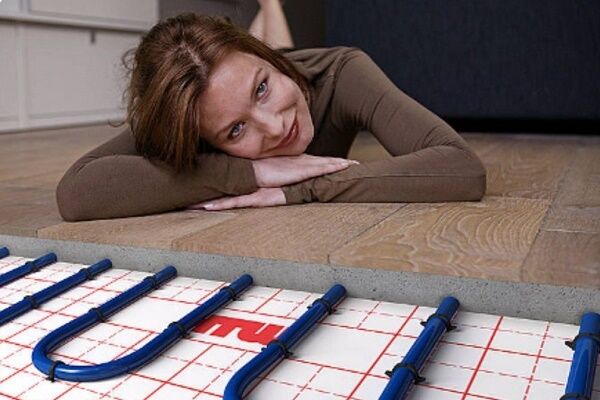
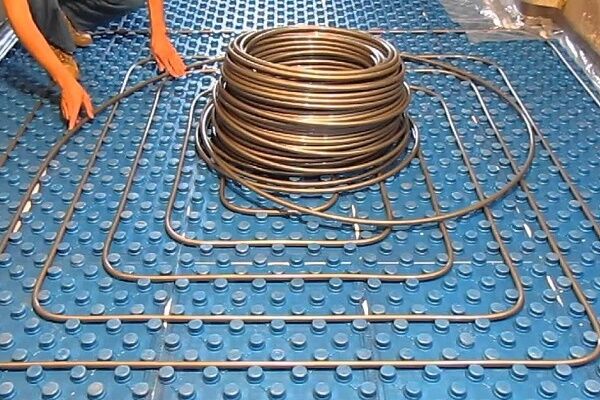
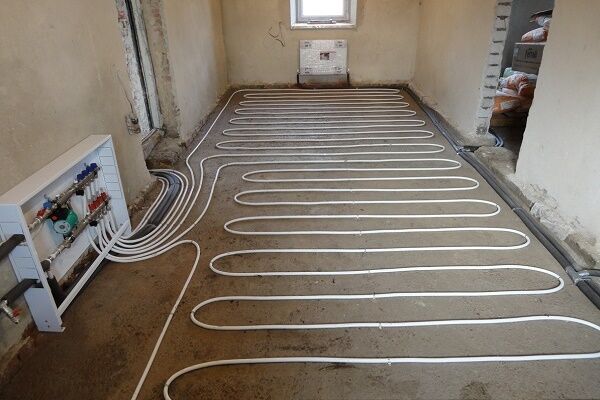
Most often used for heated floors metal-plastic pipes, as the most reliable and relatively inexpensive. They are also actively used in the construction of floor heating systems. cross-linked polyethylene pipes and copper soft tubes.
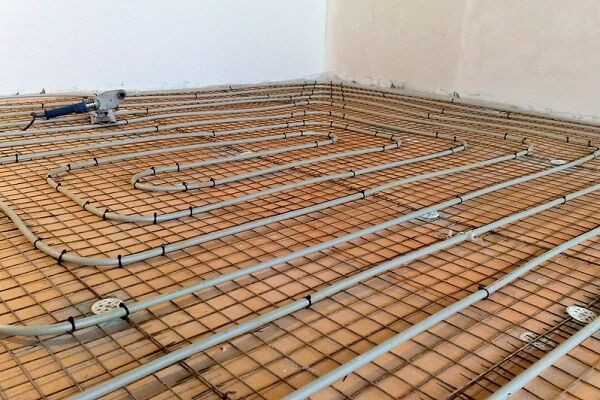
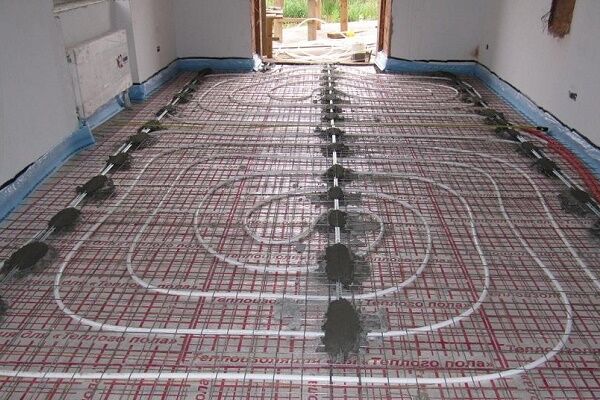
The pipes are laid on the grid in accordance with the previously drawn up project and fixed with ordinary plastic clamps in increments of about one meter. Do not secure the pipes to the mesh too tightly. When exposed to heat, they can expand slightly, and when cooled, they can contract. You need to leave a little space for this process.

When laying coils, you must carefully observe distance between pipes and distance from the wall. If these distances “walk”, then in the future the floor will be heated unevenly.Overloads will soon lead to system breakdowns, and repairs will be quite expensive.

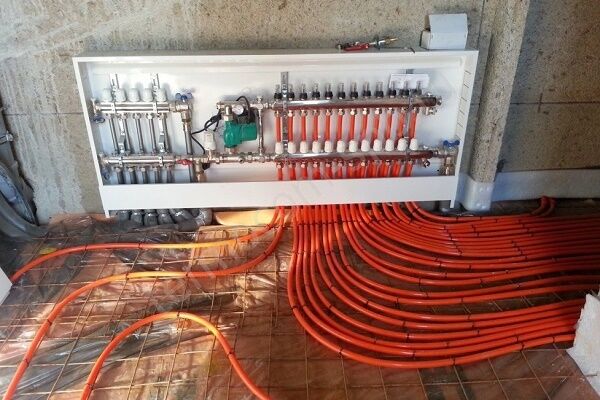
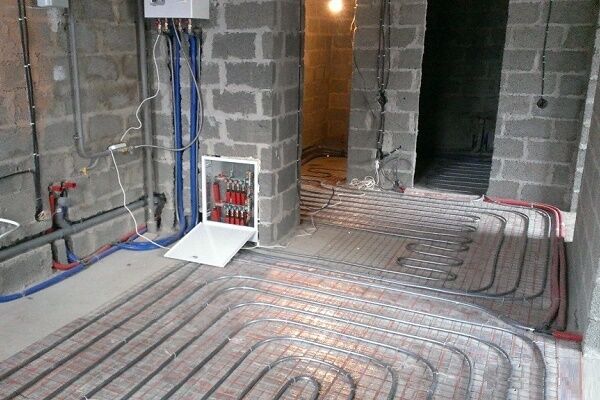
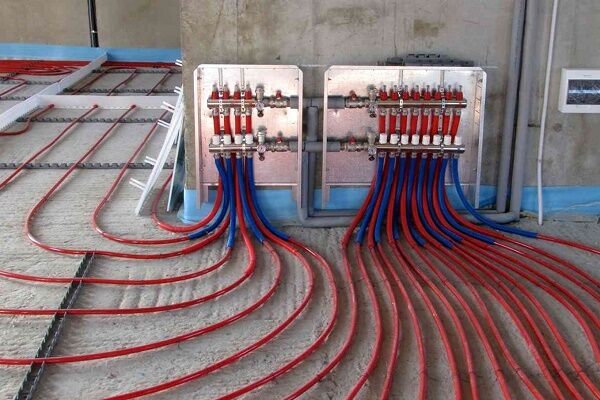
Now you need to install the collector and connect the heated floor circuit to it. You can assemble this device yourself, but it will be easier and cheaper to buy a ready-made model. Looks like manifold mixing unit like a neat cabinet, inside there are controls for the underfloor heating system and connectors for connecting pipes.

Each circuit is connected to the manifold twice: to the hole through which hot water will flow, and to the output connector designed to return the cooled coolant to the boiler heat exchanger. The pipes are secured with special clamping nuts, which are supplied with the manifold.
Of course, the collector should be connected to the heating boiler in accordance with the manufacturer's instructions. Before pouring, you should check the operation of the new heated floor system, i.e. perform pressure testing.
To do this, turn on the boiler and supply hot water to the system under pressure, which is 50% higher than the working norm. The system should be left in this state for approximately two hours.
At this time, it is necessary to inspect the pipes and identify shortcomings, for example:
- places where the pipe is clamped with a fixing clamp;
- the presence of leaks at the junction of the pipe with other elements of the system;
- violation of the integrity of the heating circuit.
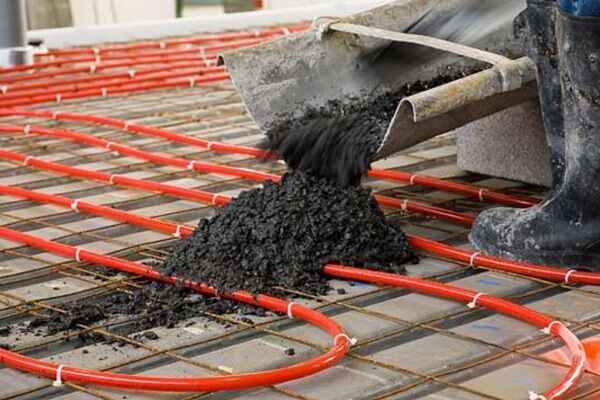
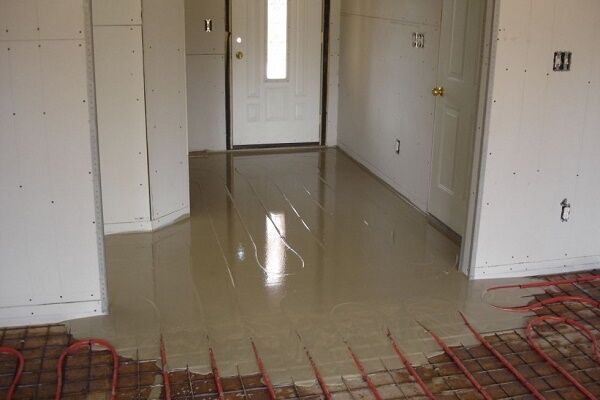
If deficiencies are found, they must be eliminated and then the system must be pressure tested again.After this, you can start pouring the screed. During the process, the laid pipes should be handled very carefully so as not to accidentally move or damage them.

To prepare the solution, you should use special dry construction mixtures that are intended for installing heated floors. Such compositions are designed for a constant heating process of structures laid in the thickness of the screed. The packaging of the CCC usually indicates the method of its preparation, which should be followed.
An important point is the shelf life of the finished composition. This time period should be taken into account when performing work. Before pouring, the pipes are filled with cold water to compensate for the pressure of the composition and prevent deformation.
Thickness ties over pipes should be about three centimeters. Now you need to wait until the screed has completely dried, and only then begin laying the flooring.

The nuances of laying floor tiles
The process of installing this flooring is not that complicated, but it requires attention and strict adherence to technology. Here, too, you need to start with a project, choose a design and layout of individual elements.
This can be the usual horizontal method, or a diagonal version, or even entire paintings made of tiles. The more complex the design, the more elements will have to be trimmed.
It is not always possible to lay only whole tiles.You need to plan the layout in such a way that the trimmed elements are not in plain sight: in the far corner, under furniture, etc.
To determine how many tiles are needed for a particular room, you can use one of the online calculators. This is more convenient, although you can perform calculations manually using a drawn up plan.
For the floor, you should choose floor tiles with a rough surface. An important point is the abrasion class of the material. The more people and the more often they visit the premises, the higher this indicator should be. When purchasing, you should consider not only the design, but also the batch number. All tile packages must be from the same batch.
Elements with the same design from different batches may differ in shade. The difference is minor, but after installation it will become obvious. Even after installation has begun, you should keep the packaging with the lot number in case you need to purchase more items.
In addition to the tiles, you need to purchase tile adhesive, as well as a notched trowel for applying it, plastic cross-shaped stops, primer and grouting compound. Tools you may also need are a regular spatula, a rubber grouting spatula, a rag, a tape measure and a building level, tile cutter and so on.
If laying heated floors done correctly, the base for the tiles will be smooth and clean. It must be treated with a primer in accordance with the instructions and wait until it dries. After this, proceed directly to laying the tiles. They start either from the corner or from the center, i.e. from the most visible areas.
First you need to make markings on the base.To do this, draw a straight line in the center of the room parallel to the longest wall, and then, again in the center, draw a line perpendicular to the first. In the doorway, a wooden block-limiter is nailed to the floor.
Place a small amount of tile adhesive on the back of an individual tile and spread it over the surface with a notched trowel. Sometimes it is more convenient to apply glue not to the tiles, but to the base, about one square meter, so that the glue does not dry out.

The tile is placed in place and lightly pressed against the base. The remaining elements are laid in the same way. Special cross-shaped stops are placed between the tiles. They help maintain the same distance between individual elements throughout the entire area.
As soon as the first row is laid out, you should carefully check how level the tiles are using a building level. This check is carried out constantly to ensure that the entire floor is perfectly level. If there is a drain in the room, then the tiles are laid with a slight slope towards the drain.

This point is usually taken into account when laying the base for the tiles. After all the tiles have been laid, you need to wait at least 12 hours so that the tile adhesive has time to dry. Now you can remove the dividers and start grouting the joints. The composition can be either matching the tile or a contrasting color, it all depends on the design.
The grout is applied in small portions to the seam area and rubbed with a special rubber spatula; movements should be cross-shaped, directed in different directions. The remaining grout is immediately removed from the surface using a cloth, for example, microfiber.
When the grout has hardened a little, you need to check how filled the seam is. If the grouting material is not enough, you should repeat the grouting in this area.
You will learn how to install heated floors under linoleum from next article, the contents of which we advise you to familiarize yourself with.
Conclusions and useful video on the topic
Detailed instructions for installing a water heated floor are presented in the following video:
The process of laying ceramic floor tiles can be seen here:
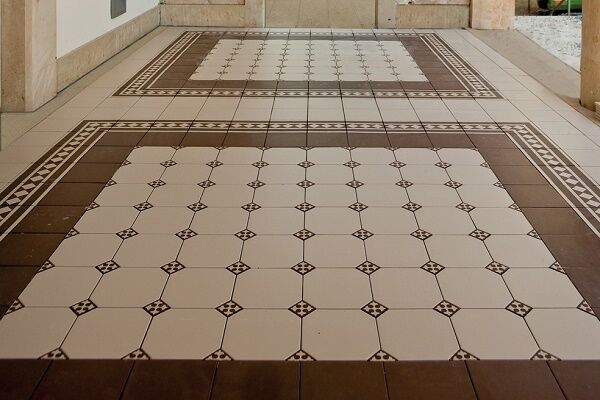
Water heated floors are a reliable and convenient heating system that allows you to make your home comfortable and cozy. If installed correctly, it will serve its purpose flawlessly for many years. Ceramic tile flooring can be considered the best choice for combination with underfloor heating of this type.
Please write comments in the block form below. Ask questions, share useful information on the topic of the article and unique photographs. Perhaps your post will provide effective assistance to site visitors.


Warm floors are a good thing. But it will be difficult to do without designers, builders and finishers. The main thing is to make the right calculation so that you don’t grab your head later. You can do the installation yourself, but you shouldn’t rush either. You can also lay the tiles yourself, although there are many nuances here.In general, the material is presented competently, everything is laid out on the shelves, but if you have no experience, then it is still better to hire a knowledgeable person who will do everything as it should.
I made myself a heated floor in the hallway, bathroom and kitchen. I had to throw out the wooden floors on the joists, which freed up 15 cm of space. In order not to greatly increase the load on the concrete floor slabs, I laid high-density extruded polystyrene foam, and then the mounting film, pipes, and concrete screed. Ceramic tiles on top. I set the coolant on the floor to 35C, the surface completely warms up to a temperature of 28-30C for about a day, but then it’s complete bliss. Tiles conduct heat best.
And in vain I left the battery in the kitchen. It is not needed there; when the floor is working, I turn it off. I want to take it off and scatter the ribs in other rooms.
Objections: 1. The temperature regime of the heated floor is at least 45-35, and preferably 55-45. The thickness of the screed (from the top of the pipe) is 4.5-5.0 cm. The classic pipe laying pitch is 20 cm. Then for 1m2 of floor you need 5m of pipe. Easy to count when doing calculations. Forgot about expansion joints. Warm floors have always been considered comfortable heating and for it to completely replace radiator heating, the house must be well insulated. Superficial article.