How to make a heated floor under linoleum on a concrete floor: detailed instructions
Having set the task of installing a warm floor under linoleum on a concrete floor, you will have to solve a difficult problem.Although linoleum is presented in a wide range on the construction market, not everything that is offered can withstand temperature loads. It’s worth understanding the device technology and the choice of materials. Isn't it true?
We will talk about how a floor heating system is constructed on a concrete base followed by laying linoleum. The article we have proposed describes in detail all stages of construction: from the selection of materials to the finishing work. Popular device options are described.
The content of the article:
Secrets of installing heated floors under linoleum on concrete
Despite its great popularity, this material can hardly be called the best finishing option for a heated floor. Good thermal insulation properties, changes in shape and color under the influence of high temperature are not all its disadvantages. The likelihood of releasing harmful substances when heated is the main disadvantage of this floor covering.
However, if you don’t want to see anything on the floor other than linoleum, you can lay a warm floor underneath it, but not all types. The most suitable types of heated floors in this case are water and electric, which include infrared and cable types.
Mandatory conditions are installation in accordance with all rules and strict adherence to temperature conditions. There are separate requirements for the concrete base. It needs to be prepared so that there are no differences in height.It is considered acceptable if over an area of 2 m² the difference in unevenness does not exceed 0.2 cm.
The base requires thorough cleaning, followed by the application of a primer and a waterproofing layer. To balance the expansion that occurs during floor operation, the lower perimeter walls are decorated with expansion tape made of foamed polyethylene.
Which linoleum to choose?
Linoleum on the market, despite its visual similarity, differs in various respects. It may have different thickness, composition, structure, and the reinforcing base, if present, may differ in type.
When choosing linoleum, you need to correctly use the information encrypted in the markings applied by the manufacturer. It contains encrypted information about the composition of this type of coating, the possibility of heating it, and the maximum permissible temperature.
You should immediately exclude from your list a material based on glypthal polymer, i.e. alkyd linoleum. It is a low thermal conductivity coating and changes its size over time. For the installation of heated floors, these properties are a big disadvantage.
Coloxiline linoleum based on nitrocellulose, which is highly flammable, is also an unsuitable option. Although this linoleum contains fire retardant boric acid, which somewhat reduces the fire hazard of the material, it is not recommended to install heated floors under it.

Relin rubber linoleum should also not be considered. In addition to being a good heat insulator, when heated from below, the material can change its structure. This will quickly lead to its destruction.
Polyvinyl chloride linoleum with good strength and hygienic characteristics is more suitable for heated floors than other types. A more expensive option is natural linoleum (marmolium), created on the basis of safe components.
It contains jute fabric, natural dyes and other natural ingredients. The main rule: PVC linoleum can only be heated to 30⁰, and natural - to a maximum of 27⁰.
When choosing PVC linoleum for finishing a heated floor, it is better to consider not the household type, but the commercial or semi-commercial one, as it is more durable. A thermal insulating base is not needed for this purpose; it will only reduce the efficiency of the system.
More suitable material would be either without a base or with a very thin fabric backing. At first, vinyl linoleum paired with a heating cable may emit an unpleasant odor, but then it will disappear.
Concrete floor installation
Immediately resolve problems related to installation of the "Warm floor" system on a concrete base, and you can choose the appropriate type of linoleum when the subfloor already exists. If instead there is only an old rotten wooden base or just soil, you need to start constructing the concrete floor itself.
The process consists of several stages:
- dismantling the old floor, if any;
- leveling the base;
- pillow devices;
- arrangement of an insulating layer;
- preparing and pouring concrete mortar.
Leveling the soil is done using a shovel. Then they begin to create a pillow.To do this, crushed stone or small pieces of brick and broken slate are poured to a height of about 50 mm. All this is lightly compacted.
The perimeter of the room is covered with sheet foam having a thickness of 20 - 50 mm. It will serve as formwork and at the same time balance the thermal expansion of the concrete base. Clean sand is poured onto this layer - 10 centimeters.
Next comes the installation of the second type of insulation. Best suited for this extruded polystyrene foam, preferably the Penoplex brand, which is produced in the form of rigid slabs with a thickness of at least 50 mm.

The manufacturer has provided a locking connection on the sheets, so there are no gaps left when laying them. During installation, you need to ensure the horizontal position using a level. Waterproofing is not needed here, because... the material is extremely moisture resistant.
The next stage is preparing the solution. The optimal ratio of components is 1 part cement, twice as much sand and three times as much screenings. As a result, the solution should not be fluid, but not excessively thick.
In order not to heavily load the floor, light fillers and levelers are introduced into the concrete solution. Before pouring the solution, place beacons near the walls and stretch a cord between them. Using these marks as a guide, intermediate marker strips are placed.

The surface is moistened and the solution is placed on it between the beacons and leveled with the rule.As it sets, the surface is leveled. At the end, apply a building level to check the horizontalness. Afterwards, the marks are removed, the resulting voids are filled with solution and everything is left until completely dry.
Infrared film on concrete floor
This version of the heating floor is the most loyal to linoleum, but the thin film is easy to damage, so the concrete base underneath must be perfectly level. For effective heat transfer by infrared heaters, this process must occur in one direction.
Any other “warm floor” system operates on the same principle. One-sided heat transfer is possible only in the case when the thermal conductivity of the materials located below and above in relation to the heating elements is radically different.
The heat capacity of the top layer should be significantly higher than that of the subfloor. Subject to these conditions, the efficiency infrared floor can reach 97%. At the same time, the installation of this system does not make significant adjustments to the height parameters of the room.

To install infrared film on a concrete floor, you must first install a thermal cutoff. After this, work begins prior to laying the linoleum.
Features of the shielding layer and its installation
A heat shield, due to its high reflectivity, can reduce heat transfer to a concrete floor by an average of 75%. The best option is a foil coating with a lavsan base.
There are other cheaper metallized materials made on the basis of foamed polyethylene, but their thermal conductivity is higher, so heat loss will be greater. A rational approach to this issue involves purchasing an electrical and thermal insulation system together with heating elements.
It’s better when all this is released by one reputable manufacturer. The quality of insulating materials is a guarantee of rational consumption of electricity for heating. A heat shield is only needed in places where the film is laid, but it is better to lay it over the entire area to avoid unevenness.
Installation is carried out in the following sequence:
- Place the thermal strips on the concrete base, with the reflective side facing up.
- Connect the individual strips with double-sided tape.
- Place the temperature sensor between the tapes and secure it with tape.
- Connect the sensor and the regulator with wires, protecting them with a box or hiding them in grooves made in concrete.
Good quality infrared films and components produced by such manufacturers as Q-term, Lavita, Enerpia, Rexva, noted by many consumers. They have approximately the same technical characteristics, and the difference in cost is a feature of the pricing policy of a particular company.
The choice should be made based on bandwidth and maximum power. For linoleum, the optimal power is 150 W/m². With such a value, the structure of the coating does not change and no harmful substances are released.
Installation of infrared film
To minimize the number of segments and connection points, the strips are placed along the room. Before installation, the film is divided into parts. The length of the panel depends on its width.For a meter film, cutting into segments up to 7 m long is allowed, for a width of 0.8 m - 10, and for a half-meter film, the maximum length of the thermal strip is 13 m.

A competent layout - a distance from the walls of 200 mm, a gap between the strips of 30 to 50 mm, contacts as close as possible to the wall on which the thermostat will be placed.
Under no circumstances should overlaps be allowed. The thermal canvas is attached to the heat shield using masking tape. The cuts on the sides are also fixed using screws or staples.
Tips are placed on the edges of the copper strip of film located in close proximity to the thermostat. The power wire will be connected to them. It is inserted into the tip and pressed down with pliers. Cuts and connection points of wires on both sides are insulated with bitumen tape. The strips are connected in parallel.
Upon completion of installation, connect to thermostat and a temperature sensor, wires connecting these elements to the infrared film. Check that the connection has been made correctly, then test the operation of the system on a concrete base.
If everything goes according to plan, the thermal fabric is covered with plastic film, making an overlap of 20 cm, then the waterproofing is secured with tape.
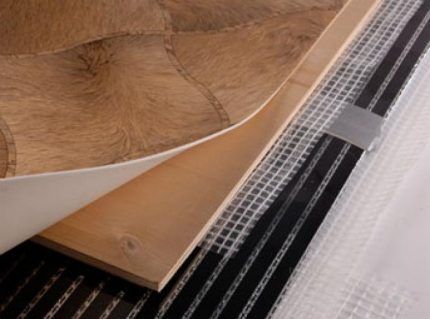
Laying linoleum over an IR system
This material is not particularly rigid, so in order not to deform the heating elements when walking, a leveling layer is needed under it.It is made from plywood with moisture-resistant properties, about 0.8 cm thick.
In order not to damage the film when fixing plywood sheets, it is necessary that the fasteners fall into the technological gaps provided between the heating elements or on the edges of the film. The fastening pitch is about 150 mm.

When laying between walls and sheets of plywood, compensating gaps of 0.1 - 0.2 cm should be left. Subsequently, they are filled with moisture-resistant sealant. After the sealant has dried, remove dust from the entire surface with a vacuum cleaner. Next, the plywood is primed, the primer is allowed to dry and the linoleum is laid in the usual way.
Cable electric floor
When laying a cable system, the concrete floor is first leveled, then a reinforcing mesh or special fastening tape is laid on it. The cable is placed on it, fixed, and then filled with concrete mixture. When the screed is dry, lay linoleum.
Before all this work, determine the length of the cable. If it is placed in 15 cm increments, one loop will take approximately 25 cm.
Given the known area of the room in which the heated floor is to be installed, calculate the number of turns, cable branches and its overall length. To the resulting value is added the segment running from the screed to the wall where the thermostat is located.
When calculating the area covered by a heated floor, the mandatory five-centimeter distance from the walls and the space occupied by furniture are subtracted from its total value. On a clean concrete floor, thermal insulation is applied over its entire area. Tape the joints with foil tape.
In the area reserved for the installation of heated floors, a metal tape is laid to secure the cable so that it is enough to cover the entire area. There is a place on the wall for the regulator. Then a hole is made for installing the mounting box and grooves are laid. After installing the regulator, a temperature sensor is attached to it.

The heating cable is laid starting from the edge of the corrugated tube, on which the cable end sleeve should be present. The electric floor is assembled by adhering to the calculated step in the form of a snake; the branches are laid evenly, excluding creases at turns. Fix the heating cable with hooks located on the previously laid metal tape.
You shouldn’t pull it too hard, but the cable should still be as straight as possible. The pitch is calculated by multiplying the heated area by 100 and then dividing the result by the length of the cable.
After briefly testing the system, a 5-centimeter layer of screed is poured. When it dries, install the finishing coat.
Water floor covering
The water heating system goes well with the concrete base. But the final covering made of linoleum is not the best choice in this case. Still, a certain type of linoleum can be laid. The main thing is that it is not thick and of low quality.
The scheme should be thought out in advance. A waterproofing layer is laid on a pre-prepared base. Strips of tape are glued along the joints between the strips.Slab thermal insulation is placed on top, which is secured with special fasteners - “fungi”, for which holes are pre-drilled.

Using the same “fungi”, a reinforcing mesh is attached to the insulation, making an overlap, the size of one cell, and using plastic clamps to connect the individual strips. A manifold is installed on the wall, and pipes are subsequently connected to it. Thermal expansion of the floor is compensated by gluing a special tape to the walls surrounding it.
After this, you can attach the pipes that form the heating circuit to the reinforcing mesh, and then connect them to the collector. A more advanced way of fixing underfloor heating pipes is to use a specially designed mounting system with click clamps or guide clips. It is fixed to the concrete base before the pipes are laid.

To start pouring water floor screeds, the pipes need to be filled with water, and beacons should be installed on the floor and aligned with a laser level. A screed with a minimum thickness of 40 mm is poured according to the same rules as for installing other types of heated floors.
It will be possible to decorate the floor with linoleum no earlier than in a month. During this time, the cement screed will gain the necessary strength. Until this moment, the water heated floor cannot be put into operation.
He will introduce the technology of constructing a heating system under linoleum on a wooden base. next article, which thoroughly examines the rules and features of such a system.
Conclusions and useful video on the topic
Video #1. An object lesson on how to construct an ideal screed for a heated floor:
Video #2. About all the elements of a heated floor in this video:
On the one hand, the technology for installing a heated floor under linoleum on a concrete floor is quite simple. But a good result can only be achieved if all recommendations are followed. Correct selection of materials and high-quality installation will ensure a long service life of both the system itself and the coating.
Would you like to talk about how you built a heating system with linoleum laid on top in your home? Do you have useful information on system design technology and flooring? Please leave comments in the block form below, post photos and ask questions about the topic of the article.


It’s not that I don’t want to see any other material, it’s just that I’ve been laying linoleum all my life. Somehow we have already gotten used to its pros and cons, but have not dealt with other floor coverings. But I have a great desire to make a warm floor. Our children are small, they constantly play on the floor, and the management company does not heat enough for the Siberian winter, so the floor is often icy. True, if there is a risk of harmful emissions, then you will have to say goodbye to linoleum. I will think.
They talk a lot about emissions in connection with heated floors, but they forget that in the sun the floor heats up much higher than the 30-35 degrees required for the floor to work.
I had heard about heated floors before, but when I came closer, I got to the bottom of it. This is especially true for linoleum floors. I would still like to have a warm floor in the apartment, but it would be a laminate flooring. I am more impressed by it both in appearance and in practicality. It is more beautiful and pleasant to touch. Over time, linoleum dries out, fades, becomes brittle and also decreases in size.
So there seems to be a special heat-resistant linoleum. It is not afraid of high temperatures and is quite suitable for any warm floor. It seems to hold at most 30 degrees, doesn’t it? I don’t know about harmful discharge, but in theory everything should be good. Well, if you are really afraid of the harmfulness of linoleum, then it is better to switch to laminate or parquet - expensive and natural.
I don’t understand why you need to prime the plywood before laying linoleum? And in the previous article it is written that foil coating is not suitable for film flooring for linoleum, but only foamed polyester. In this article, foil is already suitable. Because?