Warm water floor in a private house: diagrams, design rules + installation instructions
A well-functioning heating system is the key to comfortable living in a house, regardless of weather conditions.Along with traditional radiator technology, heating circuit devices are actively using a warm water floor system. Its installation is labor-intensive and financially expensive, but this heating option fully pays for itself in 5 years.
In order to somehow save money, many install a warm water floor in a private home on their own. Agree, the idea of obtaining efficient heating with minimal investment is very attractive, isn’t it? However, its implementation requires certain knowledge and skills from the performer.
We offer for consideration detailed material on the installation of water heated floors. The article outlines the design rules, provides advice on choosing system components, and also describes the step-by-step progress of the installation, connection and startup of the water circuit.
The content of the article:
Conditions for installing a water floor
It is recommended to include the installation of an additional heating circuit in the project even before the start of construction - this makes calculations easier.
In a finished new house or building where the radiator system has been in operation for a long time, installing a water floor is also possible, but under certain conditions.

If the desire to insulate the floor arose after the construction of the house, you should determine whether the building is suitable for this. One of the main conditions is pre-made thermal insulation of the house, since heat losses above 100 W/m² will make the installation of the floor useless.
Pay attention to the height of the ceilings: the installation “pie” with pipes takes about 15 cm, or even more, from the total height of the room. After implementation of the system, the dimensions of doorways must be maintained, with a height of 210 cm or more.

If the house is new, then before starting installation it is necessary to completely complete construction - erect walls and ceilings, install windows, and plaster.
Design and Build Rules
The decision to choose a water floor, rather than an electric analogue that does not require scrupulous installation, is optimal for heating systems in gas boilers.
Such schemes are recognized as the least energy-consuming, most efficient and inexpensive to operate. Options with solid fuel boilers are also acceptable.
Flawless operation of the system is possible only under two conditions: professionally performed design calculations and competent installation.
Consequently, the first steps towards installing a water heated floor in a country house or in a private house are analysis of the structure, selection of materials, and drawing up a project.
Nuances of installing heated floors
The construction of a water floor is complex and simple at the same time. It is multi-component in composition, so the main thing is to observe the order in which all layers are laid.

Each element of the “pie” performs a special function. The base for the structure is soil or a concrete slab. A thin film (but not less than 0.1 mm thick) is laid on it - ordinary polyethylene or a more expensive analogue.
Then the floor is covered with thermal insulation material. One of the best options is extruded polystyrene foam – durable, relatively inexpensive, with low thermal conductivity.
Minimum requirements:
- density – from 40 kg/m³;
- thickness – from 300 mm.
Main layer – cement pouring, inside which pipes with coolant will be located. Plasticizers are added to the solution to make it more flexible and easier to install.
For strength, the screed is reinforced with a reinforcing mesh with a cell of 50*50 mm or a larger cell of 100*100 mm and a rod thickness of 3-5 mm.

The choice of finishing coating will determine the thermal regime, which can be adjusted automatically or manually using mixing units - manifolds.
What styling principles should you follow?
First required make calculations. This is a separate and complex topic, but for quick calculations on your own, you can use an online calculator by entering individual parameters into the required columns.
If a construction company deals with heated floors, then the calculation operations are carried out by its specialists.
Standard verified figures are taken as the calculation basis, which must be adhered to regardless of the installation method and specific installation conditions.
Typically, PEX pipes are used for installation, which cannot be laid closer than 10-15 cm from each other, since there is a high risk of kinks.If the thermal load on the floor is small, for example, many people like to relax in cool bedrooms, then a layout step of up to 60 cm is allowed.
Some more useful tips:
- one circuit is not distributed into two rooms;
- for a room of 35-40 m², 1 circuit is not enough, the minimum is 2;
- one side of the contour – no more than 8 m;
- The damper tape compensates for deformation due to thermal expansion.
There are exceptions. For example, if the toilet and bathroom are small in area and located next door, then one water circuit is enough to heat them.
Methods for installing water circuits
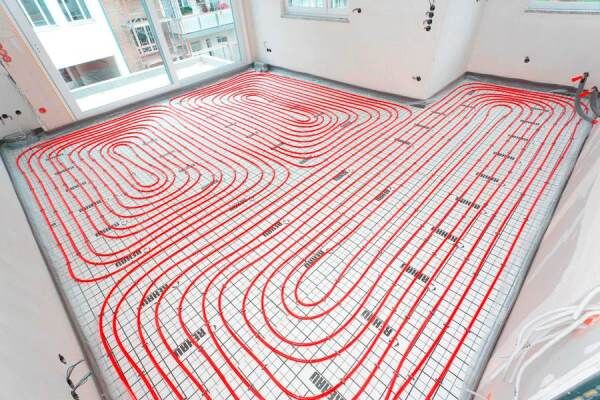
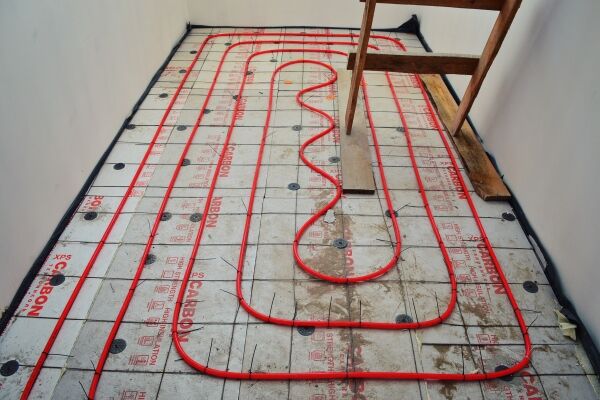
The most effective types of pipe installation have long been invented - “snail” and “snake”, so there is no need to experiment with the design of circuits.

«Snake"is the easiest option to implement. Its disadvantage is the large difference in coolant temperatures at the inlet/outlet. It should be taken into account that the second half of the circuit will give off less heat.
«Snail» distributes heat evenly throughout the room, but it is more difficult to implement. If the owners do not want to divide the room into warm and cool zones, then it is better to use this method.
To save pipes and increase energy efficiency, a combination of two options is often used: a “snail” is laid in the center, and a “snake” is laid along the walls. If you correctly position the hinges and calculate the laying step, the floor temperature will be as comfortable as possible for the residents.
We choose materials wisely
Warm water floors are covered with screed, which means that they are planned to be used not for years, but for decades.
Taking into account the long service life, the choice of materials should be approached responsibly: exclude cheap and illiquid products, select high-quality pipes, insulation, fasteners with maximum service life.
No. 1 - selecting the optimal pipe option
Currently, two types of pipes are used - PE-X and PERT, both made of cross-linked polyethylene. PE-Xa products have an advantage because, thanks to their 85% cross-link density, they have a memory effect.
The beneficial effect is that pipes stretched by high-temperature coolant or deformed always return to their original position.

The use of PERT pipes is justified if the screed contains solid sections, and the fittings are installed only for fastening to the manifold.
Experienced builders do not recommend using composite pipes with aluminum foil - there is always a risk of peeling off the metallized layer. If you need maximum reliability and insulation, then it is better to use products with polyvinylethylene reinforcement located inside the products.

Construction companies usually work with trusted manufacturers who are responsible for the performance of their products. The products of well-promoted brands have proven themselves well. Rehau And Valtec, as well as lesser known Tece, KAN, Uponor.
Read more about choosing pipes for laying water heated floors in this article.
No. 2 - deciding on insulation
The main purpose of the insulation is to separate the screed with pipes from the base so that the heat is transferred upward and does not go in vain into the ground. A thermal insulation layer is required; without it, installing a heated floor becomes meaningless.
Now two are used type of substrate, since the rest are inferior to them in all respects. These are extruded polystyrene foam in the form of plates and profile polystyrene foam mats with mounting protrusions.

Eps boards are easy to install and have standard sizes: 600*1250 mm, 500*1000 mm. Thickness – from 20 to 100 mm, its choice depends on the required degree of insulation. Thanks to the fastening side grooves, there are no gaps at the joints of adjacent slabs.

How to determine the required thickness of insulation? It all depends on the installation conditions in a particular private house: 10-centimeter slabs are placed on the ground, 5 cm is enough above the basement or plinth, and if there is a heated room below, then 3-centimeter thermal insulation is enough.
Disc-shaped dowels are used to fasten the slabs to the floor, and harpoon clamps are used to fix the pipes. The distance between adjacent brackets is from 30 cm to half a meter, in places where the pipe turns - 10 cm.
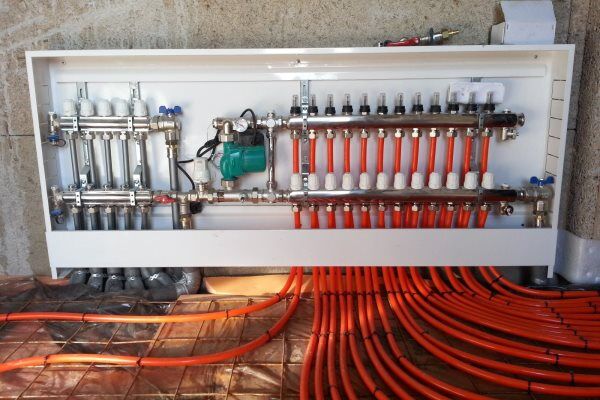
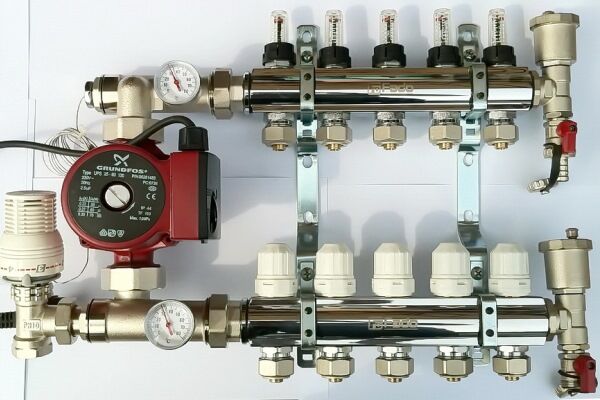
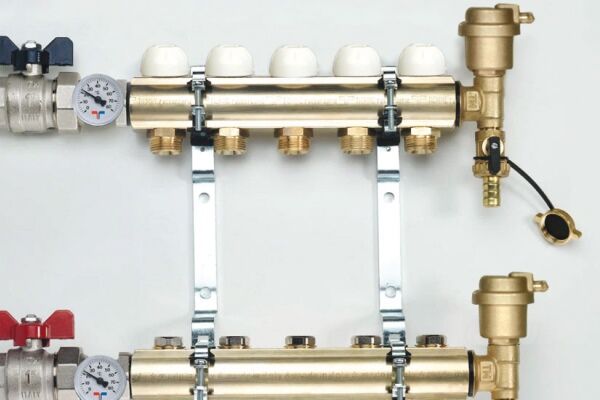
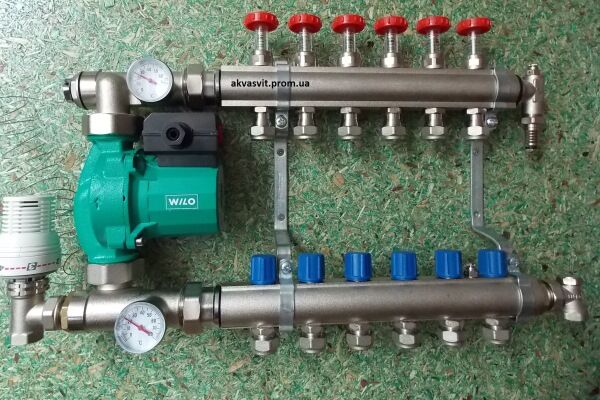
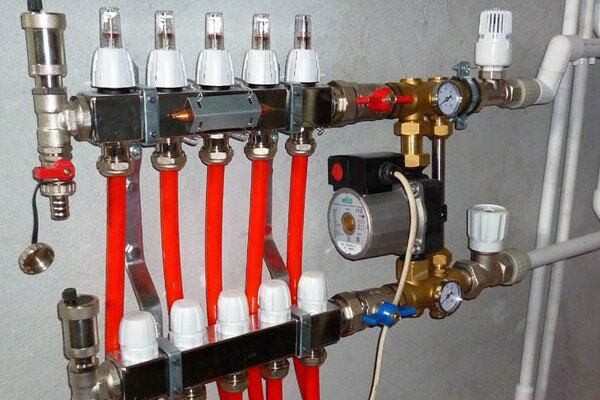
No. 3 - buy components for the manifold
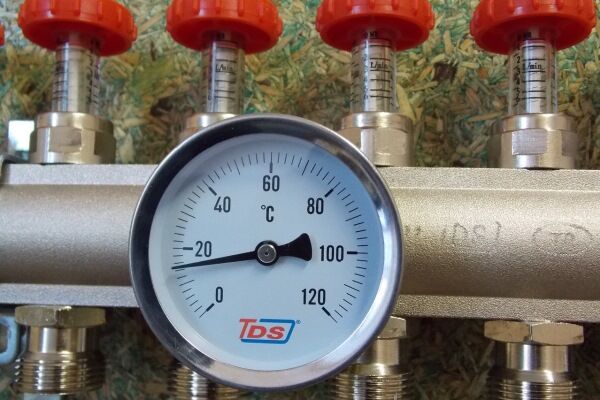
Coolant distribution center and floor heating control point - collector-mixing unit. With its help, hot water is directed from the main into separate circuits, the coolant flow is monitored, and the temperature is regulated.
The collectors are not sold assembled, as each system has its own characteristics. It is better to entrust the purchase of components to specialists, but to purchase them yourself, you should remember all the necessary elements:
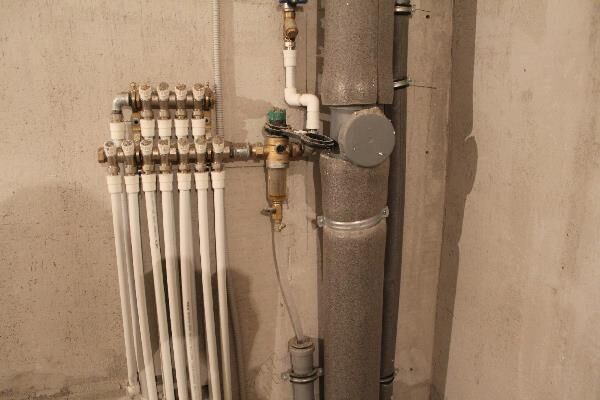
The installation location often depends on the nuances of maintenance: for some it is more convenient to adjust the ETP in the boiler room, together with the boiler, for others - from the corridor. Theoretically, a manifold cabinet can be installed in any room of the house, but it is desirable that the length of all circuits be approximately the same.
TVP Installation Guide
Before laying the heated floor structure, you should carry out preparatory work: purchase components, mark the installation location of the cabinet, drill holes in the walls for communications. Then you can proceed to the first stage.
Step #1 - subfloor installation
If you plan to install a heated floor directly on the ground, it is recommended to choose one of two options:
- make a “rough” screed from cement pouring;
- instead of screed, pour, compact and level a layer of sand.
A layer of sand will be required in any case, since it also serves as the basis for the screed. A layer of waterproofing is placed on it, the most basic option is a thick polyethylene film.

When making calculations, it should be remembered that heat loss when installing the system on the ground is higher, therefore, the temperature of the coolant in the pipes should be higher than usual.
Step #2 - laying a heat-insulating layer
The insulation is laid on a clean, level floor. Before starting work, a strip is cut on the walls - the level of the clean floor; small depressions, if they were formed during the construction work, are filled with clean, dry sand.
Installation instructions:
- Spread the waterproofing - lay sheets of film with a density of 150-200 microns with an overlap of at least 10 cm and wrap them on the walls.
- Lay the slabs of extruded polystyrene foam with the markings facing up, joining the grooves together. It's better to start from the far corner.
- If necessary, cut out fragments with a construction knife.
- Secure the slabs with disc dowels at the corners, along the middle of the joints and in the center of the slabs.
- Seal the seams with construction tape.
If laying a second layer is required, then it is better to change the direction of the upper slabs, that is, lay them perpendicular to the lower ones.

To move on the slabs during installation, it is recommended to use thin boards or pieces of plywood - the structure of the slabs, despite their density, can be deformed.
Step #3 - marking and placing pipes
Markings are applied to the surface of the slabs using a marker or paint cord. If profile mats are used instead of EPS, markings will not be required.

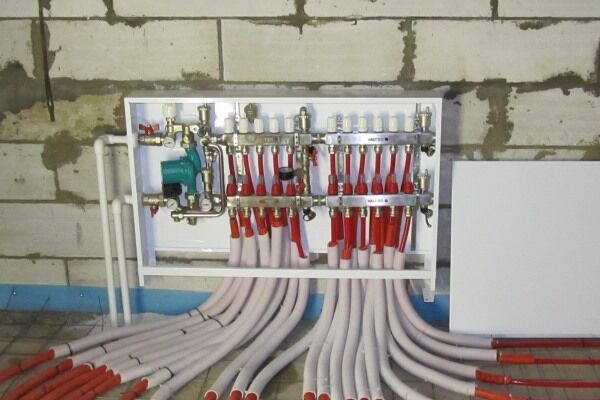
Before the beginning pipe installation It is also recommended to install collectors and prepare places for connections.
Installation instructions:
- Unwind 15-20 m from the pipe, put a heat-insulating sleeve and a fitting on the end for connection.
- Connect to the collector.
- Carefully lay the pipe according to the markings.
- Secure the outline with harpoon staples.
- Bring the pipe to the manifold and connect the other end.
The length of each loop must be recorded, and not just remembered, but written down near the fitting on the wall.

Transit pipes passing through walls or transition zones are insulated as much as possible with sleeves. Instead of expensive imported products, you can use ordinary insulation - foamed polyethylene.
Step #4 - installation of reinforcing mesh
Properly laid fittings should be located above the pipes, not under them or between them. An acceptable option is a metal mesh with a 10*10 cm cell made of 3 mm wire.

Nowadays, many people use plastic mesh instead of wire mesh. This option is also suitable, since the polymer creates the necessary rigidity.
Step #5 - system testing
Until hydraulic tests have been carried out to check the tightness of the system, the screed cannot be poured. Usually the circuits are checked one by one.
First, a main line and a pump are connected to the pipe, and water is supplied. For drainage, use a hose connected to the drain pipe of the manifold.

During inspection, staples may fly off as the pipe tends to straighten under pressure. The harpoons that fly off are attached 5 cm from their original place; after pouring the screed, they will no longer fly off.
Step #6 - laying cement screed
The pipes are left under a pressure of 5 bar and the screed is laid. Usually the traditional beacon method is used. You can use a metal profile for drywall as beacons.

Laying is done in parts, starting from the far corner. Immediately after pouring, each fragment must be leveled, dips and sagging must be eliminated.
After 2 days, the surface is cleaned, the damper tape is cut, the screed is sprayed with water and covered with film (the last two steps are repeated for 10 days).
Commissioning
Full maturation of the cement screed occurs after a month, which is when balancing needs to be done using collector flow meters.

After manipulating with cold water, if the system is working correctly, you can conduct tests with heated coolant. At this point, the installation of the heated floor is considered complete.
Conclusions and useful video on the topic
General installation rules for budget-conscious owners:
Practical recommendations from experienced builders:
What mistakes should you avoid:
When installing a heated floor, there are dozens of solutions that can help you save on components or choose the optimal design.
If you spend more time designing and selecting materials, then the finished heating system will 100% fulfill its functions and will not need repairs for many years.
Do you have personal experience in designing and installing a heated water floor? Do you want to share your accumulated knowledge or ask questions on the topic? Please leave comments and participate in discussions - the feedback form is located below.


I installed heated floors in the house with a total area of 100 sq.m. and installed a double snake heating pipe. It was connected to an autonomous double-circuit boiler, but since it was of lower power, I installed an additional pump. However, I used polypropylene pipes, as it turned out, the heat transfer is quite good. The question arises: what type of pipes should you choose when installing a heated floor?
Warm floors are a real godsend for our family. The idea of installation was suggested by the builders during the renovation. Since we have small children, this option seemed very interesting. True, we were worried that the work technology would suddenly be disrupted. Fortunately, we were lucky with the brigade. Everything was done efficiently. The house has become much more comfortable, especially since autumn. And the children began to get sick less.
Who knows when it is necessary to use pumps when installing a heated floor?
Hello, who knows, I want to make a warm floor 1) A layer of Glassine 2) Sheben 3) Expanded clay mortar
4) Penaplix 5) Snake made of pipes 6) Leveler 7) insulation 8) Laminate, do you think this is correct?