Laying schemes for heated water floors: analysis of the most effective installation options
A warm water floor can be an additional source of heating or serve as the main heating system.The effectiveness of the complex largely depends on competent design. An important role will be played by the chosen scheme of a thermal water floor - the method, step and “pattern” of laying pipes.
Before you begin designing a heating circuit, you need to study the general principles of installing the system, select pipes and calculate the heated floor. All these points are described in detail in the article. In addition, we have prepared a detailed algorithm for drawing up a diagram and provided practical tips for organizing underfloor heating.
The content of the article:
Features of designing heated floors
Water-type underfloor heating has long been known and quite popular. Narrow pipes are enclosed in a concrete screed under a suitable floor covering. Hot coolant is circulated through the system, which heats the room. Of course, the system consists not only of pipes and screeds, it includes many other important elements.
This type of heating provides better heating compared to traditional pipe systems. Heat comes from below and gradually moves upward. As a result, the room is heated more evenly.
It is believed that using such a system you can save about 25% of heating costs. This is due not only to the quality of heating, but also to the relatively low temperature of the coolant, which should not be higher than 50°C.
Since the pipes are hidden, direct contact with the heaters is excluded, i.e. the possibility of burns is completely excluded. The interior will only benefit from such a solution, because there is no need to install radiators, grilles for them, etc.
You can walk barefoot on the heated floor; some housewives lay out washed clothes on the surface; they dry very quickly.
However, it is worth noting that such a system also has significant drawbacks. To begin with, this is a very difficult installation that needs to be done very carefully. In addition, this heating option is not available to everyone.
You can easily install water systems in almost any private building, but for apartment buildings there are serious restrictions.

Here, such systems can only be done on the ground floor, and after agreement with a number of organizations. Central heating systems were not originally designed for such modifications, so it will be necessary to ensure that the modification does not upset the hydrostatic balance of the system.
The significant weight of the screed and the danger of leakage should be taken into account. It will not be easy to identify the location of damage to a pipe hidden under a screed, and it is almost impossible to quickly repair the damage in such a situation.
Therefore, in high-rise apartments, the implementation of water heated floors according to any installation scheme is prohibited; it is recommended to give preference to electrical systems.
Water options are so highly efficient and economical only in rooms with good thermal insulation.

Before installing any heating system, it is recommended to insulate the building, check the reliability of windows and doors, and for a water system this is especially important, because the temperature of the coolant must remain low.
And if you use a floor covering that is sensitive to overheating, for example, linoleum or laminate, then you will have to monitor the temperature level especially carefully.
In addition to the concrete system, there are also so-called flooring options. When using them, instead of concrete screed, ready-made materials are used that do not require long-term drying. Installation time with flooring technology is much shorter, but costs will increase noticeably.
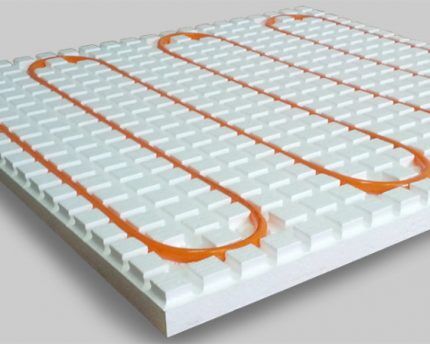
Depending on the materials, the following system options are distinguished:
- polystyrene;
- rack and pinion;
- modular wooden.
The underfloor heating manifold should be equipped with shut-off valves for each individual loop so that quick shutdown remains possible. This function can be useful not only in case of breakdown.
If some rooms are not used in winter, you can shut off the flow of coolant to the circuit serving them, which will reduce heating costs for the entire house.

Most often, for the arrangement of such systems, metal-plastic communications are used, which are relatively inexpensive, quite reliable, and are not so difficult to install.
Another option is copper pipes. They are not often used in such systems, mainly due to their high cost. But such communications are extremely reliable, so it makes sense to consider this option.

More information about choosing pipes for a warm water floor is written in this article.
General principles for installing water-type systems
First you need to prepare the base: level it and clean it of dirt. After this, a layer of thermal insulation is laid, often slabs are used for this extruded polystyrene foam.
This material comes in the form of slabs that are not difficult to install. After this, the thermal insulation material is covered with a waterproofing film.
Before installation, a damper tape is placed around the perimeter of the room to compensate for thermal expansion during system operation. In large areas it is installed not only along the walls, but also in the seams running in the middle of the room.
If the insulation and tape are laid correctly, then the film can be carefully tucked over the edge of the insulating material, it will lie flat and with little tension.

Pipes for hot water need to be laid on top of the film; it is at this stage that the layout of the water heated floor should be implemented; it is chosen in advance. The pipes should be laid evenly, trying to maintain an equal distance between them in order to achieve uniform heating of the floor.

The laid communications are connected to distribution manifold, through which they are connected to the heating system of the house, to the boiler, etc. The pipes are filled with concrete screed, after which it is necessary to wait for it to dry completely. All that remains is to check the operation of the system and lay the flooring.

There are no small details when installing systems of this type. A small error can cause serious damage in the future.
Therefore, it makes sense to consider a number of useful tips before starting installation work:
- It is better to completely dismantle the old screed, and place the waterproofing and insulation on the strongest possible base, carefully leveled horizontally.
- You should not think that under the screed the unevenness of the base will be invisible; all differences of more than 10 mm must be carefully leveled out.
- If several separate circuits of the system are installed in one room, the space between them should be divided with a damper tape, not limited to just laying it around the perimeter.
- In small areas, it is quite acceptable to use penofol as insulation.
- Above an unheated basement or on the ground, you need to make the most reliable insulation, for example, a layer of expanded clay and expanded polystyrene slabs at least 50 mm thick.
- When attaching pipes to the mesh, do not tighten the ties too tightly so as not to damage the pipe.
- The diameter of the pipe for such a system can vary between 16-20 mm, the material must be designed for a pressure of at least 10 bar and heating up to 95 degrees.
- If you have a limited budget, you should not spend money on pipes with options in the form of additional protection, although reinforcing polypropylene communications with fiberglass will not be superfluous.
- To automate the operation of the system, you need to correctly select and install the collector, supplementing its design with servos, pressure sensors, air vents and other useful devices.
- The collector box is placed in a niche on the wall; it must rise high enough above the floor level so that the pipes entering it can be correctly bent.
- All pipes must exit the manifold downwards, and never upwards, to ensure proper operation of devices for removing air trapped in the system.
- It is not recommended to make a niche for the collector in load-bearing walls; if there is no other option, it is better to simply install the cabinet on the wall, and not inside it.
For obvious reasons, it can be very difficult to correct flaws after the installation of such a system is completed, so all operations should be performed very carefully. For example, each loop must consist of one solid pipe; no soldering or any other connections are allowed.
Drawing up a project and diagram
Design is the first step when creating underfloor heating systems. First you need to consider whether this will be the main heating or just an auxiliary option.
After this, you need to take a sheet of paper and draw up a plan for the placement of stationary furniture in the room. For example, it makes no sense to heat the ceiling under a built-in wardrobe or under an automatic washing machine.

The position of each such object should be noted and the exact dimensions should be indicated. After this, you can leave a specific pipe layout. Usually only two main types of layouts are used. One of them is called a snake, and the second is a spiral or snail. The first option is easier to implement.
The pipes are laid from one end of the room to the other, and then brought back to the collector. But this method has a significant drawback. The coolant, moving through the pipe, will gradually give off heat and cool down. As a result, a long pipe will be much hotter at the beginning than at the end.

In small areas such a difference does not matter, but in a spacious room the floor in different parts will warm up unevenly. To avoid this problem, use a snail circuit. In this case, the pipe is first carried along the perimeter walls, moving towards the center of the room.
Here the pipe should form a neat loop. From the center, the laying continues in the opposite direction parallel to the already laid pipe. It turns out that the coolant that has reached the center of the room, when returning in a reverse spiral, will absorb part of the thermal energy of the fresh coolant.

When choosing an installation diagram for a water-heated floor in an apartment, you need to take into account the size of the room. For example, in a corridor or bathroom you can get by with a snake, but in large areas you need to use spiral laying.
For rooms with complex configurations, it is recommended to use a combined option. If it is not possible to lay out the correct spiral everywhere, then individual small areas can be decorated with a snake.
Another important point that affects the quality of heating is the length of each pipe section. It should be approximately the same to ensure uniform flow of coolant and high-quality heating of all areas of the floor.

Sometimes a snake-type scheme may be suitable for those rooms that cool unevenly. It is necessary to organize it in such a way that the beginning of the pipe, where the hot coolant enters, is located in the same place where the coldest zone is located.
They also combine different schemes when passing through such small rooms as a balcony, loggia, etc.
They begin drawing up a project diagram by determining heat loss. At this stage, you should think about thermal insulation of the room and, if necessary, take additional measures: insulate the facade, insulate the ceiling, repair windows, install new doors, etc.
Based on the data obtained, they determine how many pipes will be needed, at what pitch they need to be laid, and other system parameters.
After this, you can begin to draw up a pipe laying diagram.
First of all, you need to choose a suitable location for the collector.If you plan to heat only a separate small area of the room (bathroom, closet, corridor), then it will not be difficult to cope with the plan.
But you shouldn’t think that if the area is small, then all the work can be done “by eye.” It is not easy to determine the exact parameters for a large house; it is better to entrust all calculations to an experienced specialist.
In addition, there are programs that help carry out calculations automatically. If you intend to install a heated floor in a room with a complex configuration, it is better to ask an engineer for help.
To perform the calculations required for system design, the following parameters should be used:
- length, width and configuration of the room;
- type of thermal insulation material used;
- material of walls and ceilings;
- selected flooring material;
- the diameter of the pipes through which the coolant will circulate;
- what material will the communications be made of?
After processing the data, the pipe length required for each specific section will be obtained, as well as the pitch that must be maintained for each section.
In large areas it is not always possible to heat such rooms using only one long pipe. Most likely, it will have to be divided into several sections for laying in different areas.
This is also connected with such an important indicator as the hydrostatic resistance of the system. The longer the pipe, the higher its resistance. The number of turns can also affect this indicator.
Typically, calculations for underfloor heating are performed separately for each room. It should be remembered that pipes cannot be laid close to the walls; you need to retreat about 10 cm.
The pipe is laid in steps that vary between 10-30 cm. The normal step between turns of the pipe is 30 cm. When passing through difficult sections where heat loss is higher, the step is made smaller - 15 cm.
You should start laying pipes from the outer wall, which is colder and needs additional heating. It is not always possible to carry out installation in this way; in this case, it is recommended to additionally insulate the pipe in the area from the entrance to the room to the cold section.
This will allow you to save some of the thermal energy to use it in such a problem area.

If the calculations for the system are not carried out professionally, this can lead to serious problems that will only be identified during operation. This could be the usual uneven heating of the floor, when in some areas the heating is stronger, or the so-called “thermal zebra”.
In this case, cold and warm stripes form on the floor, which makes using the system extremely uncomfortable.
Correcting this situation will not be easy; you will need to practically dismantle the entire system and perform the installation again in accordance with the correct calculations.
Less obvious problems that arise from design flaws are heat loss and a decrease in the speed of coolant movement. As a result, heating costs will increase, but the house will not be heated properly.
More information about performing calculations is written in the articles:
- Calculation of pipes for heated floors: selection of pipes according to parameters, choice of laying step + calculation example
- Screed on a warm water floor: choice of thickness and popular installation methods
Some experts recommend setting aside for heating loggias and balconies, as well as rooms with increased heat loss, a separate circuit. This will allow you to deliver a sufficient amount of heat to both the balcony and the room adjacent to it.
Conclusions and useful video on the topic
Detailed information on the installation of systems of this type is contained in the video:
Water heated floors are a convenient system, but you shouldn’t call it easy to install. Proper design, accurate calculations, selection of quality materials and elements will allow you to create a truly effective heating option.
Do you have personal experience in designing and installing water heated floors? Do you want to share your accumulated knowledge or ask questions on the topic? Please leave comments and participate in discussions - the feedback form is located below.


Hello, do you do projects for water heated floors in houses?
Thank you very much for your rather detailed and concise story. Please explain, if possible, in what cases is so-called double reinforcement done? And one more question. Is it possible to place chairs under the reinforcing mesh on which the hard floor pipes are attached so that the reinforcing mesh works as a reinforcing mesh?