How to make a heated floor in the bathroom with your own hands: a step-by-step guide
Warm floors are still considered a rarity in bathrooms, but they are no longer surprising. They give coziness and comfort.Every year the number of people wishing to install such a heating system is growing. Everyone knows how unpleasant it is to stand barefoot on icy tiles, and the floor next to the bathtub or shower is also constantly wet.
We will tell you how best to make a heated floor in the bathroom, indicate and warn you what you need to pay close attention to. The article we have proposed discusses methods for constructing all acceptable electrical and water types. Do-it-yourselfers will find detailed manuals on the design and connection of systems.
The content of the article:
Types of heated floors + their features
What to prefer - water or electric heating systems? There is no point in burning kilowatts of electricity to heat the floor in a house with a powerful heating boiler. It would be more rational to make some changes to the existing heating system in order to direct the hot coolant into the pipes located in the floor.
Of course, it is best to think about connecting a heated floor at the heating design stage. But even in the working system it is easy to find a point at which it will be possible to break the pipeline to insert an additional distribution comb.
It distributes coolant flows and is called a collector among engineers. Each flow is directed to a separate heating circuit; the floor is heated by several such circuits.All of them are connected to the collector, the coolant is supplied to the collector using a special circular pump.
If the floor area in the bathroom is small (up to 5 square meters), then you can dispense with the distribution comb and pump and use cut-off taps and a thermostat. In large rooms you cannot do without this equipment: the boiler will consume too much energy, and floor heating will have to be considered ineffective.
Arguments for choosing the most suitable one warm floor under tiles, which is most often used in arranging a hygienic room, are given in our recommended article.

In electric floors, the heating “core” is:
- heating cables, mats;
- infrared carbon emitters.
Heating cable or mat? The fundamental difference is seen in the complexity of installation and the height to which the floor is raised.
For a heating mat, a 3-4 mm layer of thin tile adhesive above itself is enough, thanks to which the tiles on the floor instantly become warmer. The cable in the mat is fixed on a nylon mesh with a given pitch.

If a cable is used rather than mats, it must be laid on the floor manually; the laying step is set arbitrarily. On top the cable is filled with a layer of DSP 30-50 mm thick. The smaller the step, the colder the room can be heated.
The cable takes longer to warm up the floor, but such heating can be used not only as additional, but also as the main one. Mats cannot cope with this task. In addition, they have a higher price.
However, the industry also produces thin heating cables that do not need to be coated with a solution up to 30-50 mm. On such a cable, as well as on mats, you can immediately apply tile adhesive, but at the same time it is possible to adjust the laying step. As a result, the advantages of both the cable and the heating mats come together.
Now about infrared heat... If we all had an idea about electrical cables before, then infrared heat is a new thing. In this case we are talking about a two-layer thin film, inside of which there is an even thinner carbon crystal lattice, emitting in the infrared range.
Film heated floors are no better and no worse than electric cable ones. They have their own scope of application. Infrared film better suited for dry installation under parquet boards, laminate without the use of mortar and glue, which do not adhere well to its smooth surface.
That's why lay infrared floor under the tiles in the bathroom - a very dubious decision, despite the fact that manufacturers allow it to be used in wet areas (bathtubs, showers).

There are other arguments not in favor of film.The width of the area on which it is placed must be a multiple of the width of the film itself. Otherwise, either the entire area will not warm up, or you will have to lay the film in pieces, apply voltage to each piece separately, and connect many contacts manually. All this reduces the reliability of the design.
Heating mats also have a standard width, but they make it much easier to cover an area of any size and shape, cutting the mesh to which the cable is attached, but without damaging it. In terms of electrical safety, cable heated floors also benefit because they have a grounding loop, while heating films do not.
So, if you do electric floor heating in the bathroom, then use cable or mats. It is easy to assemble such a heating system; it is enough to have basic electrical knowledge. Installing a water floor is much more difficult.
What else does it give us? comparison of electric and water floors? A heating system built into a screed with water circulating through pipes is prohibited for use in apartment buildings due to its heavy weight and the risk of accidents. Installation is possible only on the first floors, and then after receiving a bunch of permits.
Connecting to a central heating system is also not an option, even for apartments on the ground floor. Where can I get coolant in this case? From the heating riser.
But having made an additional journey through the bathroom, the water will return to the same riser cooled. Apartments located on the floors below will not receive enough heat, and their owners will rightly begin to express dissatisfaction. And in the summer the floors will not be heated.

By electric heating circuits there are no such prohibitions. Since there is no water in the system, flooding is also excluded - incidents that bring a lot of trouble to both the culprits and the victims. The device does not use the same powerful and heavy screed as required by water varieties.
And again we return to the need to raise the height of the floor. In the version with an electric floor, its level, as mentioned above, rises by 30-50 mm. And with water - by 80-100 mm. You don’t want to build a podium that is too high, but a water heated floor is more economical during operation compared to the alternative electric option.
Steps to construct an electric floor
Before purchasing a heating cable or mat, we focus on the free space in the bathroom. We do not take into account the area under the bowl with the screen, shower stall, plumbing furniture, washing machine, washbasin and toilet. There is no point in placing heating elements under these items. Moreover, the cable will overheat in such places and fail.
Electric floor power in the bathroom
The standard floor power for bathrooms is 170-180 W/sq.m. meter. We multiply this standard by the installation area. For example, the total area of the bathroom is 5.5 square meters. meters. Minus the area occupied by various objects, we get, say, free 3 square meters. meters.
We multiply the average standard value of 175 by 3, add a reserve of up to 10% to the result and get 525-575 W/sq. meter. This is the required power of the floor heating elements.
Instructions for installing cables and mats
Preliminary calculations make it possible to purchase components and consumables in the required volume, after which you can safely begin constructing the system.
Step 1. We clean the base from debris, remove dust with a vacuum cleaner, smooth out unevenness (1-2 leveling layers are enough).
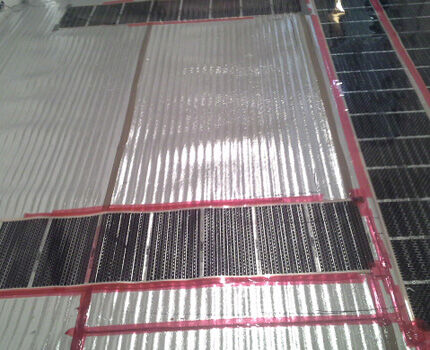
Step 2. We lay thermal insulation. Thermal insulation sheets should be placed on the floor with the reflective surface facing up and the joints between them should be sealed with mounting tape (adhesive tape).

Step 3. Waterproofing. We roll out the film or rolled waterproofing membrane, carefully level it and press it to the base, lift the edges onto the walls (20 cm). If you have to use several panels, then lay them with an overlap of 10 cm, and fasten the joints with tape.
It is allowed to use both coating and cast waterproofing in several layers. Each previous layer must be thoroughly dried before applying the next one.
Step 4. Edge processing. We attach a damper (edge) tape along the perimeter along the walls. It is needed to create a “floating” screed to avoid the appearance of cracks and swelling on it. The tape should be up to 20 cm wide, so that it is enough to cover the height of the floor, including the tiled floor.
Step 5. Laying cables (or mats). We check the working condition of the cables and begin installation. The heating cable is placed on a substrate to which it can be attached.
Metal mesh is suitable for this purpose.In addition to fixation, it will prevent the cable from sinking into the screed and provide strength. Make sure that the cable does not cross. We handle it carefully to avoid even the smallest damage.
We connect the end of the heating cable to the electrical coupling. It will need to be recessed into the screed, positioned as close as possible to the thermostat (thermostat), but maintaining a distance between the wall and the connection of at least 20 cm.
It is much easier to spread an electric mat on the floor. The process is somewhat reminiscent of cutting fabric.

Step 6. Install thermostat with sensor. In the right place on the wall, a meter above the floor, we drill a hole, guided by the dimensions of the thermostat.
We drill a longitudinal groove from it vertically downwards and continue it along the floor towards the location of the sensor. It is advisable to place the sensor between the cables, and not close to one of them, so that it shows the temperature reliably. The distance from the wall is half a meter.
We place the sensor with the wire in a corrugated pipe. The corrugation will protect the equipment. We insert the wire from the heating mats into the same corrugated tube and direct both wires to the thermostat.
To do this, we stretch the corrugated pipe along the floor, put it into a groove on the wall, and try not to bend it too much at the junction of the floor and the wall, so as not to damage the wires. When the screed is poured, the corrugated tube with the sensor should protrude slightly from it.

Step 7 Screed. The installation is nearing completion, so we once again inspect all the elements of the cable floor, make sure there are no defects and begin pouring. We prepare the cement mortar and distribute it over the surface carefully and evenly with a minimum thickness of 3 cm. There should be no voids in the screed. If mats have been laid, we skip this step.
Step 8 The final touch remains - glue the tiles to the screed or directly to the mats with tile adhesive.
This is followed by a long drying period. It will be possible to turn on the electric floor no earlier than 28-30 days after completion of the work. It is imperative to wait until the mortar and glue have completely dried so that the screed does not crack.
Tips for installing infrared film
Preparatory work - as in the previous version. The infrared film is laid in parallel sheets on the thermal insulation material. Overlapping sheets is strictly prohibited. Next, you should install a thermostat with a sensor and make sure the system is working.
The assembled structure is covered with polyethylene and reinforcing mesh. Secure the mounting grid with self-tapping screws, but be careful not to touch the contacts. The mesh needs to be filled with cement-sand screed on top and the system tested again. After the screed has dried, tiles are laid on it using glue.
The infrared floor can be tested no earlier than after 28 days, when it is guaranteed to dry.
Construction of a water system
Make it yourself warm water floor in the bathroom - a more difficult task, but why not try to cope with it... We have to assemble a structure from pipes and connect them to a source of hot water.
Metal-plastic and polyethylene pipes are suitable for the pipeline. Both materials have flexibility and low hydraulic resistance.
Thorough theoretical preparation
One heating circuit can cover an area of up to 20 square meters. meters, which is enough for a bathroom, but if the floor is planned to be divided into autonomous zones, then water must be supplied to them through distribution manifold.

The collector must have flow regulators. With the same water supply to circuits of different lengths, they will heat unevenly. A longer circuit will heat up worse. Moreover, the flow of water in it may even stop due to strong resistance. To eliminate these troubles, flow regulators in the manifold are used.

A number of strict conditions in order to proceed with installation:
- The presence of a closed-type heating system using a circulation pump.
- A double-circuit boiler must have a power reserve.
- All work is carried out with the heating system completely turned off.
The pipes must be freed from coolant.
In the thickness of a warm floor, one can distinguish the obligatory functional layers:
- base;
- hydro- and thermal insulation;
- pipeline from durable pipes;
- concrete screed or gypsum fiber;
- decorative floor covering.
In wooden houses it is also possible make a water floor, but you should worry about reliable waterproofing. It needs to be done in several layers, this is the only way the wooden base of the floor will last for many years without repair.
Step-by-step guide for installing a water floor
The construction of a water system is a cycle that includes standard types of work.
Stage 1. We clean the floor and, if necessary, remove the old covering.
Stage 2. Waterproofing the floor. We lay a waterproofing film on the floor. Preferably in one piece, but if there are several strips, then they should be laid overlapping and the seams should be joined with a blowtorch. The waterproofing material should also cover the surface of the walls (up to 10 cm upward).
Stage 3. Fill the rough screed with a mixture of expanded clay and cement (3-5 cm thick). Dry thoroughly (up to a week), sprinkling the surface with water in the first days to prevent cracks.
Stage 4. We insulate the surface with foam plastic, polystyrene or other similar material. We spread polyurethane with a foil reflective coating on top. We seal the joints with tape. Now the heat from the pipes will be directed only towards the room.
Stage 5. We lay the pipes. We bend them according to the developed diagram, maintain 15-20 cm between the pipes. We fasten the resulting curved structure. Connecting the water supply pipe to the flow distribution manifold.

Stage 6. Turn on the coolant supply and check for water leaks in the system.
Stage 7. We make the second screed with the same solution as the rough screed. If unevenness of up to 5 mm was allowed in the rough screed, now we pre-install beacon slats to perfectly level the surface.

The finishing layer of screed takes 5-7 days to dry - the same as the rough layer. After complete drying, you can begin finishing the floor and laying floor tiles.
Conclusions and useful video on the topic
Video #1. A visual demonstration of the steps to install an electric mat:
Video #2. The process of installing and connecting an electric cable floor:
Video #2. Rules and stages for installing pipes for water heated floors:
Today, every family can afford heated floors; a bathroom with such floors will be transformed and become more comfortable. The underfloor heating system will last a long time if technical inspection and maintenance are carried out in a timely manner.
What kind of underfloor heating is installed in your bathroom? Tell us about how you chose the best option for you, how you installed and connected the system. Please write comments in the block below, post photos and ask questions about the topic of the article.


In general, I think it would be better to install an electric heated floor. Water ones are powered by heating (if you live in an apartment), but this is only in the cold season, and is only allowed for installation on the first floors. You can, of course, install it if you have your own boiler or live in a private house. But the electric option can be turned on or off at any time, and it’s not particularly energy-consuming, since it won’t work for you around the clock. The best thing to do would be to discuss the device design with knowledgeable people and entrust the work to specialists.
Do you really need a warm floor in the summer, when it’s already hot? Most people are looking for coolness at this time.
I tried to make a heated floor in the bathroom myself, but then I decided to turn to specialists for help, because I realized that my knowledge and skills were not enough. The specialist, like Denis, recommended an electric version of a heating system built into the floor. Firstly, it is simpler to construct, and secondly, only this type is allowed in high-rise buildings. In general, we installed an electric floor, and I don’t regret it.
I want to install an electric heated floor in the bathroom, but I am worried about the safety. After all, there is a shower and a washing machine here; water leaks are quite likely. Which waterproofing is best for a bathroom? And isn't this dangerous in principle?
Hello. Electric heated floors are installed in wet rooms in compliance with grounding conditions, installation of automatic devices and RCDs. The wire must also be protected with a special coating, and it is best to immediately buy a cable designed for installation in such rooms.TPs are not installed under shower stalls.
For safe installation, it is advisable to initially invite an experienced electrician with a permit, who will advise you on everything, help you choose, install the system and connect it.