DIY water well drilling: review of work technology
A well at the dacha will provide the owners with water. However, ordering production from a drilling organization, frankly speaking, is not affordable for everyone.Owners of country plots who want to minimize the costs of developing their own source have a choice - hydro-drilling. Not everyone is familiar with this technology, do you agree? Those who are interested in it should first understand the methodology.
We will tell interested home craftsmen in detail how to do hydraulic drilling of wells with your own hands. We thoroughly outline the technological subtleties and list the nuances of preparing and carrying out work. Using the information we have carefully checked and presented, you will cope with the difficult drilling process without the slightest difficulty.
In addition to a scrupulous presentation of hydraulic drilling technology, the author of the article describes the specifics of arranging a site for carrying out independent drilling operations. Provides data on the required drilling rig, tools and accessories. Informative photos and video tutorials will provide significant assistance in mastering a complex issue.
The content of the article:
Distinctive features of the method
Using wells as an autonomous source of drinking water is a fairly old and proven method. Along with traditional, sometimes expensive technologies, the hydrodrilling method can rightfully be called economical and universal.
Popular methods of drilling wells are discussed in our other article.
This is a fairly simple method drill a well has some nuances, ignoring which can nullify all your efforts. Its essence lies in an integrated approach.
Two main processes are combined here - this is the direct destruction of rocks drilling tool and washing out of drilled soil fragments with working fluid. That is, the rock is affected by the drill and water pressure.
The load required for immersion into the ground is provided by the weight of the drill rod string and special drilling equipment that pumps flushing fluid into the body of the resulting well.
The washing solution is a mixture of tiny clay particles and water. Mix it in a consistency slightly thicker than pure water. The drilling fluid is taken from the pit by a motor pump and directed under pressure into the wellbore.
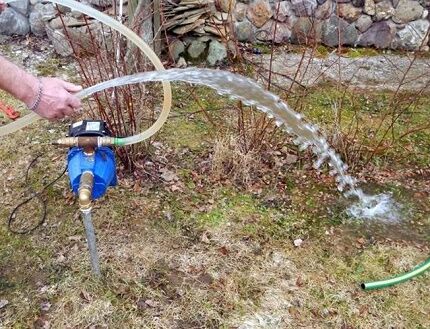
Water in a hydraulic drilling scheme performs several functions simultaneously:
- washes away drilled particles of destroyed soil;
- carries the dump to the surface along with the current;
- cools the working surfaces of the drilling tool;
- when moving, it grinds the inner surface of the well;
- strengthens the well walls that are not secured by casing, reducing the risk of collapse and filling of the shaft with waste.
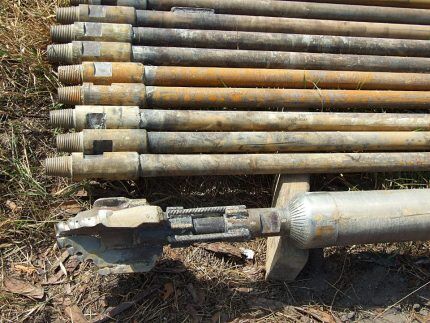
As the drill string deepens, it is expanded with rods - sections of VGP pipes 1.2 - 1.5 m long, Ø 50 - 80 mm. The number of extended rods depends on the depth of the water carrier. It can be determined in advance by farrowing neighbors to determine the water level in their wells or wells.
The estimated depth of the future well is divided by the length of one rod to calculate how many pieces need to be prepared for work. Both ends of each rod must be threaded to allow the work column to be screwed together.
One side must be equipped with a coupling, which it is advisable to weld to the rod so that it does not unscrew in the barrel.
In practice, hydrodrilling in its pure form is rarely used, because high water pressure is needed. It is also difficult to drill through dense clay layers. More often, hydrodrilling is done with a drill bit.
This method is somewhat similar to rotary drilling, but without the rotor. To better center the well and easily overcome dense areas, use a petal or cone-shaped drill.
Hydrodrilling is not suitable for driving through rocky and semi-rocky soils. If the sedimentary rocks in the drilling region are represented by crushed stone, pebbles, sands with a large inclusion of boulders, this method will also have to be abandoned.
It is technically impossible to wash and lift heavy stones and heavy rock fragments from a well using water.
Advantages of hydrodrilling wells
The technology of hydraulic drilling for water has gained popularity among the people relatively recently, and therefore has many misinterpretations. Firstly, it is a misconception that the method is only suitable for small wells. This is wrong.
If desired and with appropriate technical support, hydraulic drilling can be used to drill wells longer than 250 meters. But the most common depth of domestic wells is 15-35 meters.
The opinion about the high cost of the method is also not confirmed by calculations. Good work speed reduces financial costs.
The obvious advantages of the method also include:
- compactness of equipment;
- the possibility of drilling in an extremely limited area;
- minimum technological operations;
- high speed of work, up to 10 m per day;
- safety for the landscape and ecological balance;
- opportunity self-drilling;
- minimum cost.
Perhaps the most significant advantage of hydraulic drilling is the ability to drill in landscaped areas without significant aesthetic troubles.
The advantages of hydraulic drilling also become very clear if we compare it with dry drilling technology, where it is necessary to constantly remove the working tool from the shaft for cleaning and load it again.
This technology is best suited for working with fine-clastic sedimentary soils, which are easiest to extract from a well. using a bailer. And the drilling fluid allows you to do without gelling.
Of course, for a good result of the enterprise, it is necessary to purchase appropriate means of mechanization, because one homemade drill, even at shallow depths, is not enough.
Necessary equipment for work
The standard type of hydraulic drilling work is carried out using small-sized installations. For your own plot, this is a great solution and the best way to get water on your own.
It is necessary to supply working fluid into the wellbore with significant pressure, and for this a pump or motor pump is needed to contaminated liquids.
Sometimes, to increase the breakdown force, shot or coarse sand is added to the working solution.To crush large pebbles that may be found in sandy layers, roller-cone and cutter bits are useful.
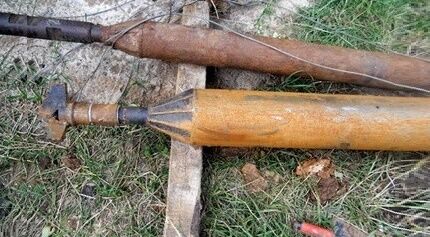
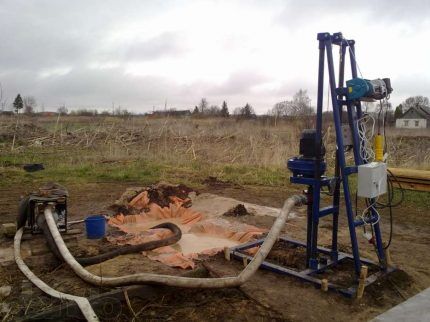
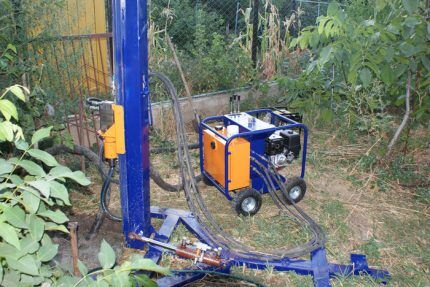
Special small-sized MDU installations are most in demand among consumers for hydraulic drilling purposes. This is a unit with a height of 3 m and a diameter of 1 m.
This prefabricated structure includes:
- collapsible metal frame;
- drilling tool;
- winch;
- a motor that transmits force to the drill;
- swivel, part of the circuit for sliding fastening of parts;
- water motor pump to ensure pressure in the system;
- exploration or flap drill;
- drill rods for forming a column;
- hoses for supplying water to the swivel from the motor pump;
- Control block.
Among the necessary equipment, it is also desirable to have a current converter. It is needed to ensure that the energy supply to the process is stable. You also definitely need a winch for raising/lowering casing and set-up pipes.
When choosing a motor pump, it is better to choose a more powerful device, since heavy loads are expected. For hydraulic drilling, you will also need such plumbing tools as a pipe wrench, a hand clamp, and a transfer fork.
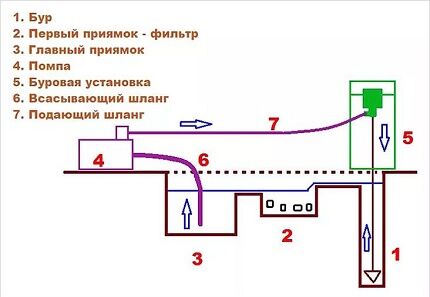
From the very beginning to the end of the work, the hydraulic drilling process involves a constant circulation of the working fluid. With the help of a pump, an aqueous suspension with eroded soil comes out of the well, enters directly into the pit and, after sedimentation of the suspension, is again supplied to the well.
In addition to this procedure, it is possible to carry out hydraulic drilling of shallow wells for water without using a pit. This method does not require a recess to settle the working solution, saves time and makes it possible to drill a well even in garages and basements.
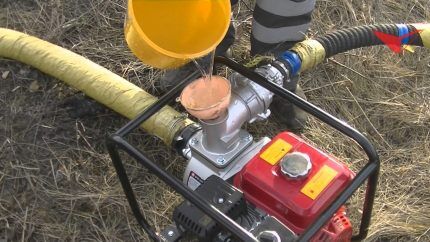
For hydraulic drilling, a motor pump is selected that is capable of pumping heavily contaminated water. It is advisable to buy a unit with a head of 26 m, a pressure of 2.6 atm and a capacity of 20 m3/h.
A more powerful pump guarantees fast, trouble-free drilling and better flushing of the well. For quality drilling, it is important that there is always a good flow of water from the well.
Step-by-step analysis of work
Hydrodrilling technology is very specific, and therefore requires correct adherence to the stages of work. It is necessary to prepare drilling equipment, prepare a solution for flushing, and prepare the casing. Then comes the assembly of the installation and the start of drilling.
The casing is extended as the well progresses to strengthen the walls. The casing is necessary so that loose sand does not fall into the trunk, pebbles lying next to the trunk do not fall, and loam or sandy loam swollen from water does not “bulge out.”
Drilling stops when an aquifer appears. All hydraulic drilling processes have some nuances, knowledge of which comes only with practical experience.
Step #1 - determining the occurrence of aquifers
It is of great importance for the success of the entire event search for water and at least an approximate determination of the depth of the aquifer on the site.
If, as a result of interviewing neighbors, it was not possible to obtain this information, you can find it out from a local drilling or construction organization that carried out work near the site planned for drilling.
As a rule, the first layers saturated with water are located in the first 1.5 - 6 m of the well. Popularly, such water-saturated layers are called perched water.
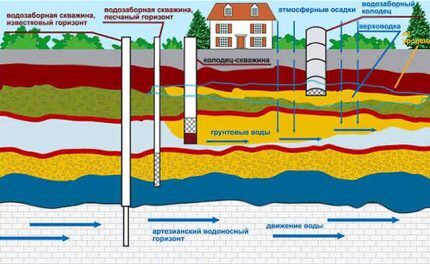
Verkhovodka does not belong to the drinking category; it produces water with technical characteristics due to traditional pollution from household wastewater and oils spilled on the ground, liquids containing petroleum products.
If you are interested in cleaner water, you will have to drill to 15 - 25 m. At this depth, the chances of obtaining life-giving moisture with potable status are approximately 70% if they are covered by a waterproof loamy or sandy loam horizon.
The underlying aquifers with a depth of 25-50 m or more guarantee the availability of high-quality drinking water by 90%.
By hydrodrilling it is easy to obtain a well of 10-30 m or more. In this case, we have a simple drilling process and easy installation of casing pipes. Experts recommend doing exploratory drilling with a 100 mm drill.
If the results are positive at 10 m, you can simply leave the drill string in the hole with a perforated starting rod as a filter. If the water turns out to be deeper, the well is drilled with a 200 mm drill and a casing pipe 116-125 with a submersible pump is inserted into it.
As a rule, aquifers consist of medium-sized sand and coarse, gravel or crushed sediments. These are sedimentary rocks, the parts of which are in no way connected with each other.
Non-cohesive rocks have the highest filtration qualities. Within their boundaries, water moves freely and seeps into the underlying layers.
In their natural occurrence, loose clastic soils usually alternate with clayey deposits: sandy loams and loams. Fine particles of clay rocks are cemented, which prevents the free passage of water through them.
They do not allow or absorb water and form unique platforms—aquifers for accumulating water.
When passing through dense clay layers, the drill moves more slowly, but quickly passes through sand and other clastic rocks. Resting against the water-repellent clay layer underlying the aquifer, drilling slows down somewhat.
If the injected water seems to be squeezed out of the excavation shaft in an amount larger than the pump distilled, then the aquifer has been opened. Drilling should be stopped and time should be allowed to allow the suspension to soak into the soil.
You can focus on the pit beacons. As long as the drilling does not expose the aquifer, the water in the pit will remain at the same level. If the excavation goes deeper into the layer of underground water, the volume of water in the pit will increase.
Step #2 - preparing the workplace
Proper preparation of the drilling site will eliminate hiccups during the work process and will contribute to a good result, since interruptions in the method with the supply of solution are extremely undesirable.
Having enough water is important. To guarantee the required amount of water during hydrodrilling, it is necessary to count on 15 m3 and prepare the required tank accordingly.
You can prepare additional containers of about 2 cubic meters or dig a hole of 5 or more cubic meters, treating the walls with clay mortar.
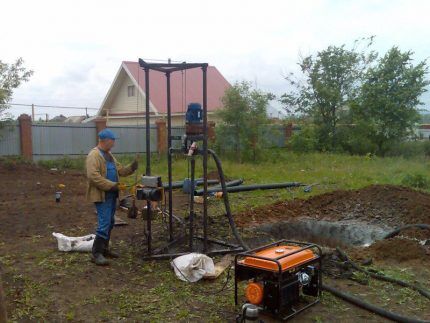
When the water supply is prepared, a small-sized MBU drilling rig is installed. The unit is installed according to the instructions. Assembly takes about an hour and does not present any technical difficulties.
The main condition for proper installation is strictly horizontal placement of the device. In the presence of even minimal distortion drilling rig you will not be able to install the casing later.
At a distance of 1.5-2 m from the structure, technological pits are dug for filling and storing drilling fluid.
Pits are depressions in the ground like bathtubs. They are connected by an overflow channel - a trench in the form of a tray or gutter. These baths contain a washing solution before pumping the barrel, and it is drained there along with the dump.
The optimal size of pits is considered to be 1x1x1 m. Liquid from the well will be collected in one pit to settle solid particles. The settled water that has overflowed through the gutter into the second pit is pumped back into the installation by means of a pump.
The first pit functions as a settling basin and can be smaller in size.During the process, it must be periodically cleaned from drilled fractions that have settled to the bottom. The second pit is considered the main one.
A motor pump (pump) is located next to it. The hose from the inlet of the motor pump is lowered into the main pit. The hose from the outlet goes to the drilling rig.
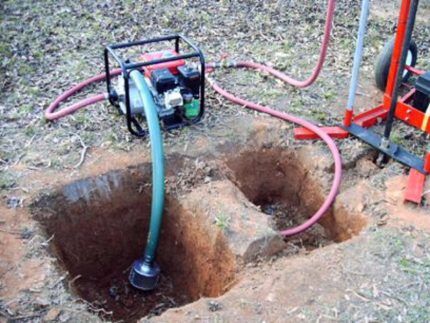
Water injected into the drill string cools the drill, which significantly increases the service life of the tool. During the drilling process, water circulates in a circle without heating. After drilling is completed, the water is simply pumped into the recesses made for it.
If you still need to leave the unit idle overnight, the carriage with the working element is lifted by a winch to the upper level of the MDU and fixed.
The next day the pump starts, runs for half an hour/hour and the drive starts. Then the column of rods is lowered and raised by a winch. When the carriage begins to move easily, you can start drilling again.
Step #3 - drilling a MBU well
After technological preparations and assembly of the drilling rig, the pits are filled with working solution and drilling begins.
After the starting rod is immersed in the ground by 95% of its length, it is connected to the next link of the drill string by screwing. The process continues until the water in the pit begins to increase sharply.
The entire hydraulic drilling process can sometimes last from 1 to 7 days, depending on the skill of the performer and the type of rocks present in the area.
For drilling in low-moisture loose sands, a certain supply of drilling fluid is required, because...these deposits quickly absorb water.
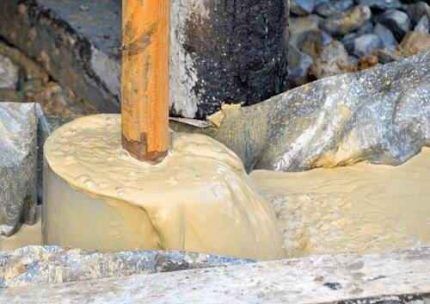
The clay component of the suspension prevents water seepage. It clogs the pores in the walls of the well, thereby reducing the absorption of liquid by the sand.
It is best to make a solution by mixing the clay with a mixer in a pit with water. Before starting work, be sure to check the serviceability of the winch and pump, since no stops are made when digging sandy soil.
To prevent collapses of a wide wellbore, the casing pipe is lowered almost simultaneously with the deepening of the drill string. It is desirable for the casing to be somewhat ahead of the drill bit in the sand. This is necessary to block the constant flow of collapsed loose rock into the trunk from the side.
Pipes made of steel alloy or plastic are used for casing. Today, plastic pipes have gained great popularity due to their durability, resistance to deformation and corrosion.
However, with this drilling method, casing pipes most often have to be forced into the trunk with force. Therefore, it is better to prefer a steel version with threads for screwing on the next link.
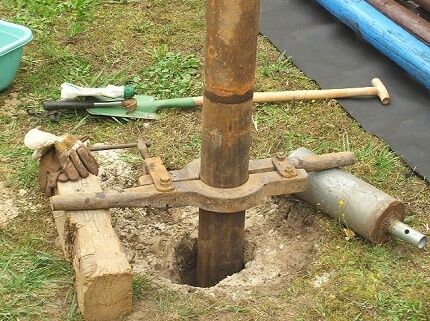
In order to securely fasten the casing string in the well, it is better to immediately install a clamp during extension. They are also used when partially pulling out the casing from the well, which is carried out to expose the filter in the wellbore.
If there are no clamps, you can use a strong cable placed on the drill in the form of a loop. The other edge of the cable is attached to a tree, log or other massive object before unscrewing the top of the drill.
The simplest hydraulic drilling scheme is difficult not to understand, much less cope with its implementation. A motor pump delivers the solution into a hose connected to the drill string. Through the cavity inside the rods, the liquid moves to the drill bit and further contributes to the destruction of the drilled rock.
The liquid that has captured the dump is directed to the first pit (filter pit). After the suspensions settle to the bottom of the pit, the liquid flows into an adjacent recess and is used in a new circle.
The composition of the drilling mixture must be adjusted depending on the rocks being passed through. For sand, a thick clay solution is used - it will strengthen the walls, preventing them from collapsing.
Clay soil, sandy loam with loams can be drilled with clean water, and for drilling through dense rocks, abrasive, shot or coarse sand can be added to the solution.
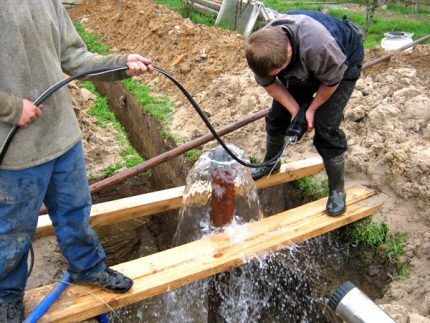
MDR works well at a depth of 10-50 m. In practice, wells up to 120 m are constructed using this installation.
Step #4 - installing a filter and constructing a well
After opening the aquifer, drilling is carried out all the way into the underlying aquifer layer. It can be determined by the slowness and difficulty of immersing the drill string. The drill rods are removed after thoroughly flushing the well with clean water.
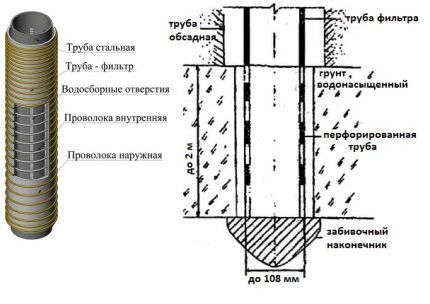
If a wide well was drilled for the subsequent installation of a submersible pump, then care must be taken filter device. To do this, another one, but of a smaller diameter, is inserted into the casing.
The first link of the internal casing should have longitudinal slots or holes drilled in a staggered pattern.
To improve the quality of water purification, the filter link is complemented with a thin steel mesh or polypropylene coating.
When the filter sinks to the bottom, the casing is slightly pulled out of the barrel so as to expose the filter holes. The excess pipe is cut off and the head is arranged.
And if a gap forms around the trunk, it is filled with crushed stone and filled with cement mortar to fix the wellhead and prevent flood waters from seeping into the aquifer.
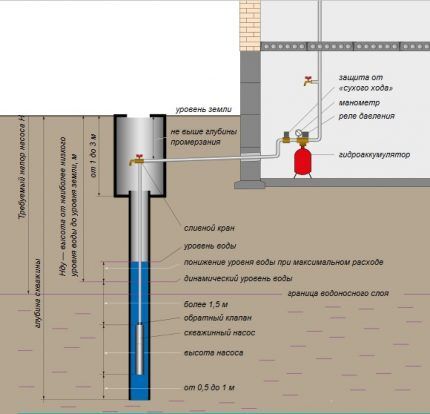
It is installed in such a way that there is a water level above it of more than 3 m, but in no case should it touch the bottom. After correct placement of the pump, the well is ready for use.
Step #5 - final stages of drilling
When the well is ready, it is necessary to dismantle the drilling rig and put it into operation.
In narrow workings, the drill string together with the drill serves as a casing string with a filter. There is no need to remove them from the barrel, because Water will be pumped out from the water intake point through the same channels through which the drilling suspension circulated.
The hydraulic drilling process is distinguished by accessible technology that does not require special theoretical knowledge. Compliance with the main stages of the process in conjunction with high-quality equipment will certainly give good results and delight you with clean underground water.
You may also find useful information on how to pump up a well after drilling, discussed In this article.
Conclusions and useful video on the topic
Using MDR for drilling a water well in sandy loam soils:
Drilling a well on your own:
You can avoid mistakes and minor miscalculations in hydraulic drilling without deviating from technological principles.
To further reduce financial costs for a single hydraulic drilling of a private well, you can not purchase an MDU, but rent the unit. Thus, with your own hands in a very short time you will get your own, free source of water supply for many years.
Are you familiar with the hydro drilling method? Or do you prefer a simpler way to drill a well? Perhaps you have discovered an inaccuracy in the hydraulic drilling algorithm we described? Write to us about it - leave your comments under the article.


Having your own well is very important, and given the price of water, it’s absolutely necessary. I have a small greenhouse: if you pay for watering, it’s cheaper to buy vegetables at the market. My neighbor helped me drill the well; I couldn’t have done it without him, and I still needed equipment. Everything was done the old fashioned way and intuitively. We were lucky, the aquifer is quite high, so we managed it quickly. But this is, of course, not an easy matter.
If you drill a well yourself, you can provide your suburban area with water everywhere.A friend of mine drilled water intake openings with an auger, and immediately as he drilled, he formed a shaft with a casing pipe. You can drill out almost any rock with an auger, as long as you don’t come across a boulder that you have to destroy with a chisel. To make things go faster, a friend did not rotate the auger manually, but attached a motor to it. The soil is captured by the auger blades and pushed up out of the hole. To increase the depth, additional links are attached to the starting auger.
My neighbors farrowed)))
I want to take a risk and try to make a well on my own at my dacha using hydrodrilling. The situation is complicated by the lack of electricity on the site (during the wiring process) and the complete lack of experience in drilling. The first difficulty was solved by borrowing an inverter generator from a relative, the second by studying a bunch of materials and videos on the Internet. I really hope that I don’t come across any stones, but without them everything looks pretty simple. I think I can handle it during the holidays.