DIY hexagonal gazebo: drawings, step-by-step construction instructions with photos
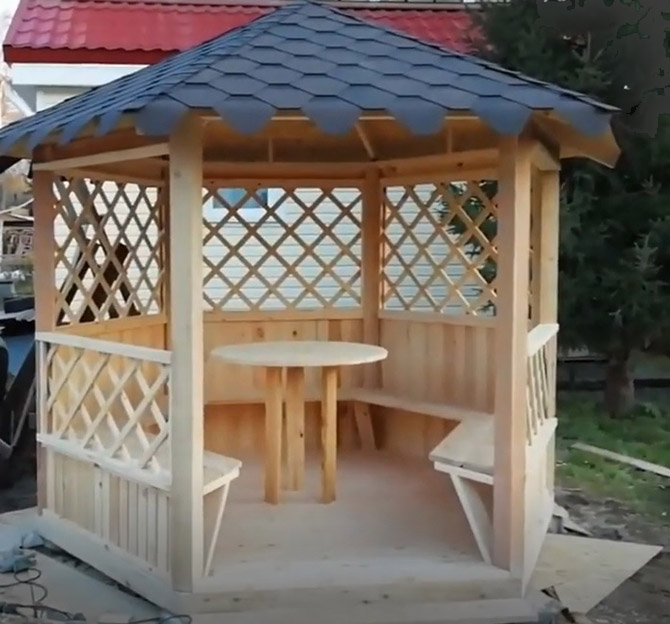
The process of building a hexagonal gazebo with your own hands looks quite complicated from the outside.But this is just a first impression due to the complex design of the roof frame. Only laying the roof will require more care. However, a gazebo with a hexagonal roof noticeably outperforms a conventional one with a gable or hip roof. Nice design, interior space is used more efficiently than rectangular or square buildings.
The content of the article:
Preparatory stage
There are three main ways to build a hexagonal gazebo:
- Assemble from a corrugated pipe and a corner, but in this case you will need to make a slab or pile foundation.
- Make a forged building from steel bars and reinforcement. You can add decorative elements made of plastic with imitation forging.
- Build a wooden gazebo with a hexagonal roof.
Of the above, the forged construction option is the most difficult to manufacture and the most labor-intensive. Working with forging requires experience and skills, therefore, if this is your first experience in building a gazebo, it is better to abandon the forged option.
The easiest way is to build a hexagonal gazebo with your own hands from a profile pipe and a steel corner. Construction will take a maximum of a couple of days. But you need to be able to weld the frame correctly. In addition, the appearance of the building is not very attractive; the design of the welded structure made from corrugated pipe is too “industrial”.
For a home gazebo with a hexagonal roof, wood is the best choice.Everyone knows how to work with boards and timber with their own hands; the building will turn out “warm”, beautiful, even without varnishing the wooden parts.
Selection of materials and tools
To make a wooden frame the following will be used:
- timber 150x150 mm;
- timber 50x50 mm;
- edged board 40x200 mm;
- rail 40x20 mm;
- concrete blocks;
- cement, sand, gravel.
For the roof you will need four sheets of OSB and bitumen shingles. Accordingly, you will need to buy fasteners (nails), glue and lining material for it. In addition, you will need to choose the right paint and varnish so that the coating is smooth and does not fade in the sun's ultraviolet radiation.
From the tools:
- shovel;
- wheelbarrow;
- container for mixing concrete;
- jigsaw, hand circular saw;
- electric drill, screwdriver;
- carpentry measuring tool - tape measure, square with a grid of angles in degrees.
In addition, you will need fasteners - carpentry screws from 40 to 120 mm, nails with a wide head, wood glue. Separately, you will need to find several pieces of roofing felt for waterproofing the foundation.
You will have to order in advance or make your own center for assembling the hexagonal roof frame. Without it, it will not be possible to assemble the roof. The center is a hexagonal prism cut from 90x90 mm timber. The tops of the triangles forming the slopes of the gazebo will rest on it.
Blueprints
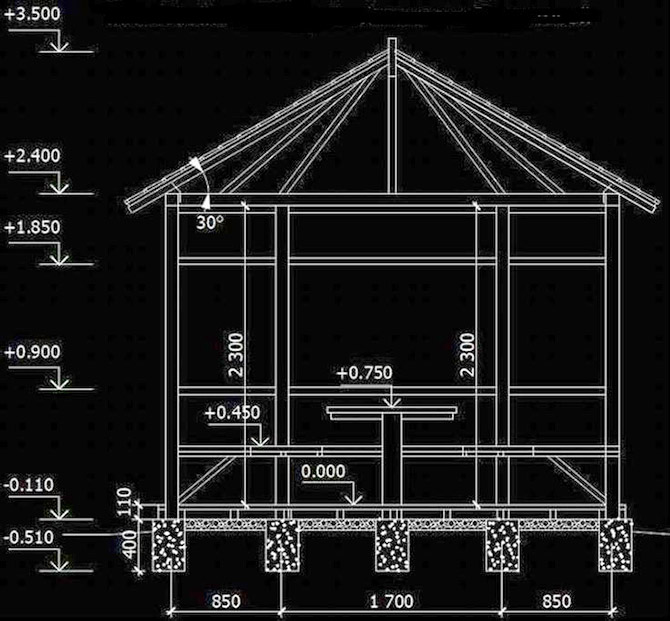
Before starting work, each builder draws up a working sketch of the future building. It is clear that you need to have a general drawing in order to calculate the estimate, order materials and stock up on tools.
But, in addition to detailed drawings, you will need a sketch, assembly diagram or step-by-step instructions. It will help to avoid such an unpleasant phenomenon as using blanks for other purposes.
The assembly diagram for a hexagonal gazebo can be drawn by hand or using a specialized program.
The gazebo will be installed on support pillars; the frame of the hexagonal building is quite light, so pouring a slab or making a hexagonal shallow foundation is impractical.
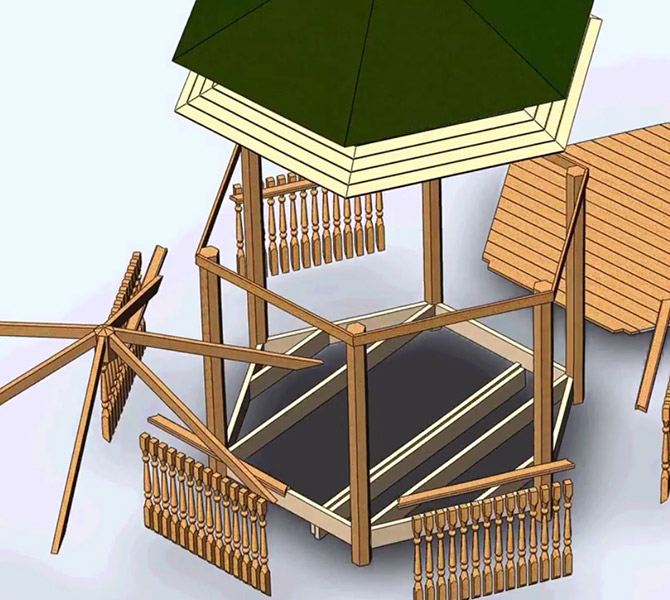
The hexagonal frame is formed by vertical posts made of timber and two frames - lower and upper. The lower one is used for laying logs and subsequent laying of the plank floor. The rafters of the hexagonal roof will rest on the top frame. Both trims will need to be carefully adjusted, otherwise the vertical posts will look uneven, and accordingly, the entire formal appearance of the hexagonal gazebo will be ruined.
Construction - step by step instructions
Construction begins with preparing the site at the dacha. The minimum area is 3x3 m. Even if you plan to build a gazebo directly next to the house, the first step is to carefully remove all grass and weeds, including the roots.
Experts recommend digging up and compacting the site, and after arranging the columnar foundation, filling it with fine gravel.
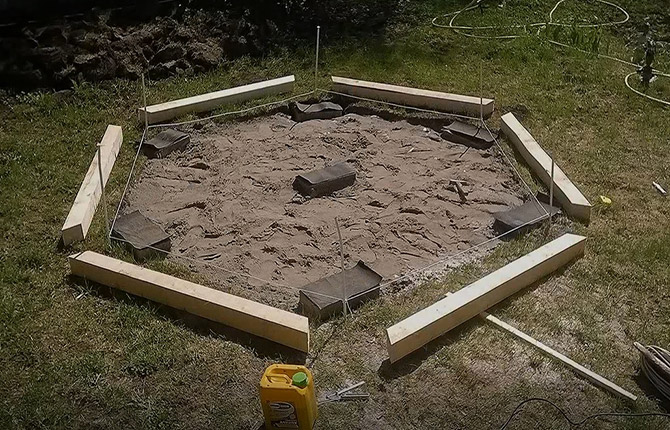
Marking
A hexagonal gazebo has an equilateral hexagon at its base. This means that the radius of the circle into which a hexagonal figure can be inscribed will be equal in length to one of the sides of the hexagon. In fact, marking the foundation for a hexagonal building is considered one of the simplest; it is almost impossible to make a mistake.
First you need to draw a circle. This can be done using a peg driven into the ground and a cord. The length of the rope is chosen equal to one of the sides of the hexagonal arbor. The method is simple, but its accuracy is low due to the fact that the rope tends to stretch.
A manual surveyor can be used to mark hexagonal foundations with edge lengths up to 1.8 m. It consists of three strong wooden planks, knocked together in the shape of the letter “A”. The distance between the lower ends of the inclined bars (the base of the “letter”) is chosen equal to the radius of the circle. It turned out to be a kind of huge compass. With its help, you can mark the foundation for a hexagonal gazebo with an accuracy of up to a millimeter.
All that remains is to select a center on the site, draw a circle and, with the help of a surveyor, mark on the circle the installation points for future pillars for the foundation of the gazebo.
Foundation
The hexagonal gazebo will be installed on poles partially submerged in the ground. You will need to install seven supports: six around the circumference, one in the center of the gazebo.
If the soil is heavy and rocky, then cuttings of an asbestos-cement pipe, 40-50 cm long, can be used as pillars. A hole in the ground is cut out using a garden drill or, if there is a lot of crushed stone, knocked out using cuttings of a 125 mm steel water pipe with a jagged edge. After pouring concrete into the pipes, you will get a foundation that can support a hexagonal gazebo with “passengers” with a total weight of up to a ton.
On soft soil (chernozem, rich clay), holes will need to be dug with a shovel to a depth of 25 cm. Sand and gravel are poured onto the bottom and molds are installed for filling. The formwork can be knocked down from scraps of an inch board or you can use a plastic ready-made blank for growing flowers in flower beds.
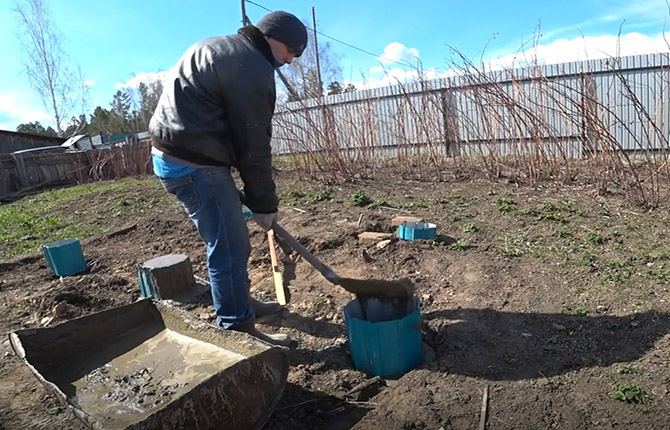
Advice! Before pouring concrete into the mold, it is necessary to level them so that all the supporting areas of future columns are located in the same plane.
Immediately, before the filling has set, you need to place one M16 steel pin into the concrete so that approximately 4/5 of the thickness of the beam from which the lower frame of the hexagonal gazebo will be made protrudes above the concrete surface.
It will take at least 7 days for the concrete pour to harden. If the construction of a hexagonal gazebo took place during the hottest time of the year, then the forms need to be covered with film. After the concrete has set, the film is removed, and pieces of two-layer glass roofing felt are glued onto the pillars (with mastic).
Connections in the bottom trim
The next step is to lay the trim from the timber around the perimeter on the posts. This is the bottom harness. Each piece is cut out with a length equal to the side of the hexagonal gazebo frame, plus another 5 cm.
Before laying, the ends of the sections must be cut at an angle of 60O to the side surface. After cutting, the workpieces are laid on poles. It is clear that the joint between two adjacent sections of the hexagonal strapping should be located in the center of the pillar support area.
First, let's drill a hole in the beam and secure the end with a pin concreted into a column, as well as a washer and nut. We will tighten the end of the adjacent beam using three 120 mm self-tapping screws. The nut should be 80% tightened. The final tightening is performed after installing the vertical posts of the hexagonal frame.
The rigidity of the hexagonal strapping turned out to be quite large, but still insufficient for installing vertical posts. Therefore, before installing the vertical supports (they will be the corners of the hexagonal frame), it is necessary to embed logs for the plank floor of the gazebo into the bottom trim.
For joist beams, you can use 150x30 mm boards.Initially, you need to install one pair of logs in the center, between the opposite edges of the trim. The logs can be embedded into the timber or secured using steel angles and self-tapping screws.
A backing board is laid in the middle between the joists. Its thickness is chosen such that both logs rest through the lining on the foundation column. All parts are sewn together using self-tapping screws.
In addition, you will need to lay one more joist beam to the left and right of the H-shaped structure. Fasten with self-tapping screws to the timber. The base for the floor of the hexagonal gazebo is ready, you can move on to the posts and roof.
Installation of pillars
For vertical supports, 100x100 mm timber is used. The material is pre-cleaned with a hand grinder. After installing the support into the frame of the hexagonal gazebo, sanding will be much more difficult.
The vertical pillar blank is installed at the joint between the strapping beams (above the foundation pillar) in an approximately vertical position and fixed with strut strips stuffed on the sides. This is the most critical stage in the construction of a hexagonal gazebo, since each pillar support must be vertically aligned as accurately as possible.
At least one assistant is needed to finally align the post, but you can try to align the post alone. You will have to sequentially unfasten one or the other strut, while moving the beam, checking the position of the pillar with a building level until the device shows vertical in perpendicular planes. After this, the pole must be fixed to the bottom trim with two screws on each side.
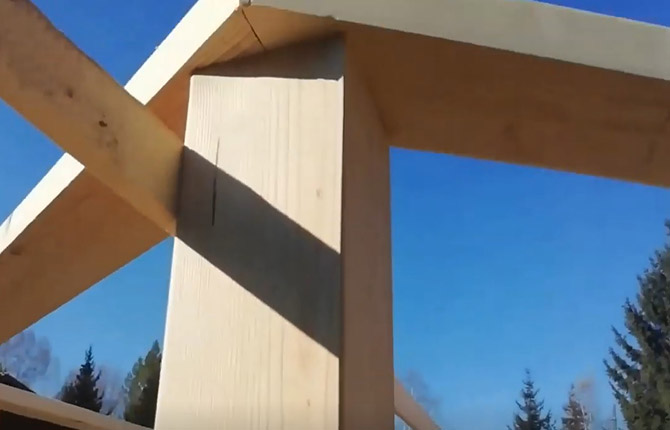
As soon as the vertical posts are aligned, they need to be fixed at the heads with horizontal spacer bars.
Floor
After the main components of the hexagonal body have been assembled, it is necessary to strengthen the base of the gazebo. Therefore, the next step is to lay the floorboards. Since the room is hexagonal in shape, each board has to be cut individually to size.
The floor turns out beautiful, white, but the final finishing is still far away, so OSB sheets are temporarily laid on the floorboards, from which a continuous sheathing for bitumen shingles will later be cut out.
Otherwise, the floor will have to be sanded to rid the gazebo of black marks from shoe soles.
Upper harness
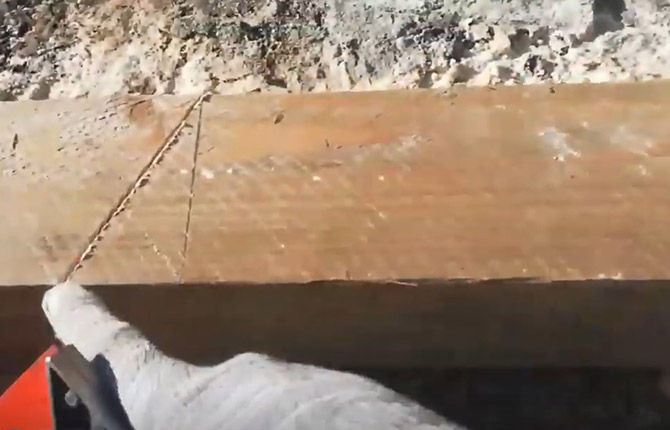
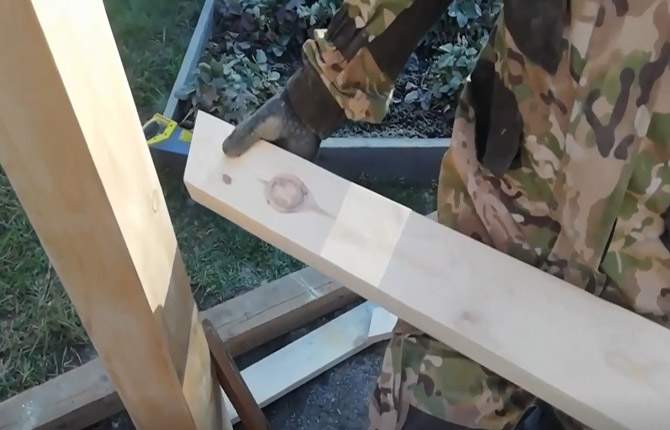
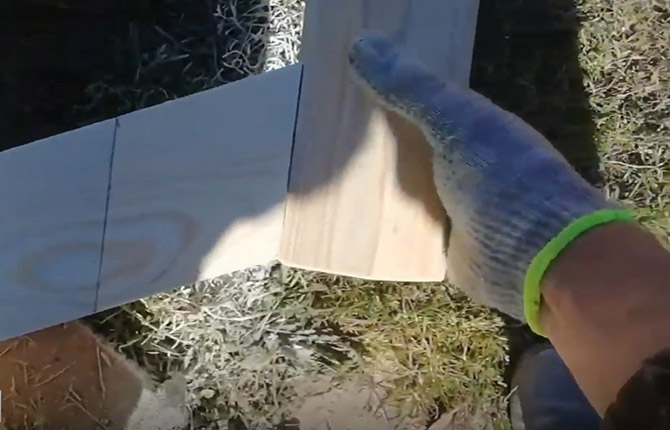
According to the project, the roof of the gazebo will also be hexagonal with overhangs of 30 cm. But before installing the rafters, you need to make the top frame of the vertical supports. To do this, use six blanks from forty boards, 150 mm wide. The length of each should be 15 cm greater than the distance between the posts.
The blanks are laid out on the heads of the supports with overlap. That is, on the post, the edge of the workpiece should lie on top of the adjacent board. Next, the overlap is fixed and sawed with a hand hacksaw along the midline. As a result, all boards are adjusted to size. You just need to number them so as not to mix them up if the upper trim of the hexagonal body has to be disassembled.
Important! All parts of the hexagonal gazebo are assembled with self-tapping screws using a screwdriver. Only the floor can be nailed onto the joists.
After installing the top frame, it will be necessary to sand the posts and boards of the top frame: remove burrs and possible chips of the wood surface. There should be no sharp edges.
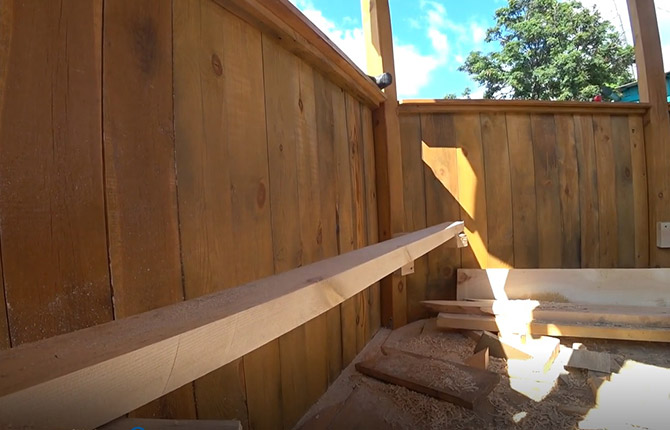
Before making a hexagonal gazebo roof, you need to install the railings of the future fence.They will not interfere with work, but at the same time they will seriously increase the rigidity or stability of the vertical supports.
Each workpiece has to be cut individually to size; it is important to make the cut angle correctly so that there is no gap left between the support and the end of the workpiece. The gazebo fencing is secured using 70 mm self-tapping screws.
The fence itself is made of 90 mm lining; part of it can be made of lathing from a 30x30 mm lath.
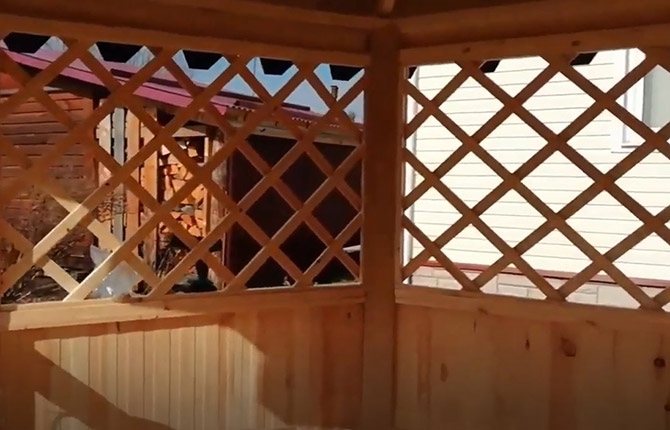
The windows of the hexagonal gazebo are completely covered with lathing.
Erection of the roof
The next step is to assemble the rafter frame. A hexagonal center will be used for this. Each rafter must be adjusted in length, and most importantly, in angle of inclination.
Therefore, the hexagonal center is placed on the table, the edge of the rafter is applied to its edge, marked and cut at an angle. Then the edge of the center and the rafter are numbered so as not to be confused. The hexagonal center only looks perfectly straight, in fact there are errors in size. Therefore, you have to adjust each rafter individually to size separately.
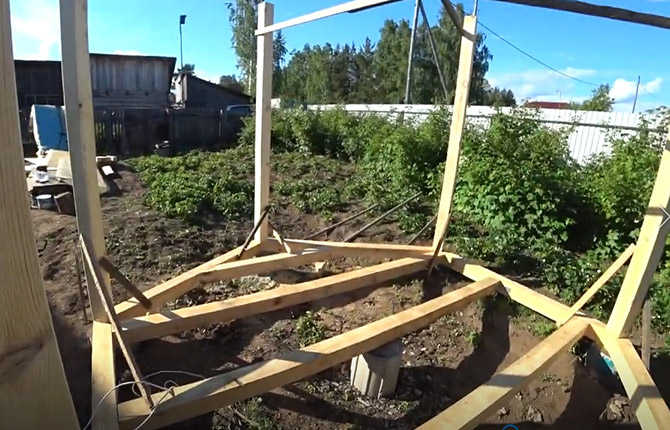
The frame for the roof of the gazebo is assembled “on the ground”. Since the roof is hexagonal, the rafters are attached to the center in pairs and at the same time the pair is strengthened using a spacer strip.
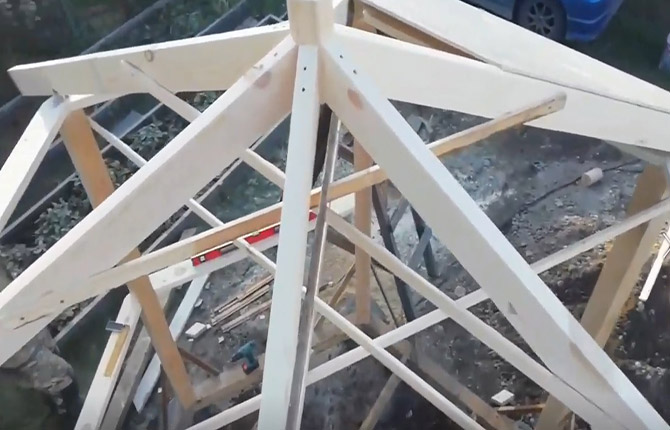
After installing all the rafters, the frame is once again checked for symmetry and raised onto poles. The rafters are fixed to the heads using steel angles and self-tapping screws.
The frame of the hexagonal gazebo is almost ready. You just need to lay the bitumen shingles.
For hexagonal gazebos, in addition to soft roofing, corrugated sheeting, metal tiles, slate, and ondulin are used. But asphalt shingles are best suited for a hexagonal roof.It is easier to lay it on a slope, and if you do not make gross mistakes, then a tiled roof on a hexagonal gazebo will easily last 20-25 years.
The only drawback of tiles is that under them you need to make a continuous sheathing of waterproof plywood or OSB. Moreover, each sector of the roof has its own dimensions. Therefore, you cannot cut out one triangle from OSB and use it, like a template, to make all the others.
In each case, you have to lift a whole sheet of OSB onto the roof, try it on in place, mark it, and then cut out a blank for the roof on the table.
If the marking is done correctly, the edges of the workpiece will rest on the rafter without going beyond the midline.
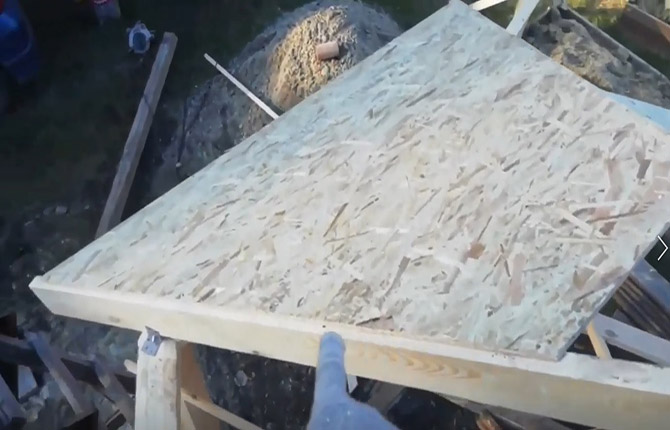
The second part of the sector is also cut out individually. It is smaller, so trimmings and waste from cutting the main sheets are used to make the “tops” of the triangles. OSB boards on the rafters of a hexagonal gazebo are secured using carpentry screws.
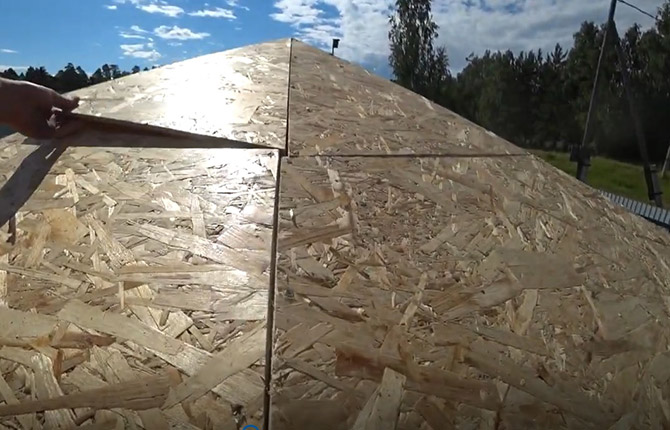
If the base under the bitumen shingles is laid correctly, then the joints will not be visible. But just in case, the joint can be puttied and sanded with a grinder.
Selection and installation of roofing
Next, you need to lay the roofing covering on the roof. The first or starting row must be carefully aligned along the overhang line. At the same time, check with the location of the starting strips in other sectors. If visually the tiles are laid evenly, then they can be attached to the OSB base. To do this, use a regular furniture stapler with a staple height of 10 mm. This is enough to fix the roofing of the gazebo without glue.
The roof of a hexagonal gazebo is considered the most complex part of the structure. Therefore, mistakes are often made in marking pieces of OSB, cracks appear, and there is a chance that water can flow under the bitumen shingles.Therefore, all flaws, cracks, and places of inconsistency are sealed with sealant.
After assembling the roof and laying the bitumen shingles, it will be necessary to install additional heel supports under the overhangs. They are installed on the trim on the inside of the roof. You will need to cut six “triangles” 150x100 mm, tuck them under the slope, and then secure them with self-tapping screws.
The final operation is to treat all parts of the hexagonal gazebo with protective impregnation against bark beetles and fungus. Particular attention to the bottom trim and floor. In these places, treatment must be performed at least three times. After a day or two, the wooden structure is opened with varnish. You can use regular pentaphthalic or acrylic. For the floor - only polyurethane varnish.
A selection for you:
- DIY gazebos made of wood
- DIY brick gazebo
- How to build a comfortable metal gazebo with your own hands
- We build a gazebo from polycarbonate with our own hands
- How to make a gazebo from a profile pipe with your own hands
- We make a gazebo from scrap materials with our own hands
- We build a modern gazebo with a barbecue for the dacha with our own hands
- How to make a beautiful gazebo from pallets
- Do-it-yourself gazebo with a pitched roof
- How to make a 3 by 4 gazebo with your own hands
Results
Building a hexagonal gazebo is not as difficult as it might seem at first glance. The only difficulty is that most operations involve individual fitting of parts to size. It requires skills, patience, and accuracy in work. All other operations are standard.
Tell us about your experience building wooden gazebos with a hexagonal roof. What do you think is the complexity of such buildings? Also bookmark the article and share it on social networks.


It seems to me that it would be easier with metal tiles. You can’t live in it, and the price is half the price of bitumen. If you like brown, you can find metal tiles that look like old clay, with different shapes and patterns. No need to fool yourself with OSB.
People do it for themselves. It's not about the money.