Drainage systems for roofing: existing types of systems and their design + calculation and installation steps
Roof drainage systems constructed along the slopes of gable roofs or along the perimeter of hipped structures can significantly reduce the load from precipitation on the façade, blind area and foundation. In order for the drainage complex to be effective, it is necessary to select the material and calculate the parameters of the component elements.
We will tell you how to choose a drainage system depending on the technical data and features of the house. The article we presented describes in detail the calculation steps and technology for installing a structure for removing atmospheric water. Taking into account our advice, you can carry out the entire scope of work with your own hands.
The content of the article:
Classification of drainage systems
The principle of organizing the drainage of melt and rainwater depends on a number of factors: the design of the roof, the climatic conditions of the region, and the personal preferences of the home owner. In any case, the drain should operate effectively all year round without the appearance of leaf, ice or dust blockages.
When planning a spillway, it is necessary to determine important parameters: the location and configuration of the system, as well as the material used to make the component elements.
External and internal drainage
The type of drainage system is selected depending on the type of roof, the number of floors of the building, and the weather conditions of the area.
Three options for drainage are used in home improvement:
- external disorganized;
- outdoor organized;
- internal organized.
The first type involves spontaneous drainage of water. To work, it is enough to move the cornice at an angle beyond the wall.
A gravity flow system is not often installed in residential buildings due to a number of disadvantages. Water falls close to the foundation, increasing the likelihood of its destruction.
Features of arrangement of unorganized drainage:
- the amount of annual precipitation in the region should not exceed 300 mm/year;
- the roof must be equipped with a canopy 60 cm long or more;
- On the side of the house towards which the slope is facing, it will not be possible to arrange a balcony; there should not be a pedestrian zone there either.
The most popular system for private homes is the outdoor organized type. This option is suitable for sloping, gable, hip, and hip roofs. For subsequent moisture removal, install filter well or storm sewer.
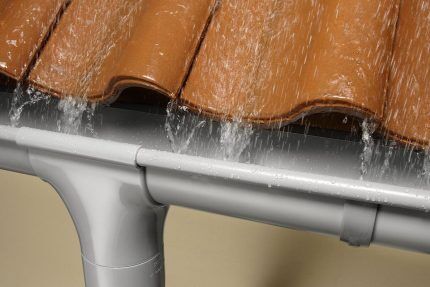
Specifics of external type drains:
- work well in warm regions; in areas with frosty winters, it is advisable to provide an anti-icing system;
- In cold warehouse buildings, the likelihood of an ice jam is minimized - here you can install an external drain without heating.
The internal system involves installing a drainage pipeline inside the building. The complex operates effectively at positive and negative outside temperatures. Such a drain is usually installed in shopping centers and multi-storey buildings with a flat or pitched roof.
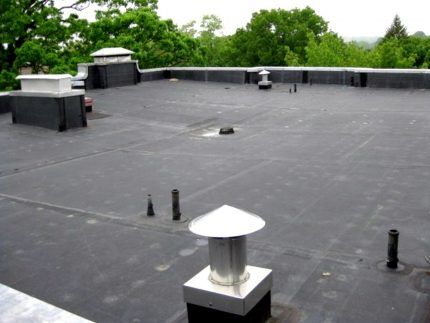
Based on design features, two types of internal systems are distinguished:
- Gravity. Water flows freely through inclined gutters. Designing the system is not difficult, and an additional advantage is its affordable cost.
- Siphon. Sediment accumulates and fills the pipe from the funnel to the sewer outlet. When the liquid level drops, a vacuum zone is formed - water is literally sucked in.
The siphon system is more expensive to install, however, during its installation you can use a minimum number of funnels and pipes of reduced diameter. The siphon drain copes well with heavy rainfall. An additional advantage is self-cleaning under the pressure of flowing water.
Closed and open type systems
The type of roof determines the configuration and specifics installation of a drainage system. For a house with a gable roof, it is enough to install two straight gutters and vertical drainage pipes.
If the roof slope is of a non-standard configuration, then in order to create an effective system and preserve the aesthetic appearance of the house, a more complex complex will have to be developed.
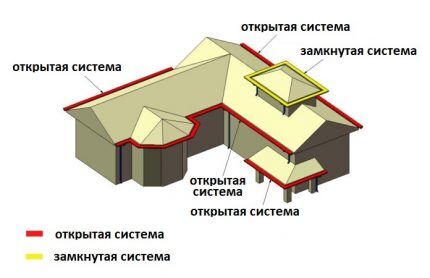
Drainage from a hip roof is carried out in different directions, so vertical drain pipes must be installed in the corners of the building. The calculation of a closed system is carried out taking into account the total roof area.
In gable, multi-slope and multi-slope structures, several separate lines of gutters are installed. Vertical drainage channels are placed in the center of the wall or at the corners of the house.
Materials for making a spillway
Elements of the drainage system are made of metal or plastic. There is also a combined option - metal products with a polymer coating. Each material has pros and cons.
Among the metal gutters used:
- steel;
- aluminum;
- copper.
Galvanized steel gutters are affordable, durable, resistant to temperature changes and UV rays.
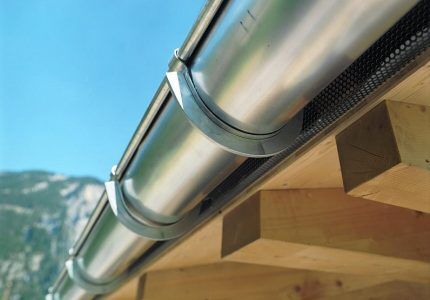
To improve the appearance and extend the service life of the drain, galvanization is coated with polymers.
Possible options:
- Pural. The surface is resistant to mechanical damage and UV rays. Service life – 30-35 years. Pural products are more expensive than other composite elements.
- Plastisol. PVC coating is affordable and comes in a variety of colors.A significant disadvantage is the fear of sunlight; under the influence of ultraviolet radiation, the polymer is deformed. A drain made of steel and plastisol is suitable for northern, mostly cloudy regions.
- Polyester. The coating is not afraid of the sun, but is sensitive to mechanical damage - scratches appear. Service life – up to 10-15 years. Deformation of the protective layer leads to gradual destruction of the steel base.
Gutters made of metal with a polymer coating are suitable for metal roofing. The durability of the materials is approximately the same - it will be possible to replace them at the same time.
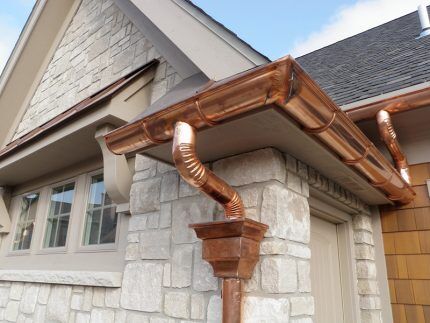
Copper drains look prestigious and are practical to use. Over time, the structure becomes covered with patina and does not oxidize. The disadvantages of copper systems are high cost and heaviness.
Plastic drainage options are in wide demand in private housing construction. Comparison of plastic and metal systems given here, we recommend that you familiarize yourself with useful information.
Among their main advantages are:
- good value for money - plastic products are more expensive than galvanized elements, but cheaper than others;
- the ability to choose a color to match the exterior of the house;
- good noise-absorbing ability;
- anti-corrosion qualities;
- ease of installation.
Plastic drainage systems are quite fragile. They are especially susceptible to mechanical damage at sub-zero temperatures. To reduce the risk of gutter failure due to excessive rainfall, snow guards must be installed on the roof.
Typical roof drainage system
Different manufacturers offer a standard set of drainage system elements. They may differ in size, material of manufacture and appearance. The system consists of horizontal gutters installed under the edge of the roof covering, and downpipes connected to the gutters by drainage funnels.
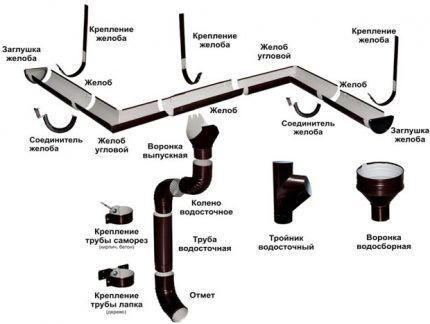
The composition of the system is configured depending on the configuration of the drainage system.
Gutter and connecting elements for it
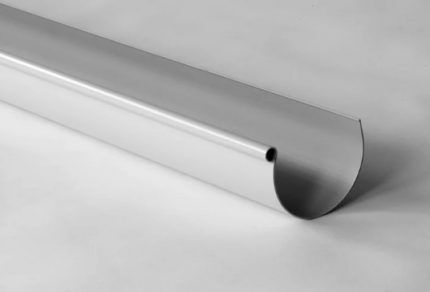
Semicircular gutter — a tray for collecting and removing precipitation from the roof. The cross-section of the gutter is an open semicircular or angular shape. The design is selected to match the architecture of the building. The tray size must match the expected load. The latter in turn depends on the roof area.
Rotate the chute used to change the drain line. The standard angle is 90°, but there are also products with a parameter of 135°.
When installing a turn, follow the following rules:
- the joints of corners and gutters must be sealed with adhesive or rubber seals;
- the distance from the ends of the turn to the brackets should be no more than 10-15 cm - in these places the strength of the system is lower.
Gutter connector - semicircular strip with clamps and latches. The element is used to join gutters into a single line. To seal the joint, a rubber seal is required.
Mounting brackets. The choice of a specific model depends on the technology gutter installations, location of main elements and stage of repair/construction.
Possible options for hook brackets:
- Long. Used to fix the drainage system to the roof covering. The elements are attached to the rafters, as a rule, even before the installation of the sheathing.
- Short. Suitable for installing gutters on a building wall or front board. Hooks can be installed before the roof covering is placed or after the roof has been installed.
- Universal. Prefabricated elements used before or after laying roofing material. The length of the universal hooks can be adjusted.
Stub installed at the end of the gutter. For reliable fixation, latches are provided, and a rubber gasket is provided to increase the tightness of the connection. The design is, as a rule, universal - the plug is suitable for the right and left edges of the tray.
Elements of the outlet pipeline
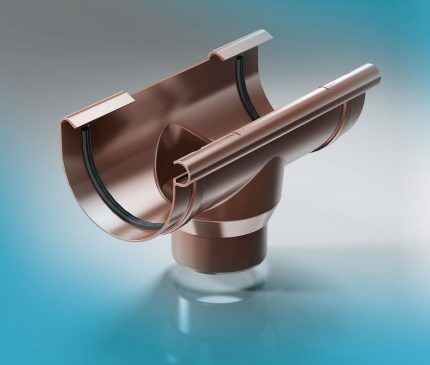
Drainage funnel Suitable for areas where it is not possible to install a conventional drainage system. It is applicable for roof valleys with complex architectural shapes. A drain pipe is directly connected to the drainage funnel.
Knee - this is an element that is necessary to change the direction of the drain riser, i.e. pipe bypass near the architectural protrusions of the building.
A drain pipe designed for the installation of a vertical waste pipeline. The diameter of the element is selected based on the water flow, the typical length is 3 m.
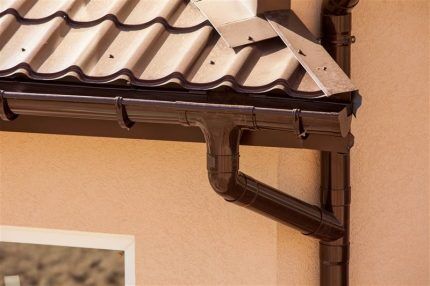
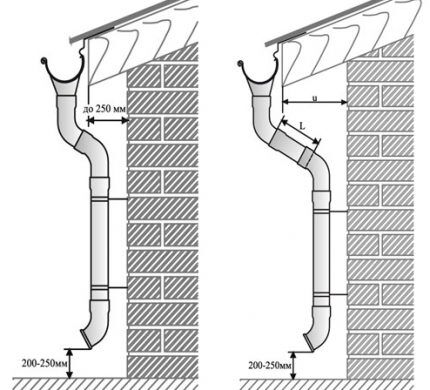
Mark - bent tip. It is mounted at the bottom of the drainpipe to drain water from the foundation and base of the building.
Pipe holders - These are clamps for attaching vertical pipes to the wall. Holders are made of plastic and metal. Fasteners must be able to withstand the load on the drain riser and be less noticeable.
Algorithm for calculating the drainage system
For the efficient operation of drainage, it is not so important what material the system is assembled from, but rather the selection of the optimal technical parameters of its components. It is important to determine the diameters of pipes and gutters, calculate the number of turns, connections and other additional elements.
Stage #1 - collecting data for calculations
The first step is to measure the parameters of the building. It is better to take measurements manually, as the technical documentation data may be somewhat distorted.
On paper you need to make a sketch showing all the roof slopes. On the diagram, indicate the length of the cornice for each element where the gutter will be placed. The next step is to determine the area of the slopes, the calculation is carried out using the appropriate formulas for geometric shapes.
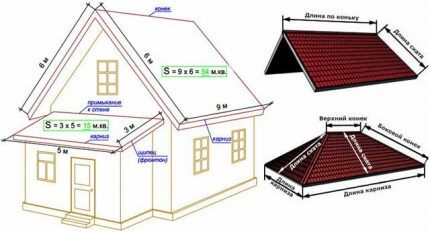
You can be guided by the roof plan and select the largest slope for calculation.
Stage #2 - determining the diameter and number of pipes
According to the standards, when calculating the cross-section of gutters and drainpipes, it is necessary to take into account the angle of inclination of the roof. However, in practice, they often rely solely on the area of the slope.
The number of gutters is determined by the sketch of the roof. It is enough to measure the length of the cornices and plan the joints of the trays.
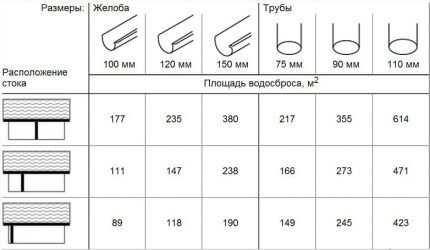
It is more difficult to calculate the number of vertical bends.
The following rules should be followed:
- for a line 10 m long or less - 1 drain;
- if the length of the gutter exceeds 12 m - 2 outlets;
- for roofs of complex shapes, it is necessary to provide additional drains for each protrusion;
- on a line with a plug - 1 outlet.
It is advisable to connect two short sections located nearby into one riser using a splitter.
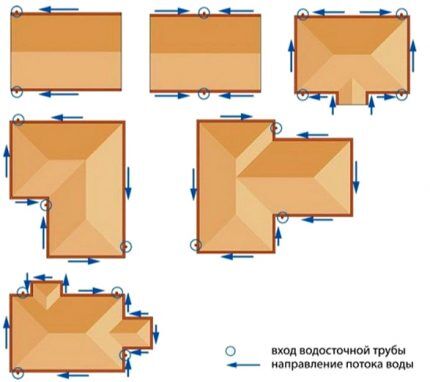
On large slopes, the distance between drainage pipes should not be more than 24 m.
Stage #3 - calculation of additional system elements
After determining the drainage configuration, length and number of gutter joints, determine the consumption of secondary parts:
- Stubs. The number of open ends is calculated from the sketch. For each open line you will need 2 plugs.
- Connectors. The number of couplings depends on the presence of gutter joints. The calculation is carried out for individual lines using the formula: number of trays minus one.
- Funnels and tees. The number of transition elements is selected individually according to the drainage system design. There is one funnel for each vertical pipe.
The number of brackets for attaching gutters depends on the type of clamp and the length of the curtain rods.
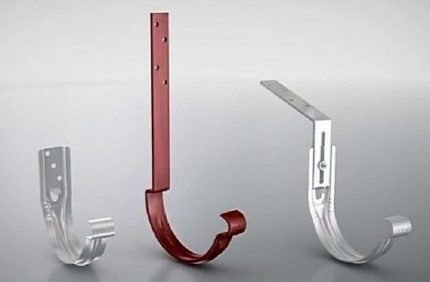
To calculate the number of short brackets, use the formula:
N = (L-30)/60,
Where:
- N – the desired value;
- L – length of the gutter in centimeters.
The calculation is carried out separately for each line.
Stage #3 - calculation of vertical outlet
You will need to calculate: the length of the pipe, the number of connectors and clamp holders. In addition, it is necessary to determine the option for organizing moisture removal.
Pipe length calculation:
- Measure the distance from the blind area to the edge of the roof.
- From the resulting value, subtract the height of the transition - the outlets from the funnels connecting the tray to the pipe. This section may contain: an elbow, a connecting section of the pipeline.
- From the estimated length you need to subtract the height of the mark and the distance to the ground - about 20-25 cm.
The number of connectors is equal to the number of joints. For example, for a drain of 6 m, 2 drains of 3 m each and 2 couplings are required. One element is the connection to the funnel, the second is the fixation of the pipes.
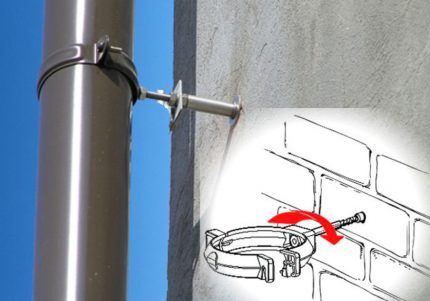
Fasteners 10 cm long are suitable for plastered walls. For an insulated facade, the size of the screw is increased by the thickness of the heat-insulating material.
Weir installation technology
The exact set of necessary tools depends on the material of the gutters.
In any case, you will need:
- perforator;
- screwdriver;
- level, plumb;
- tape measure, pencil, cord;
- pliers;
- ladder;
- hammer, mallet.
Sequence of work on installation of a drainage system can be broken down into three main stages.
Correct installation of brackets
When installing brackets, the order of work is as follows:
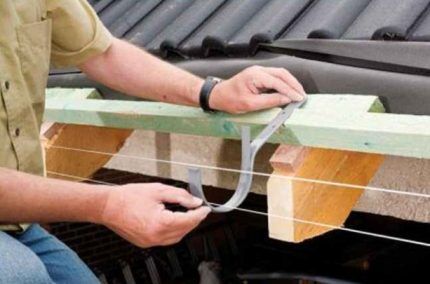
- Marks are made at the corners of the slopes, indicating the locations of the outer brackets.
- The first bracket is fixed to the front board.
- An extreme hook is installed on the back side of the load-bearing base, maintaining the required slope - 3-5 mm per 1 m.
- A cord is pulled between the brackets and intermediate elements are placed along the line.
After placing the hooks, the rope must be removed.
Attaching the gutter system
It is better to start installation from the place where the vertical drain will be connected. You need to make a hole in the gutter for the funnel using a hacksaw, and trim the edges. You can install an adapter between horizontal and vertical elements using connectors.
Following actions:
- Place a plug on the outer tray.
- Place the gutters one by one in the brackets, maintaining overlaps of 5-10 cm between the elements.
To ensure better sealing, rubberized connectors should be placed on the joints.
Installation of vertical risers
The installation of risers begins with the installation of clamps. To do this, a vertical line is plumbed down from the funnel and marked on the wall.
It is imperative to provide clamps near the junction of the drainpipes; the maximum distance to the fastenings is 10 cm.
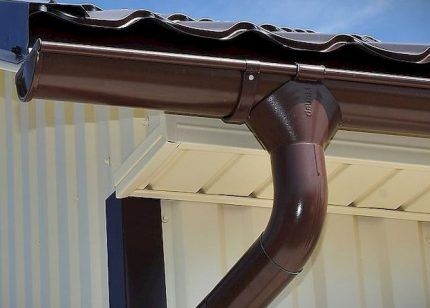
Next, additional elements are mounted, vertical and horizontal bends are connected to each other, and the lower mark is set. In regions with heavy winter precipitation, it is advisable to equip a drainage system heating circuit, instructions for installing it are outlined in our recommended article.
Conclusions and useful video on the topic
Determination of roof parameters and calculation of drainpipes:
Step-by-step instructions for installing a roof drainage system for a private home:
In principle, the calculation procedure and installation technology of the drainage system are quite simple. It is quite possible to cope with the task on your own. Experienced craftsmen install drainage from the roof in one day; for a novice craftsman, the work will take more time.
Please write comments in the block below, post photos related to the topic of the article, and ask questions. Tell us how you calculated the material consumption for the drainage system and installed its elements. Share useful information and technological subtleties.


I would recommend that when installing vertical risers, when it is necessary to mount clamps near pipe joints, not to take risks and not resort to a maximum distance of 10 cm from the fasteners. In my opinion, the optimal distance interval will be half as much, 5 cm. This will allow provide a stronger and more reliable fastening. In general, I agree with what is said above.The drainage system, built around the perimeter of the house, quite significantly protects the facade and foundation of the house.
My situation is the following - I have a house covered with siding. Will it be possible to install a drainage system on it? And is it even needed in this case? The foundation of the house is pile-screw.
Hello. In general, it would be advisable to hang the fasteners before the sheathing, of course. But they mount it after. For example, attach brackets to the chamfer of the front board. To avoid harsh pressure on the siding and leave the strain relief, you can make slightly larger holes for the anchor fasteners and use a sleeve for fixation.
I have seen (but have not used in practice) even special drainage systems that are sold assembled for ready-made siding.
Don't forget to also make a storm drainage system for draining water from the foundation.
I decided to hang trays (stacks) on the iron roof of an old house. Well, I don’t want to mount them on brackets, as is done everywhere now. I liked the old version, when the tray is fixed to the roof sheet itself! It’s both reliable and aesthetically pleasing! But..... I can’t find instructions anywhere on how to calculate the angle of inclination. WAS THIS METHOD FORGOTTEN OR NOT JUSTIFICED IN THE LONG TERM?!