How to connect a socket block: installation rules and connection diagrams
Where it is necessary to connect an interacting group of household appliances, a block of sockets is installed, including from two to four electrical points.Installation and connection of this option differs from the same actions with a conventional outlet. In order for the result to please you with reliability, you need to know the subtleties. Do you agree?
We will tell you in detail how to connect the socket block, what connection options exist, taking into account consumers. Here you will learn what installation rules should be taken into account when installing such a modular device. The information presented for consideration is based on the PUE.
We supported the detailed technology for installing and connecting socket blocks with diagrams, step-by-step photo guides, and videos.
The content of the article:
Design and installation locations of socket blocks
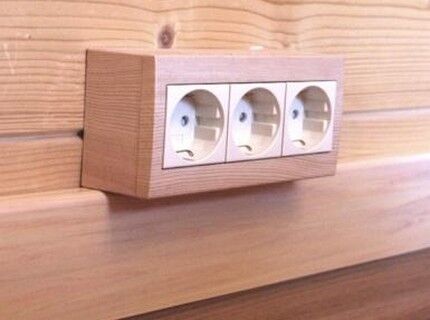
The design of the socket block differs from a conventional socket only in the number of “seats”. It consists of a plastic body and an internal part, represented by terminals with contacts and terminals, to which springs for the plugs are attached.
Most modern models are equipped with grounding contacts, which are designed to increase the safety of the system and reduce voltage from all electrical appliances connected through the unit.

There are two types of socket blocks:
- Designed for hidden wiring.Installed into the thickness of the wall using a module made of glass-shaped socket boxes;
- Designed for open wiring. They are installed on the wall surface using a plate-shaped socket box.
In addition to the two main types of socket blocks, there is also a very practical retractable type. They are easily mounted in a countertop or cabinet, from which they can be pulled out when needed. Their operating principle is similar to power supplies located on/in the wall.
Socket blocks are often installed in kitchens, placing them behind the work table at a height of 10 cm, inside kitchen cabinets and behind the walls of adjacent cabinets at a level of 30-60 cm from the finished floor. Built-in sockets are convenient to use when connecting a group of low-power household appliances: hoods, multicookers, refrigerators...

When arranging halls and living rooms, they are placed near computer desks or behind the TV screen. Socket groups of three electrical points can often be found in bathrooms. But in this case, devices with waterproof housings are used, placing them at a distance of at least 60 cm from the water source.
Connection methods taking into account consumers
Connection of a block of sockets of one group is carried out daisy chain method. It involves connecting all elements of the group to a common power supply line. The circuit created by the daisy chain method is designed for a load that does not exceed 16A.

Today, connecting a block of sockets is often carried out in a combined way, which is based on a parallel circuit. This method is actively practiced in European countries. We use it to provide a separate line for powerful consumers.
Parallel connection involves laying two cables from the junction box:
- the first is sent in the form of a train, feeding four of the five sockets in the 5-gang unit;
- the second is brought separately to the fifth point of the socket group, which will be intended for power supply powerful device.
The good thing about this method is that it ensures the functionality of a single point and makes it independent of the functioning of other nearby participants in the chain.

The only drawback of the scheme is the increase in cable consumption and labor costs for the electrician.
Both daisy chain and combined connection methods can be closed or open. The first involves hollowing out channels in the wall to lay lines and “sockets” for connectors, the second is implemented by laying a PE conductor on the wall surface.
The use of plastic cable ducts increases the safety and aesthetics of open wiring.Most of them are equipped with partitions, between which a line is laid. It is convenient to monitor the condition of the PE conductor through the removable front part.
Installation instructions for socket block
Choosing the installation method, whether external installation or internal wiring, depends on the material you have to work with. The walls in the house can be concrete or brick, or made of wood or plasterboard.
Whether you plan to groove concrete in a panel house or limit yourself to installing an overhead block with open wiring is up to you.
Carrying out preparatory work
The first thing that needs to be done is to turn off the power to the area where the work will be performed.

In old houses where automatic circuit breakers are not installed, in order to de-energize the room you only need to unscrew the plugs.
The following materials must be prepared in advance:
- socket block;
- decorative strip;
- jumper wires;
- wiring cable;
- socket boxes connected into blocks;
- plaster or alabaster.
The choice of socket block should be based on the quality of the product, as well as the possibility of separately connecting PE conductors.
Tools you will need:
- a hammer drill equipped with a drill bit D 70 mm;
- building level;
- tape measure, ruler and marker;
- electrical installation tool kit;
- container for mixing gypsum;
- putty knife.
The choice of a drill bit depends on the material you have to work with. Nozzles for drywall or concrete vary in performance parameters and, accordingly, in price.
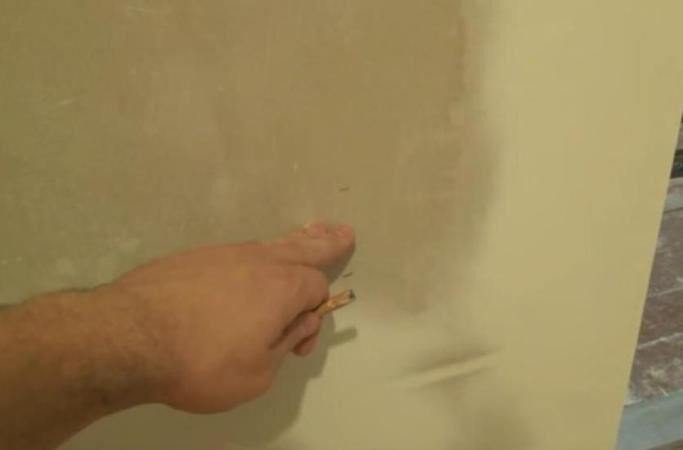
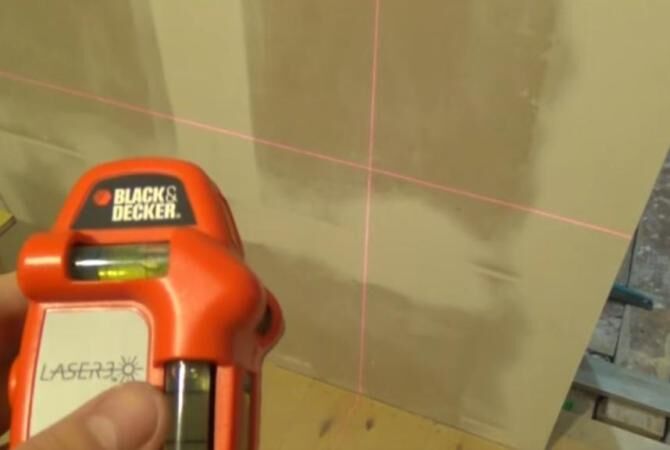
Marking the wall
The ease of installation and connection of the socket group largely depends on the correct marking. Before starting work, you should make sure that there are no communications under the wall. When working with a plasterboard base, it is important not to get on the profile supporting it.
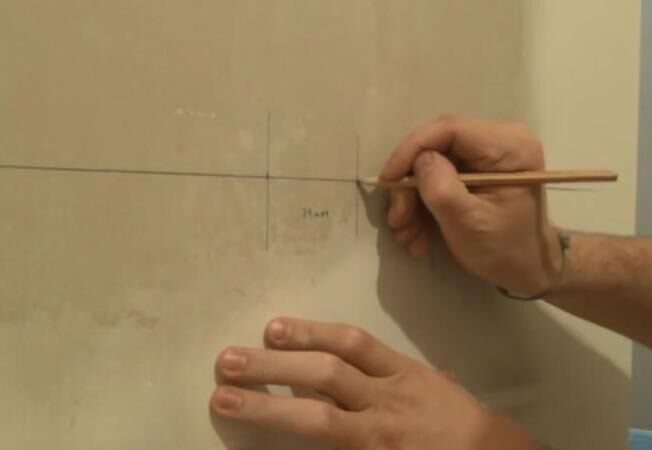
Using a ruler, level and marker, mark the place where they plan to install. When applying markings, they are guided by how many electrical points the group includes. Cross lines indicate the centers of future holes.
In the center of future holes, recesses are removed. It is important to ensure that the drill bit guide bit does not “go” to the side.A little trick: since when creating a socket block it is quite difficult to achieve a horizontal arrangement of the holes, you can use a slightly larger crown with a diameter of 80 mm for the job.

In order to subsequently avoid erroneous drilling of holes when laying the cable hidden, it is better to make a drawing at the installation stage that shows the location of the wires.
Methods for wiring and laying cables in an apartment are described in detail in popular article our site.
Creation of grooves and “seats”
When preparing “seats” in a concrete or brick wall, drilling along the marked crosshairs begins at low speeds, while not forgetting to control the position of the drill.
To ensure installation accuracy, the hole is first marked with a small diameter drill. Only after this is a crown placed, which makes a recess along the contour of the future “seat”.

The wall material remaining in the holes is gouged out with a perforated chisel. After this, the grooves necessary for the connecting protrusions are laid between the holes socket boxes.
When planning to lay the wire hidden, grooves are hollowed out along the marked lines. When feeding one of the points of the block with a separate line, it is necessary to lay another furrow from the shield.
All holes and ditches are cleaned of crushed pieces and dust using a brush or cotton napkin. In the future, to protect the PE conductor and ease of laying, it is better to run the cable in a corrugated sleeve.

If desired, wall gating can also be done in the “old-fashioned” way using a chisel and hammer. But be prepared that implementing this method will require more effort and time. And making indentations with a chisel in brick for laying cables is not an easy task, which does not always give the neat desired result.
It is much easier to work with a plasterboard base. To make the seats, you only need to cut round grooves using a plasterboard attachment according to the markings. The main thing is not to press too hard, so as not to break the fragile base.
Specifics of fastening socket boxes
To fasten the socket boxes, it is most convenient to use special glasses connected to each other with plastic clips. Designs of standard sizes, round or square, provide rigid fastening of elements in a plane.

To fix the socket boxes in the brickwork or wall, use alabaster or gypsum mortar. The powder is diluted with water in a ratio of 4:1. When working with these creamy compositions, remember that they set quickly.
The powder must be diluted in small portions and quickly placed in the hole before the mixture hardens.The outer side edges adjacent to the surface and the bottom of the connected glasses are coated with the same solution, after which the entire block is inserted into the hole.
The position of the recessed glasses is adjusted using a level, preventing the protrusions of the edges from extending beyond the plane of the wall.
After making sure that the socket boxes are in the correct position, the edges are covered with a liquid solution, giving the plane the most even surface possible. The remains of alabaster or plaster can be used to mask the wire laid to the socket.

Mounting cups for drywall are additionally equipped with special claws. By pressing against the back of the plate surface, these claws pull the glass into the hole.
Socket boxes recessed into the wall should not rest against or protrude beyond its limits. If the gap between the wall and the plasterboard is insufficient to accommodate the socket box, the hole in the wall is further deepened.
The only exception is when the surface is to be tiled or finished with plaster. In this case, the socket box is made to protrude slightly beyond the wall by 5-7 mm.
Subtleties of electrical connection
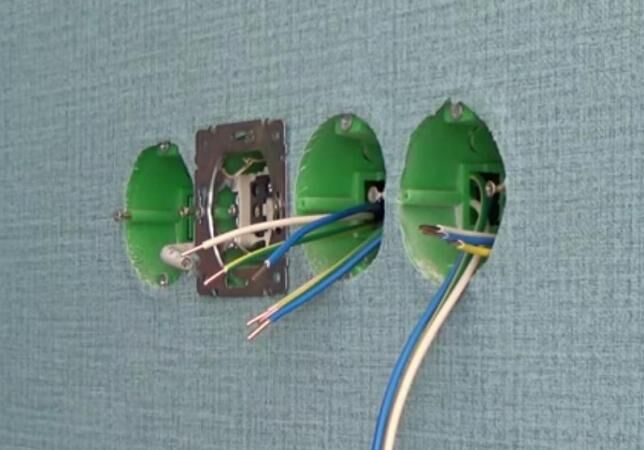
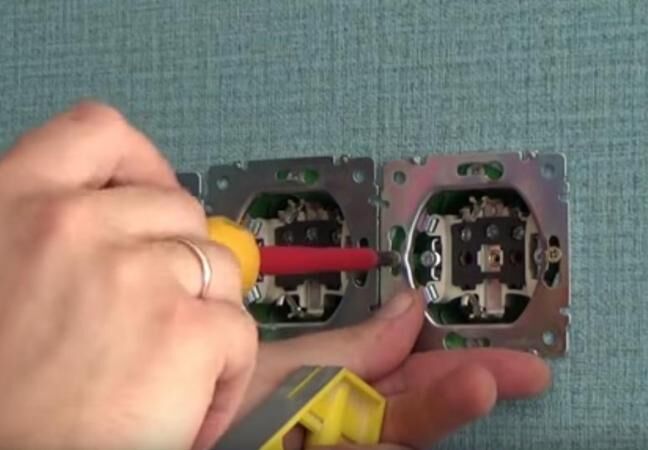
After the solution acquires the desired strength, proceed to connecting the indoor unit. To connect sockets in a daisy-chain manner, the wires laid from the distribution box are led into the first socket box.
Immediately before this, the ends of the cable are stripped of 10-15 mm of braid. You can do the job using a sharply sharpened knife.But to achieve maximum accuracy, experienced owners recommend using side cutters.
In order to be able to make a new connection if necessary in the future, the craftsmen recommend leaving a small supply of the power cable directed from the junction box when stripping. During installation, it can be folded inside the socket box in the form of a large-diameter spiral or in the shape of a snake.

Cuts of multi-colored wires are prepared in advance to create jumpers. The cross-section of the jumpers must correspond to the conductors of the supply line. The jumper wires should not be made too long. Otherwise, during the connection process they will interfere and prevent the socket from fitting tightly into the installation box. In the cut wires, the insulation is also stripped about a centimeter.
Wires are threaded through the adapters of the cavities of the socket boxes, which have been previously cleared of gypsum residues. To simplify installation, the ends of the conductors are bent in the direction of the terminals.
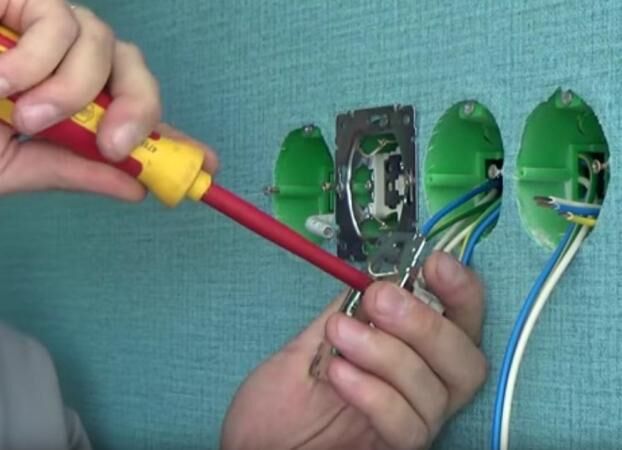
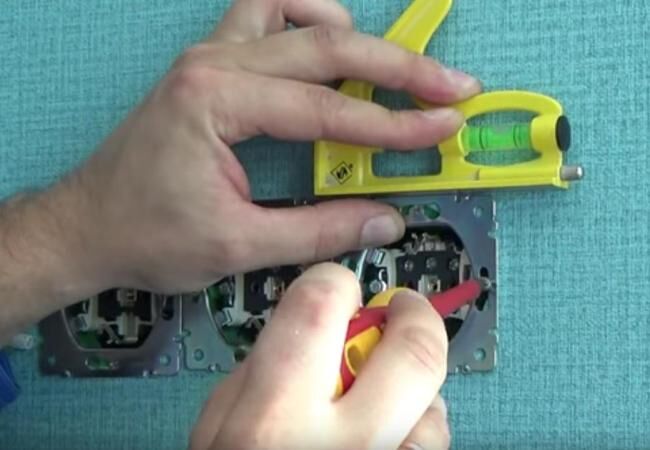
Remove the protective cover from the socket block itself, then unscrew the clamping screws by 5-6 mm. The stripped end of the phase wire of the power cable is brought to the first socket, taking into account the position of the terminals. From it, through the PE contacts, the conductor and neutral wires of the power cable are directed to the second socket.

The same principle is used to connect all subsequent outlets. Sockets with neatly laid wires are not tightly tightened with screws. When connecting sockets, the polarity of the contacts must be observed: the phase conductor is removed from the terminal with the phase conductor, and the neutral conductor is removed from the neutral terminal.

When connecting the protective conductor, you must strictly observe the basic requirement of the PUE, which states that all connections of this wire must be non-separable. Underestimating the importance of installation quality can lead to the fact that in the event of a dangerous incident, the risk of electric shock increases significantly.
So, if the head power socket loses contact with ground during installation, the following circuit participants lose their protective zero. In the future, if the housing is accidentally exposed to mains voltage, for example, due to a malfunction of the iron, the housings of all electrical appliances connected to the power cord will be energized.

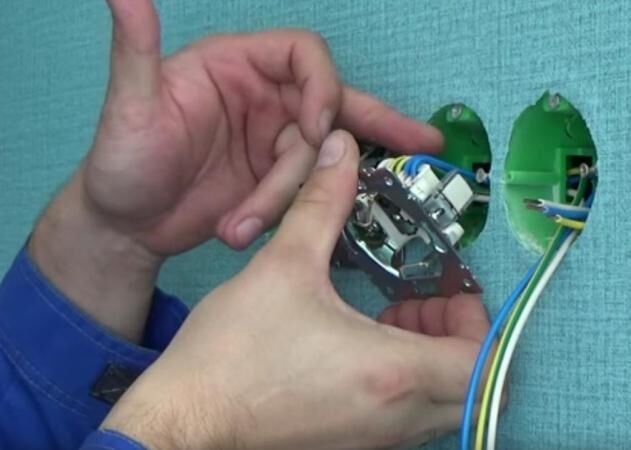
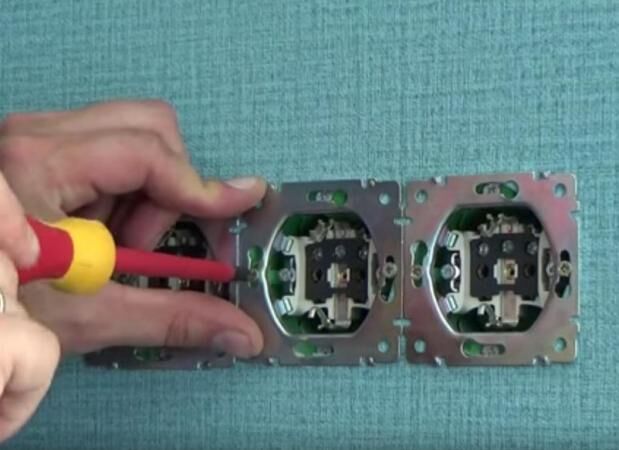
Socket boxes with wires connected to the corresponding terminals are inserted into the wall holes and secured with side clamps. Then check the reliability of the installation of all devices, using a level to correct their position. If necessary, bare sections of the wire are wrapped with insulating tape or insulated with heat-shrinkable sponge.
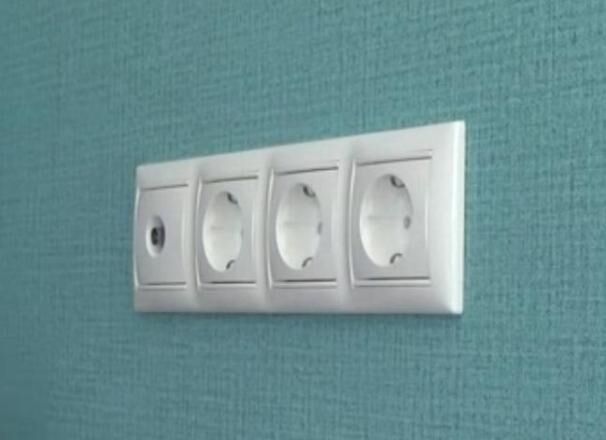
After this, all that remains is to “press” all the screws, fix the housing in the socket box and replace the decorative cover.
Step-by-step photo instructions:
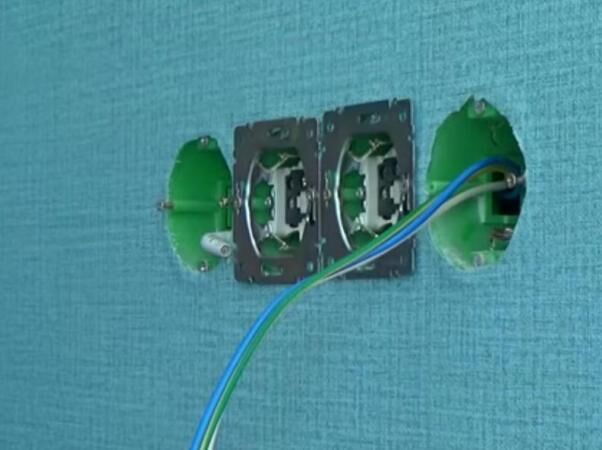
If the unit is connected correctly, all sockets should work, and the frame with socket boxes should not move during use.
Conclusions and useful video on the topic
The video materials we offer will clearly help you understand how to properly install a power socket block.
Video #1. Arrangement of socket boxes for the socket panel:
Video #2. Instructions for installing a five-socket unit:
Installing a socket block is not much more labor-intensive than connecting a regular or double socket. Having shown attention and maximum accuracy, installation can be carried out by any owner who has only basic skills in electrical installation work.
Would you like to talk about your personal experience in installing and connecting group sockets? Do you have useful information or have questions while reading the article? Please write comments in the block below.


A block of sockets in the wall is a very convenient and functional thing. But during installation, if you do not have experience in such matters, problems will certainly arise. It is very important to correctly mark and install socket boxes. The distance between their centers must be exactly 72 mm, otherwise the decorative panel will never fall into place. Do not rush to fix the socket boxes in the wall with mortar until you are sure that the panel will be installed correctly.
Since when did the center-to-center spacing in installation boxes become 72 mm instead of 71 mm?
Yes, the standard is 71 mm for the center distance in installation boxes - this is if you take trusted manufacturers. But I have had several cases where these standards were not met. I had to try really hard to fix it without buying new boxes.
Once there was a case where I took five socket boxes, fastened them together, and the distance between the extreme axes turned out to be not 284 mm, as it should be, but 281.5 mm. So I wouldn’t be surprised that some people have options with a center distance of 72 mm. It's good that this is an exception to the rule and not a common occurrence.
How I went through the trouble of assembling it so that the client would not spend money on new ones, but they had purchased socket boxes for the entire three-room apartment. It wasn't me who bought it, if anything.
Always, when I watched the installation of a block of sockets in the house, it seemed that it was very simple and that you didn’t need a lot of intelligence to drill a hole and insert an socket there. But everything turned out to be much more complicated. When I myself was faced with the fact that a child had turned out the socket in the room, I suffered for a very long time with connecting all the wires, so it could not have been done without a technician.
Something didn’t work out for me with alabaster, even using citric acid as a moderator. To fix the sockets, I use PERLFIX plasterboard mounting adhesive from Knauf. The result is excellent.
Tell me how to lay the wiring in the socket box like a snake or in a circle on top?
In the case of hidden wiring, it is especially important: The wires, for a block of sockets of 2 - 4 pcs., at the entrance to the socket box, always leave with a good margin of at least 100 mm and, as a rule, are laid in a ring, although whoever is used to it and whoever is more comfortable, on This does not affect the result when installing the socket. The main thing and the main thing is that all contacts in the sockets must be very well clamped (tightened) and the sockets themselves must be very securely fixed in the socket boxes so that it is not possible to pull them out of the socket box. It is very important, especially after installing the sockets, after a few days of their operation, to check the reliability of the contacts! And don’t be lazy, at least once every six months, check the reliability of the contacts, not only in the sockets, but also in the lighting and machines in the input panel.And you will be happy! Because poor contact is the root cause of fire. And this applies not only to apartments, but especially to private houses! The wires themselves do not burn or burn out; this is only possible in places of poor contact. Poor contact means they will heat up and, as a result, begin to smoke, melt, and burn. For other reasons, this is impossible, because now all sources are recorded with a cable of the required cross-section and through reliable machines designed for each consumer, namely lighting groups, socket groups, boilers, water heaters, etc. Good luck to everyone, good luck and long, long summer!!!
Is it possible to connect socket to socket not with jumpers from socket to socket, but with a single power cable to make branches to each socket through tees or sockets?
Yes, of course it’s possible and even more reliable than using a cable. There are two disadvantages: cable consumption will increase and labor costs will increase in the case of hidden wiring, you will have to make grooves. And in the case of open wiring, which is now increasingly popular in private homes (maybe this is correct because everything is accessible), the cost of cable channels will be added; they can be painted in any color and they do not disturb the appearance of the room.
Yes, the author correctly noted, during electrical work related to the installation and connection of electrical circuits, it is necessary to measure 100 times and cut once, as is customary with tailors, and electricians and electricians need to check with a multimeter and a tester and even a test light for the presence of voltage in order to make sure the absence of one or determine which wire is energized.And another reinforced concrete rule during installation: The phase wire can be any color except blue, most often the phase wire L is black, brown and red. Blue wire N is only blue!!! The grounding wire is now traditionally the earth, grounding! If you do electrical work with your own hands, take this as a rule, like the Lord’s Prayer, like the multiplication table. I have come across cases many times when wires of blue and yellow-green colors were recorded as phase wires. Do not do this under any circumstances. And also, if you are in a hopeless situation and as a last resort (even if it never happens better in your life), never check whether the wire is live with your bare hand, grasping it with your fingers from the palm side. Only with the back of your hand. Good luck to you and take care of your family and friends! Always remember that the work of an electrician and electrician does not require rushing! Remember that in some cases, the current strikes much stronger than a horse’s hoof, immediately on the spot. Always be focused, collected and you will live happily ever after!!!
I'm interested in a four-piece combination block, why do I need two, three or several in a row!!!!!!!