Arrangement of ventilation from sewer pipes: construction of air ducts from polymer products
Properly done ventilation in a private home is the key to a healthy and comfortable microclimate in residential premises and the durability of building structures. Agree that the budget also plays an important role. If a reputable building requires an expensive system, then in a country house it is most often unnecessary.
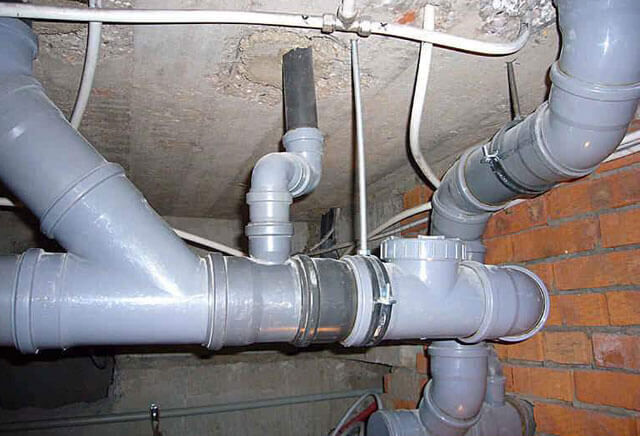
Various materials are used in the construction of ventilation ducts. Among them are galvanized steel recommended by SNiPs, polymer and asbestos products, corrugation, brickwork, concrete and ceramic blocks. However, in dachas, ventilation from sewer pipes is constructed more often than the listed options.
We will talk about the pros and cons of this solution. Let's introduce the options for its implementation that have been tested in practice. Independent home craftsmen will find valuable recommendations on building a ventilation network.
The content of the article:
Sewer pipes: pros and cons
It would seem that if you do ventilation, buy ventilation pipes. Moreover, the stores offer a large selection from different manufacturers. However, upon closer examination, it turns out that ventilation plastic pipes, despite their external similarity, are 2 or even 5 times more expensive than sewer pipes.
First of all, it is, of course, color. Most often, ventilation pipes are produced in white, which is certainly more aesthetically pleasing in the context of internal integration into the interior.The color of the fan pipes is grey. However, this advantage is insignificant if the ventilation pipeline runs in the wall, is sewn up with a duct, or is simply painted in the color of the walls.

Let's look at the material of manufacture. Plastic pipes, both ventilation and sewer, are made from:
- polyvinyl chloride (PVC);
- polypropylene (PP);
- polyethylene (PET or HDPE, LDPE).
That is, all the advantages of plastic products are inherent in both pipelines:
- ease;
- ease of installation;
- variety of fittings;
- tightness;
- smooth inner surface;
- impact resistance;
- non-susceptibility to any kind of corrosion processes;
- resistance to aggressive environments;
- antibacterial properties;
- electrical insulation;
- durability.
A huge number of fittings for creating pipelines, both sewer and ventilation, allows you to lay systems of a wide variety of configurations.

We have listed the advantages, now let's touch on the disadvantages. By and large, they are also common to all plastic pipelines. The main disadvantage is flammability. According to fire safety regulations, no flammable materials should be used in ventilation ducts.
When laying plastic pipeline from any pipes, the home owner receives a fire-conducting channel with constant excellent draft throughout the house.That is why, for fire safety purposes, especially for wooden houses, there is always one recommendation: non-combustible materials - tin, galvanized, ceramics, concrete, brickwork.
Differences in pipe diameters will also cause some difficulty in building a ventilation system. All standard ventilation systems are tailored to diameters of 100mm, 125mm, 150mm, 200mm. And these are air ducts, fittings, fasteners, and most importantly for forced-air systems - ventilation equipment (fans).
Standard diameters of sewer pipes are: 110mm, 160mm, 200mm. That is, they do not coincide with the diameter of the ventilation equipment.

Thus, sewer pipes and fittings are suitable for creating a natural ventilation system in all respects (except for flammability). However, if there is a connection to be made with an existing ventilation duct, or if it is planned to use fans and other ventilation equipment, this issue will need to be addressed.
If the difference in diameter is 1-2 mm, you can simply place the device on the sealant. If the difference is greater, you will have to buy a coupling of the appropriate size to connect the pair. Another difference that manufacturers point out ventilation pipes — the possibility of electrifying waste pipelines.

When air flows, a static electric charge appears on the inner surface of the pipe, attracting dust.
This is especially true when the device hoods in the kitchenwhen fumes, soot, and oil particles in the air are sucked into the ventilation. All this settles on the inner surface of the pipes and cokes with dust, narrowing the diameter of the working passage.
Manufacturers of ventilation pipes use antistatic treatment in their manufacture. However, if you think about it, in the case of a kitchen, an antistatic agent is unlikely to help, and in ordinary ventilation, not so much dust settles.
In any case, on the homeowners’ forums dedicated to this issue, there are no terrifying photographs with passages completely clogged with dust and dirt. Therefore, this aspect can be classified as a marketing horror story.
Requirements for the ventilation system
The requirements for a ventilation system for a private home are universal, that is, they do not depend on the materials from which it is installed.
Natural ventilation from sewer pipes should provide the following volumes of air:
- for residential premises up to 20 sq.m. – 3 cubic meters per hour per person;
- for residential premises with an area of 30 sq.m. and more - 30 cubic meters of air per hour per person;
- for kitchens equipped with an electric stove - more than 60 cubic meters;
- for technical rooms in which there is a gas boiler - 140 cubic meters;
- boiler room with natural gas heat generator - 3-fold update;
- for baths and toilets - 25 cubic meters per hour;
- washing, drying - 90 cubic meters per hour;
- pantry, dressing room - multiplicity 0.2;
- office, library - 0.5 volumes per hour.
When using sewer pipes, you need to consider:
- plastic has a fairly limited range of operating temperatures - no more than 70 degrees, so sewer pipes cannot be used for ventilation of saunas, baths, workshops;
- compatibility with fans and other equipment in terms of joint diameter;
- plastic is unstable, i.e. is capable of expanding when heated and returning to its previous dimensions when cooling, so it is necessary to provide for the presence of compensating sections, for example, from corrugation;
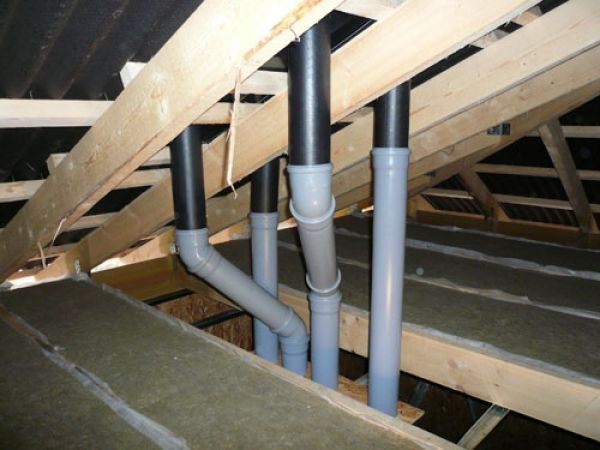
- the need to install thermal insulation in some areas (in the attic);
- combination of ventilation pipelines with roof elements for installation on top of the roof covering.
For device forced system in the cellar, in the attic or attic, in living quarters, kitchens and bathrooms, calculations are carried out taking into account the performance of fans and other equipment.
Calculation of pipes for ventilation installation
When performing calculations to create an effective ventilation system, 2 problems are solved:
- the productivity of the entire system is calculated;
- the required amount of materials is calculated.
First of all, the required diameter of plastic air ducts for all areas is calculated.
To determine the cross-section of ventilation ducts, the following actions are performed:
- the volume of the premises is calculated based on the linear dimensions of each: height, length, width (the data is multiplied);
- the obtained data are summarized;
- The required amount of air to replace in 1 hour in living rooms, boiler rooms, boiler rooms, and bathrooms is determined. For a quick calculation, you can adopt the following standard: renewal of the entire volume of air in residential premises once per hour;
- the result is rounded up;
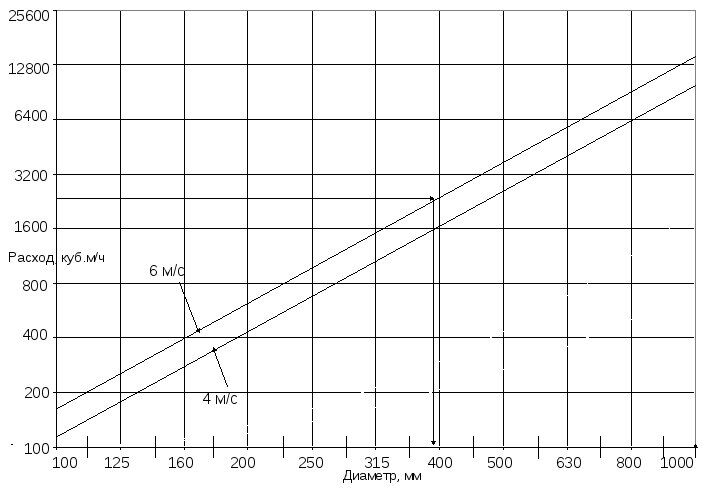
- The diameter of the air ducts is determined from a table that takes into account the speed of air flow and their volume.
To install an air vent from the kitchen and boiler room, you need to use pipes with a diameter of 150mm or 200mm.
Features of the ventilation device for a private house
In private houses, natural ventilation systems are installed much more often - they are cheaper and simpler. Often, only one element can be noted for the forced removal of exhaust gases - kitchen hood, the calculations for the device of which will be introduced in our recommended article.
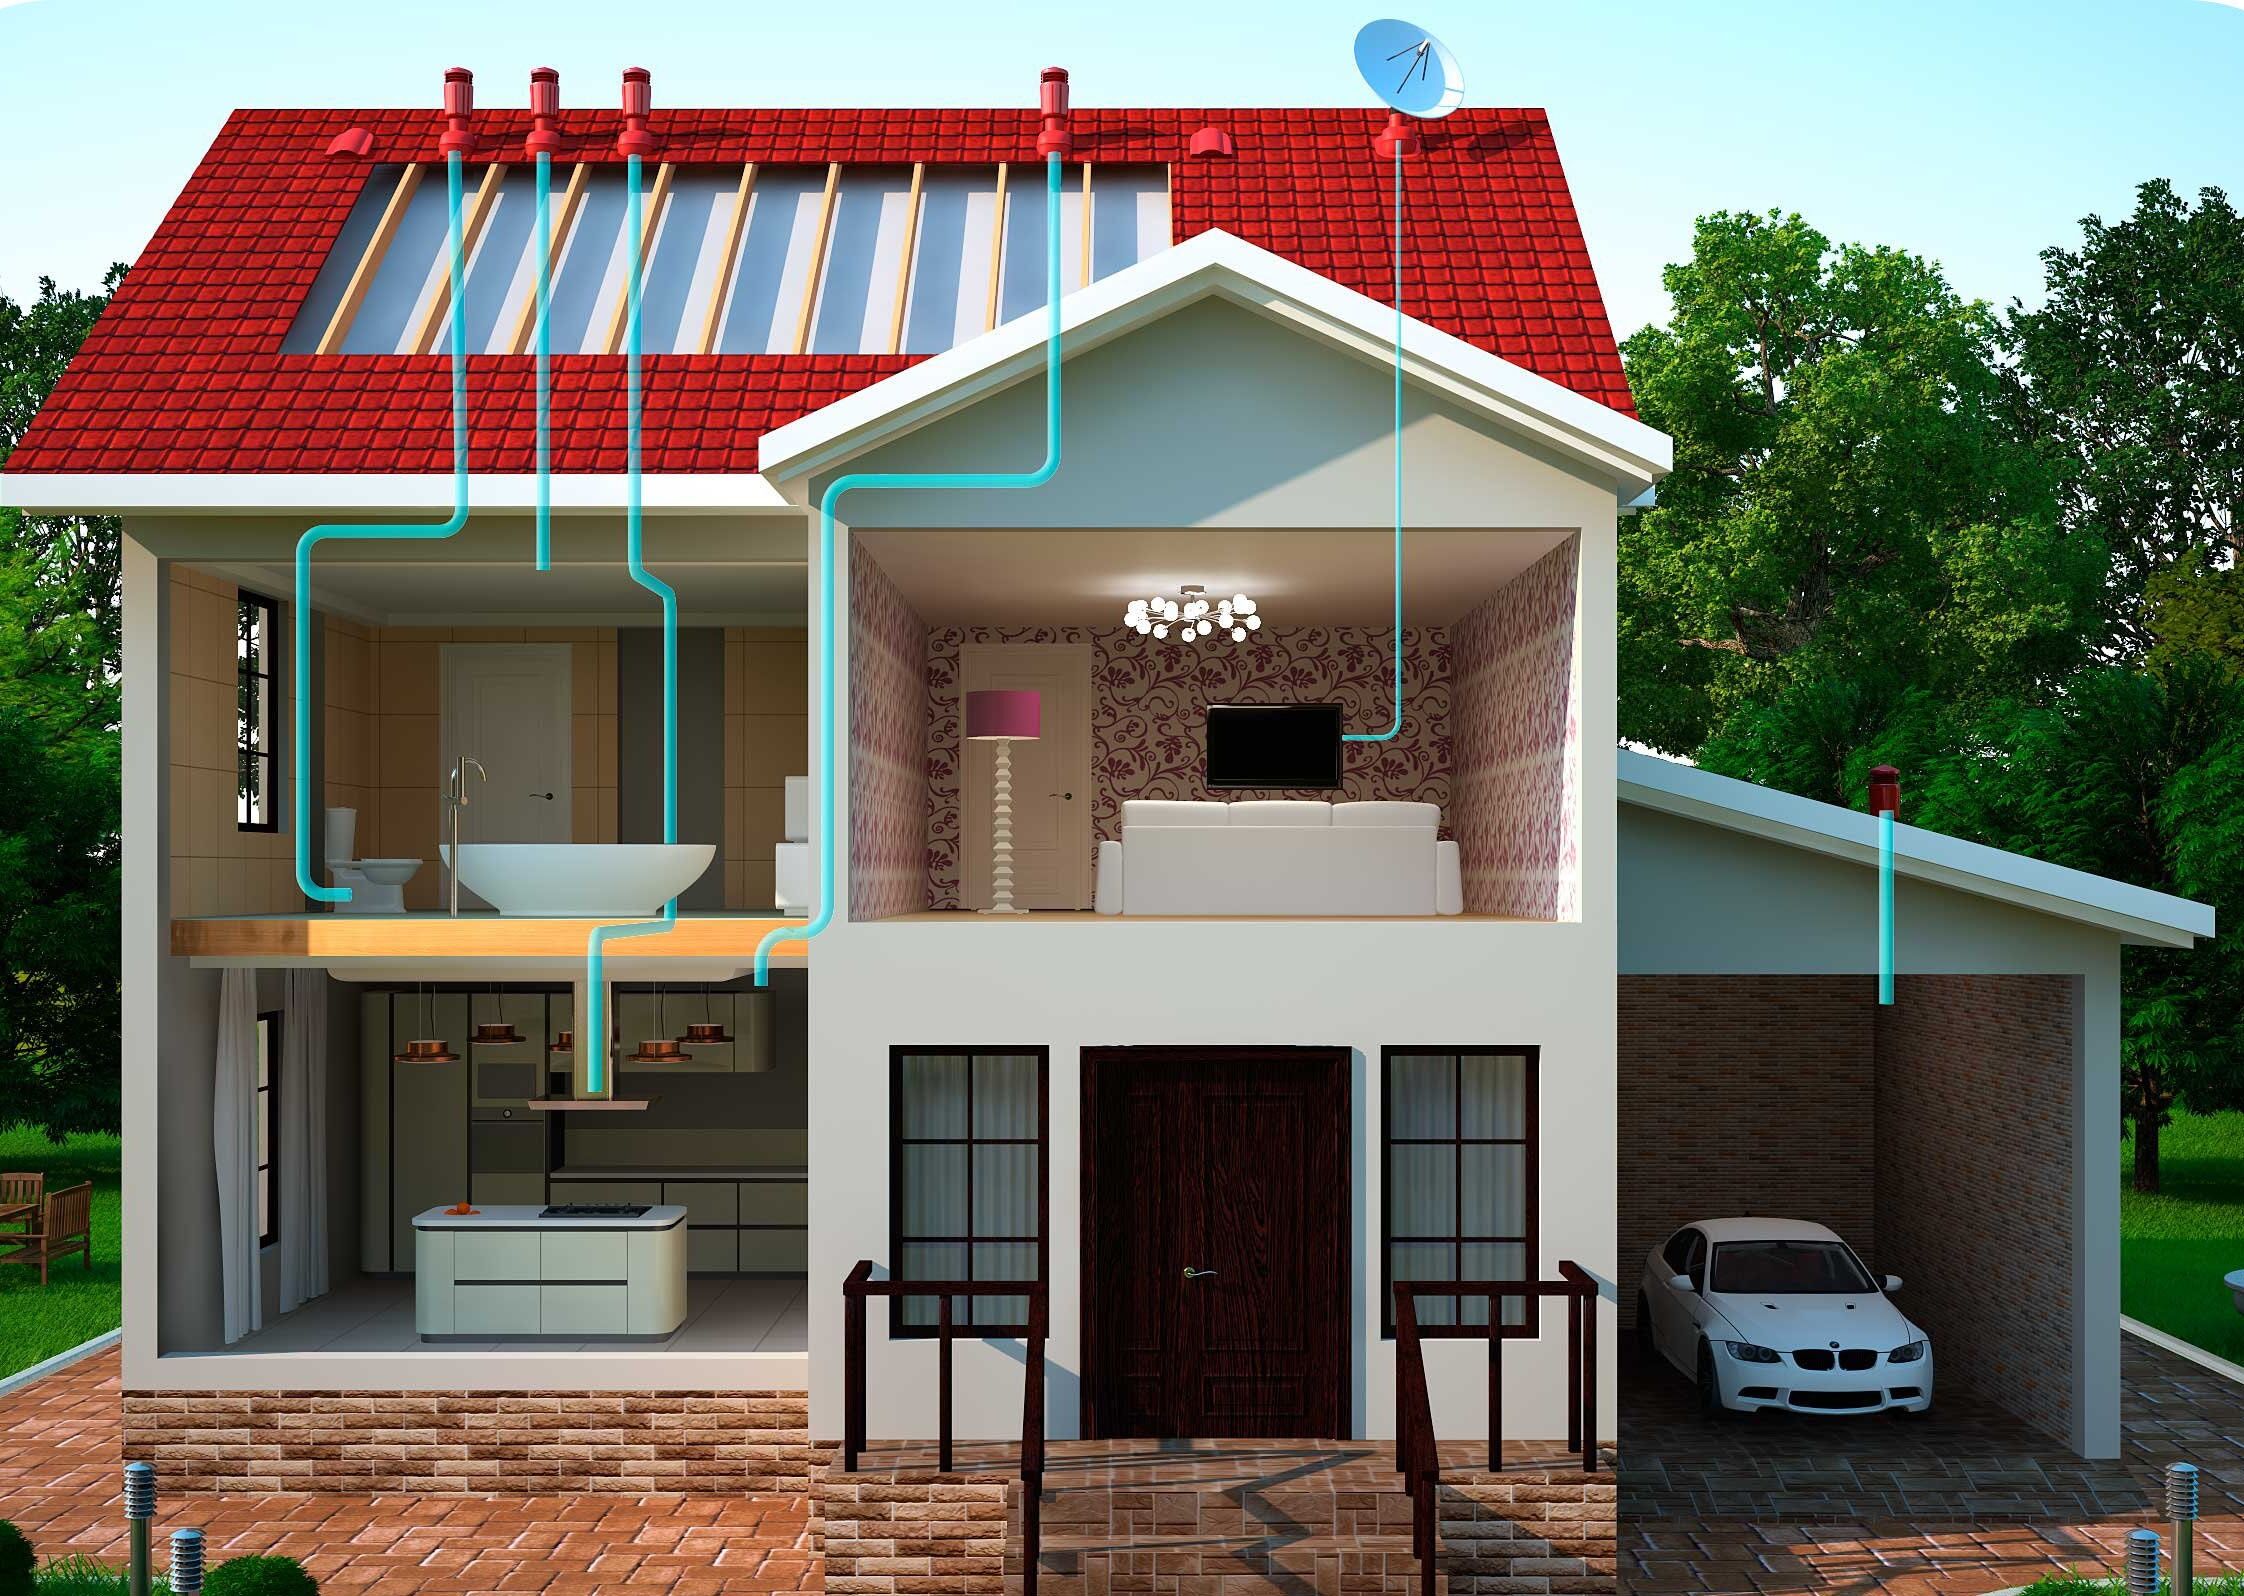
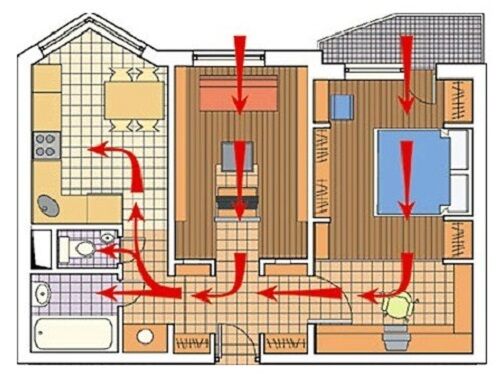
So, how to properly organize the movement of air flows, for example, in a one-story house:
- Automatic valves must be installed in window profiles or external walls, since modern windows are airtight.
- Between the kitchen and the bathroom (if they are nearby), a block of 3 vertical shafts is immediately placed in the partition, leading through the attic to the roof.
- To allow air to pass under interior doors, gaps up to 1 cm wide are made. If there are no gaps, then supply grilles are installed near the doorways or in the door leaf.
- The kitchen hood is connected to a separate channel. In addition to the main function, it performs an additional function - it takes on part of the load - it can remove up to 100 cubic meters of air. This can be taken into account when calculating the diameter of pipes for kitchen ventilation.
- 2 separate shafts lead to the kitchen and bathroom.
- Thanks to the natural draft in these 2 channels, air from the living quarters will rush into the corridor, and from it to the exhaust grilles.
You need to make a detailed plan for laying highways and branches in advance. Air ducts must be laid along the shortest path from the supply inlet to the exhaust outlet. The diagram should indicate exhaust openings in the walls, passages through the ceiling, and junction points.
Ventilation ducts should have a minimum of bends and branches, and the hood should be positioned strictly vertically. The length of horizontal sections should not exceed 3 meters, and air ducts should be additionally secured with fasteners.

To install natural ventilation, the height of the exhaust air duct must be at least 5 m. Otherwise there will be weak traction.Otherwise, fans will need to be installed in the channels of the upper floors, and this will convert the circuit into a combined one, i.e. partially mechanical type.
The fresh air supply can be:
- infiltration - through windows, cracks, ventilators in window systems;
- controlled - through climate control systems.
The exhaust duct is usually located 250mm below the ceiling.
System assembly features
To achieve greater tightness, it is more convenient to assemble the channels in blocks, and then install them in assembled blocks. This is purely a matter of ease of assembly. It is better to start laying by installing separate channels in the kitchen, bathroom or toilet.
The holes in the ceilings are made in such a way that the pipe can easily fit into place. Initially, the hole with the pipe can be fixed with a rag, then the fixation is secured with polyurethane foam.
Commonly used fittings for connecting pipes are:
- tees (at the interface/branch areas of the system);
- bends and elbows (in areas where the canal turns);
- adapters (when connecting pipes of different sections).
Installation of fans that lock check valves, recuperators are done before the final fixation of the ventilation holes. Final fixation to the structures with fasteners or clamps is carried out after assembling the entire section. Before tightening the clamps for the last time, the functionality of the system is checked.
Requirements for channel aggregation
The kitchen channel cannot be combined with others.The kitchen exhaust duct must not be combined with stove hood. The hood must have its own air duct. Many modern models of kitchen hoods have a remote unit that is installed in the attic.
Only channels of the same type are combined - this is the bathroom-toilet-technical rooms, laundry. You can combine exhaust pipes from several bathrooms, but with the installation of check valves to prevent the transfer of odors from one toilet to another.
It is not recommended to install ventilation ducts in external walls - condensation will form there due to temperature changes. When connected polymer pipes and fittings It is better to additionally seal the places where the cuffs are installed with silicone for greater tightness and durability of the connections.
It is not advisable to lay air ducts in internal load-bearing walls. They will certainly significantly weaken the structures on which considerable load is distributed.
No ventilation ducts should be led into the chimney. If a channel made of plastic pipes runs next to the chimney, it will be necessary to install a thermal protective shield made of non-combustible material.
Passage of ventilation ducts through the roof
The easiest way to do it ventilation pipe outlet through the roof - lead it through the ridge. For pitched roofs, the optimal solution would be to install a ventilation pipe next to the ridge.
What height should the ventilation pipe be:
- if it is located next to the smoke room, it should be equal to its height;
- above the flat roof it should rise more than half a meter;
- if the pipe is located one and a half meters from the ridge, it should be half a meter or more higher than the ridge;
- if the pipe is located from the ridge at a distance of 1.5 meters to 3 meters, it should be level with the ridge in height;
- if it is more than 3 meters away from the ridge, then it can be lower than the ridge, the height is determined by constructing a drawing with an angle of 10 degrees from the ridge;
- from the head of the ventilation pipe to the nearest window there should be at least 3.5 meters.
More accurately, the height of the pipe can be calculated by its diameter. All necessary data can be viewed in the table below.

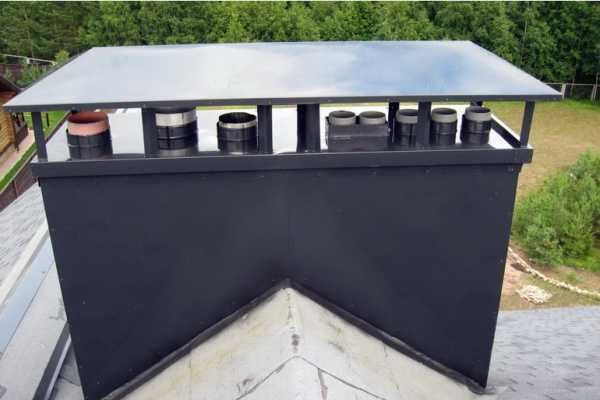
The best way to route several air ducts through the roof is to combine them into a ventilation shaft. It can accommodate up to 6 pipes.
It is much easier to make and seal one opening in the roof for a common vertical structure than to cut several holes for the outlet of round pipes.
To prevent pipes from freezing outside in supply and exhaust systems, they are sheathed with insulation and lined. Pipes in an unheated attic or passing through unheated rooms must also be insulated. For thermal insulation, hygroscopic materials are used: mineral wool, polyurethane or polyethylene insulation.
Today, polyethylene insulation is very popular. Foamed polyethylene is a ready-made shell for pipes.To insulate, it is enough to put them on the pipe and glue them along the seam. Some manufacturers also produce polyethylene foam insulation with a sticky backing.

After laying the thermal insulation, final fixation to the load-bearing beams or to the roof structure is carried out. After final fixation, a deflector or any other protective device is installed on the roof to protect the mouth of the ventilation pipes from atmospheric water, dust particles, wind-blown branches and other contaminants.
Stages of assembling a ventilation system
Ventilation system assembly sequence:
- Marking - on the walls and ceilings, the places of communication with the points of installation of fasteners are marked.
- Installation of fasteners at pre-marked locations.
- Assembly of the general ventilation riser.
- Collection of individual air ducts from interior spaces.
- Installation of semi-assembled air ducts and riser.
- Connection of ventilation system branches.
- Sealing of connections.
- Installation of fans, valves and other devices that increase draft.
- Exiting pipes through the roof.
- Insulation of air duct sections in unheated rooms.
Thus, the construction of a ventilation system from sewer pipes has no fundamental differences with the installation of ventilation systems from special pipes - ventilation.
Conclusions and useful video on the topic
An example of assembling a ventilation system in the video:
The following video will introduce you to the specifics of constructing a ventilation system in a private house:
The issue of using sewer pipes for installing a ventilation system for a private house is due to their affordable cost, good tightness and ease of assembly. Do-it-yourself ventilation made from plastic sewer pipes will delight the residents of the house for a long time with its efficiency and durability.
Would you like to share your own experience in constructing a ventilation system from ordinary sewer pipes? Do you have useful information and technological subtleties that may be useful to site visitors? Please leave comments in the block below, ask questions, post photos on the topic of the article.


