How to install a bathtub yourself: step-by-step installation guide
Rationally located and trouble-free plumbing in the bathroom is an important component of the comfort of the owners.Its flawless connection is a guarantee of good relations with neighbors from the apartment below. To achieve the ideal, you need professional installation, the price of which not everyone agrees with.
But there is an opportunity to significantly reduce the cost of replacing old plumbing. If you install a bathtub yourself, then the home craftsman will only have to pay for consumables. However, an excellent result can only be achieved if you follow the technological rules that we are ready to share with you.
We suggest that you familiarize yourself with a detailed description of the process of installing and connecting plumbing fixtures made of cast iron, acrylic, and steel. We thoroughly outline the nuances of connecting to the sewerage system. The information we present is supplemented by photo collections, diagrams, and videos.
The content of the article:
Guidelines for choosing a suitable bath
Modern industry offers us bathtubs of different shapes and colors, made from various materials. Due to the variety of models, the home owner is always faced with the problem of choice.
If the shape of the container and its color concern us more from an aesthetic point of view, then the important performance characteristics of the product depend on the material of manufacture: its practicality, appearance and durability.

In the production of bath bowls the following are used:
- Steel. Steel plumbing attracts with its affordable price and abundant assortment. Thanks to its lightness, installation can be completed without the help of assistants. The disadvantages include high heat transfer, the ability to deform, sag under the weight of large people, and “noisiness” when taking water into the bowl.
- Cast iron. Expensive, reliable, durable. It does not make noise when filling with water and perfectly maintains the temperature in the container. Due to its impressive weight, installing a cast iron bathtub cannot be done alone. Plumbing fixtures are quite fragile; if handled carelessly, you can break the bowl or damage the enamel.
- Acrylic. A lightweight and inexpensive option that is easier and more logical to replace than to repair. It doesn’t sound when filling with water, it retains heat, but it doesn’t last long enough and isn’t very stable. You can easily handle the installation yourself.
If there are people in the family with impressive weight, it is advisable to install sanitary containers made of steel and acrylic on pedestals made of brick or additional supports constructed from it.
These measures will ensure stability and stabilize the position of the bottom.For owners with a less solid build, instead of capital brick fixtures, it is enough to install an additional frame made of a bar or a steel profile.

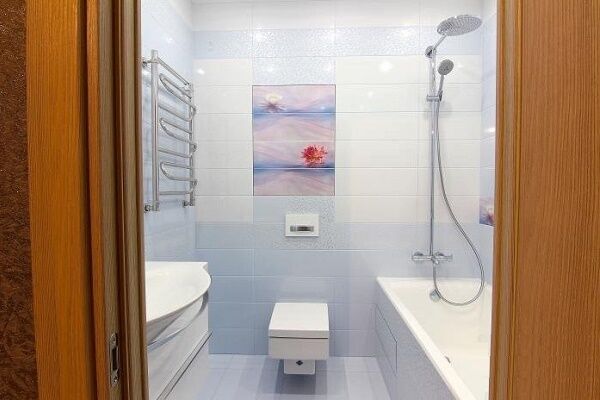
The shapes of the bathtubs are also pleasingly varied. In addition to the rectangular structures familiar to our eyes, there are oval and square ones. For small bathrooms, corner models are increasingly being used. And in addition to products in which it is more convenient to take a bath while lying down, those that are specifically designed for procedures in the “sitting” position are also in demand.
The subtleties of choosing a bath that suits you personally are described in detail in another popular article our site.
Preparing the premises for the upcoming installation
If you have already made a choice in favor of a specific model, you should complete a number of preparatory work before installation.In addition, you should choose a place in advance, decide how you will install the bath: you plan to do the work yourself, invite workers or call your friends.
After drawing up a unique plan for upcoming actions, it is necessary to assess the condition of the premises, and if a need for repairs is detected, carry them out.
When should walls be tiled?
It is best to install a bath before tiling the walls during a major renovation of the room. This sequence of work will allow you to achieve the best practical and aesthetic results.
Installing tiles after installing the bath allows you to most effectively seal all the gaps and cracks so that moisture does not accumulate in them, which creates an ideal environment for the development of bacteria and mold.
If you were not going to renovate the bathroom, but only wanted to replace the bathtub itself, you need to choose a model that will be slightly higher than the previous one. At least 1.5 cm.
Note that the tiles under the edge of the old bathtub are different in color from the rest of the tiles: they have not been faded. In addition, it may have a dirty surface that cannot be washed. Therefore, it is better to hide it.

How to properly prepare the floor?
The floor in the bathroom should not only be perfectly flat, but also durable. This is especially important if we have to work with a cast iron product, which has a fair amount of weight even without water.
If we lay floor tiles under the bathtub with our own hands, then they should be laid using the pressing method to prevent the formation of voids underneath. Otherwise, the tile may crack during use of the bath.
Any bathtub filled with water creates a significant load on the floor surface. To distribute it evenly, wooden logs can be used. Practice has shown that larch is optimally suited for this purpose.
The wood is prepared by treating it with antibacterial and antiseptic solutions. Then the logs are impregnated with PVA putty or drying oil.
The logs not only redistribute the load, but also successfully solve the issue of increasing the height of the product. Sometimes we need to raise the bathtub so that we can install siphon with deep elbow. Such siphons will prevent sewage waste from entering in the opposite direction. If you raise the bathtub slightly, for example, less hair will accumulate in the siphon.

Selecting suitable drain fittings
When choosing drain fittings, it’s easy to get confused by how wide the range of products offered on the market is. But really, what characteristics should you pay close attention to when purchasing, and what can you ignore?
Reinforcement material
The building materials market offers us two types of materials: PVC (polyvinyl chloride) and polyisopropylene. We come across PVC more often, that’s why we choose it.
But relatively expensive polyisopropylene is not only stronger than polyvinyl chloride, but also has a whole list of indisputable advantages, these are:
- Hardness. This material is significantly harder than its competitor, which reduces the likelihood of mechanical damage during bath installation.
- Durability. Its strength characteristics do not decrease over time.
- Surface quality. The surface of this material is smoother than PVC, which means that dirt sticks to it less.
The efficiency factor is also extremely important. The efficiency of polyisopropylene is higher than that of PVC, since the friction of water against the walls of smooth pipes made of this material is much less.
Qualities of drain elements
Most of the plums you see for sale are made in China. During their installation, a bolt is used. Regardless of what material it is made of, over time this bolt will oxidize, rust, or otherwise corrode.
You can buy a stainless steel bolt separately, but its contact with the mesh will certainly form a solder, which will significantly reduce the repairability of the product.
When buying drain fittings, do not hesitate to check its contents and make sure that all the elements stated in the passport are present:
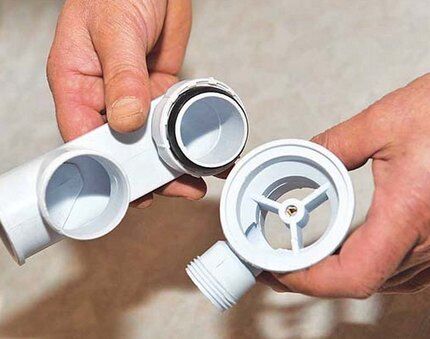
- Drain mesh. The most economical of all commercially available nets is a model that consists of two intersecting crossbars. It perfectly traps hair, preventing clogging. The most practical option is considered to be one with round holes located around the perimeter of the product.The most reliable is a mesh that has profiled oblique holes. However, this is also the most expensive model.
- Cork chain. It would seem that the chain is a detail that is not of significant importance. But that's not true. Usually we use the chain that we come across as part of the kit. It is not advisable to do this. Buy separately the one that fishermen use. Its surface is covered with protective paint, which prevents water from spoiling its appearance over time.
- Overflow pipe. In older bathtub models, the overflow pipe is made of metal, but modern production offers a better option. Use a corrugated pipe that has a large diameter, and, therefore, throughput. The high capacity of the pipe significantly reduces the risk of water overflow.
There are some installation nuances that are worth considering. For example, if the outlet valve of the drain fitting is wide enough, you can make the connection without using a collar. The resulting gap is simply filled with silicone-based sealant or silicone itself.
Matching the dimensions of the room and the bath
Owners of spacious bathrooms can rest easy: they have a wonderful opportunity to choose any bathtub they like, as long as they can fit in it themselves.
Everyone else will have to carefully measure their small spaces to make sure that the chosen model will look organic and will not deprive you of the opportunity to place the equipment you need in the bathroom.

Please remember that the appearance of the product may give a false impression. Some very similar models have completely different sizes. The most common sizes of bathtubs made from different materials also differ from each other.
The length of steel products is 150-180 cm, the height is 65 cm, the width is 70-85 cm.
For cast iron models, three types of sizes are considered standard:
- small-sized with a length of 120-130 cm and a width of 70 cm,
- European standard with the same width of 70 cm, but length 140-150 cm,
- large-sized with a width of 70-85 cm and a length of 170 to 180 cm.
The choice of acrylic models is truly huge. Their length varies from 120 to 190 cm, and width – 70-170 cm.

Small bathrooms are purchased for various reasons. Sometimes due to the fact that there is not enough space in the bathroom for a large structure. But sometimes owners of large premises also opt for compact models.
For example, elderly people and people with disabilities are often recommended to perform hygiene procedures in a sitting position. They need small-sized “sitz” baths.
By the way, the fact that the model takes up little space does not make it cheaper. On the contrary, compact products are often quite expensive. They are created in order to satisfy the needs of a number of people. And since they are in demand, it means you have to pay for them.
However, usually completely different models reign in spacious rooms. They are made of acrylic or cast iron. Cast iron ones look monumental and reliable, but without pretensions to originality, but the variety of acrylic ones is enviable. There are both angular and rectangular models, there are even polygons or ovals. The abundance of decorative trim also makes an impression.
Sometimes buyers, falling under the influence of unscrupulous sellers, buy cheap plastic fakes instead of acrylic products. As a rule, these are Chinese low-quality consumer goods, which you will have to worry about installing later. We will return to the nuances of installing plastic bathtubs later.

Preparing for DIY installation
Bathtubs, regardless of type or size, are not installed in one go. The same actions are performed when connecting seated models and full-size bowls. The number of operations increases significantly only when installing a jacuzzi.
During their installation, you will definitely need some special tools, which would be better prepared in advance so that you have them on hand, such as:
- Rule. This is exactly what a flat long plank is called, with an emphasis on the letter “i”. Its length should be equal to the diagonal of the bathtub that we have to install. If there is no rule in your household, and you don’t want to buy it specifically for a single operation, you can use for this purpose any flat and long bar with a level set on it.
- Fork key. This tool is used for installing drain mechanisms, which are usually made of plastic.
- Rubber hammer. It is necessary if you need to seat the legs of the bathtub. Rubber, unlike metal, will not damage the enamel of the bathtub and will not cause deformation of the product itself.
Silicone sealant is needed as an additional material. If you have to install an acrylic bathtub, do not forget to stock up on “rag” tape.
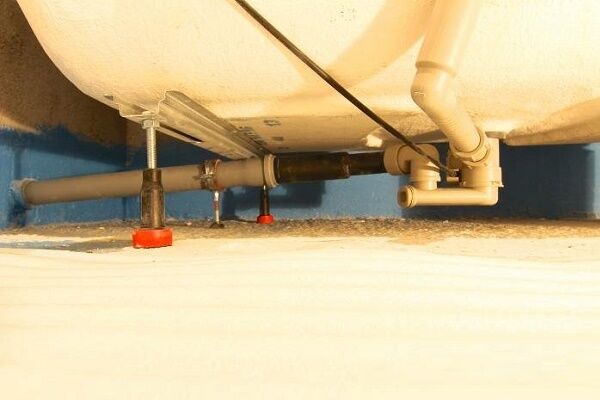
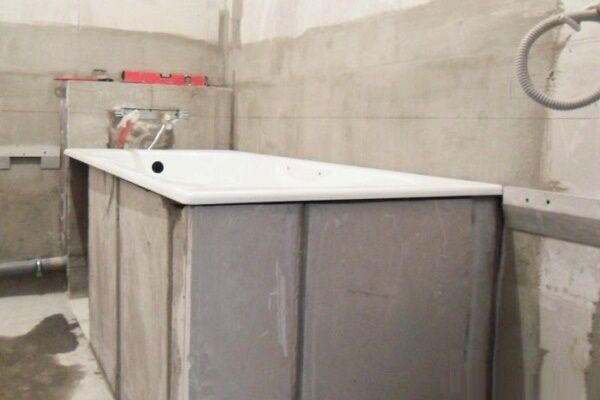
Alignment and connection of plumbing
We will level the bath using a level. In this case, you should adhere to the following principle: raise the lowered part, and do not lower the raised one. Do not forget that height of the installed product matters to us.
First you need to finish leveling the bathtub, and only then connect it to the sewer drain. Otherwise, you may accidentally damage the siphon.

There are two ways to level the bathtub yourself:
- along the sides;
- diagonally.
When leveling diagonally, the rule is laid on opposite corners of the container. The level is set on top of the rule. We level the bathtub by twisting its legs until the level shows that our goal has been achieved.
After this, we shift the rule with the level to other corners, also located diagonally relative to each other. The procedure should be repeated twice to ensure the result.
When aligning along the sides, the rule is set first on one side of the bathroom, and then on the other. First, adjust one side of the container, and then the other. This procedure should also be repeated several times, because when adjusting one side, the other may lose its setting. This method is much more labor-intensive than diagonal. If the floor itself has an uneven surface, then you will have to sweat.
How to prepare a sewer?
The water will have to be turned off. You may have to shut off the water supply to the entire house, but most likely you will be able to get by with only apartments powered by the same riser as your living space.
In any case, people should be warned in advance so that this event does not become an unpleasant surprise for those who are washing dishes, doing laundry, or taking a shower or bath at this time.
The goal of this event is to achieve a complete absence of moisture not only in the sewer pipe pipe, but also in the pipe itself. By ensuring dryness, we will achieve better sealing during the connection process. To dry the inner and outer surfaces of the pipe, you can use a regular home hair dryer.
Detailed Installation Guide
All. The workplace is ready. Let's start installation. Since installing different types of bathtubs has its own characteristics, we’ll talk separately about this procedure for each type of bathtub. Let's start with an acrylic model.

Installation of acrylic sanitary ware
When will you choose an acrylic bathtub in the store, pay attention to the fact that the kit includes special guides for attaching the legs of the bathtub. They are called lodgements. They are installed across the container. It is into them that the legs should be screwed.
The trays are attached to the surface of the bathtub using self-tapping screws included in the product package. Self-tapping screws must fit into holes specially designed for them.
Otherwise, they may simply make a hole in the bathtub. When drilling, use a drill equipped with a limiter. Holes cannot be made deeper than three-quarters of the length of the self-tapping screw.
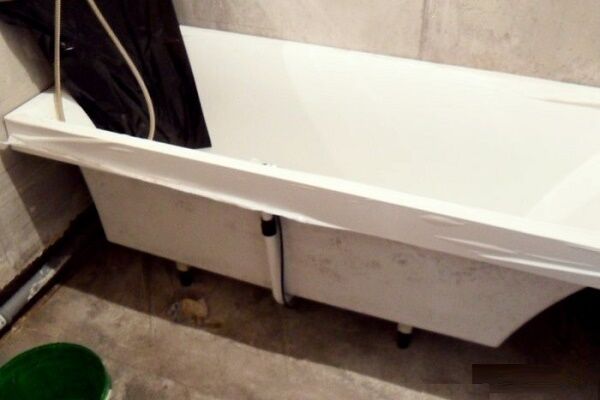
The holders are installed.Now the bathtub should be carefully placed on the side surface and the drain fittings should be connected. Do not forget to thoroughly treat all gaskets that will be used with silicone before installing the drain fittings.
If you don’t want to make trouble with your neighbors downstairs and pay them for expensive repairs, make sure that the drain gasket is installed outside.

Of course, the design of the bathtub has threaded connections of the elements. Do not tighten them tightly, because the installation process is not easy, the joints and individual elements of the bath may become damaged and will have to be replaced.
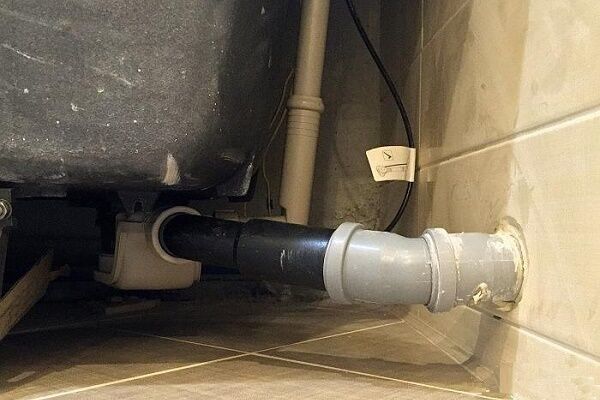
If we installing a bath, it should come close to three of the four walls. Make sure that the bathtub outlet is connected to the sewer pipe. Now you can level the bathtub using the rule, and treat the outlet connection with the pipe with sealant.
When the sealant begins to cure, take a fork wrench and tighten all loose threaded connections.

That's it, the sealant has completely frozen. Now you need to check all existing joints for leaks. All shortcomings are eliminated, and if they are not there, then proceed to process the gaps between the walls and the bathroom. To do this, use the same sealant.
We bring to your attention the article: How to level the floor under the bathroom with your own hands.
Nuances of installing a steel container
Special nuances installation of a steel bath No.It is mounted in almost the same way as acrylic. The work algorithm is the same except for the method of attaching the legs. The legs are attached to the steel container using wedges, pins or bolts. When using bolts for this purpose, be aware that you will have to tighten them one by one and gradually.
No matter how much it seems to you that everything is attached correctly, you should not immediately tighten the bolt all the way. It is possible that fine adjustment of the legs will be necessary, which will become impossible if the bolts are completely fixed.
We have already said that during the process of filling a steel bath, a stream of water hitting the walls of the container makes a loud sound. To muffle it, you can place pieces of automobile rubber in the space between the surface of the bathtub and the fastening of the legs or fill it with polyurethane foam.
You can learn how to seal the joint between the wall and the bowl. read here.
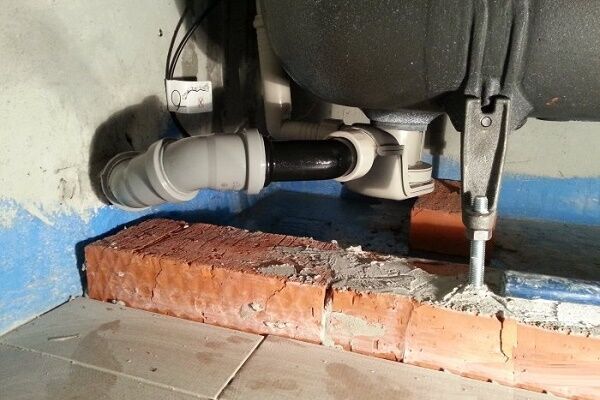
Features of installing a cast iron bathtub
Cast iron is a heavy material. And the bathtub made from it has a lot of weight. To prevent this massive object from damaging doorways and furniture, you need to properly organize the installation work. The bathtub should be adjusted and connected directly in the bathroom, without moving the container to other rooms.
Some cast iron bathtubs can be equipped with decorative legs. Such models become a real interior decoration and a designer find. If, in the process of adjusting the level of such a bathtub, you use raising gaskets, you can completely destroy all the efforts of the designer.

You can get around this point by filing the legs at the base, but only a professional can perform this work efficiently.
There are also special features when connecting the drain to the sewer. Cast iron bath It's better not to put it on its side. You can simply lift the front of the container. This will create additional space, which will be enough to complete the work. The structure should be temporarily fixed in the desired condition using wooden blocks.
The general principle of performing the work is maximum accuracy and no possibility of moving a heavy container.
A guide to installing a cast iron container on bricks, if there is a need for this solution, can be found in step by step guideposted on our website.
The nuances of installing a plastic bathtub
Plastic bathtubs are a cheap analogue of acrylic models, therefore the installation process for these models is similar to each other. But of course there is a difference. For a plastic structure, a special cushion must be created, the task of which is to relieve the load on the bottom of the product.
The pillow can be made of wood (larch) or cement. Bathtubs made of plastic should be used very carefully. Caring for it with aggressive detergents is strictly prohibited. If these nuances are ignored, then after 7, or even 5 years, the bathtub will need to be thrown out.
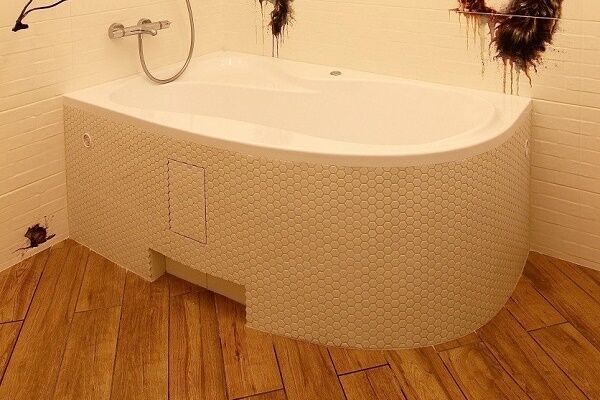
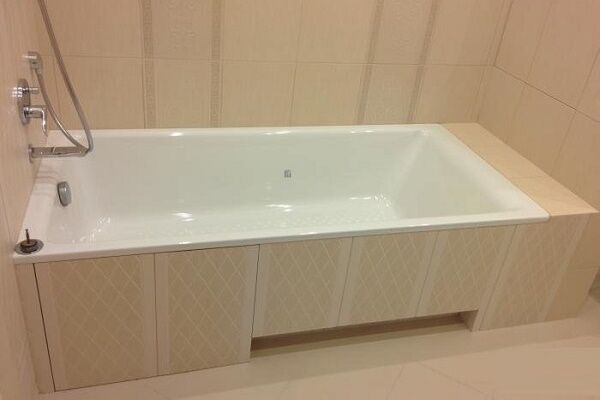
Construction of a bath screen
The space between the bathtub and the floor does not need to be closed if the outer surface of the model has an attractive appearance. But more often we still try to close this gap.
This can be done using, for example, sliding screen. This bathroom accessory is sold in stores, but some people prefer homemade screens. Homemade products attract with their uniqueness and low cost.

Conclusions and useful video on the topic
Installing any bathtub is not as easy as it might seem. This video presents some editing nuances that you should pay attention to. Take a look and see if you can do this job yourself:
We have outlined to you the theory of how to install different types of bathtubs with your own hands. All that remains is to apply the acquired knowledge in practice. We warn you that theory is not always easily translated into practice.
You will have to skillfully use different tools, as well as demonstrate knowledge of the intricacies of the installation process. Particular attention should be paid to cast iron products. Take reasonable care to avoid injury to your hands and feet.
You can ask a question or tell us about how you installed the bathtub yourself and connected it to the sewer in the block below. Please comment and share useful information. We and site visitors are interested in your opinion.


The other day I was installing a cast iron bathtub; I have had it in stock since Soviet times. I used your information and it turned out very well. I really liked the idea of a screen in the shape of a shampoo stand. While I haven’t closed this gap in any way, I want to try to make a screen myself. Tell me, what materials are best to make it from? Plastic?
Yes, the theme with the screen is very cool, I did one myself. I can give you some advice. You can buy it, but it will be much more expensive. The main thing is that the material is light: plastic or something similar. Plasterboard sheathing, gypsum fiber board or MDF panels, polymer lining - all this can be used. Options in the form of blinds or regular curtains look great. You can buy it with a drawing, or you can sit the children down and they will draw something there themselves.
Hello. Yes, plastic with a frame made of metal profiles is suitable, besides, as it is not strange, the gypsum board is well puttied, covered with tiles with sealant at the joints and seams.