Installing an acrylic bathtub with your own hands: detailed step-by-step installation instructions
The advantage of acrylic bathtubs is their lightness, but this point is also their disadvantage, since a rather fragile and thin structure may not withstand and burst upon impact or be damaged by the fall of a heavy object.
Agree, I wouldn’t want to spoil the new plumbing during installation. Overall, installing a DIY acrylic bathtub is not a difficult task. The main thing is to understand the principle of operation and adhere to the technology.
Below are various methods of installing a bathtub, describing the procedure for connecting the siphon and sewerage supply. All instructions are accompanied by visual photographs and video materials.
The content of the article:
Advantages and disadvantages of acrylic bathtubs
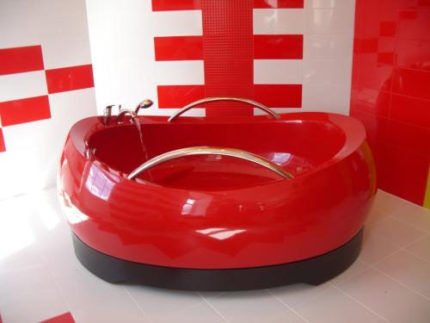
Acrylic bathtubs are very beautiful, have an original design and a variety of colors. At the same time, they have their own weaknesses and vulnerabilities.
Therefore, it would be a good idea to find out what problems you may encounter during installation and subsequent operation, and how to prevent them.
Among the advantages are:
- Plastic. Acrylic lends itself well to molding and subsequent processing. This property of the material determines the presence of a huge variety of shapes of acrylic bowls.
- Lightness. The acrylic bathtub is light in weight (15-25 kg), so its installation can be easily handled by one adult man.
- Priority heating technology. Acrylic itself is a warm material. In addition, it has low thermal conductivity; bathtubs made of acrylic can retain heat for a long time; the water in them cools much more slowly than in cast iron structures.
- Maintainability. Plumbing fixtures and acrylic products in general lend themselves well to repair and restoration. If the damage is significant, then you can restore the bathtub using an acrylic liner, which is made for a specific design and then simply inserted into the old container.
As for the disadvantages, they are also present. About the disadvantages acrylic products must not be forgotten. Following the recommendations below will help you avoid possible problems and extend the life of your acrylic bathtub.
The disadvantages of acrylic plumbing include:
- Sensitivity to high tº. Acrylic cannot withstand very high temperatures. When heated above 60 degrees, it may become deformed, so you should not pour too hot water into the bath.
- Fragility. If you accidentally drop a heavy metal object, a step, or similar uneven surface into the bathtub, its bottom can be pierced through.
- Vulnerability. Acrylic bath capricious in care — it cannot be rubbed with hard brushes or washed with powders containing abrasives, since the enamel is very sensitive and can be easily scratched by exposure to hard particles.
And it should also be noted, if not a disadvantage, then the inconvenience faced by those who first plunged into an acrylic bathtub. Due to the thinness of the material, the bottom may bend slightly under the weight of a person.However, you get used to this feature of an acrylic bathtub quite quickly.
Methods for installing an acrylic bathtub
There are several options for installing an acrylic bathtub.The easiest way is to install it on legs, which are pre-installed on the slats and then attached to the bottom of the bathroom using three or four self-tapping screws.
The installation process includes a number of standard steps:
However, this option cannot be called reliable, since the bathtub is supported only by four racks, while its sides remain without support. In addition, when bathing an obese person, the bottom will sag greatly, which is also not very pleasant.
Acrylic bathtubs with thin walls require a more durable support, which is usually used:
- Massive metal frame made of thick profile pipe, manufactured in a factory.
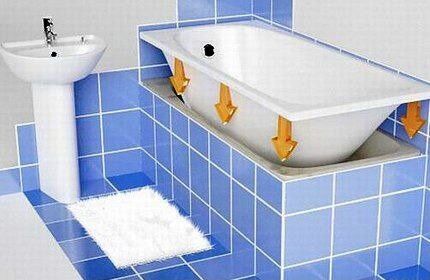
- Brickwork built under the bottom of the bathtub.
- Support legs and bricks at the same time.
Often the choice of installation option depends on the configuration.The most optimal installation method is to mount it on a factory frame, but not all manufacturers complete the bathtub with a metal frame.
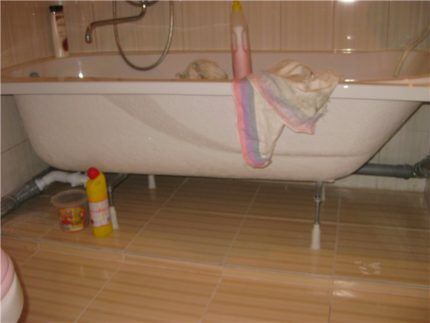
As a rule, inexpensive products are sold either with legs or without a mounting kit at all. The frame can be purchased additionally. You can install the bathtub on bricks, which is also a reliable type of fastening.
#1: Installing the bowl on the legs
Installation of an acrylic bathtub on legs is only permissible for standard rectangular structures. In other cases, you should choose a different installation method.
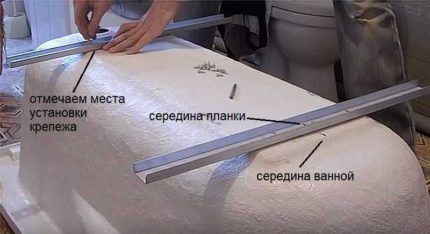
Turning the bathtub upside down, step back 4 cm from the edge of the reinforcing plate and mark the middle. Find the center of the mounting strips and align it with the middle of the tub. Mark the fastening points, drill holes in the bottom and secure the strips with self-tapping screws.
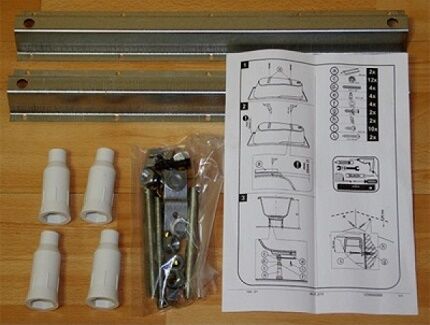
To attach the legs, a rod with a lock nut is inserted into the hole on the bar and secured with another nut. Then adjustable plastic legs with thrust bearings are screwed onto the stud.
Now you need to turn the bathtub over, put it on the legs and adjust their height so that the structure stands level without distortion.We carry out this operation using a building level.
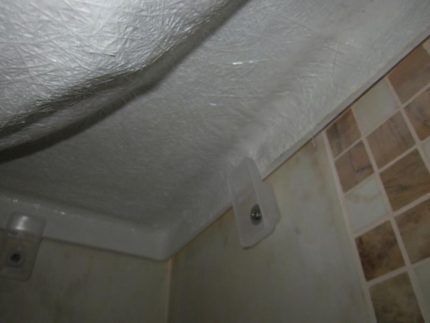
To fix the structure, the side of the bathtub is placed on special mounting plates included in the delivery kit, which are screwed to the wall. To determine where the fasteners will be located, place the bathtub against the wall and mark the edge of its side with a line.
The top edge of the plate should be approximately 4mm below the mark. For standard bathtubs, there are usually four fasteners along the length and two along the width. Screw the plates at the markings.
#2: Mounting on a metal frame
This method of installing an acrylic bathtub is somewhat more complicated and will require more time, but it is also more reliable. Frames are developed by manufacturers for a specific model and, as a rule, are sold as a set.
For standard rectangular structures, you can purchase the frame separately or make a support frame on one's own.
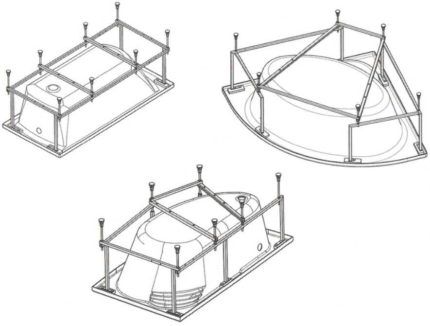
The main element of the frame is the frame, onto which the remaining structural parts are then attached. Often the package includes a factory-welded frame, but not always.In some cases, you will have to assemble it yourself according to the manual included with the product.
The frame is placed on an inverted bathtub, and in this position they begin to assemble the entire frame, sequentially securing the remaining parts. The kit includes stands, studs, plastic feet with thrust bearings, nuts, self-tapping screws and wall mounts.
The number of parts depends on the size and shape of the bath; the more complex the design, the more elements.
To secure the vertical post, a pin with a screwed nut is threaded through the corner hole of the frame, and then inserted into the post and screwed into it. The top of the stud is secured with another nut. All frame posts are installed in this way.
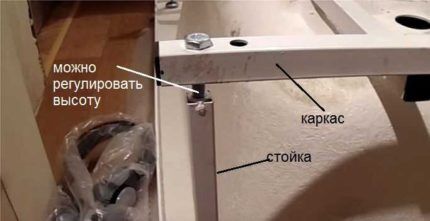
When all the racks are screwed on, it is necessary to level the frame by adjusting its height and checking the accuracy of the installation with a building level. Next, the frame is screwed to the bath using self-tapping screws. First, the frame is attached to the reinforced bottom plate, and then the racks are fixed in the corners of the bathtub in the places where the mounting plates are located.
Now all that remains is to screw the legs to the frame. In the places where they should be, holes are made, into which the studs are first screwed in and secured at the required height with nuts. Then plastic legs with thrust bearings are screwed onto them.
If you purchased an acrylic bathtub with a screen, then metal L-shaped plates are additionally inserted onto the legs, which will be located on the outside, to secure the screen.
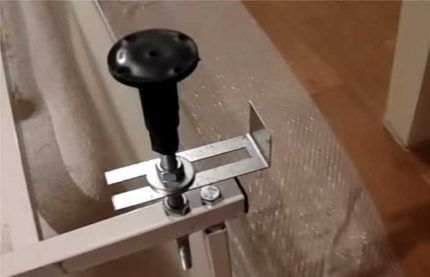
Turn the bathtub over, place the screen on it and adjust the height of the structure using the nuts on the legs. Place it against the wall and mark the places where the wall mounts will be located. Screw them on and fix the sides of the bathtub to the plates as described above.
Once again, attach the screen to the bathtub, mark the places where the screen is attached along the edges and in the center of the bathtub and screw the plates that are supplied in the kit there with self-tapping screws. Secure the screen to all plates, including those that were previously screwed onto the legs.
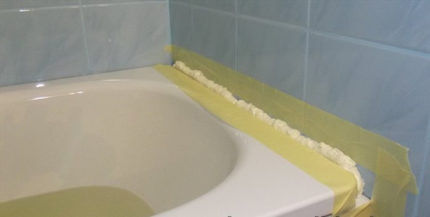
Seal the joints between the acrylic bathtub and the wall with silicone sealant. To do this, first clean both surfaces of dust and then degrease with alcohol. Apply construction tape to the wall and sides of the bathtub, apply an even layer of silicone, and then wet your finger with soapy water and smooth it out.
#3: Option with a brick support
If you purchased an acrylic bathtub that does not have a frame or legs, and at the same time you do not want to burden yourself with additional costs, that’s okay. It is possible to solve this problem, if not completely free, then very inexpensively.
To do this, you will need a few bricks, some cement, a metal (preferably aluminum) corner for attaching the bathtub to the wall and plumbing silicone to seal the seams. Your task is to create two brick supports on which the bathtub is then installed.
Brickwork is done on both sides of the acrylic bathtub so that the bottom reinforcing plate rests firmly on two brick supports. Depending on the required height of the bath and the location of the sewer inlet, two or three rows of bricks are laid out.
The solution should consist only of cement (1 part) and sand (3 parts), or you can buy an inexpensive masonry adhesive.
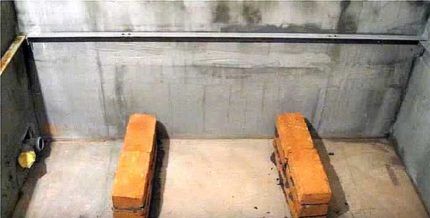
After two rows of bricks have been laid, wait until the cement sets and place an acrylic bath on them. If the height suits you, mark the level of the sides of the bathtub on the wall, and then attach a metal corner according to the marking and apply silicone compound to it.
Place a layer of cement on the brick base and install the bathtub on top, lowering its sides to the corner and pushing it tightly against the wall. Don’t forget to remove any escaping silicone from the sides and remove excess solution from under the bathtub a maximum of half an hour after installing the bathtub.
There is another way to install an acrylic bathtub on bricks, which involves creating a kind of pedestal on which the bowl will stand. In this case, you can install the bottom of the bathtub directly on the bricks, or you can pre-fix the legs and build a brick foundation under them.
The brickwork is pre-made as described above, with the only difference that no space is left between the bricks, but one continuous base is made. Next, if a bathtub without legs will be installed on the pedestal, then it is necessary to lay two metal strips on the bricks and place the bowl on them.
This is done so that between the brickwork and the acrylic bath there is a gap of about 1 cm, where then, after the solution has completely hardened, the foam will be blown in to secure the bowl.
If the legs are pre-screwed to the bathtub, then in this case everything is simple: it is installed above the foundation, the legs are adjusted to the desired height, then the foam is blown in.
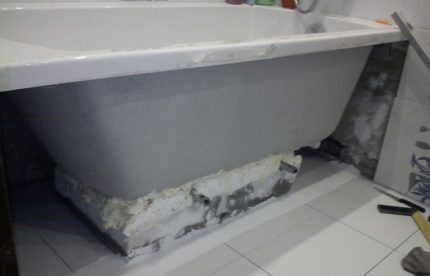
The space between the bathtub and the bricks is filled with construction foam. To ensure optimal pressure on the foam, it is advisable to fill the bath with water.
Sealing joints between the wall and the side of the bathtub
The silicone sealant you used to seal the joints between the wall and the acrylic bathtub is good, but not sufficient. No matter how tightly the structure fits against the wall, gaps still remain. You can buy special tape in construction stores.
It is mounted on silicone and attached to the wall and sides of the bathtub. In addition to complete tightness, it gives the structure an aesthetic and complete look.
You can also seal the joints using plastic corners. Their edges are equipped with rubber inserts that prevent water from entering. There are many skirting boards of various shapes, colors and designs, which allows you to choose a product to suit any bathroom interior.
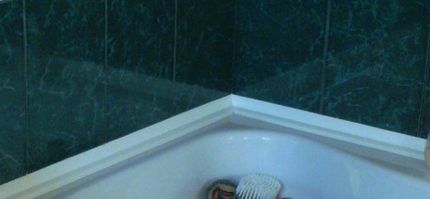
The corners are attached to the bathtub and walls using silicone, which is applied to surfaces previously degreased with alcohol. It is recommended to fill the bath with water before applying it and leave it filled until the sealant has completely dried. If this is not done, microcracks may appear on it in the future.
Siphon assembly and connection to the sewer system
We have moved this point to the end of the article to describe in detail the process and nuances of connecting siphon equipment to an acrylic bathtub. However, this work must be done immediately after installing the legs or frame, before installing the screen, and before finally attaching the bath to the wall and brickwork.
As a rule, the siphon is supplied disassembled. A large number of chaotically located parts can, at first glance, even frighten a person who is faced with connecting a bathtub for the first time. However, the attached instructions describe everything in detail and show how the siphon is assembled, so assembly does not cause any particular difficulties.
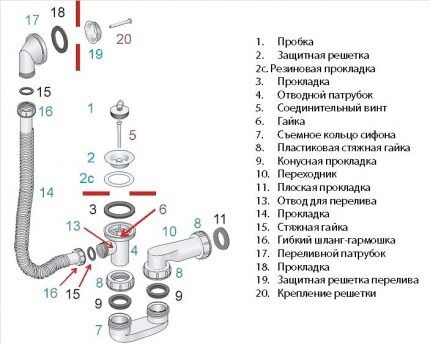
Installation siphon begins by connecting the inlet pipe (4) and the protective grille (2) to the lower outlet of the bath. Before this, the joints must be treated with sealant and a rubber gasket (3) must be placed inside, on top of which a layer of sealant is also applied.
Then, without waiting for it to dry, the outlet pipe is inserted into the lower part of the bath.
Next, an already assembled flexible hose (16) is inserted into the overflow outlet (13), and its other end with a pre-installed gasket (18) is connected to the upper hole of the bath and secured with a protective overflow grill (19).
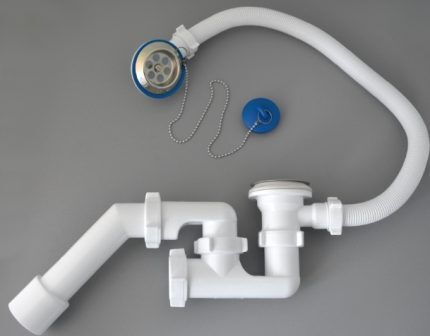
Then the part of the siphon that is connected to the sewer pipe is assembled. All joints are treated with sealant. When assembling the siphon, try not to overtighten the threaded connections, as this can lead to deformation and breakage of the plastic parts.
At this stage of work it is worth taking care of mixer installation.
Methods for exterior finishing of an acrylic bathtub
If you purchased an acrylic bathtub without a decorative screen, then you can make this part yourself.
When performing finishing work, you must follow some rules:
- use only moisture-resistant materials that are resistant to temperature changes and are not susceptible to the formation of mold and mildew;
- provide quick and easy access to communications located under the structure.
If the bathtub is installed on bricks, you can also lay out a half-brick thick brick wall on the front part, and then veneer it ceramic tiles or mosaic. The top row of bricks is made 2-3 cm below the side of the bathtub, and then blown with foam to seal.
It is also necessary to leave a technological hole, and then use canopies to make a door.
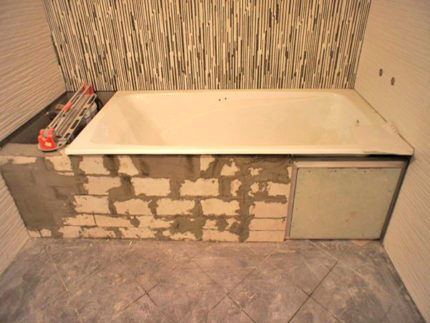
Finishing an acrylic bathtub with plastic, MDF or moisture-resistant plasterboard is very popular. The original solution is to create mirror screen. Plastic panels allow you to quickly and inexpensively finish the finishing of the bathtub. In addition, if the panel becomes unusable, it can be very easily replaced.
As for drywall, after installation, it can be finished with different materials: tiles, waterproof wallpaper, covered with film or applied with decorative plaster.
In both cases, it is first necessary to make a frame from a metal profile or wooden beam. In this case, the metal must be treated with an anti-corrosion compound, and the wood must be treated with a moisture-resistant primer.
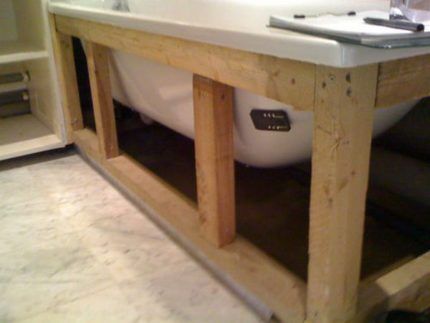
To make a wooden frame, install boards around the entire perimeter of the bath that will serve as a base and screw them to the floor with self-tapping screws. Make vertical posts in the corners, attach the top horizontal board to them using metal corners and install additional vertical posts in increments of 50-60 cm.
Interesting options for creating a screen for a bathtub are offered in this article.
Conclusions and useful video on the topic
Assembly of the frame and installation of a bathtub with a plastic screen is described in the following video:
Video instructions on how to properly assemble a factory metal frame for an acrylic bathtub:
Acrylic bathtubs of angular, round or asymmetrical shape are installed only on a factory-made metal frame. Manufacturers include detailed instructions according to which any man can cope with this work on his own. However, it is better to entrust the installation of a hot tub to specialists, since it requires the connection of complex electrical equipment.
Do you have anything to add or have questions about installing a bathtub? Share your personal experience in installing plumbing fixtures and please leave comments on the publication.


This was the first experience of installing such a bathtub, which was more sad than successful. I decided to install it myself, and in vain. The tub came with free installation hardware, feet, and fixtures. I fiddled around for half a day, did everything according to the instructions, in the end everything seemed ready, but due to inattention, or because of the rush when moving, I didn’t take one thing into account - the uneven floor in the bathroom, the bathtub was shaking. I had to redo it. So my advice to beginners for the future is to check everything thoroughly, inside and out.
We also have an acrylic bathtub at home, but I don’t agree with the disadvantages listed above. It's not that fragile, they've dropped some pretty heavy things. And not only did the bottom not fall through, but there were no scratches either. Of course, you can’t clean it with powders, but it’s not that fancy at all. They didn’t install it themselves, but a master who did the repairs, but, according to him, the process is simple. The bathtub came with a frame with legs, so it was quite stable. The only thing is, after installation, the master filled our bathtub with water and forbade us to drain it for three days, apparently so that the joints would harden properly.
Why do you need to leave 4 mm when installing the bowl on the legs? for subsidence if it is already standing on legs? The legs will not allow it to sag by 4 mm.
If it’s on bricks with foam, then that’s fine. And if legs, then why? Then the legs need to be aligned afterwards. I don't understand.
Hello. The subsidence of the bathtub under load with the absence of wall fastenings is taken into account.
Let's do the math. The average weight of the bathtub is 25 kg (acrylic), water 200-250 kg, human body weight. The bathtub has sagging, the load on each leg is 25%, which is not small.
Can you please tell me if the mounting plates that are screwed to the wall are located at the same level?