Installing a cast iron bathtub yourself: a detailed step-by-step guide
To prevent the installation of a cast-iron bathtub from seeming like an overwhelming and very complicated repair step, you need to study the process itself in more detail.We examined this in detail in our article, highlighting the main stages of installation and paying special attention to each step.
Having become familiar with the nuances of installation, it is quite possible to cope with such work on your own. The main thing is to do everything correctly and consistently, following the installation recommendations.
At the same time, it is important to avoid common mistakes, some of which we also discussed in our article. This will allow you to save a lot on the services of relevant specialists.
The content of the article:
What to look for when buying a bathtub?
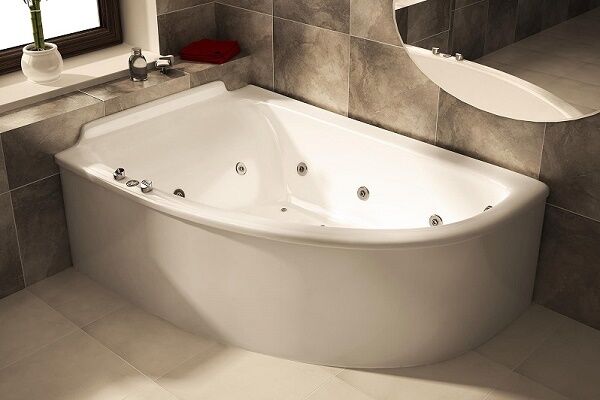
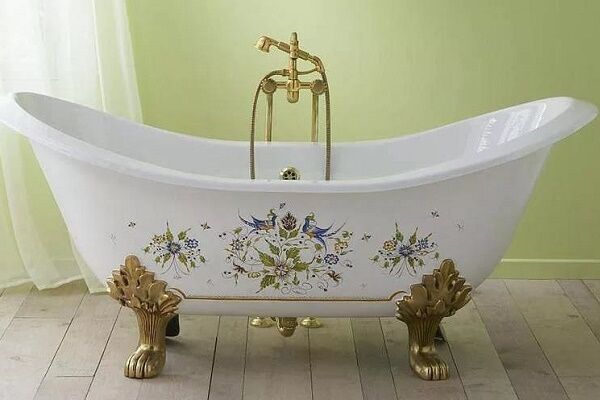
Choosing a cast iron bathtub is quite difficult - manufacturers offer so many beautiful models that you won’t immediately understand which one to take.
There are original designer bathtubs with beautiful legs, and some with ordinary ones, there are corner, round, simple rectangular shapes, with a hydromassage function and musical accompaniment of the bathing process - for any consumer.
It is important not to get lost in all this diversity and study the technical characteristics. Let's consider the main criteria that are important when choosing a cast iron bathtub.
Declared and actual dimensions of the product
The very first and most important thing is to choose the optimal size of plumbing equipment, based on the individual parameters of your room.
The choice of cast iron bathtubs on the market is very diverse. Here it is important to take into account not only your wishes, but also the actual size of the room, the floor, and the strength of the building’s floors.
Don’t forget about the size of doorways, the presence and size of a freight elevator in the house, and the width of flights of stairs so that the purchased bathtub can be physically delivered to the installation site.
Bathtub weight with additional equipment
The weight of the product is important. If this is an old house with wooden floors, then installing a large cast-iron bathtub with hydromassage can end very badly - at one point the partitions will not hold up and everything will collapse to the neighbors below.
It’s good if no one gets hurt in this fall. Therefore, it is important to take a reasonable approach to choosing the model to be installed.

For a private house and apartments with durable floors, there will be more options - from both domestic and foreign manufacturers. The shape of the products, the variety of additional functions and capabilities, overall dimensions - choose what you want.
The owner of a small apartment with a combined bathroom has significantly fewer models - the main thing here is that the equipment fits into the room.

Enamel thickness and quality
Another important characteristic is the quality of the enamel that covers the working surface. According to standards, its thickness should be at least 1 mm along the walls and at least 1.5 mm at the bottom of the bath.
As practice shows, cast iron bathtubs from foreign manufacturers are significantly superior in this indicator. Their coating is stronger and more durable.

Also, it is foreign technologies that make it possible to produce stronger and lighter cast iron bathtubs. The main advantage of domestic products is their low cost.
For budget repairs, this option will be more acceptable, and a service life of up to 100 years will be a pleasant bonus. You just need to properly and promptly care for your cast iron bathtub so that it retains its attractiveness.

Equipment and accompanying documentation
Having chosen your ideal bathtub, do not hesitate to ask the seller about the accompanying documentation. Manufacturers usually supply instructions for installation, use and care.
Also, the product most often includes legs on which to install a cast-iron bathtub, fasteners for connecting them, drain fittings and an electrical potential equalizer.
First you need to carefully inspect the bathtub for chips, cracks and scratches. If everything is in order, then all components must be carefully checked to ensure that they are suitable for use. Sometimes the kit is missing some parts - you will have to buy them separately.
Particular attention should be paid to the supports (legs) of the bathtub. They must support the weight of the product they come with. If the legs are flimsy and unreliable, it is better to refuse such a bath. After all, a conscientious manufacturer will not skimp on supports.
We also have a detailed guide on our website. choosing a cast iron bath, which we recommend that you familiarize yourself with.
Step-by-step installation process
Having decided to install a cast iron bathtub without involving specialists, you will have to do everything yourself. It is useful to first understand the theory of installation in detail to make your work easier and calmer.
To bring the bathtub to the desired floor and deliver it to the room without damage, you can hire movers. But this option will obviously cost a pretty penny. It’s better to invite someone you know and take care of one or two assistants - there’s no way you can handle the weight of a cast iron product yourself.
Stage #1 - leveling the floor in the bathroom
Before you begin installing a cast iron bathtub, you need to complete the preparatory work in the appropriate room as much as possible. This will help protect the product from accidental damage and chips during repairs.

Depending on the shape of the product, its future installation location and the overall design of the room, it is recommended to level the walls and floor. If there are supposed to be tiles in the room, then they are laid before installing the bathtub. Sometimes the tiles are laid up to the level of the bathtub.
This allows the edges of the product to be firmly recessed into the adjacent walls, which guarantees greater stability. When the walls and floor are tiled in the right places, you can begin installing plumbing equipment.
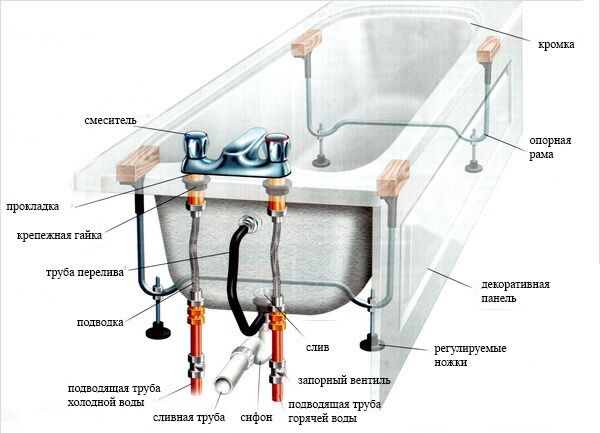
Stage #2 - connecting components
Everything must be done very carefully so as not to scratch either the tiles or the top layer of the bathtub enamel. You can use a soft cloth so that when connecting components and turning the product from one side to the other, you do not accidentally break the edges.
The first step is to carefully turn the cast-iron bathtub on its side so that it is convenient to connect the siphon and other parts for draining the water.
To do this, you will need to take the package with components supplied along with the sanitary container. If this is not available, then you need to buy a siphon in advance from a plumbing store to connect the bathtub to the sewer system.

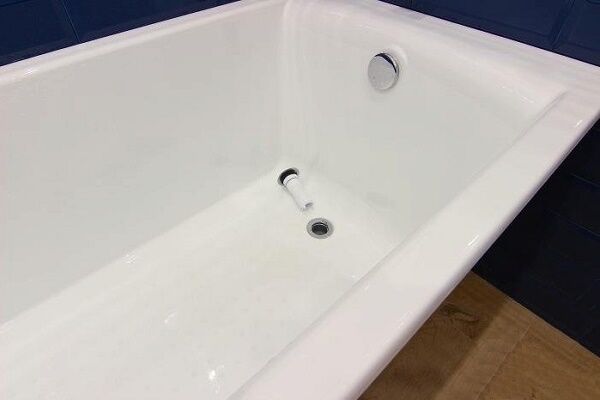
First you need to assemble the siphon attached to the hole in the bottom of the bathtub.
It is assembled quite simply, the main thing is to correctly install the rubber gaskets and place the seals before screwing on the nuts:
- the assembled siphon is attached to the lower hole located in the bottom of the bath and intended for draining water;
- a rubber pad of appropriate size is installed;
- then the siphon is screwed on the outside, and the siphon mesh is screwed on the inside.
Next, you need to assemble the top overflow - the hole that prevents the container from overflowing with water is located on the wall of the bathtub. It serves to drain excess water. To assemble it correctly, you need to connect the corresponding part - the overflow outlet.
Attach the corresponding overflow part to the side hole, after placing a seal between it and the wall of the product. The outlet is expanded on the water inlet side.
This part is secured to the inside of the bath with a special bolt passing through the overflow hole. He simultaneously attaches the cover with water holes to the inside of the bathtub.
All that remains is to connect this overflow to the main siphon. This can be done using a special pipe included in the kit. The pipe can be corrugated, made of plastic, or another type.
The upper overflow outlet is attached to the pipe with a special nut, which is then connected to the siphon. Be sure to put an elastic band under the nut - the seal that comes with the kit.
This will protect you from leaks in the future. Also, on the other side of the siphon there is a hole to which a pipe must be screwed - the outlet pipe - to enter the sewer pipe.

The issue with the difference in diameters of the siphon and sewer pipe can be successfully resolved with a special cuff. It's conical. It is lubricated with sealing grease, put on a siphon pipe, the diameter of which is usually 40 mm, and inserted into the socket of a sewer pipe with a diameter of 50 mm.
Such a connection usually does not leak, but if a leak suddenly appears, the assembly must be filled with sanitary sealant.
The material for making the siphon and bath overflow can be plastic, aluminum alloy or brass. Regardless of the type of material, it is important to carefully connect the components together using gaskets and seals, and not overtighten the nuts so that nothing cracks.
The floor siphon for the bath comes with or without revision. The first one is much more convenient, because if it becomes clogged, you can unscrew the inspection cover and clean everything.
As for size, the siphon is usually not tall. It is convenient to install it under the bottom, if the basic installation rule is not violated - the distance from the bottom of the container to the floor must be at least 145 mm.
In our other article, we provided recommendations for choosing the best siphon design and step-by-step instructions for siphon assembly and installation for a bath.
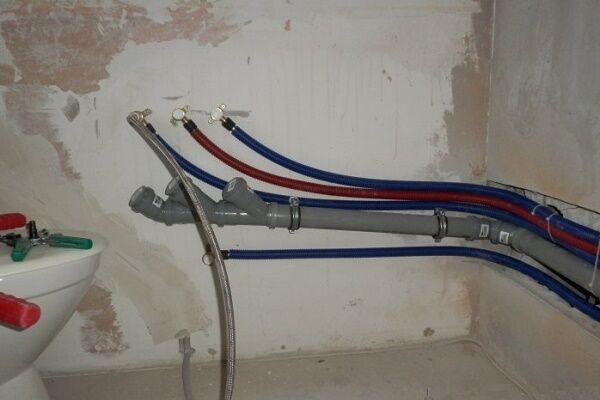
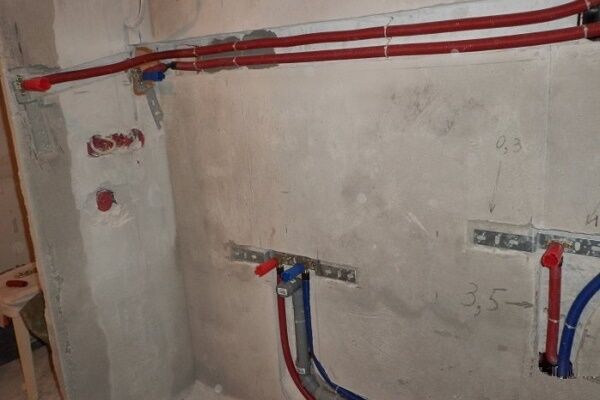
If the design of the bathtub requires the installation of a mixer, then now is the time to install it. Then using flexible hoses, connect to water sockets.
Do not forget about static electricity, which can harm humans. It occurs when a stream of water hits the edge of the bathtub. To prevent electric shock, you will need to install an electrical potential equalizer - this is a metal wire or plate included in the kit.
If such a part is not available, you can use ordinary steel wire with a diameter of at least 5 mm. One end of it is connected to the second overflow, and the second must be connected to a water pipe or grounded.

It is important that when grounding the bath, all connection points are thoroughly cleaned to a shine and then insulated. To do this, you can use window putty or tape.
We discussed the bath grounding process in more detail in another article.
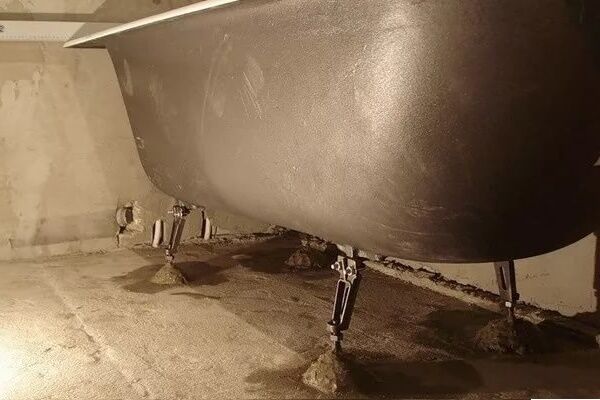
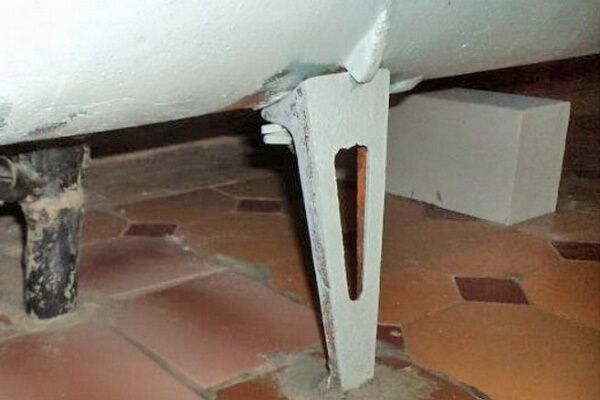
Stage #3 - installing legs and leveling the bathtub
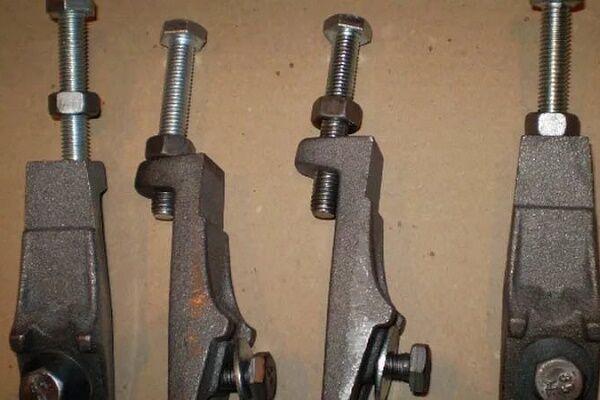
The second step in installing a bathtub yourself is screwing on the legs. Their height in most cast iron models is adjustable.
The main thing is to adhere to the generally accepted norm:
- the distance from the top edge of the bathtub to the floor must be at least 60 cm, more detailed standards and norms for the height of the bathtub to the floor reviewed here;
- at least 50 cm if this container will be used by a child in kindergarten or a disabled person;
- the height when installing a bathtub may exceed the norm, but under no circumstances should it be less.
It is convenient to screw the legs while the bath is in a lying position.By carefully screwing them with the special bolts and nuts included in the kit to the fastenings, you can turn the product over.
Before doing this, you should consider what kind of surface it will stand on. If there is a danger of scratching the tiles with your feet, then you can put them on special plastic pads.
Sometimes in houses with weak floors, the legs of a cast-iron bathtub are placed on wooden boards, which allows the load to be evenly distributed over the entire floor area. This option is not suitable for rooms where, according to the designer, a bathtub with open legs is intended, without the use of screens.

The bathtub with the screwed supports is turned over and placed on legs. Here, special attention is paid to the stability of the structure. It is necessary, using a building level, to achieve a horizontal position of the upper edges of the container.
Also, do not forget about the slight slope towards the drain hole. According to the standards, its value is 2 cm per 1 meter of product length.
All that remains is to secure the bath tightly to its permanent location. But, before such an important step, you must check whether the connections are leaking and whether all the water is completely gone.
To do this, place paper or a white dry cloth under the bath, add water and watch the result. If there is the slightest leak somewhere, then it will be clearly visible on paper.
In addition to the factory legs, included in the kit or purchased separately, a situation may arise when you need to fix the bathtub using a strong support.In such cases, brickwork is used. To figure out how to properly install the bowl on bricks, go via this link.
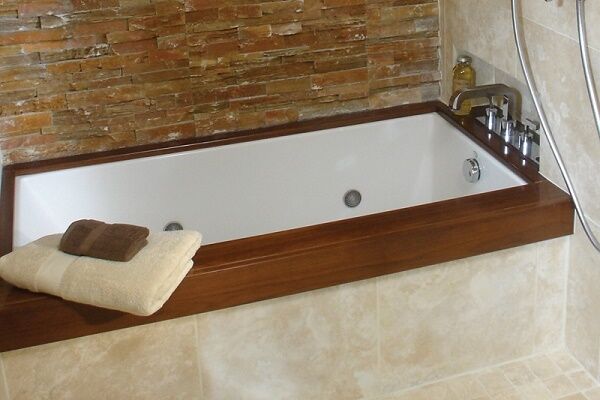
Stage #4 - installing the bowl and sealing the joints
When all the components are installed, the components are sealed, and the legs hold the bathtub in a horizontal position, you can proceed to the final stage - installing the container and sealing all joints and seams. This is true for models that will stand close to the walls.
For free-standing bathtubs with open legs, it is enough to firmly secure the supports with waterproof polymer glue so that the filled container does not go anywhere with its owner during the ablution process.

If the tiles are laid to the level of the bathtub, then a recess is made in the wall - a gutter, into which the edge of the container is inserted. It is important that the side does not go deep into the wall, otherwise it will become inconvenient during operation and will greatly spoil the appearance.
Also, do not forget to immediately remove all excess, carefully wiping the surface of the bath. It is advisable to provide complete protection for the enamel of plumbing equipment by wrapping the surface with film.

All joints and small gaps are treated with cement or foam and covered with silicone sealant.
Sometimes a special plastic corner is used for finishing.It sticks easily and looks good, but quickly loses its attractiveness and begins to leak water. It is more practical to make a tight junction of the tiles on top and use grout.
We have material on our website that details the best methods of sealing joints between the bathtub and the wall. We recommend that you familiarize yourself with them.
Having processed all the joints, you can begin installation of screens and tiling. At this stage, it is important to provide free access to the siphon inspection. After all, no one is safe from clogged pipes or leaks.
For such situations, a freely removable door or lid disguised as a tile is provided. Or a separate tile is placed on 4 magnets - as you like. We reviewed the rules for selecting and installing an inspection hatch In this article.

Errors during installation
Often, even the team hired to install a cast-iron bathtub does a poor job. The most unpleasant thing is that all errors become noticeable only during operation.
At first glance, it seems that everything was done correctly, but in reality it turns out to be the opposite. You should pay attention to the most common mistakes made by home craftsmen who are faced with self-installation for the first time.
Firstly, there is no horizontal leveling of the bathtub using a building level. This may result in poor or slow water flow, or an unstable position of the container.Such an error must be corrected immediately - after all, the installed equipment is not suitable for use.
Secondly, when installing the legs, the screws may be overtightened. As a result, cracks or chips may appear. This seemingly unnoticeable problem will in the near future lead to the need to replace the bathtub with a new one.
If, due to negligence during the installation process, you touched the bowl and chips or scratches appeared on its inner surface, then you can perform a set of work on restoration of enamel.

Thirdly, it is extremely undesirable to place thick rubber pads under the legs. After all, during the bathing process the bathtub will spring back and after a couple of months the sides will move away from the walls of the room. Water will begin to enter these gaps, flowing under the bathtub. You will have to spend time, effort and money to fix this problem.
Fourthly, a rather dangerous mistake is not to ground the bathtub. When installing an electrical potential equalizer, you need to pay special attention to its tight fit to ensure reliable contact.

Fifthly, when, in order to save money, a siphon was used without inspection or access to the inspection was walled up. In the event of a blockage or breakdown, you will have to put in a lot of effort to eliminate the problem.
Sixthly, it is very inconvenient when the sides of the bathtub go deep into the wall. This visually makes the bathing procedure extremely unpleasant and interferes with attaching shelves or installing seats. It is important to remember this even at the stage of cutting a recess in the wall, so as not to overdo it.

Seventh, you should not make a tile shelf on the side of the legs. After all, during operation, water will fall on it and flow onto the floor. If you make the shelf more inclined, then you won’t be able to place any shampoo bottles on it - they will slide off.
There are other problems that arise during the installation of a bathtub that can ruin the appearance. For example, if silicone or cement is not wiped off the surface in time, it may remain there forever.
Conclusions and useful video on the topic
Video instruction with a detailed demonstration of the bathtub installation process:
A visual video about the assembly and installation of a polymer siphon:
A guide on how to fix a leak between a wall and a bathroom yourself:
Having found out the features and dealt with the main problems that arise in the process, you can install a cast iron bathtub yourself. It will be possible to manage without a brigade, but not without assistants. The whole problem is the weight of the product, which one person cannot physically handle.
Do you have experience in installing a cast iron bathtub yourself? Tell us how difficult this task was for you.
Perhaps you want to give useful recommendations to home craftsmen who are faced with the issue of installing such heavy plumbing equipment for the first time? Write your tips in the comments block under this article, add a photo of a cast-iron bathtub you installed yourself.


After the renovation was completed, it was necessary to find a suitable bathtub.The cast iron one was noticed right away, because with proper care its service life is quite long. I just wanted to introduce some kind of novelty. We decided to take a hot tub. We re-read a large amount of literature, searched for information on the Internet, and prepared for independent installation. Everything turned out quickly and efficiently. The bath looks beautiful. So, if you want, you can do everything yourself.
When we were renovating the bathroom, we foolishly threw out the old cast iron bathtub. They installed a cheap acrylic one, but it’s heaven and earth! I don't like the shape, there is no feeling of reliability. Again we think about cast iron. But I have a question - how to calculate the maximum allowable weight of a bathtub in an old house? Is there such data somewhere? The old cast-iron bathtub was large, but after reading the article it became somehow scary. Another question about the electrical potential equalizer - this is the first time I’ve heard about this, is it only for hydromassage baths? Is this not necessary for ordinary people?
Olga, an electrical potential equalizer is a type of grounding. What is it for? In any house there can be stray currents, for example, if someone grounded a pipe or battery, say a washing machine. This cannot be done; grounding must be carried out to the shield. But not everyone wants to live honestly, and they do what is easier, closer and cheaper for them. But the equalizer is exactly what you need so that you are not electrocuted when water comes out of the tap. It connects directly to the pipe where the water comes from. If the bathtub is connected to the pipe, then there will be ZERO volts between the bathtub and the pipe. But if there are dishonest groundings in the house, then in the absence of grounding, you can measure up to 30 volts of difference. I personally measured 5 volts. Not much pleasant.Every time you pour it or when water has already poured into the drain, you will be pinched by stray currents between the mixer, especially when draining the water from the bathroom. Not only is it not pleasant, but maybe... and dangerous. Those. you need to connect the wire to the bolt of the cast iron bathtub to the pipe. It is necessary to make a crimp contact on the pipe, such as a clamp with bolts. I don’t remember exactly what it’s called, but the point is that the main pipe at the point of future contact must also be degreased with a solvent, then the same crimp contact must be applied to it.
Why wasn’t the bathtub grounded in Soviet times? I have a bathtub without screws/adjustable feet, how do I level it? How can I ground a bathtub if the riser is made of copper, then there is a section of pipes made of corrugated pipes, then again made of copper?
Mb, who told you that in Soviet times no one grounded the bathtub??? Where does such strange information come from?))
Grounding to bathrooms in Soviet apartments was done, but not always and not everywhere. In addition, after more than a dozen years, the system could stop working. For an old-style cast iron bathtub, grounding must be done as follows:
1. Drill a hole in the bathtub leg;
2. Secure the grounding jumper;
3. The stranded wire is connected to the bathtub leg;
4. Next, the stranded wire is connected to a special distributor.
In turn, wires from other metal objects are connected to the distributor. The distributor must be connected to the common grounding bus of the panel (located in the entrance). And leveling the bathtub is not difficult - wooden stands will help.
So how do you propose to lift, turn over and generally move a 150 kg cast iron bathtub? Jacks, a bunch of friends, some kind of hoist? So much water, but the most important thing was not said...
Ivan, where did you get 150 kg?))) 1.70 weighed approximately 119-120 kg. This is during Soviet times. And now even less. Regarding the jack, a bunch of friends, I’ve been laughing for half an hour, remembering how 18-year-old me and my husband took the bathtub from the house to the street together and changed it. So we took it out carefully, turned it over so that the rain wouldn’t pour inside, and then loaded it into a CAR a few days later and took it to my mother-in-law. She was smaller, a little over a hundred kg, but I’m a woman. If you think I'm a bomb carrier, no. I weigh 45 with a height of 1.59. I also remember how the Polyus refrigerator was dragged 5 km all on the same wheelbarrow (weighted by ITSELF), and passed through a pontoon bridge. Yes, now I don’t lift, but only because due to my son’s illness, amid stress, I now have a heart condition and exercise is contraindicated for me... but 2 healthy people will be able to lift a bathtub, it’s even funny.