How to install a bathtub on bricks: step-by-step installation instructions
The traditional scheme for installing a bathtub on legs is not always able to guarantee the stability of the structure.The screw fastening begins to loosen under load over time, thereby reducing static. Therefore, the most reliable installation of a cast iron or steel bowl is on strong supports made using brickwork.
If you decide to replace the bathtub, but don’t know where to start and how to implement everything correctly, we will tell you how to install a bathtub on bricks and whether you can do it yourself.
Also, in the article you will find step-by-step instructions for installing supports for various types of plumbing fixtures. To make it easier to understand, the material contains thematic photos and videos.
The content of the article:
Erection of a support for a cast iron bathtub
Used everywhere during Soviet times cast iron baths do not lose popularity even today. And the secret of popularity is easily explained by the high heat capacity of the iron-carbon alloy.
The heavy weight of the product itself plus the weight of the person in it, with unreliable support, can cause the plumbing to become distorted during operation. And this will entail a violation of the angle, the likelihood of depressurization of node connections and difficulty in the normal drainage of waste water into the sewer.

A cast-iron bathtub installed on bricks can be freely used for water procedures by a person of almost any body type, without fear that the walls will bend and the bowl will warp.
As a supporting structure you can build:
- two separate platforms;
- several pillars on the sides and corners of the bowl;
- continuous brickwork around the perimeter of the product.
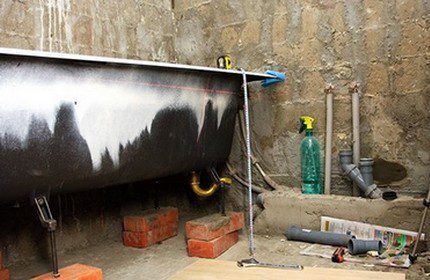
Due to the heaviness of the structure installation of a cast iron bathtub Only two people work on bricks. The work is carried out in several sequential stages.
The specific moments of installing a cast iron bathtub on a brick base are demonstrated by a selection of photos:
Selection of tools and materials
To erect a supporting structure for a cast iron bathtub, you should prepare:
- bricks;
- concrete grade M:400;
- sifted river sand;
- tile adhesive;
- tape sealant.
Bricks can be white silicate, made from pressed sand, or red, burnt, made from clay. The main thing is that they do not have empty spaces inside.
 The number of bricks should be taken on the basis that on average it takes up to 10 bricks per support, and to securely fix the bowl you will need to build 2-3 such supports

Additionally, you will need about 20 bricks for laying along the edges of the bed - the recess.
Tools you will need:
- Master OK;
- building level;
- container for mixing the solution;
- grinder and self-tapping screws.
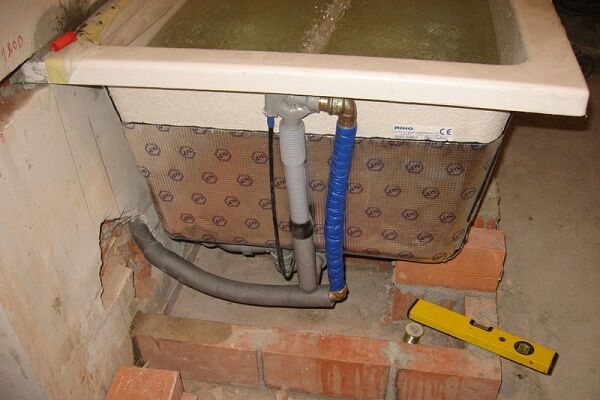
To prevent chipping of the brickwork, protective rubber gaskets can be laid between the bottom of the bathtub and the upper edge of the erected supports.

Preparation of the base and carrying out measuring work
Before how to install a bath on bricks, remove the covering from the floor to the base base. If necessary, cracks in the floor are cleaned and sealed with cement mortar. If the base floor is uneven, it is better to screed using any inexpensive method than to adjust the position of the plumbing by laying down scraps of board or something similar.
It is also necessary to consider how the bowl will be located in relation to plumbing equipment, water sockets, drains and household appliances. Measure in advance the distance from the rear end of the container to the opposite wall of the bathroom.

When taking exact dimensions, you should clarify:
- length and width of the product;
- the depth of the bowl (if it changes from one edge to the other, then the depth should be measured on both sides);
- the distance from the intended installation location of the supports to the ends of the plumbing fixtures.
When calculating the dimensions of the structure, it should be taken into account that the height of the upper edge of the bathtub will reach 55 - 70 cm. The specific height is determined according to the conditions for the convenience of taking hygienic procedures in the bathtub for people of any age, build, and physical limitations, if any.

The height of the front stage will be 17 cm, and the stage located on the opposite edge will be a couple of centimeters higher.
If the bowl is already designed taking into account the slope for unobstructed drainage, then there is no need to lay out racks of different heights.

There is no need to artificially form the slope of the bowl, because some reduction towards the drain is inherent in the design.
At the end of the measuring work, you should record on paper the distance in centimeters from the overflow hole to the bottom of the bowl.

Carrying out masonry with cement mortar
To prepare the solution, the cement mixture is diluted with sand in a ratio of 4:1. Water is added during mixing until the mixture has a creamy consistency.
Having laid out the first row of bricks of one support until the mortar has acquired the necessary strength, use a level to level the masonry. After this, lay out the second row, followed by horizontal alignment, then the third.

At the upper level of the support, mortar is laid out on the outer sides of the masonry to a height of half a brick. For good adhesion of the cement mortar to the building bricks, it is necessary to allow the erected supports to “settle” for at least the first two days.
Otherwise, under the heavy weight of the iron bowl, the newly erected racks will shift or even collapse.

It is also possible to build a solid stand made of bricks. It is constructed between the four legs of the product.
The solid stand is a straight brick platform equipped with grooves that comfortably accommodate the bottom of the bowl. When laying out the “pillow”, you should also take into account the slope towards the drain.

Installation of siphon equipment
For a bathtub that has not yet been installed on supports siphon is installed with overflow. To do this, the bowl is placed on its side.The drain hole under the siphon is equipped with silicone gaskets and treated with sealing agents.

The bowl is placed on a leveled base, guided by the level. The outer edge of the bathtub should be half a centimeter inside. This helps prevent water from overflowing onto the floor of the room.
The outlet pipe of the siphon is connected to the sewer pipe.
The drain and sewer hose can be connected in two ways:
- hard – involves the use of a plastic pipe equipped with elbows at an angle of 45° and 90°;
- flexible – by means of a plastic movable corrugation.
To ensure a tight fit of the outlet pipe to the sewer pipe, the connecting elements are covered with a layer of sealant.

In order to reliably seal the holes and prevent water from leaking during emptying of the bowl, the applied composition must be given enough time to dry and harden.
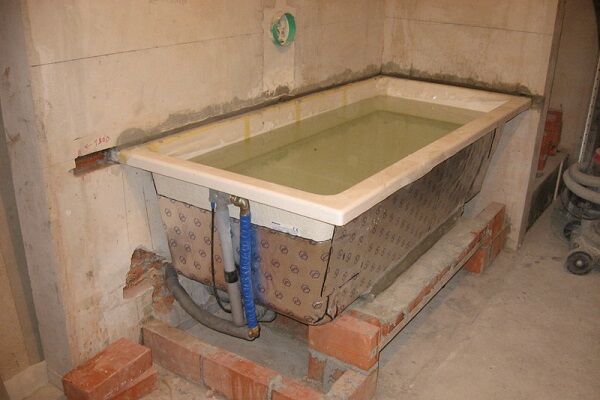
Before installing the bowl on the brick pedestal, spacers are placed at the points of contact with the supports. Having placed the container on the supports, use a level to check the horizontality of the sides. The sides in the longitudinal direction must be strictly horizontal.
If the container does not have special recesses along the perimeter of the sides for water drainage, then in the transverse direction the control of the horizon should show some deviation.Then the bathtub should be installed so that the outer side is higher than the inner side adjacent to the wall by about 0.5 cm. This deviation will reduce or completely eliminate splashing on the floor.
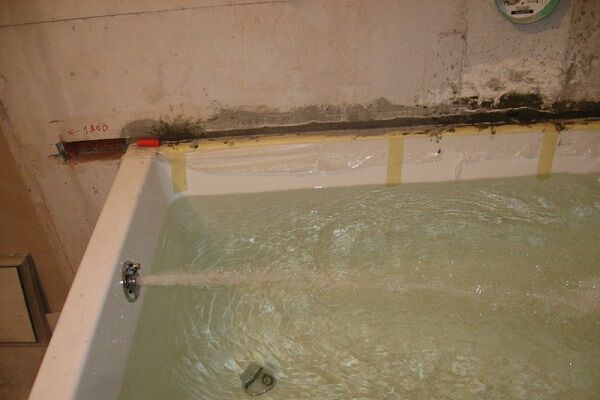
Attaching the bowl to the walls of the bathroom
The edges of the bowl are placed as close to the wall as possible. To check the stability of the structure, take the edge of the bathtub and make several movements from side to side, as if trying to rock it.
If the structure has moved due to instability, you need to inspect the supports and, if necessary, place pieces of brick under the bowl, securing the new parts with tile adhesive or cement mortar.

If desired, the sides of the structure are fixed using a metal profile, “placing” it on dowels and screws. But most often craftsmen limit themselves to filling the voids with tile adhesive or mortar.
For greater strength, the side surfaces of the bathtub adjacent to the wall can also be coated with tile adhesive. This adhesive edging will seal the seams and create a strong “tub-wall” connection.
To ensure correct installation, first fill the bowl completely with water and then open the drain. Ideally, water should drain quickly and freely, and no leaks should form in the area of the joints. If the water does not drain so quickly, there is a distortion.
Finishing of plumbing fixtures
The final design of the plumbing depends only on the interior of the room and the preferences of the master.
Ideal for cladding:
- sheets of moisture-resistant plasterboard;
- ceramic tiles or porcelain stoneware;
- wall panels made of plastic or PVC material;
- ready-made decorative screen.
The only requirement for the facing material is that it be resistant to moisture.
The tiles can be laid on the same cement mortar or on a special tile adhesive. To increase the adhesion of the finishing material to the walls, the surface should be pre-treated with diluted PVA and the addition of sand.

You can use the bathroom as soon as the cement-sand mortar has hardened. The waiting period can last from two to five days.
Construction of racks for a steel bathtub
The weight of steel plumbing, in contrast to cast iron bathtubs, is only about 50 kg. But the light weight of the plumbing fixtures is a key reason for its instability. The products often come with legs.
And therefore install steel bowl can be done in two ways:
- Only on brick supports without legs and additional frames.
- Combined installation, which involves the use of both brick supports and the legs of the product.
Supporting support points can also be constructed by constructing a pier.

When determining which is better, a wall or support posts, focus on the location of the plumbing equipment. If steel bath adjoins only one wall of the room - build a wall.If its bowl is limited by three walls of the bathroom, then brick columns are quite enough.
Preparing the necessary materials
Materials you need to purchase in advance:
- bricks;
- concrete grade M:400;
- metal profile;
- water-repellent impregnations;
- roll guerlain;
- tile adhesive.
Guerlain is a plastic roll material made of foamed polyethylene based on bitumen sealant. The material perfectly insulates steel.

Since a significant disadvantage of steel bathtubs is their noise during the filling process, in order to reduce the noise, craftsmen recommend foaming the outside of the bowls with polyurethane foam. To foam a bathtub, on average it takes 1.5-2 cylinders with a volume of 65 liters.
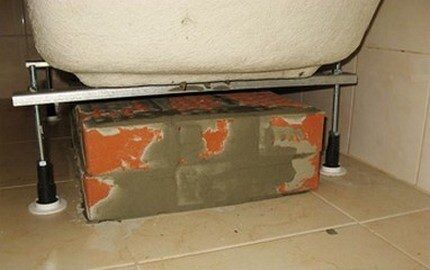
Support legs for increased height
Often there is a desire to raise the bowl above the standard distance from its top to the leveled floor. This happens when carrying out repairs if the part of the floor free from plumbing is already equipped with a water-heated floor system. It is necessary if the builders made a mistake with the location of the drain or the owners want to slightly adjust the small height of the container.
When planning to use the installation scheme on rising posts, the first step is to screw the legs to the bottom of the bowl. To do this, the legs are inserted into a specially drilled hole and fixed using connecting elements.
Having determined the place where the bathtub will be located, we begin to measure the plumbing. To do this, measure the height of the space between the bottom of the bowl and the floor, as well as the width between the legs.Based on the measurements, locations for brick support posts are outlined.
The height of the racks is made such that the distance from the top edge of the bath to the floor is the required number of cm - read more in this material. Most often, additional supports of one or two bricks are sufficient.
The distance between the erected brick racks is determined by the same size between the screwed legs. But for steel plumbing, which is distinguished by its lightness and flexibility, it is recommended to supplement the low columns with the above-described full-fledged brick supports in the middle of the tank.
The shape of the supports is made in accordance with the dimensions of the bottom of the bowl.
After all, the configuration of bathtubs on sale can be very diverse:
- oval and beveled;
- triangular under corner model;
- rectangular with slightly rounded corners.
The brickwork of the supports is carried out using the same technology as when constructing racks for cast iron plumbing.
If the shape of the bottom of the bowl allows you to make racks, the upper edge of which has not a semicircular, but a flat surface, you can use moisture-resistant plywood to create a flat base plane.
To do this, a cement “cushion” is formed on top of the racks, the top layer of which is laid out with pre-cut sheets of moisture-resistant plywood.
The bathtub bowl is installed on top of the constructed structure as soon as the cement mortar of the supports acquires the necessary strength.
Foaming a steel bowl
The most convenient way to blow foam on the bathtub is to turn it upside down. Before carrying out work, wipe the surface with a damp cloth or sponge.The foam is distributed around the perimeter of the bowl, gradually covering areas of 0.5 square meters.
Using a special gun when applying foam, you can reduce material consumption by up to one and a half times. With its help, it is convenient to regulate the amount of incoming foam and the degree of its expansion.

It will not be difficult to cut off the excess applied foam when it hardens using a construction knife. When treating the bottom of the bathtub, the installation sites on the brick racks should be left unfoamed. This is due to the fact that over time the foam may sag and the bathtub will become less stable.
Sealing spatial gaps
Having installed the bathtub on the supports and connected the siphon and drain/overflow to it, we begin to process the spatial gaps.
To seal the resulting cracks and improve the adhesion of the sides of the bathtub with the cement mortar, the bricks are covered with rolled guerlain. The fabric layer included in the composition of guerlain acts as a kind of compensator between the bathtub body and the cement mortar.

To eliminate air zones between surfaces and better adhesion of materials, tile adhesive is applied to the interlayer in one layer. The easiest way to seal small cracks is with liquid cement diluted with tile adhesive.
To enhance the reliability of adhesion between the bottom of the bathtub and the dried brickwork, blow foam. The joints between the edges of the bathtub, the decorative screen and the wall are sealed with transparent sealant.After hardening it will be almost invisible.
Features of installing an acrylic bathtub
Process installation of acrylic bathtubs similar. Lightweight structures do not require the creation of a complex supporting structure. The traditional version of the supporting frame for an acrylic bathtub is a flat pillow placed under the bottom and columnar supports installed along the edges of the sides.
To create a frame support, in accordance with the dimensions of the bathtub, outline the contour of the masonry placement. In this case, it is important to provide a centimeter gap between the sides of the bowl and the support. It is convenient to use installation hooks in places where they abut the wall.
After the solution hardens, the bath is placed inside the constructed frame. The gaps between the erected frame and the outer walls of the bowl are filled with polyurethane foam. You may also be interested in reading how to do sliding screen for bathtub.
Conclusions and useful video on the topic
Tips for constructing supports and installing a bathtub:
Video review of the option of installing a bathtub on bricks:
You can learn how to foam a bathtub before installation from the following video:
There is nothing complicated in the construction of brick racks and frames. Therefore, when installing a bathtub on bricks, you can use any of the described methods. The main thing is to strengthen the weak points of the bathtub, while creating a strong and durable supporting structure.
If you still have questions about installing a bathtub on bricks or know another reliable and durable installation method, please share your knowledge with our readers. Leave comments and ask questions in the block below.


A few years ago I installed brick supports under an old, old, huge cast-iron bathtub. How much effort it cost me! If only I had read this article then! First of all, he worked alone. Secondly, I installed the supports along the edges of the existing legs. The floor was not leveled and the bathtub could not be pulled out at all. I don’t understand how many pieces of brick I put in there, achieving uniformity, and how it didn’t turn gray! My wife asked me to make a brick apron in front, but I didn’t have the strength, so I ended up installing a regular plastic screen and that’s it. The bath remains as it was, that’s the main thing.
And we, like Dmitry, built supports for a cast-iron bathtub installed many years ago. They were only built on the two extreme sides of bricks. Moreover, they made two vertical supports in the form of an inverted letter “P”, both of which were placed close to the wall. I’m not sure if the support was installed according to the technology; the height turned out to be higher than recommended here. It might be worth adding another brick counter in the middle.
I have a cast iron bathtub. For 60 years it has stood on its own legs without any “collective farm” with bricks and God knows what else. Everything is fine. Why is all this? I still didn’t understand it from the article.
Because there are not only cast iron bathtubs. I have a steel one and it constantly sags under the weight. Now I’m thinking about what supports to put on the bottom and bricks are not the most “collective farm” option. But cast iron can sway and will need additional support or something else. You never know what problems might arise.
Hello.Firstly, the legs are not always of high quality, secondly, as Egor has already correctly noted, to distribute the load and for stability, and thirdly, they often do this when you need to set the drain-overflow level, despite the fact that the surface was not originally designed for this correctly.
Brick is not the most farm-friendly option, especially since it can be disguised with a screen or covered, for example, with tiles.
I would not say so unequivocally that implementing various practical solutions for installing a bathtub not only on legs is “collective farming,” as you put it. In this case this is not true.
The article discusses options when installing a bathtub with legs is impossible or not the best solution. Plus, combined options are considered, when the bathtub is installed not only on supports, but also on bricks at the same time.
In bathrooms, there are various design, engineering and design solutions when installing a bathtub on legs is simply not necessary. In this case, installation is performed using the methods described in the article. I don’t see anything wrong with this; practical advice is given that will help to avoid many problems and shortcomings that may arise during the installation of the bathtub.