Do-it-yourself lean-to wooden shed for a summer residence: drawings, step-by-step instructions
Any, even the simplest summer cottage, should have a shed in which you can store equipment, water, and plant food.This is where the improvement of the territory, and often even the construction of a house, begins. It is best to build a lean-to shed from wood with your own hands. The design is simple, there is enough material, and almost everyone can work with boards and timber.
The content of the article:
Advantages and disadvantages of a shed with a pitched roof
You can build a temporary shelter from timber, boards, or profiled steel pipes. You can simply buy a ready-made shift bag or a plastic Chinese box for storing tools. Many dacha owners do just that.
But, as practice shows, the optimal solution is still a frame shed with a simple pitched roof.
Advantages of timber frame construction:
- Building a frame-type shed from timber will cost about half as much as the option with a log house, and about three times less if you put brick or cinder block walls under a pitched roof.
- It is possible to well insulate the room with modern thermal insulation materials. As a result, the weight of the barn structure will be small, which means there is no need to build a shallow foundation.
- The use of wood guarantees minimal heat loss, and in hot weather the barn will be quite cool.
- A shed roof is quite simple in design; even a beginner with little experience in building wooden structures can do it.
Another plus that few people pay attention to.For example, a wooden barn with a gable roof is considered “cold”. The roof overhangs on the northwest side cover the upper parts of the walls from the sun's rays. Therefore, the wood will need to be regularly treated and protected from water and condensation, otherwise the material will rot.
A shed with a pitched roof usually does not have problems with wood. It is enough to correctly orient the building on the ground, with the facade facing north-west. The lower overhang of a pitched roof will be well warmed up by the sun's heat, and the upper overhang will always be open, so it is blown through by a draft.
In addition, many summer residents choose the option of a lean-to barn made of timber as the simplest option, in the hope of dismantling it for building materials after completing the construction of a permanent house.
Possible problems
The structure with a pitched roof has a high windage capacity. Simply put, a building with a flat roof with a slight slope is less resistant to gusts of wind. If the summer cottage is located in an open field, then it is possible that a hip roof is better suited for the barn.
At the same time, to hide a shed with a pitched roof, it is enough that several mature trees grow on the border of the plot, or that the neighbor has already built a house.
The problem of windage means that the barn cannot use the usual columnar foundation, which is widely used for most wood frame structures. It will be necessary to install piles.
Preparation for construction: drawings and dimensions
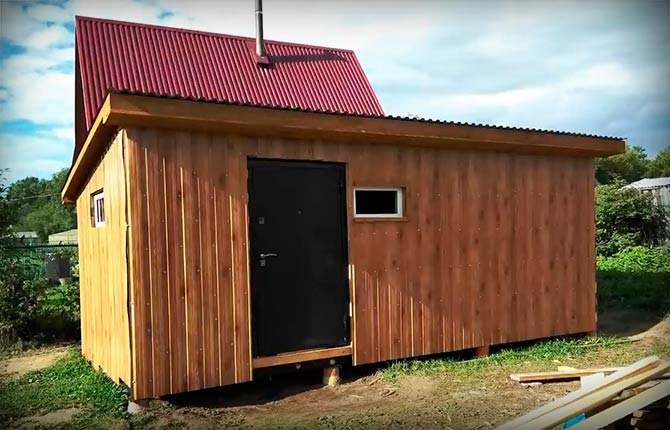
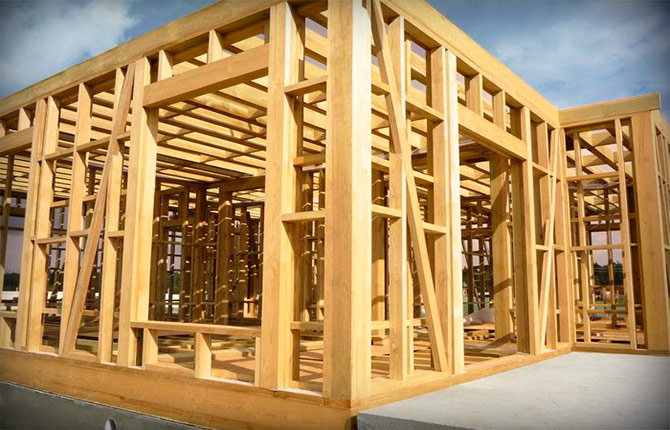
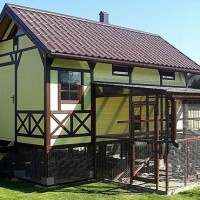
First of all, you need to find a suitable project. Quite convenient, but simple. It is advisable to make drawings. Frame structures with a pitched roof can be quite complex, as in the photo, so you need to choose something that you can build with your own hands.
The optimal size for a simple shed is 3x6 m or 3x5 m, depending on the required usable volume of the room.
A lean-to frame shed made of wood cannot be placed directly on the ground. The foundation option in the form of a slab or MZF is not suitable. The wood at the base of the building will rot even on dry soil. Therefore, the shed box will need to be placed on piles and raised above the surface by at least 30 cm.
Materials
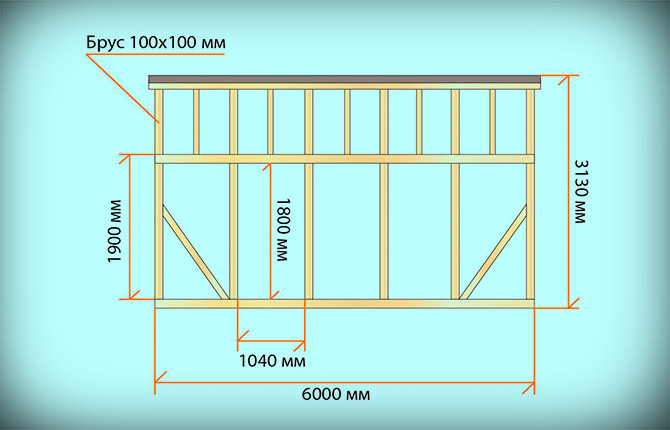
The frame, racks, lower and upper frames will be made of 100x100 mm timber, the inch board, rafters will be made of 50x100 mm timber, and the logs for the floorboards will be made from it. Most connections are made with nails. In addition to the lower trim, threaded rods, self-tapping screws, and steel angles are used in this area.
The corners of the box are sewn up with a plastic corner, and the overhangs are hemmed with a cornice (frontal) strip. Corrugated sheeting will be used as a pitched roof.
The walls and floor will be insulated with slabs mineral wool TechnoNIKOL.
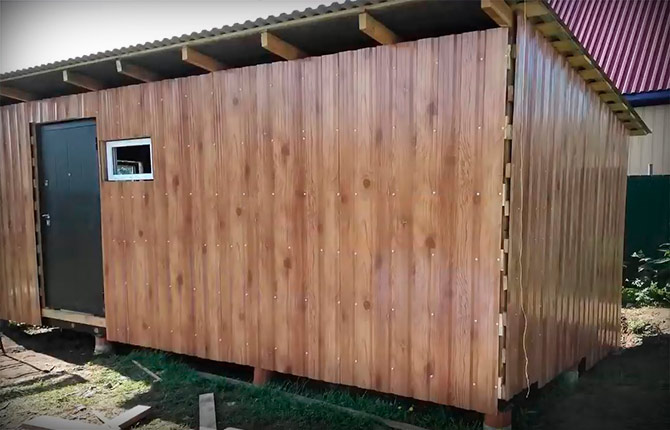
External wall cladding can be made of wood (lining), plastic siding or covered with panels.
In addition, a small window will be embedded next to the door. There is no electricity or lighting inside the barn, so for orientation in space you need at least weak lighting. If desired, the window can be made like a transom, then the wooden frame shed can be ventilated, for example, in extreme heat or rain.
Tools
To prepare, you will need a 180-200 mm garden drill, a wheelbarrow for removing soil, a container for mixing the solution, and a shovel.
At the stage of constructing the harness - hacksaw for metal, grinder, circular saw, laser level, screwdriver.
When assembling the frame, you will additionally need a building level, a hammer, a stapler, and a wood saw.
Interesting: Do-it-yourself gazebo with a pitched roof
Step-by-step instructions for building a frame shed with a pitched roof
The process of constructing a utility block can be divided into 4 stages:
- Preparation of the site, foundation, arrangement of the lower piping.
- Installation of vertical posts, assembly of the top frame and frame of the pitched roof.
- Insulation of walls and floors.
- Laying roofing on a pitched roof.
You can detail the process in the form of step-by-step instructions, but this method is used only when building for a customer. The advantage of this project is that it can be implemented by anyone who has at least a little experience in carpentry. The most difficult stage is insulating and laying the roof on a pitched roof; in this case, you can invite an assistant.
For the construction of a lean-to barn, a site was chosen next to the neighbor’s fence. According to the plan, the barn will stand with its back side facing the fence. There is also a neighbor's house here. The slope of the pitched roof is oriented towards the fence. It turns out that the lean-to barn is well protected from strong gusts of wind.
Marking
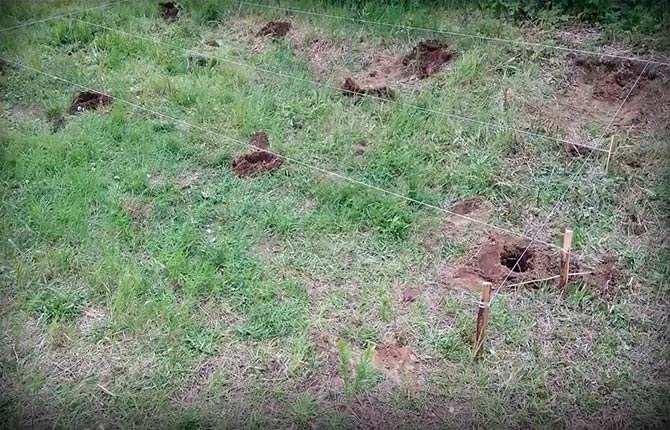
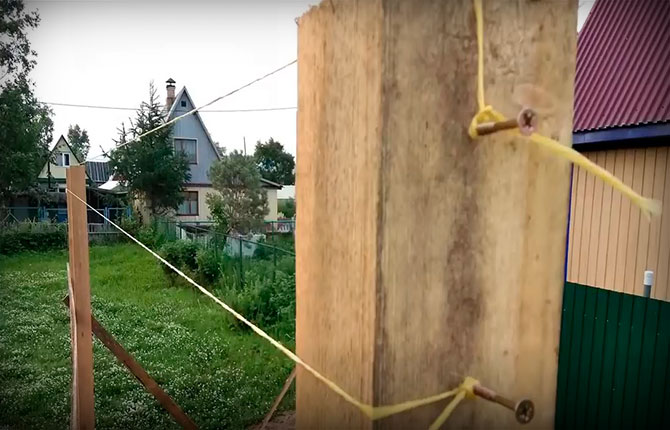
The area for the shed is quite flat, without a sharp slope to one side. So all you need to do to prepare is clear away tall grass and debris. Marking is done using four pegs driven into the ground at the corners. At the same time, the distance along the diagonals of the rectangle is controlled.
According to the instructions, a lean-to shed will require at least 12 pile supports. All elements of the building, with the exception of the roof and external cladding, are made of wood, the total weight of the barn is no more than 500 kg, so small piles with a diameter of 150 mm and a depth of 100-120 cm will be sufficient.
The points for drilling the piles should be marked with a tape measure along the stretched cords.We mark the length on the cord with a marker and use a plumb line to find a point on the ground. Holes for the piles are drilled using a garden drill with a diameter of 170 mm. Depth – 110 mm.
Foundation
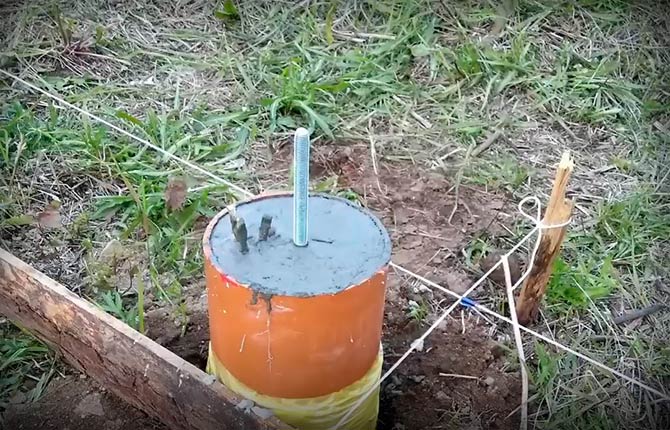
Now you need to install the formwork under the piles and fill them with concrete. Asbestos-cement pipes can be used as formwork. The method is reliable, but, as practice shows, it is more convenient to install pieces of vinyl (orange) sewer pipes with a diameter of 150 mm for external sewerage.
Formwork manufacturing scheme:
- Cut 12 pieces 130 cm long.
- Circles with a diameter of 155 mm (12 pieces) are cut out of roofing felt and secured to the bottom of each pipe with tape.
- Each workpiece is wrapped in a bag of thick plastic film and lowered into a drilled hole. First you will need to sprinkle a small amount of sand inside and compact it so that the bottom of the pit is flat.
Align vertically and fill the gaps between the pipe wall and the soil with a mixture of sand and gravel.
Now is the most important stage. Before pouring concrete, you need to cut all 12 pipes so that their ends are located in the same horizontal plane at a height of 12-18 cm. It is quite difficult to do this by eye or using cords; the result is a high error in height. Therefore, it is better to rent a laser level for one day and use it to mark the cutting line on all 12 stands. You can cut it with a regular hand hacksaw.
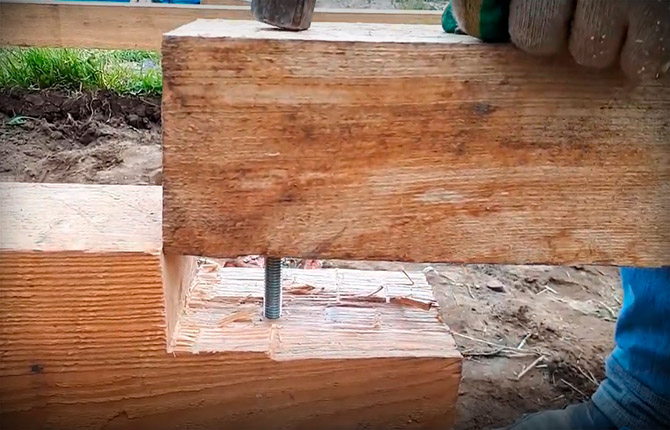
For pouring, use a standard cement-sand mortar with the addition of fine crushed stone. Once the pipe is filled with concrete, threaded rods with two screwed nuts on the lower end are immersed in the solution. This will be an anchor fastening, so the thread should protrude at least 120 mm above the concrete.
After filling, you will need to wait at least 5 days.
Useful: How to attach a comfortable terrace to your house with your own hands
Bottom harness made of timber
Next you need to tie the piles out of wood. The base of a lean-to shed turns out to be quite large. Ideally, the strapping should be made from solid pieces of wood; only then can the required rigidity of the frame be achieved.
Therefore, if you have the opportunity to buy at least three wooden blanks of 6 m each and two of 3 m each, then you need to buy them. To assemble the strapping, it will be enough to make cuts at the ends of the timber in half a tree and place the parts from the timber on the studs.
If there is no other option, then you will have to assemble the harness from 1.5-2 m pieces of wood. In this case, each point for drilling a hole for a hairpin will have to be marked separately, and the two mating parts made of wood should fit on the hairpin without a gap and without strong tension.
To make a half-tree castle, you need:
- Mark 110 mm from the end of the beam and cut with a manual circular saw to a depth of 50 mm.
- Parallel to the first cut, another 4-5 cuts are made to the same depth.
- The wood is chopped with an ax and hammer, and the resulting area is cleaned, if necessary, trimmed with a chisel to fit the plane.
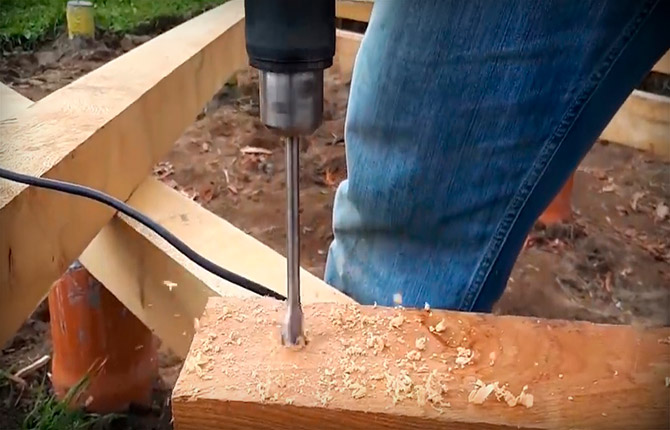
One more nuance. A long piece of wood cannot be accurately drilled and laid on studs. Therefore, first of all, holes are drilled at the opposite ends of the beam, then they are placed on the ends of the studs and a few gentle blows are applied. Imprints (dents) remain on the wood, along which markings are made and holes are drilled.
After all the wooden strapping parts have been marked and cut, an undercut for the nut is made in the holes, the beams are marked and removed.Next, screw the nuts onto the studs and cut off the excess thread. The height of the stud should be such that the nut is completely recessed into the wood of the beam.
Since the floor is supposed to be insulated, the entire wood of the lower frame of the barn must be treated with a mixture of white spirit, then covered with roofing mastic. Otherwise the tree will rot.
Frame
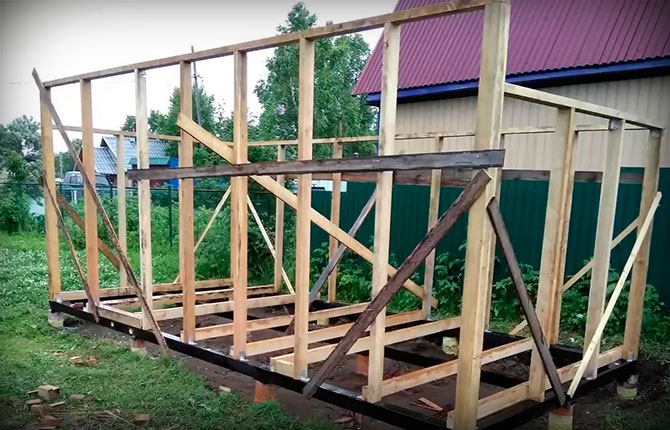
The next step is to install vertical wooden posts. For the front and rear walls, you will need to install 8 vertical supports made of 100x100 mm timber (including corner ones). On the side view there are two more racks on each side.
The four corner supports are installed first. Each is leveled vertically using a building level and applied to the tree along two edges of the beam. As soon as the rack is in the correct position, it is fixed using two slab struts or scraps of wood. The process is long and tedious; each wooden stand takes at least 20 minutes.

Now you need to install the internal supports. To speed up the process, you need to stretch two cords between the corner posts, one along the side edge, the second along the heads.
Now you can install vertical posts, making sure that they are in the same plane of the facade of the barn. Immediately sew on longitudinal struts and install additional struts. This is necessary so that the front wall of the barn does not deform when laying the top frame under the pitched roof.
The vertical posts are reinforced at the bottom with steel corners.
Construction of floors and walls
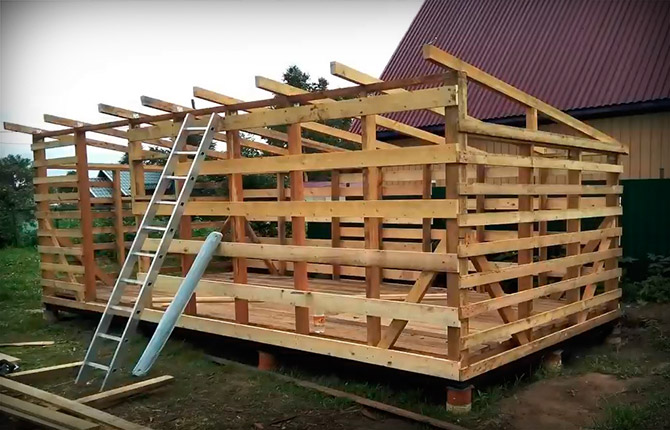
On the facade, the vertical posts are 60 cm higher than the overall height of the barn frame. In fact, this is the front part of the shed roof, so the first beam of the top frame is placed on the highest posts.For now, the crossbar is temporarily attached to the supports using self-tapping screws screwed “obliquely” into the wood.
At this stage, it is important to align the timber horizontally so that the pitched roof looks level. After leveling using a level, the rear and side sections are attached in a similar manner.
The next step is to make the floor; it will be plank, insulated with mineral fiber boards. Lag beams (8 pieces) are cut from 50x100 mm blanks and laid on the bottom frame “at the end”. Each log is fastened with self-tapping screws into the wood to the vertical posts of the barn.
In the space between the two posts, where the frame with the door will be installed, additional wood is sewn onto the frame. This will be a threshold and at the same time strengthen the frame.
The outer walls of the barn are covered with boards. The tree will need to be treated with bioprotection agents and thoroughly dried. All temporary struts and struts must be removed before installing the shed insulation.
We insulate the floor
To install insulation, you need to assemble a subfloor. It can be filled from planks, edged boards, lining, any waste wood, just as is done when insulating the ceiling of a country house. It is faster and easier to hem the logs with OSB sheets.
Since the distance between the lags is different, the blanks for the subfloor are cut from the slabs individually to size. The floor area of a lean-to barn is large, so you should not try to hem the barn joists with large pieces of OSB, it is inconvenient. The recommended size is 1x1 m. A handle is sewn into the center, and several blocks of wood are sewn around the perimeter. Hold the slab with one hand, and with the other hand, screw the screws into the wood of the joists. You can sew it up with scraps of boards; any wood will do, as long as it is dry.
The next step is to install the insulation of the barn floor. Cut pieces of TechnoNIKOL slabs, the width of each should be 1-2 cm less than the distance between the logs. When laying, the insulation must be pressed tightly against the adjacent edge and against the wood of the joists so that no cold bridges remain. Next, a vapor barrier membrane is laid on top and secured with a stapler directly to the log wood.
A 20x50 mm strip is sewn on top. It is used to fix the film. In addition, installing “counter-lattice” slats creates an air gap between the insulation and the wood of the floorboards. And this is important for floor ventilation, since a lean-to barn will not be heated.
The last stage is filling the floorboards. Unlike regular plank flooring, self-tapping screws are used rather than nails. Otherwise, the slats can split, and the floor of the lean-to shed will have to be replaced in a couple of months. If there is no other option, and you need to hit nails, then you will have to drill a hole each time before driving in the fasteners. In addition, each nail is dipped in liquid soap.
In this way, plank floors, oak and larch logs are assembled. It is clear that it is unlikely that anyone will use such an expensive building material to build a lean-to shed. Often these types of wood are used for the bottom frame of a barn if the soil is waterlogged with groundwater.
We insulate the walls
The process of thermal insulation of the frame of a lean-to shed is almost the same as in the case of a residential building. Initially, a vertical lathing made of wood 40x40 mm is placed on the outside, with a pitch of 50-150 mm. The slats will also need to be treated in advance with a mordant against pathogenic microflora.
Thermal insulation is placed in the spaces between the vertical posts.It is recommended to cut one continuous mat of mineral wool for each niche. In this case, there will definitely be no subsidence of insulation, the appearance of cracks and cold bridges.
From the inside of the shed, a vapor barrier membrane must be sewn on top of the insulation. You don’t have to do this from the outside, since the lean-to barn has no heating. And a small amount of water vapor released when people breathe or store crops is easily removed through the vents of a pitched roof.
Immediately after installation, you need to cover the walls of the lean-to shed with cladding. It is important to immediately cover the thermal insulation and wood of the walls with panels, since fallen dew, condensation or even light rain can damage the insulation.
You will definitely need to make steps at the entrance to the barn. Moreover, it is best not to lay out a couple of cinder blocks, but to put at least a couple of treads on the stringers.
Roof
The design of the shed's shed roof is simple. Initially, you need to select 10 pieces of timber 4 m long, the smoothest and highest quality. One beam will be used to make a template for a pitched roof. It is laid on the beams of the upper frame and the squares are marked. It is clear that you will have to try it on a couple of times and clarify the slope of the pitched roof.
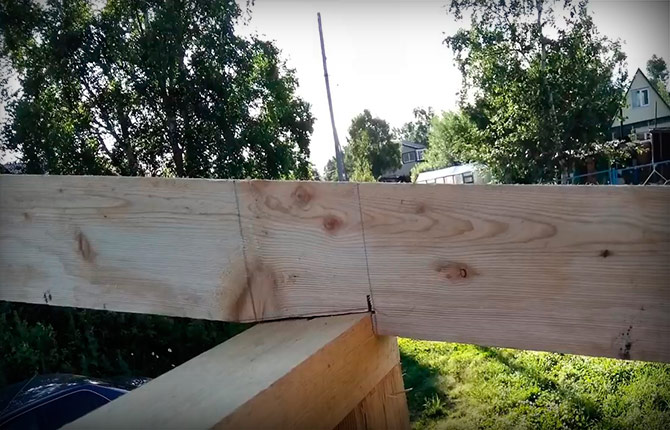
All rafter beams are cut out according to the template, they are lifted onto the shed and nailed. If there are no problems with leveling the frame of a pitched roof, then the rafters are reinforced at the fastening points with steel corners.

Next, you will need to lay film waterproofing directly along the rafters. The film is fixed with staples (with a stapler into the rafter wood), then with longitudinal slats 20x40 mm.
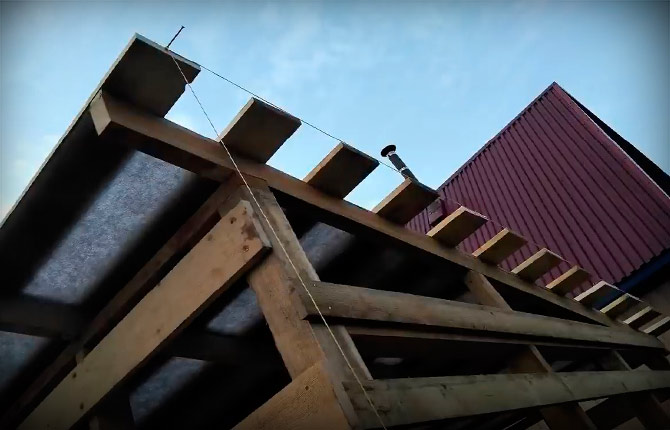
Now you need to sew on the counter-lattice board, using 100x20 mm wood.The material is attached through the end-to-end method to the beams of the rafter beams with self-tapping screws.

The last stage is laying corrugated sheets on a single-pitched base. It is also secured with special screws with a silicone gasket. Usually after three waves to the bottom of the fourth. After laying the roof of a lean-to barn, you must hem the eaves on the front side, and install at least a couple of drainage gutters on the back side. Otherwise, the tree under the overhang will get very wet.
Building a shed with a pitched roof is a creative process. During use, you always have to add or redo something. Therefore, leftover materials and some tools are often stored in a shed so that they can trim a tree, finish something off, or strengthen a pitched roof.
Tell us about your experience in building wooden sheds - is it worth choosing a lean-to scheme for a country house?


Why would the insulation be made from mineral wool? I would make it from penoplex or polystyrene foam. It would have been cheaper without vapor barrier films.
A rodent protection net needs to be placed in the underground and walls.They will eat the harvest, settle in for the winter, and then there will be a lot of problems. Although if there are a couple of cats on the property assigned to the barn, then it may carry through.