Do-it-yourself pitched roof step-by-step instructions on arrangement + features of a pitched roof
Now the construction of private residential buildings in the Scandi, hi-tech, or minimalist styles is gaining popularity. Agree, when the design of buildings strives for simplicity and conciseness, multi-level roofs cease to fit into the overall concept. They are being replaced by single-pitched ones, familiar to European buildings. By learning how to build a pitched roof with your own hands step by step, you can significantly save your budget when building a house.
To construct such a roof, less materials will be required. Consequently, the cost of its installation will be lower. A lean-to structure is much simpler to design and construct. After reviewing the calculations and the list of necessary materials, you can create a reliable and durable roof yourself.
Our article will help you understand the technology of building a roof with one slope using ready-made examples. By complying with the requirements and following the step-by-step instructions, the result will be not only a durable, but also a stylish structure that harmoniously complements the style of the house and landscape design.
The content of the article:
- Design features of a pitched roof
- Advantages and disadvantages of a pitched roof
- How to calculate the level of inclination?
- Selection of materials and calculation of their quantity
- Types of roof supports
- Instructions for constructing a pitched roof
- Choosing roofing material
- Conclusions and useful video on the topic
Design features of a pitched roof
Single-pitched technology involves the presence of one pitched area, built using a rafter system. The supporting part is made of boards and timber.
The edges of the rafter legs are classified as layered, as they have support underneath them. For covering, corrugated sheeting, sheet material, soft roofing in rolls, ondulin, plastic, ceramic tiles, metal tiles, etc. can be used.
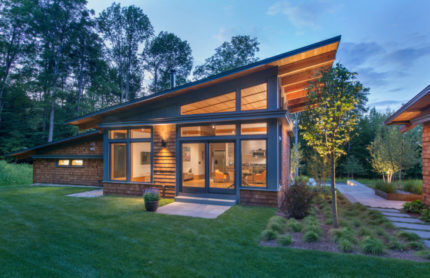
The peculiarity of the lean-to structure with a strong slope minimizes the possibility of accumulation of snow masses and water. Sediment removal occurs automatically due to the difference in the height of the supporting walls. If the roofing system has a flat shape, it must be equipped with a gutter for water drainage.
Depending on the functional purpose, pitched roofs are divided into:
- Non-ventilated. Most often they are installed during the construction of utility and work premises or terraces.
- Ventilated. It is assumed that there is an air gap between the insulating and waterproofing material.
Each element of the supporting structure is laid alternately and fixed on two walls of the building, different in height. All elements are connected via a Mauerlat.
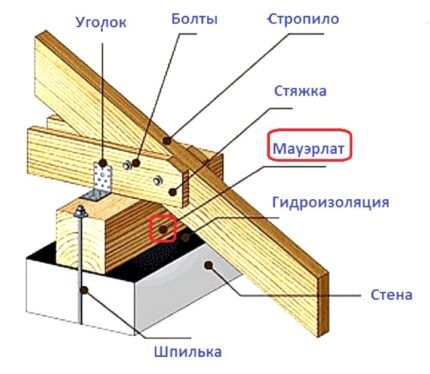
A roof with one slope can have different supporting elements, depending on the intended height and design.
The following are used as support:
- support pillars on which the sheathing can later be attached;
- load-bearing structures made of foam concrete, brick or wood.
The pitched roof includes several varieties: it can be with attic or without it, cold or equipped with thermal insulation. Between the ceiling of the house and the roof, you can arrange a residential semi-attic or utility area.
Interesting: DIY gable roof for a gazebo
Advantages and disadvantages of a pitched roof
When choosing the type of roof, it is necessary to take into account all the positive and negative characteristics of each option. Below we will present the features of single-pitched roofs.
The main advantages of a pitched roof: the quick process of its construction, ease of installation and low weight. The minimum permissible angle of inclination for such a roof is 5 degrees.
By directing the slope to the south side, you can reduce heat loss. The low windage of the roof with one slope ensures the reliability and durability of the structure, as well as the possibility of its installation in regions with high windiness.
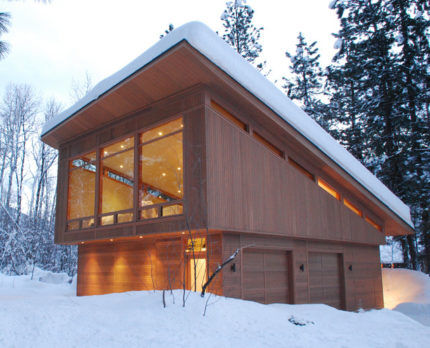
Ventilation system A sloping shed roof is much simpler than a gable roof: it does not require ventilated ridges and aerators. But despite its simplicity and versatility for low-rise buildings, such a roof has limitations and disadvantages.
These include:
- strictly regulated fire codes make it difficult to create an attic or attics;
- low slope level is not suitable for Northern regions where snow precipitation prevails;
- the need for mechanical snow removal in winter if it accumulates due to the small angle of inclination.
Depending on the area and configuration of the building, a certain type of roof will be required.A roof with one slope can be installed on residential buildings with several floors, but is not suitable for multi-story buildings.
Useful: Do-it-yourself lean-to wooden shed for a summer residence
How to calculate the level of inclination?
The key factor that determines the required level of slope of a pitched roof is the climate of the region. To prevent the accumulation of snow masses during snowfalls, in northern regions it is recommended to design the roof with an angle of at least 30 degrees. This will reduce the load on the roof due to the spontaneous melting of snow.
For geographical areas with excessive windiness, the requirements are radically opposite. A sharp angle of inclination increases the windage of the structure, reducing its reliability. For example, the impact of wind and load on a roof with an angle of 45 degrees will be five times stronger compared to a similar roof with a slope of 10-11 degrees. The snow and wind loads of the region can be determined using special maps of the area.

Another parameter that affects the angle of inclination is the type of roofing material and its weight. This indicator is regulated by the manufacturer. The structure must be constructed taking into account these recommendations. Failure to comply with this requirement may result in structural leakage.
By adding up all the load values, you get the final calculation figure. Next, you need to compare it with the indicators in the table and select the parameters of the rafter system.

The more flat the roof is installed, the better the waterproofing should be. All joints must be treated with a liquid moisture-repellent compound. More often, bitumen mastic or a special sealant is used.
Selection of materials and calculation of their quantity
The length of the rafters for a roof with one slope affects the cross-sectional size of the beam and its quantity. Thin beams are not intended for heavy loads, therefore, in this version, the rafters should be installed more tightly.
When choosing a roofing material, you need to take into account not only the level of inclination of the roof structure, but also its area. A smooth surface increases the sliding of sediments, while a ribbed surface reduces it. This must also be taken into account when making mistakes.

For each type of roofing material, there are certain requirements for the sheathing pitch and installation. For tiles the pitch is 30 cm, for slate – 44 cm. For flexible roofing there are no strict requirements for the pitch and angle of inclination. The weight of the roofing material is indicated in the technical requirements for use.
Types of roof supports
The design of a pitched roof is based on rafter legs that rest on the front wall on one side and on the back wall on the other. The front wall must be higher than the back wall to ensure the required angle of inclination of the roofing system.
If the distance between the walls does not exceed 4.5 m, the roof structure will be simple: two mauerlat beams fixed on the walls and rafter legs resting on the mauerlat.
When the gap between the ceiling and the roof does not exceed 4.5 m, the structure can be mounted without installing additional supports. If the gap is more than 4.5 m, you will need to install support posts under the rafters. Boards or beams can be used as supports.
There are two ways to install supports:
- Installing supports in the center of the rafter length.
- Installation of a horizontal purlin from one beam under the rafters, running in the middle of their length. This option will reduce the number of support posts by half.
If the building width is more than 6 m, the design of the rafter system will be more complex. The optimal solution in this case is to design a house with a load-bearing wall, which will act as a support for the racks.
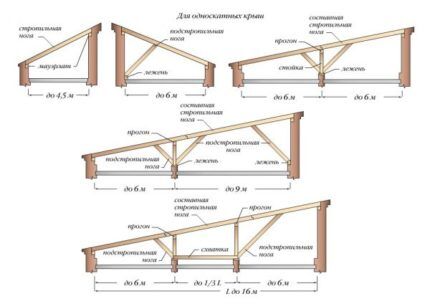
If the house is more than 12 m wide, additional rafter legs must be used. Manufacturing beams of non-standard size will entail increased financial costs. In some cases, this can be avoided with the help of fillies.
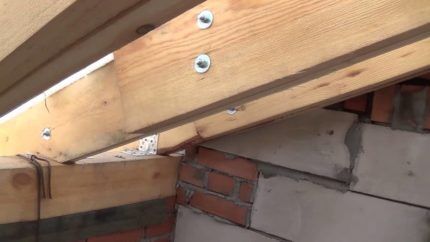
The fillies are sections of beams of a similar cross-section, connected to the main beams and fixed with two 60 cm pads. This structure is fastened with bolts or mounting plates.
Instructions for constructing a pitched roof
After making the calculations, you will need to draw up a construction plan taking into account its type and configuration.Next, you can begin purchasing materials and begin the installation process.
Step #1 - installation of the roofing Mauerlat
At the first stage of roof construction, the mauerlat is laid. It consists of two beams laid on top of the front and rear walls.
Its purpose is to evenly distribute the load from the rafters along the walls. Thus, each rafter will create not a local load, but a general one along the entire perimeter.
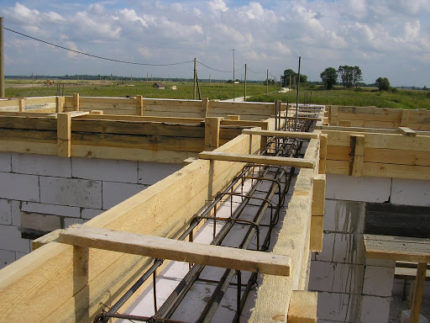
It is recommended to create a mauerlat from timber, the width of which is equal to the thickness of the wall. Its height can vary between 5-20 cm. It is important to securely fix it on the walls.
A common option for mounting the Mauerlat:
- Install formwork from boards 10-15 cm wide around the perimeter of the walls.
- Fill it with concrete, installing a reinforcing frame.
- Threaded studs are installed in the concrete mortar poured in sections of the front and rear walls. They are attached to the reinforcing structure using welding or wire. The preferred stud installation spacing is 1 m.
- After the concrete solution has completely dried, the Mauerlat beam is placed on the studs. It is secured with nuts and wide washers.
You can do without a concrete reinforcing belt. In this case, at the stage of laying blocks or bricks, it is necessary to lay burnt wire twisted in several layers. Its diameter should be 4-6 mm.
For a block structure, the wire is laid 2-3 rows lower, for a brick structure - 5-6. The length of the wire must be sufficient for subsequent winding and twisting of the Mauerlat.The recommended pitch for twisting is 1 m with mandatory laying of the wire in the corners of the building.
Step #2 - assembling the rafter system
Fastening the rafters is not difficult. Step-by-step assembly instructions will help speed up the roof construction process.
At the first stage, notches in the shape of a triangle are made at the bottom and top of one rafter. Using this model, similar actions are performed for each rafter. After this, the rafters are installed at an equal distance from each other. Recommended installation pitch: for plank rafters - 60-70 cm, for timber - 1.5-2 m.
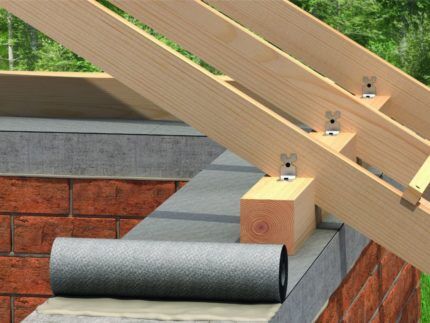
An alternative installation option is possible. The two outer rafters are installed along the roof gable. They are not attached to the Mauerlat. Threads are stretched between the ends of the legs and tied to screwed screws. The threads must be held tight.
Lifting the rafter legs one by one, insert wooden inserts under them, and align the edges using a building level (first along the facade, then along the back wall).
After this, using perforated corners and self-tapping screws, the rafters are attached to the Mauerlat. By pulling a few more threads, a roof plane is created. The remaining elements of the rafter system are mounted along pre-tensioned threads. Finally, fastening is carried out with a Mauerlat.
Each element must be carefully treated first with an antiseptic, then with a fire retardant. This minimizes the risk of fire and helps protect the roof from biological destruction.
Rafter system with equal wall heights
In such a house project, the slope of the slope will be ensured by creating a truss from racks, floor beams and rafter legs. This design has a triangular shape.
The truss must be assembled on the ground. The finished system is lifted onto the building using a crane. If a large opening has been created between the base and the top point, the truss must be equipped with reinforcing elements.
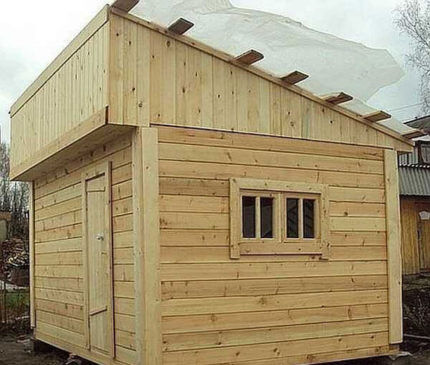
For buildings with a small area, the use of short racks is allowed. The pitch of their installation must coincide with the calculated gap between the rafters. Fastenings are made using corners.
The longer the post, the higher the roof structure will be raised. Accordingly, there will be a sharper slope. This method can replace creating a farm. This method is used when forming roofs for utility and technical buildings.
Step #3 - installation of roofing thermal insulation
Small utility rooms can be left without insulation. For residential buildings, this element is required. Process roof thermal insulation may vary depending on the degree of inclination. This is due to the fact that a higher gap ensures the convenience of work carried out inside. It is recommended to insulate the roof before installing the sheathing.
The process of carrying out work for a roof with a large clearance:
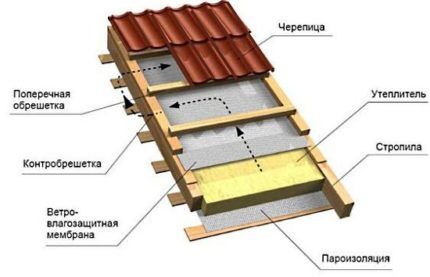
- The waterproofing membrane is laid along the rafters inside the attic. You need to start from the bottom, overlapping each next part by 10-15 cm of the previous one. The material can be secured using a stapler and steel staples.
- Using self-adhesive tape, the resulting joints are overlapped.
- From the inside, slats or boards are attached to the rafters. The step should be 1 m. This method of fastening will protect against possible damage to the waterproofing.
- Thermal insulation material is laid between the legs on top of the rafter system. The width of the slabs must exceed the gaps between the rafter legs. The thickness of the waterproofing layer should be equal to the width of the rafters.
- The vapor barrier is laid on top of the insulating layer.
- After this, you can begin assembling the sheathing.
The insulation of a flat roof is significantly different due to the inability to carry out work inside the attic. The process must begin with fixing the tile bars along the lower part at the ends of the rafter legs. It is recommended to take a cross-section of 3 cm. Then pieces of boards are attached on top of the bars and across the rafter system. Their thickness should be 2.5 cm. For these purposes, plywood or chipboard, fiberboard, etc. can be used.
From above, the roof will have the appearance of niches, which are formed from rafter legs and tiled beams. Next, a layer of waterproofing is mounted on this structure. In this case, the film should follow the shape of the formed niches. Insulation is placed in them and the resulting structure is covered with a layer of vapor barrier.
For insulating pie, polystyrene, mineral wool or cellulose are used. If the roof has a strong slope, it is recommended to purchase soft insulation. They are not inferior in functionality, but greatly simplify installation.
For insulating pie, polystyrene, mineral wool or cellulose are used. If the roof has a strong slope, it is recommended to purchase soft insulation. They are not inferior in functionality, but greatly simplify installation.
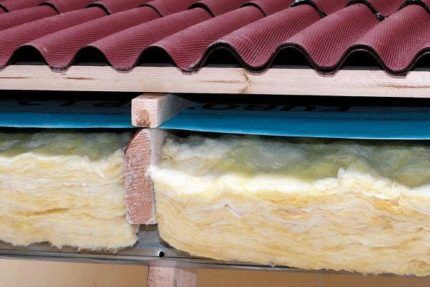
Flat roofs are insulated with sawdust or expanded clay. This budget method has good waterproofing performance.
Step #4 - creating a roof sheathing
The type of sheathing is selected based on the intended roofing material. Installation is carried out after completion of the installation of the rafter system. Often a counter batten is installed between the sheathing and the insulation.
A continuous sheathing is installed under bitumen roll materials, flexible tiles, and seams. This sheathing is made of moisture-resistant plywood, 2.5 cm thick boards, and moisture-resistant OSB-3 boards.
It is recommended to leave a gap of 1-1.5 cm between the sheathing elements. This will prevent their deformation in case of expansion due to exposure to weather conditions. The selected material is attached only to the rafter legs.
Sparse lathing is installed under other types of roofing materials. This system involves the use of boards with a thickness of 2-2.5 cm, or slats with a cross section of 5 cm.
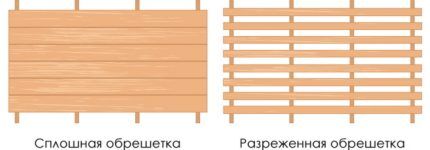
Under each unit of ondulin and slate there must be at least three parts of the sheathing: at the edges and in the center. This will ensure reliable fixation and integrity of each roof element.
This sheathing is attached to the rafters using self-tapping screws. Their length should be twice the thickness of the sheathing fragment.
Choosing roofing material
The main factor influencing the choice of material is the angle of inclination of the pitched roof. Below are recommendations for selecting a roof based on common slope angles:
- the rebate can be used even for flat roofs with a slope of 5 degrees;
- if the corrugated sheet completely covers the length of the slope, the minimum angle is 5 degrees. If an assembly of elements with transverse joints is used - from 20 degrees;
- the minimum angle for bitumen shingles is 11 degrees;
- install metal tiles possible on roofs with an angle of 10-15 degrees;
- for slate and ondulin the indicator should be at least 20;
- roofing made of soft material can even be laid on a flat or flat roof.
Under a roof made of corrugated sheets or metal tiles, it is imperative to install a counter-lattice. It will not only provide clearance for ventilation, but will also significantly increase the strength of the structure.
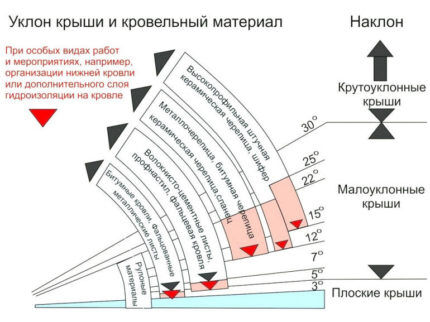
One of the advantages of a pitched roof is the ability to use any roofing materials. The choice depends on the design of the building and its intended purpose.
For residential buildings, it is better to choose durable and visually attractive options. Roofing for utility rooms may be more affordable.
Conclusions and useful video on the topic
Installation of shed roof rafters:
Step-by-step process for building a pitched roof:
The process of constructing a pitched roof requires strict compliance with requirements and standards.By following the manufacturers' recommendations for processing materials and following the sequence of steps, you will receive a reliable and safe design. A properly designed and assembled roof will be resistant to loads, which will guarantee a long service life.
If you have questions about the topic of the article or can supplement the material with valuable information regarding the arrangement of a pitched roof, please leave your comments and share your experience - the communication block is located under the article.


