Installation of socket boxes: how to install socket boxes in concrete and plasterboard
A socket is not only a mandatory functional element of electrical wiring, used to connect electrical household appliances, but also a significant interior detail.
The trouble-free operation of the outlet, as well as its neat appearance, depend to a large extent on how well the installation is done, right? To make the correct installation, it is necessary to take into account a number of nuances that are present in this work, one of which is the correct installation of socket boxes.
Have you never installed a socket box and are afraid of making mistakes? We will help you understand all the features - the article discusses in detail the types of installation boxes and the intricacies of installing each of them.
Attention is also paid to the installation of socket boxes in common types of bases - concrete, plasterboard, tiled wall. The material is supplemented with visual photos and useful videos.
The content of the article:
Types and characteristics of socket boxes
Modern sockets, both in appearance and in the installation method, differ significantly from those installed in Soviet-era houses.
If earlier they were simply embedded in the wall without the possibility of replacement, then today you can install them, and, if necessary, change the socket, is not particularly difficult.
And all this thanks to the socket box, which, in fact, is a box that securely holds the socket in its depths and at the same time ensures its fire safety.
Socket boxes come in different shapes and sizes, differ in materials of manufacture and installation method, so before you buy, you need to understand their types.
Selecting a socket box based on wall material
The main selection criterion is the material of the walls into which the socket boxes will be installed.
On this basis, there is the following classification of boxes:
- structures intended for installation in walls made of solid materials: concrete, reinforced concrete, aerated concrete, brick;
- glasses for walls made of composite materials: plasterboard, plastic boards, chipboard, plywood and others.
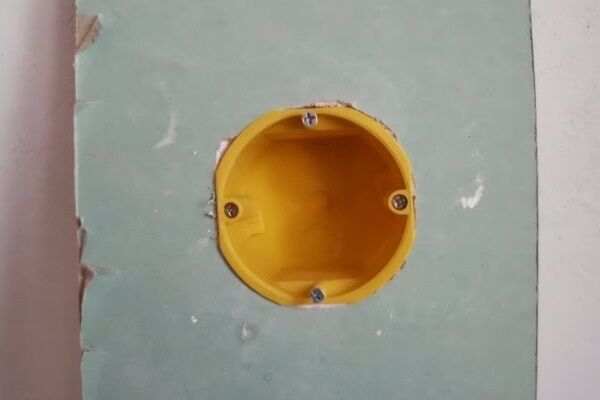
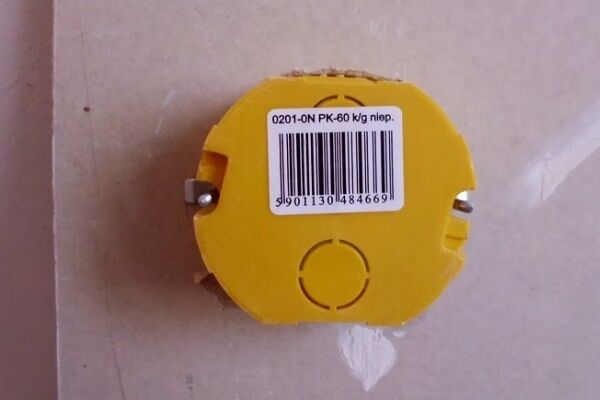
In the first case, the socket box is a round glass without any additional elements. It is fixed to the wall using mortar.
There are mounting holes in its walls or bottom for electrical wiring. When installing a socket box, it is enough to remove the jumpers and push out the plug.

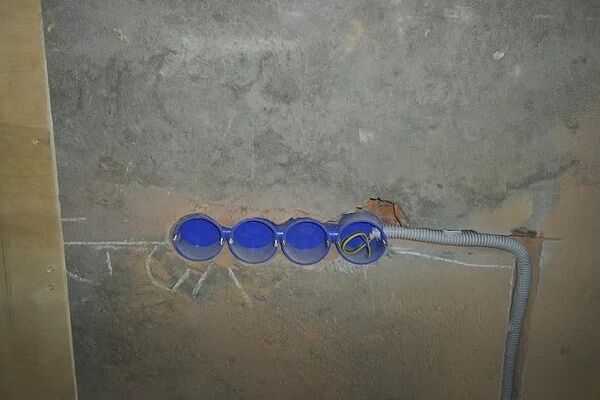
To install several sockets located nearby, you can use glasses, on the side of which there is a fastening mechanism. The socket boxes are connected to each other using special grooves and combined into blocks.
Drywall boxes contain special plastic or metal clamping tabs designed to secure elements into hollow walls. The clamps are attached to screws, which rotate to adjust their position.

What shapes are the products produced in?
Round socket boxes have become most widespread. It is very easy for them to make a hole in the wall using a variety of tools.
Round glasses can be used both for mounting a single socket or switch, and they can be combined into groups, connecting to each other using docking units.
Square boxes, although not used as often, have certain advantages. Their volume is much larger, so you can hide a lot of wires in them.
They are often used to install system elements "smart House". There are single and group square-shaped socket boxes designed to install up to five sockets.
There are also oval boxes on sale, which, like square ones, have a large internal space. They are convenient because you can immediately connect double socket. All the products described above are mounted in walls and used for hidden wiring.
There is another type of mounting boxes that stand somewhat apart - plastic linings or, in other words, multiboxes, designed for open installation on the baseboard. They are designed for one or several sockets and are usually square in shape.

External socket boxes have two modifications - designs with installation to the middle of the baseboard or to the floor. Since multiboxes are mounted on top of the baseboard, their distinctive feature is their aesthetic appeal and original design.
Installation box size
An important parameter of socket boxes is their dimensions, which are selected based on specific installation conditions.The fork dimensions are 60-70 mm in diameter and 25-80 mm in depth.
Standard designs have external dimensions of 45 x 68 mm, but it must be taken into account that the internal depth in this case will be 40 and the diameter 65 mm.

Glasses of increased sizes, the depth of which is about 80 mm, are advisable to use when there is no distribution box in the electrical wiring, and its functions are performed by the electrical outlet itself. As for square products, as a rule, they have a size of 70x70 or 60x60 mm.
Material for making mounting boxes
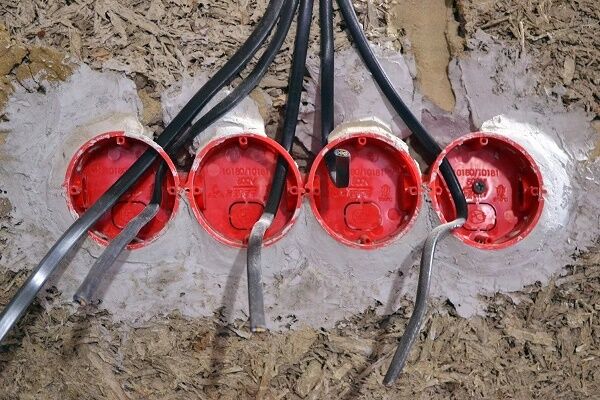
The most popular are socket boxes made of non-flammable plastic. They can be installed in concrete walls and structures made of composite materials.
There are also metal boxes, which were used everywhere in the past, but today they have almost been replaced by plastic products.
Metal socket boxes are usually installed during installation electrical wiring in wooden houses. They are made of galvanized or non-ferrous metal and cannot be welded, so the connection to a metal pipe is made by soldering.

Basic rules for installing socket boxes
Before installing the socket box, you must select the location for its installation.But since the socket is a source of increased danger, its placement in some rooms is subject to special requirements specified in "Rules for electrical installations" (PUE).
According to the PUE:
- there must be a distance of at least 50 cm from the electrical outlet to the pipe through which the gas passes;
- sockets in the bathroom can be installed at a distance of at least 60 cm from the source of splashes (washbasin, shower, bath);
- It is recommended to install switches on the side where the door handle is located, while distance from the device to the floor should be up to 100 cm;
- You cannot install sockets in saunas, baths, or rooms where laundry is done.
There are no special rules for other premises. Sockets should be placed in such a way that their use is convenient for all family members.
It is also necessary to follow safety requirements and install devices taking into account the location of electrical appliances in the house so that their cords reach the outlets without the use of extension cords.
You may also be interested in information about the nuances of installation sockets for washing machines or sockets for electric stove.

Installation of a socket box in a concrete base
If you have already decided where your sockets will be located, you can begin installation work, which consists of several stages.
Before installing the socket box in concrete, markings are made, then a hole is made in the wall and a gypsum solution is prepared.
Step #1 - marking the wall
The sequence of marking work is as follows:
- Using a tape measure, measure the distance from the floor to the intended installation location of the socket box;
- if the floor covering has not yet been laid, then you need to add another 5 cm;
- using a building level, draw two lines: horizontal and vertical with an intersection point at the place where the box will be installed;
- Place the glass against the wall and trace it with a pencil.
If two or more socket boxes are to be installed, then first draw a horizontal line using a building level. It should be located at the distance from the floor where the sockets will be placed.
Find the center of the first box and draw a vertical line through it. Then set aside exactly 71 mm and draw the second vertical. The center of the second glass will be located in this place. The marking of the following socket boxes is done in the same way.

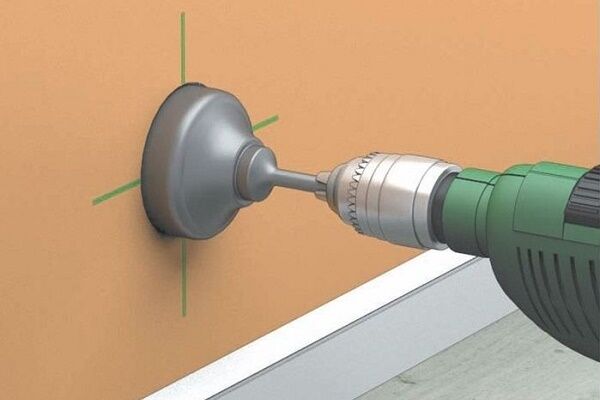
Step #2 - punching a hole in the concrete
There are several ways to make holes in a brick or concrete wall. The simplest of them is using a concrete crown with pobedit teeth, which, when cutting into the wall, makes a circle of the required size.
In the center of the crown there is a drill bit made of pobedit for making the central hole.
Since standard socket boxes have an outer diameter of 67-68 mm, a crown with a diameter of 70 mm is suitable for the job. The nozzle is put on a hammer drill or drill, placed on the marked line and a hole is made.
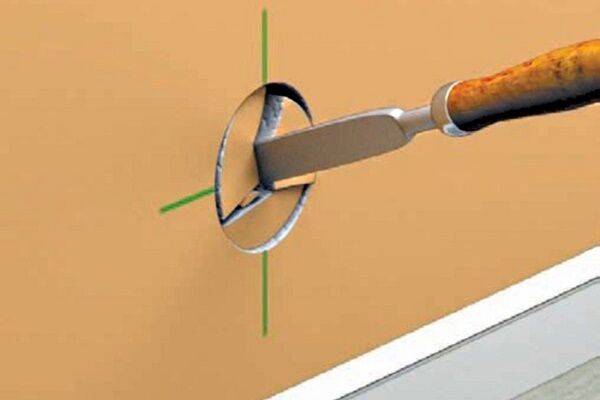
Then the nozzle is pulled out, and the entire remaining layer of concrete is knocked out of the hole with a chisel and hammer.

If you don’t have a concrete crown, you can make a hole with a drill with a Pobedit drill bit.First, a central hole is drilled to the entire depth of the nozzle, and then holes are made along the circumference line with the same drill.
The more of them, the easier it will be to hollow out a hole of the required diameter and depth with a chisel and hammer or hammer drill.
Another way is to make a square hole using a grinder with a diamond blade attachment. First, the central lines are cut, and then along the entire perimeter of the socket box. The process, as always, is completed with a chisel and hammer.
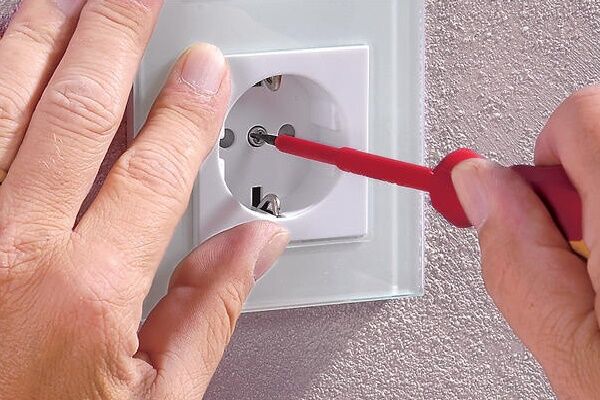
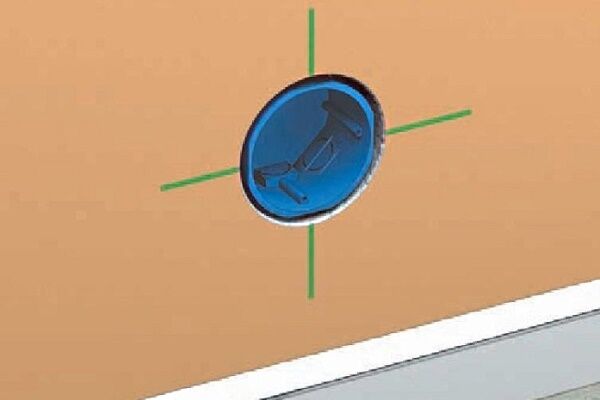
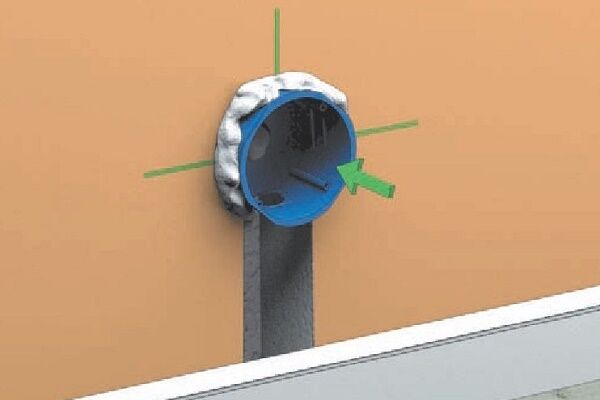
Step #3 - installing the box into the wall
After the hole is made, you need to clean it well and insert a socket into it for fitting. It should fit freely in width, and in depth there should be a margin of approximately 5 mm for the solution.
If everything worked out as it should, then now you need to make a passage from the top or bottom of the hole (depending on the location of the electrical wiring in the room) for laying the wire.

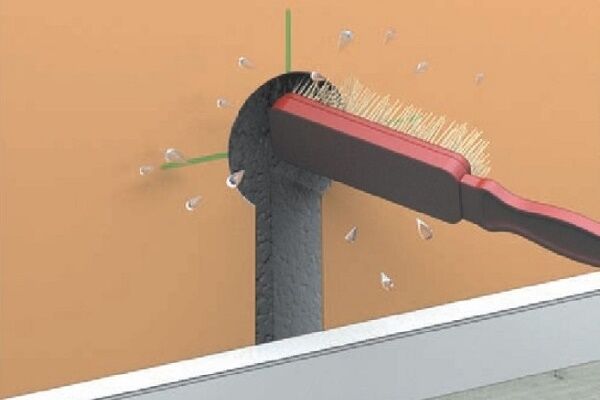
The socket box also needs to be prepared. We turn it over with the bottom side where the slots for the wires are and cut one of them with a knife. We run the wire there and insert the box into the wall to check.
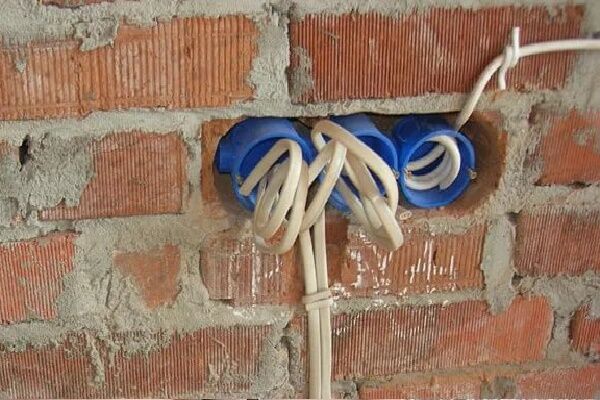
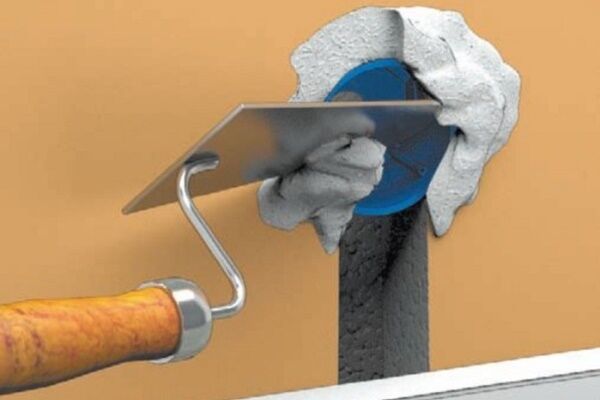
To secure the glass, prepare a solution from plaster or alabaster, which should have the consistency of sour cream. It is worth considering that the solution made from these materials hardens very quickly, and you have no more than three to four minutes to complete the process of installing the socket box. After five minutes the mixture will no longer be suitable.
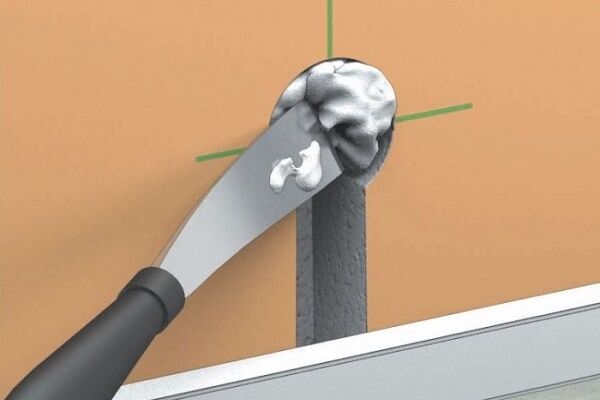
Two minutes before placing the box in the wall, the hole is moistened with water.After the liquid is absorbed, a layer of gypsum is applied to its walls with a spatula. A wire is threaded into the glass, its back part is also smeared with the solution, and the socket box is inserted into the hole.
Adjust the position of the box so that its edge is flush with the wall and the screws are horizontal.

Step #4 - combining several socket boxes
How the marking of two or more electrical outlets is carried out was described above. Holes are made using the same methods as for a single box. The only difference is the need to connect the holes together. This can be done with a chisel or grinder.
Before installation work, the socket boxes must be joined to each other using a side fastening element. Installation into the wall is carried out similarly to the installation of a single glass.
An important point that you must pay attention to when attaching a block of boxes is the strict alignment of the socket boxes horizontally while fixing them in the wall with gypsum mortar. It is necessary to carry out this part of the installation only using a building level.

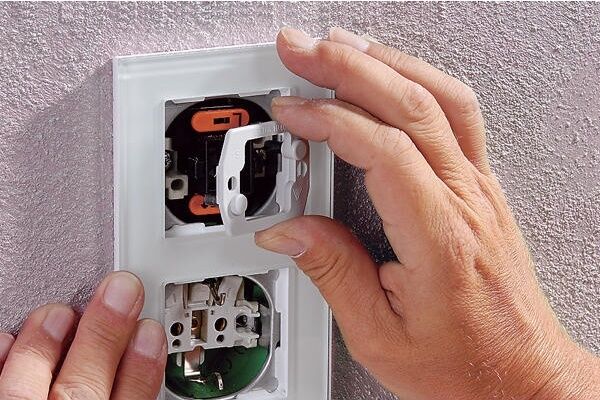
Installing a box in hollow walls
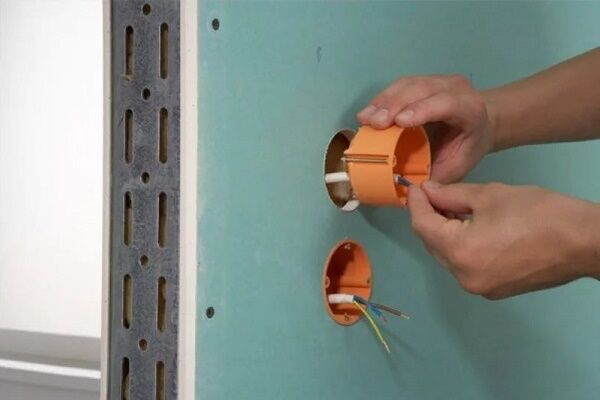
Socket boxes designed for walls made of composite materials, in particular plasterboard, have a slightly different design than installation boxes for concrete and brick bases.
The glass is fixed in the wall without gypsum mortar, which allows installing a socket box in drywall much faster and easier.

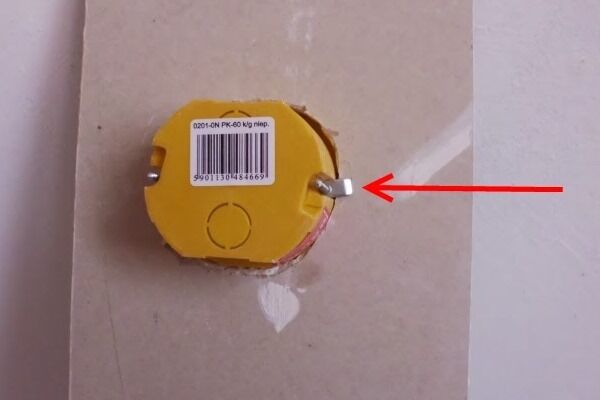
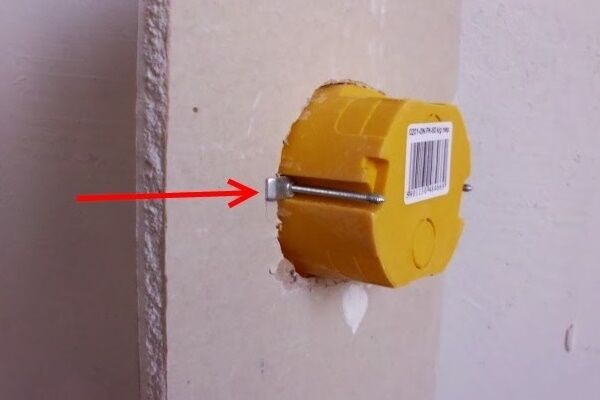
At the top of the glass there are four screws arranged in pairs. Two of them protrude slightly outward and are intended for attaching a switch or socket.
The other two are slightly recessed into the socket body. On the bottom of each screw there is a metal or plastic tab, which, when the screw is turned, moves and fixes the box in the drywall.

Before installing the socket box, make markings as described above. Making a hole in drywall is much easier than making a hole in a concrete wall. You can simply cut a circle with a knife or drill along the contour with a drill, and then cut it with the same knife.
However, when using these methods, the edges are not very smooth. In addition, drywall is a rather fragile material and can break.
It is best to do the job using a wood crown. After the hole is prepared, bring the wire out into it and insert the socket so that the screws are positioned horizontally. Secure the cup into the drywall by tightening the two recessed screws clockwise.
Installation of socket boxes in ceramic tiles
If it is necessary to install a socket or switch in a wall that is supposed to be tiled, marking and making holes in the concrete should be done before finishing work begins. Electrical wires are laid in advance in the resulting recesses.
After laying the tiles, markings are made again and holes of the required depth are drilled in it. It is best to drill the tile with a diamond core bit, periodically cooling it with water.
A gypsum solution is placed in the recesses, it is also applied to the back of the socket box, and then the box is pressed into the hole and leveled.

The nuances of installing a multibox on a plinth
What should you do if your house has already undergone high-quality repairs, but you need another point to connect electrical household appliances?
In this case, it is not at all necessary to rip off the new wallpaper and ditch the wall; you can make a socket directly on the baseboard.

However, it should be noted that this method can only be used on collapsible plastic skirting boards with a cable channel. Before installing the socket box, it is necessary to lay the wire inside the baseboard.
To do this, remove the cover from the part where the socket will be located. This operation is performed from a corner or from a nearby plug; simply pry the cover with a screwdriver and carefully remove it.
Cut the baseboard so that there is a gap the width of which matches the size of the plastic trim. Insert the multibox into it, thread the wire through the hole in its body, and secure the socket box with dowels.
Conclusions and useful video on the topic
How to install socket boxes in a concrete wall can be seen in the following video:
The entire process of installing a block of socket boxes in plasterboard is described in detail in the video:
The installation of a plastic lining on the baseboard is shown in the video:
To find out how to install socket boxes in tiles, watch the video:
The installation of socket boxes, although it seems very simple at first glance, has its own difficulties and nuances that must be taken into account during work, so that after a while you do not have to re-dissolve the dirt and reinstall loose devices.
The durability and appearance of the socket or switch depends on how correctly and competently the socket boxes are installed..
Have you installed a socket box in a concrete or brick wall at home with your own hands? Or maybe they installed a socket box in drywall? Share your experience, tell us about the difficulties that arose during the installation process.Many beginners will find your advice useful - leave your comments under this article.


First of all, I don’t understand why sockets in modern apartments are installed so close to the floor. After all, this is very inconvenient during installation and repair. In my opinion, it is not safe for small children either. I don't see a single argument in favor. As for the socket boxes, the only problem I encountered was the mismatch in size between the socket and the socket box. Some sockets cannot catch even with the antennae spread as far apart as possible.
To a greater extent, this is dictated by aesthetics - a socket at eye level spoils the appearance. Plus it's also convenient. And for safety, there are childproof sockets.
Hello. Sockets are installed close to the floor by those who do not want wires hanging unsightly along the wall. At least, many are guided by this principle. But in fact, it is also convenient. For example, you need to stretch an extension cord from one room to another. Either it will lie on the floor or hang in the middle of the room, you see, option 1 is more comfortable. Also with a corded vacuum cleaner.
As for children... When connecting a TV, for example, it is much more convenient and safer to hide the socket behind the cabinet on which the device is installed, and so on. That is, plus for those sockets that can be hidden behind furniture, it is more difficult for a child to get there. When the device is in the public domain, you can easily buy “child protection” - cheaply and quite reliably. Verified. As for socket outlets, such a problem exists, yes.But it can be solved very simply - by purchasing high-quality devices, even if they are more expensive.
Good afternoon, Mikhail. Sockets mounted near the floor were brought about by perestroika - European-quality renovations began, and the craftsmen recommended following European standards. If you look at it, it turns out that this arrangement of sockets and switches is beneficial when wiring is located inside the baseboards - it saves wire.
The PUE, by the way, does not force you to follow foreign standards, and the requirements for the placement of sockets and switches are very “democratic”. For residential premises, the Rules recommend the height of sockets, taking into account the interior, convenience, and purpose. True, a height of more than a meter is considered impractical. For schools and kindergartens, the height of the socket is regulated at 1.8 meters. The height of the switches is even less limited.
I have attached a screenshot with the PUE points.
I'm doing renovations in my apartment. I got around to installing the socket boxes. I’m doing the repairs myself; to be honest, I don’t have the information on how to install and secure them. I found it on the Internet, where everything is written and outlined step by step. I found exactly those socket boxes that fit my walls. It is also well described how to mark for installation of mounting boxes. Very useful information for those who, like me, do their own repairs.
I myself changed the sockets in the apartment and coped with the job quite well. What made the installation easier was the fact that the seats were made, since they contained outdated socket boxes. The main thing that needs to be done is to take the old socket box and go with it to the store to pick up a similar one.I think that those who are comfortable with a screwdriver should not have problems performing this type of work.
What the hell are electrical sockets? Here is a regulatory document, GOST, how much higher? Read: “GOST 8594-80 Boxes for installing switches and sockets with hidden electrical wiring. General technical conditions (with Amendments No. 1, 2, 3)". BOXES! And the semi-literate “trade managers” began to call them under-roofers, for whom it doesn’t matter what or how to call them, as long as they sell them. And we were followed by the same “electricians”.