How to change and remake an outlet: step-by-step instructions for replacement
A situation where an electrical outlet fails is a common occurrence that requires professional intervention from a technician.But with a competent approach to solving the issue, it is not at all necessary to resort to the help of specialists.
Let's take a closer look at what nuances to consider when replacing an old connection point with a new one and how to change an outlet on your own.
The content of the article:
The principle of replacing sockets
Usually the sockets that are used most often fail.
There can be many reasons why you need to remake the outlet. This:
- malfunction of the connection point, for example, when the device body melts or the socket falls out of the wall;
- for the purpose of improving electrical equipment;
- when changing the design from a banal aesthetic point of view.
In any case, replacing the socket must be carried out in strict accordance with the rules of SNiP.

Regardless of the reason, it is important to consider a number of key factors when choosing a feeding device:
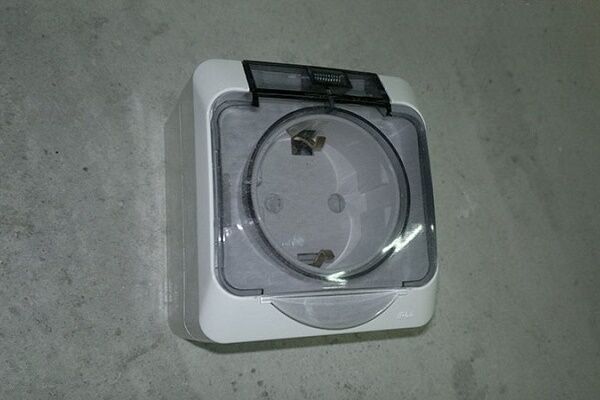
- Connection point parameters match. The operational characteristics of the installed outlet must exactly meet the requirements for a particular room. So, to “power” kitchens and bathrooms, you need to use devices that have an increased degree of housing protection. Read about how to choose such an outlet Further.
- Electrical wiring method. When installing sockets, both open and closed installation methods are used.To implement each of these options, the radio market offers a wide range of built-in and built-in sockets. overhead version.
- Aesthetic qualities. A large selection of equipment, produced in a wide color palette, allows you to organically fit connection points into any stylistic interior design.
When choosing and installing an outlet, you should focus on the type of network. So in a three-wire network, a conventional design cannot do without a grounding contact.
But even if a two-wire network is installed in the house, electricians still recommend using sockets equipped with grounding terminals. The main argument for this decision is the fact that metal inserts will enhance the strength of not only the connection point, but also the plug itself, thereby extending the service life of the product.
Step-by-step dismantling instructions
Working with electricity requires care and caution. When dismantling and replacing an outlet, it is important to follow safety precautions. In this article we will talk about replacing an outlet on a two-wire network. But if you need to replace a grounded outlet, we recommend that you familiarize yourself with with this material.

In multi-storey buildings, panels with package switches that cut off the supply of electricity to apartments are located on staircase landings. It is necessary to determine on the dashboard the bag that corresponds to the apartment, and then move it to the upper “off” position.
If desired, you can de-energize only one room in which the replacement will take place.But for this you need to clearly know which of the machines is responsible for the corresponding line.
Since when the power goes out you will be temporarily deprived of lighting, when replacing an outlet in a dark room or during the twilight period of the day, you should think about an alternative light source in advance. As a backlight, it is convenient to use a battery-powered flashlight or a lamp connected to another power line.

The wires at the connection point are separated into phase and neutral threads. The indicator alternately touches the phase and neutral wires of the socket. If it is energized, the light on the screwdriver will light up. You can safely replace the connection point only if the indicator does not react when the probe comes into contact with the bare ends.
Dismantling the socket is performed in the following sequence:
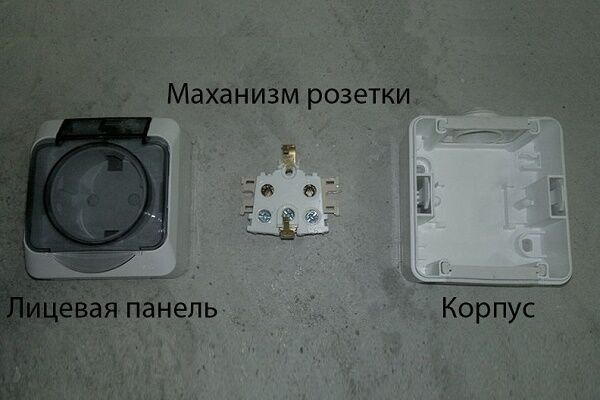
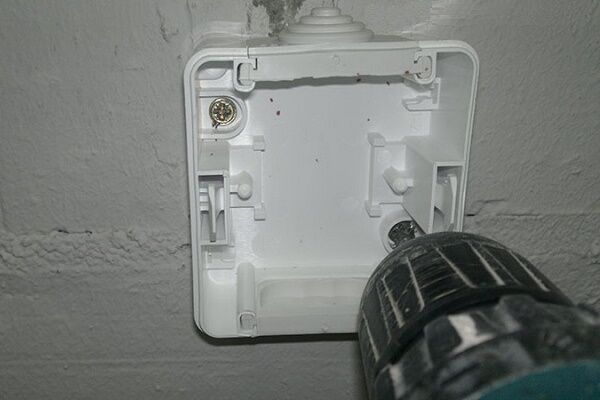
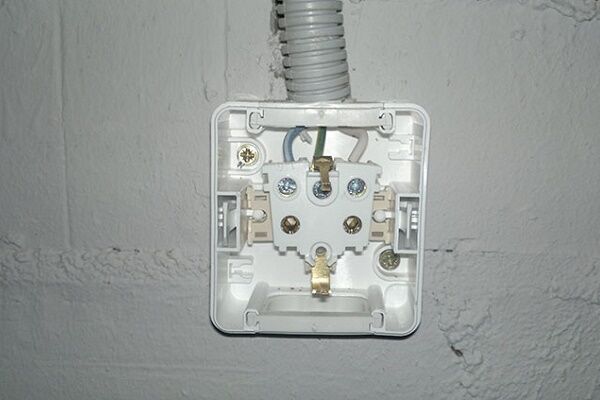
- Remove the body of the old device. To unscrew the central mounting bolt located on the cover, you will need a Phillips or flat-head screwdriver. Under the removed cover you will see the working mechanism.
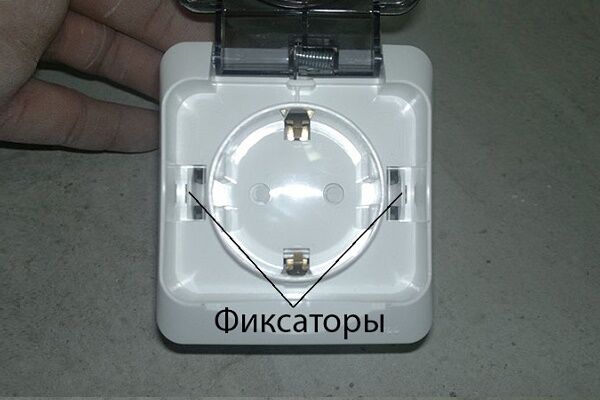
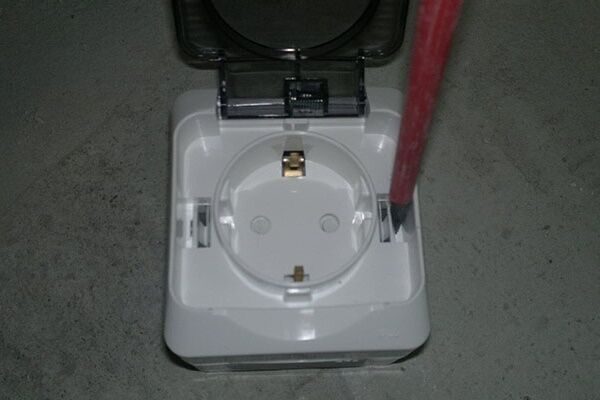
- After making sure that there is no voltage in the network, proceed to removing the internal unit of the device. To do this, special spacer tabs are opened on the sides of the working board. In some models, the metal plate of the mechanism is secured with two screws. They need to be unscrewed.
- Having removed the socket from the socket box as far as the wires allow, unscrew the clamping screws that secure the power cables. The current-carrying conductors in the block are sequentially disconnected.
When dismantling a socket for external wiring, keep in mind that there are devices with a mechanism that is separated from the socket box and models whose mechanisms are combined with overhead socket boxes. Both are subject to analysis. Only in the first option, you first need to remove the housing, and only then disconnect the working element, and in models of the second type, only remove the housing.
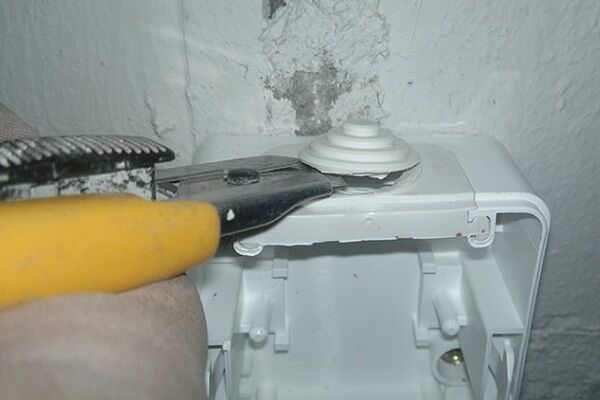
If, when dismantling the socket for hidden wiring, the screw securing the cover cannot be unscrewed, you can take an extreme measure - with a precise, but not very strong blow of a hammer, split it. The socket itself should be removed very carefully so as not to damage the cables leading to it.

After dismantling the socket, it is necessary to inspect the insulation of the wires. If the braid is melted or damaged, the wire should be cut back to undamaged insulation. For the future, keep in mind that one of the main reasons for insulation melting is an incorrectly selected fuse rating or circuit breaker, which leads to a malfunction of the protection device.
In old-built houses, situations often arise when, after dismantling the socket, it is discovered that the socket box is missing in the niche, and the “core” itself is attached directly to its walls. You cannot install the socket this way: the device will not be securely fastened. In this case, you will have to install a new plastic socket box.
Setting up a new connection point
The electrical outlet circuits are similar in almost all models. Therefore, there should be no problems with installing a new connection point.
Stages of work with an external device
The sequence of actions for installing overhead and hidden sockets is similar. However, it is better for a novice electrician to start with the overhead option:
When disassembling the socket, we remember the sequence of actions and the sides according to which the parts were connected into a solid device. Assembly will need to be done in reverse order.
Selection of required materials
To replace the socket you need to prepare:
- mounting knife for cutting cables;
- Phillips or straight screwdriver;
- pliers;
- heat shrink tubes;
- dielectric gloves;
- self-tapping screws
It is also worth preparing a multimeter or voltage indicator in advance.

If a situation arises when the wire length is not enough, it can always be increased by connecting small sections.
But when building up you should consider:
- Extension of aluminum wires is carried out using terminal blocks.
- Copper wires are lengthened by twisting the sections and then insulating or soldering the connection.
When extending or replacing wires, it is important to ensure that the cable sections match. So, to connect the same washing machine, the power of which does not exceed 2 kW, a three-core copper cable of the VVGng brand with a cross-section of 3X1.5 mm is sufficient2. At the input, to protect such a cable, a machine with a rated current of 10A is sufficient.
When planning to use an outlet to power the same iron or hair dryer, you should consider replacing the wire with a copper three-core cable, but with a cross-section of 3x2.5 mm2. But such a line will have to be replaced at the input by a machine with a nominal value of 16A.
Replacing or installing a socket box
The first step is to disassemble the body of the new device, removing the front panel from it. The master’s task is to fix the metal frame with the built-in working mechanism to the old place and connect the conductors with terminals.
When replacing an old-style socket, be prepared for the size of the socket to be slightly larger than the diameter of the plastic cup used in modern devices.

In the new type of plastic socket boxes, the problem of weak fastening of the stops of the “core” of the device is absent. Therefore, when remaking an outlet, it is advisable to remove the old metal socket box and install a new plastic box in its place.
Plastic socket boxes intended for installation in plasterboard differ from analogues for installation in concrete and brick walls by the presence of two lugs. With their help, the box can be easily secured to the back of the plasterboard sheet.
If desired, you can upgrade the metal socket box. This solution allows you to avoid “dirty” work and “wet” procedures associated with plaster. In addition, this method is good because it allows the socket to sit “dead” in its place. They improve the design using a standard socket designed for concrete.

The resulting ring-shaped blank is inserted into an old metal socket box, placing it so that the socket mounts coincide with the holes where everything is screwed. To fasten plastic to metal, small “bug” screws are used. They are screwed in diagonally.
When replacing a metal socket box with a plastic counterpart, keep in mind that the “glass” must be completely buried in the niche. Deformation of the structure is unacceptable.
If the socket box does not completely fit into the hole, the issue can be resolved in two ways:
- cut off the back of the socket box, shortening it to the depth of the hole;
- widen and deepen the hole in the wall.
To securely fix the socket box, use a solution of gypsum or alabaster. To do this, the walls of the niche opening are moistened with water and covered with a layer of gypsum solution. The same manipulations are performed with the outer walls of the plastic socket box, after which it is inserted into the hole in the wall.

To obtain a solution of the desired consistency of thick sour cream, the powder is gradually diluted in small portions in a container with water. To obtain a homogeneous mixture free of lumps, gypsum is added to water, but not vice versa.
When working with alabaster, keep in mind that its hardening time varies within a few minutes. Therefore, the work should be done carefully but quickly.
If desired, a cement-based mixture can be used for fixation.But it will be a little more difficult to work with.

The socket box should not protrude beyond the wall, otherwise the socket installed in it will stick out strongly, which will be extremely unsafe and also unsightly. The two holes located along the outer edge of the “glass” must be positioned strictly horizontally.
A hole is made in the socket box on the side where the electrical wires enter.
Using a narrow spatula, the solution is used to cover the voids and the junction of the end part of the structure with the wall surface. After the solution has hardened and acquired the necessary strength, thread the wires and begin installing the indoor unit. We also recommend reading our other article, which describes the technology in more detail. installation of socket boxes.
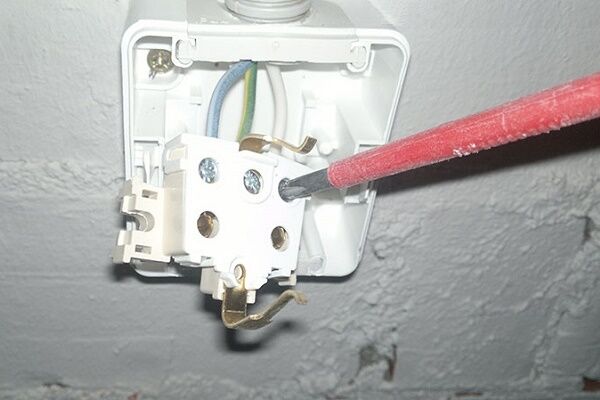
Connecting the mechanism to the cores
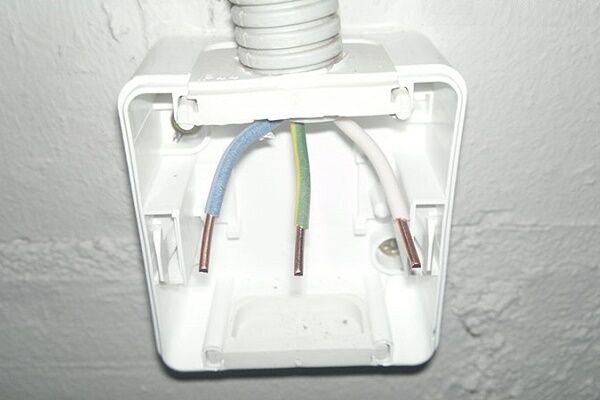
The socket mechanism is connected to the conductors by inserting the ends into special terminals. Since the “phase”, “zero” and “ground” wires must lie separately inside the box, but at the same time they have one common insulation in the cable, the first step is to remove the flexible tube enclosing them.
To do this, remove the insulation from the conductors of the supplied wire and “bite off” the excess ends. But still, experienced craftsmen recommend not “biting off” the excess wire, but leaving a “reserve” of 20 cm and hiding it in the walls of the socket box.

The work should be done as carefully as possible so as not to damage the fragile wires.In the absence of a special knife for stripping insulation, you can use a sharpened kitchen or stationery knife. Some craftsmen recommend warming it up a little with a lighter before removing the braid.
The regulatory document PUE clearly states that the identification of wire cores by digital designations or colors is carried out in accordance with the current GOST 50462-92.
So the color coding for wires up to 1000 V looks like this:
- “phase” - white braiding (less often gray, red or black);
- zero working “N” - blue (less often blue) color of the braid;
- protective conductor “PE ground” - yellow-green insulation.
When connecting wires to a new point, as well as performing any electrical work, these requirements must be strictly observed.

When working with old electrical wiring that only uses white or black braided wires, it is advisable to check the supply wire before connecting it to the outlet. To prevent an error when connecting contacts, the phase wire is marked with a marker.
In order to prevent distortion of the core, the screws are first tightened and then tightened one by one until securely fixed. To give elasticity to the structure and at the same time prevent it from becoming loose, a bolt is tightened in the center of the core.

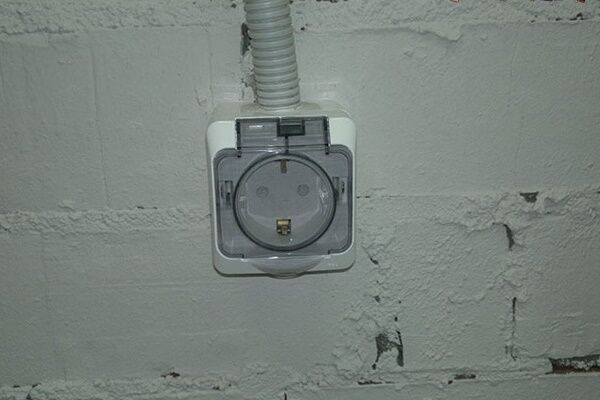
At the final stage, all that remains is to install the panel.The cover is fixed with a central bolt, being careful not to overtighten the fastener so as not to “tear” the hole and damage the fragile material of the protective cover.
To check the reliability of fixation of the socket, insert the plug of one of the electrical appliances into it. If the socket in the box is loosely secured, you will have to remove the decorative panel again and tighten the spacer bolts a little tighter.
Having installed the cover in its original place, you can connect the power supply to the panel. After the connection is completed, the correct connections in the installed socket are checked with an indicator.
There are also several articles on our website that describe in detail the process of repairing and connecting various types of sockets:
- How to move an outlet: instructions for moving an outlet to another location
- Common socket malfunctions: how to fix the socket yourself
- How to make two from one socket and how to correctly connect a socket from a socket
- How to connect a double socket: installing a double socket in one socket box
Conclusions and useful video on the topic
A video with a visual demonstration and detailed explanation of how to properly remake an outlet:
Guide on how to change the socket correctly:
Even a novice technician can change the socket on his own. The main thing is to observe safety precautions and strictly adhere to the above actions.
If you have had to change or remodel an outlet yourself, please share your experience with our readers, tell us about the nuances that those who are encountering such work for the first time need to know. Write comments and ask questions about the topic of the article in the block below.


When replacing the socket, the biggest problem I had was with replacing the socket box - the apartment was old, the socket box was metal, and after removal, old cement fell out. When I inserted the new one, I was so tortured with cementing around it that I tore the foam into pieces and with small pieces in the cement I was able to fix the new socket box in the center. Experienced electricians will probably laugh. Everything else went fine. In general, everything is not as scary as it seems, the eyes are afraid, but the hands are doing it, the main thing is to follow safety precautions.
From time to time I encountered the fact that the sockets in the apartment began to “wobble” after a while. It was necessary to somehow solve the problem. I found these recommendations and realized that this is exactly what I need. I have metal sockets in the walls, so I didn’t want to deal with replacing them. I selected the plastic ones according to the diameter, adjusted them to size (I had to cut them and adjust them to the depth), and assembled the structure. Now the sockets are firmly seated and, I hope, will not have to be reattached for a long time.
To change the socket, it was not at all necessary to be an electrician or to call him. If your hands grow from the right place, then everything is possible. Many people make the mistake of naively believing that they have lost power and then receive a shock. You need to check not only the phase, but also zero. Well, when replacing wiring, think in advance where the sockets and switches will be located. He himself corrected his mistakes more than once.
in fact, the main thing is that the hands grow from that place, and everything else will come with experience, because even basic things need to be learned to do