How to connect a double socket: installing a double socket in one socket box
A socket with a double connector will provide the ability to simultaneously power two devices connected to separate electrical points.In addition, for each of them there is no need to pull a cable, and it is more convenient to use thanks to the grouped arrangement.
You can handle the installation yourself without any problems if you take into account the recommendations we have given. We are ready to share the intricacies of electrical installation work. We will tell you in detail and show you how to connect a double socket, how to arrange a socket for an electrical outlet and ensure safe operation.
The information offered for review is supplemented with step-by-step photo guides, visual illustrations and videos explaining the nuances of installing and connecting power devices.
The content of the article:
Types of double sockets
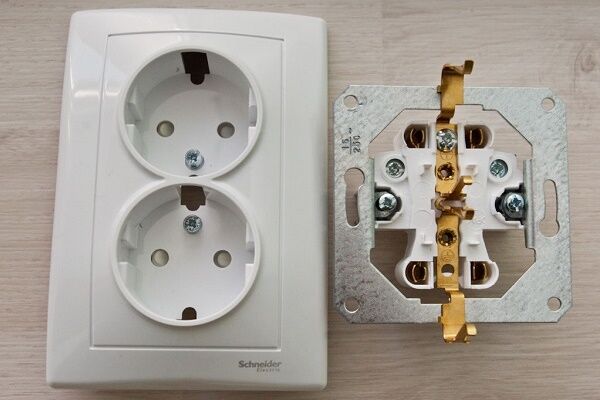
The main elements of an electrical outlet are the outer protective casing and the working part, which includes the base and contacts.
They are connected to each other by screw terminals - clamps necessary for connecting the cable of electrical equipment.

There is a misconception that double sockets are identical to assembled or dual models and represent several independent devices located close to each other, interconnected by cables.

Technological progress does not stand still. Modern models are more advanced designs. In terms of rated voltage and current, they are strikingly different from the sockets that were ubiquitous during the Soviet era.
For example, if in old-style models the permissible current did not exceed 10A, then for modern electrical installation equipment this figure is 16A.

In reality, a double socket has one clamp and several distribution strips. Due to this, the electric current is supplied to both sockets equally, but its level will be divided depending on the power of the devices powered from the network.
Therefore, when replacing a failed old device with a new one, it is worth knowing its design features, which require certain nuances during installation.

According to modification, double sockets are classified into the following main types:
- Open and closed version. In closed models, the holes are hidden behind curtains, which move to the side when the device is turned on. Devices of this type are indispensable for homes where there are small children. The curtains only work when pressed at the same time. Thanks to this, even if a foreign object is deliberately inserted, nothing dangerous happens.
- Without grounding and with grounding contacts. In models of the second type, grounding contacts are installed on the socket body, which protect electrical appliances and the user from breaking currents that accidentally “exit” the plastic body.
- For installation in rooms with high humidity and outdoor installation. Models of the first option are marked IP-44. They are equipped with a housing that protects the device from moisture penetration. Devices for outdoor installation are marked IP-55. Their highly durable housings are protected from dust contamination and moisture penetration.
Each type has a corresponding letter marking. For example: “A” indicates that this is an American double socket, “B” indicates the presence of a grounding contact.

Among the latest developments, programmed sockets are especially popular. Timer-equipped devices turn on and off independently from the power supply after a set time interval.
The protective housing of modern sockets is made of heat-resistant, unbreakable plastic. To enhance its decorative qualities, it is decorated with various inserts.

When planning to install a double socket yourself, experts recommend choosing simple models without any modifications. Or give preference to double sockets with a spring-loaded plug ejector.Such models are convenient because they are equipped with springs that are activated when the plug is removed from the device.
To protect yourself by minimizing the risk of accidents, you should choose products from trusted manufacturers: Schneider electric, ABB, Legrand.
Device installation features
A double socket has one socket box with two separated terminal blocks and one mounting part for wires.

If desired, you can install the electrical point yourself, without resorting to the services of a specialist.
The use of jumpers is allowed only if it is planned to connect not very powerful devices to the electrical points. When connecting powerful equipment, technicians recommend connecting two outlets in parallel, creating a branch of wires for each point.
But in any case, to prevent emergency situations, the total load on this type of outlet should be no more than 16A.
If it is necessary to install a socket with two different socket boxes, the niches for their installation will need to be pre-drilled with an electric drill, while maintaining the same distance between the holes.
Connection materials
The wire for connecting the electrical point must be made of the same metal as the main cable. For example, when using an aluminum cable, the jumper must also be made of aluminum.

To install a double socket you also need:
- flat and Phillips screwdrivers;
- braid stripping tool;
- pliers;
- insulating tape.
For safety reasons in case of fire, it is recommended that any electrical wires be laid in corrugation.This solution is also convenient because it does not require breaking through the wall, and also simplifies the replacement of damaged wires during subsequent operation.
Double socket installation technology
Installing a double socket in one socket box requires certain preparatory steps. The first step is to determine the identity of the wires by finding out where the phase and zero are.
The easiest way is to study the insulation code marking:
- phase wire painted red or brown (less often white or black);
- neutral has white-blue or blue insulation;
- grounding always colored green-yellow.
Will familiarize you in detail with the features of marking of electrical cable cores next article, which we recommend that you familiarize yourself with. But for greater reliability, it is better to play it safe by taking measurements.

To determine the identity of the wires, remove the cover from the failed device and touch it one by one screwdriver with sensitive indicator to each bare wire: on the neutral wire there will be no light signal, but on the phase wire it will light up.
If there is no ground wire in the house, the installation work is a little easier.
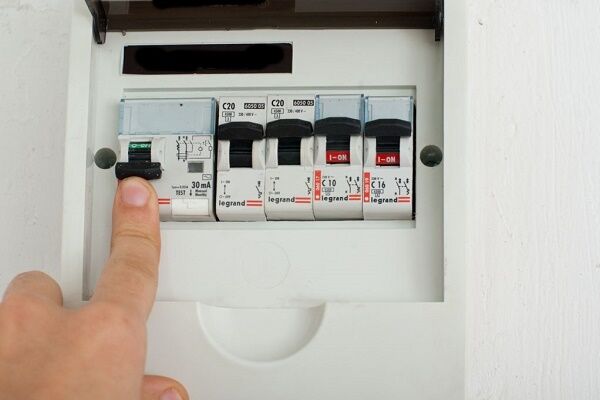
Before you begin arranging an electrical outlet, you must de-energize the room. For this purpose levers circuit breakers on the shield is lowered down, moving to the “off” position. It is recommended to re-check the voltage at the location where the double socket is installed.
If there is still current in the phase, this indicates that not all supply lines have yet been de-energized.That’s why it’s so important to turn off all circuit breakers before starting work, and not limit yourself to just those that control the wires going to the outlet.

Marking the wall
The socket is placed near the wire running in the wall or from the electrical distribution box. The location of the future device is marked with a pencil.
Before installing a double socket with two “glasses”, it is necessary to determine the distance between the drilled holes. To do this, mark the center of the first socket box. This is the point of intersection of the diagonals. Using the same principle, the center of the second device is determined.

To drill a hole in the wall itself, use a crown, the diameter of which is a couple of millimeters larger than the size of the purchased socket box. If there should be no problems with a brick or plasterboard wall, then to drill a hole to install a socket in a concrete wall, you will have to set the hammer drill to the shock mode.
With rules and technology installation of socket boxes in walls made of concrete and plasterboard will familiarize you with the material collected and systematized in the article we propose.
The depth of the hole should be such that the “glass” does not protrude beyond the surface of the wall. Having drilled a niche, you need to clean its middle. To do this, use a chisel and a hammer. Plaster can be knocked off with a chisel or screwdriver without much difficulty.
Routing sockets and twisting wires
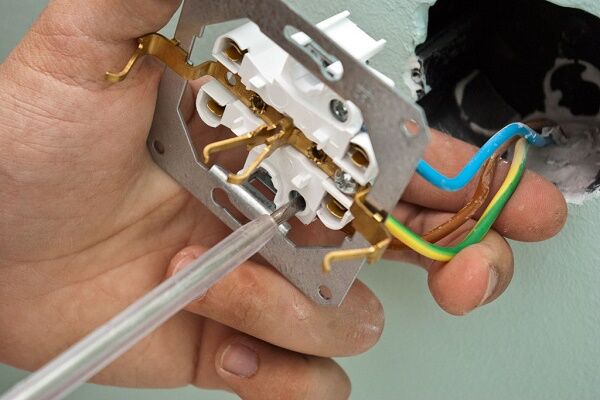
This stage is very important and must be approached with the utmost care and caution. The master’s task is to connect the power wire to the contacts. To do this, a wire is pulled from the junction box to a double socket.

The previously installed crown must be replaced with a drill. The diameter of the drill should be slightly larger than the cross-section of the wire supplied to the socket or the diameter of the corrugated pipe in the cavity of which the supplied wire will lie. The ideal option is when the diameters of the drill and wire match.
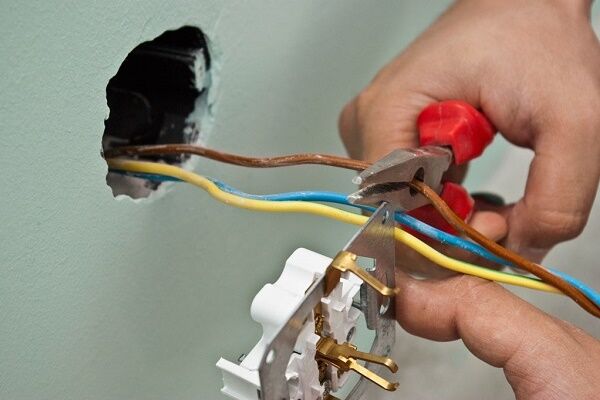
The main wire is inserted through one of the mounting holes of the socket box. And the auxiliary one is launched through the second hole.
Twisting of wires is performed directly in the “glass”. Before performing work, the extreme one and a half centimeters of the ends strip the braid with a stripper - a tool that does not cut the wire.
In the absence of one, you can use a sharp knife, first cutting the winding in a circle with it, and then carefully removing it from the wire. For ease of assembly, the edges of the cores are raised up.
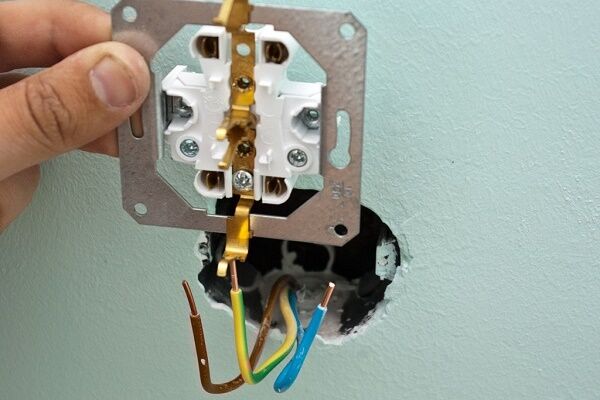
To extend the service life of the socket, the exposed ends of the wires must be soldered, or a brass contact must be used. The second option is more successful, since it not only simplifies the subsequent use of the outlet, but also ensures high safety of the device.

When connecting a grounded socket, always follow the wiring rule: on the right - phase, on the left - neutral. The grounding cable is connected to the top and central terminal of the device, which is equipped with protruding “antennae”, which often protrude beyond the body of the device. The grounding contact is fixed in the same way as phase and zero.
You cannot attach a phase and a neutral to the same plate, as this will cause a short circuit and damage to the entire wiring.

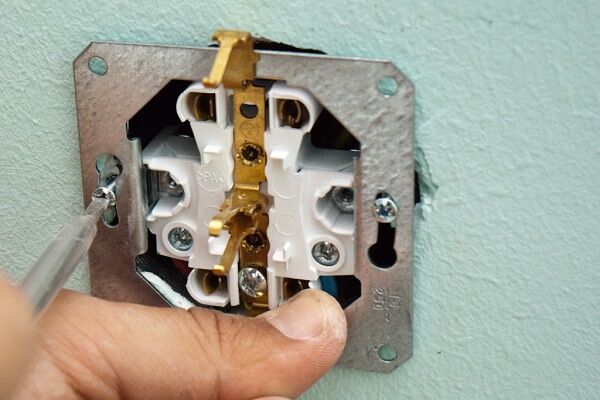
Having completed the installation of electrical connections, proceed to the installation of socket boxes.
Subtleties of fastening socket boxes
The socket boxes with the power cables attached to them are secured using holders located on the sides. They may be included with the device, or they will have to be purchased separately. There are also models that are not equipped with fixing tabs, which are secured by screwing them onto screws.

But since the socket box with the lever in the center experiences a double load, during operation the fastenings of the mechanism can become loose and weaken. When the socket boxes fall out, the wires are often exposed, which can lead to emergency situations.
To increase the reliability of fastening, craftsmen often use alabaster or cement mortar. To obtain a homogeneous thick mass, the structure of which resembles sour cream, dry alabaster is mixed with water.But keep in mind that the material should be diluted in small portions and you need to work with it quickly and carefully.
The alabaster mixture is placed in the place where it is planned to install the socket box. To ensure that the mixture adheres well to the surface, the inner edges of the hole should first be moistened with water.
Work on installing the inside of the device should be carried out 20-30 minutes after laying the mixture so that it has time to “set” a little. Having placed the “glass” on the prepared place and buried it in the mixture, level the position using a level and a hammer.

The resulting gaps between the wall and the socket box are filled with the remains of alabaster. Without waiting for the plaster to acquire the desired strength, the sagging is removed with a knife.
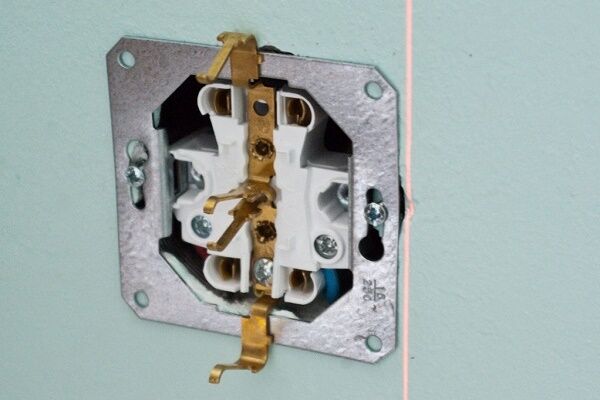
Having placed the double socket horizontally or vertically and given the device the desired position, secure it with screws. If it is necessary to adjust the level, the work is performed using pliers.

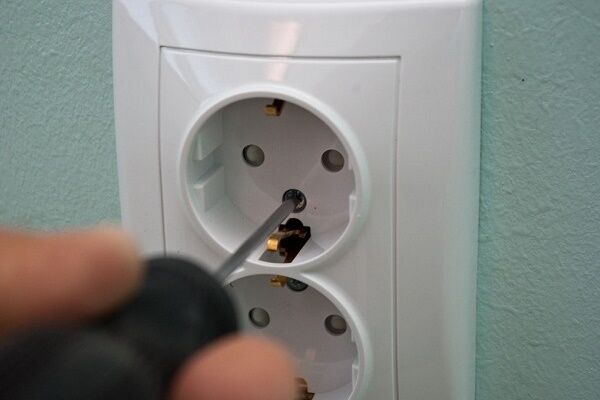
At the final stage, the front panel is placed on top and clamped with screws. The decorating element will cover the unsightly part of the outlet and protect it from accidental damage.
After completing the connection of the outlet, all that remains is to turn on the machines and residual current device in the panel and test the operation of the electrical installation equipment. It is better to check the operation of the outlet when turning on inexpensive household appliances, for example, a table lamp.After all, the slightest mistake during the installation process can cause a short circuit and “burnout” of household appliances.
Conclusions and useful video on the topic
Video #1. Connection process for built-in double socket:
Video #2. Instructions for those who want to connect the outlet themselves:
If the quality of the installation is in doubt, contact a professional electrician for assistance. He will not only inspect the work and, if necessary, fix problems, but also dispel all your doubts regarding the safety of using the device.
Those wishing to share their own experience in the field of electrical installation, useful recommendations or ask questions are invited to leave comments in the block located under the text of the article.


It is enough to know the basic safety rules. Even with such luggage, you can change sockets throughout the house (or apartment) even without special knowledge. To connect a double socket, you must first determine the identity of the wires, then turn off the power to the line, check the voltage again, and you can install the socket. The total load should ultimately not exceed 10-16A for safety reasons.
Good afternoon, Bogdan. Installing double sockets is a task that really does not require any special abilities. But the start of work should be preceded by an analysis of the ability of the existing wiring to withstand additional loads. After all, double sockets require the simultaneous operation of several household devices.
Several articles on the website are devoted to the issue of calculating the load capacity of wires in the section “Wiring installation" Read it - it will be very useful.
Indeed, converting sockets to double ones is not so difficult. I did the same wiring, only for four sockets. Of course, I had to use a hammer drill to select a fairly large hole in the wall; it turned out quite dirty. Yes, and I obviously did something with the wires. It's a shame I didn't read this information earlier. Now I will redo it, because a large outlet in the room is necessary, and the extension cords do not look very aesthetically pleasing.
In fact, there is nothing complicated or supernatural about installing sockets. I have not resorted to the help of electricians for a long time (only if the case is very complex or critical). However, when it comes to sockets, there are many different types on the market. From my own experience, I can say that it is better to overpay slightly, but take a good brand name, than cheap consumer goods. I was convinced of this personally.
For a long time now I have only installed double ones when replacing sockets. One more connection point is never superfluous. I always take sockets that fit easily into a single box so as not to do extra work.
Is it possible to leave the Soviet “internals” and simply mount a new case on top of the socket?
If the housing from the new outlet fits the old Soviet “internals,” then you can make such a replacement. But I would strongly recommend making a full replacement of the outlet.
Firstly, this way you will carefully check all the contacts and the condition of the wires, which will allow you to avoid unpleasant surprises in the future (poor contact, lack of grounding, melting of the socket body). And secondly, the terminals in Soviet sockets were designed for smaller diameter plugs.Therefore, modern European plugs can get stuck in such terminals.
Moreover, it is so tight that the plug is then pulled out along with the entire socket - another important argument in favor of the fact that the socket needs to be changed completely. Well, as a piece of advice, I’ll attach a classic diagram of the correct and incorrect way to connect a double socket.
I read about “nothing complicated” and remembered one story. In general, I had a friend who was a finisher. I worked alone, the reviews were good. Well done guy. And his brother... a drug addict, didn’t work anywhere, just got on his mother’s nerves. And so their mother asks Dimka to take Artem to work with her, maybe he will become like a person. Well, Dimka does it, sniffles angrily. Artyom sits in the same place where he was ordered. And he asks Dimka to entrust him with at least some work.
He thinks, well, how much I work, he should have learned at least something. And asks the electrician to twist it in the distribution. It's already starting to get dark outside. He digs through the delivery for a long time, then goes to the box, puffs in concentration. After a while, so proud, Dimka says - I’m done. And Dimka is working on something from a stepladder and says to him - what the hell, go turn it on on the panel. After 5 minutes, there was a deafening crash, a burning smell, Dimka, in complete shock, approached the box, and Artyom had wound all the wires into one huge bundle and generously wrapped the whole thing with electrical tape.
Good afternoon Please tell me, I was changing the double socket in the apartment, but I didn’t know anything about the wiring rule “on the right – phase, on the left – neutral”, so I installed it without a second thought.The socket itself works, after reading the article I thought that I could have mixed it up and installed it the other way around, for example, on the right - neutral, on the left - phase, how could this be dangerous?