Installing a heating cable inside a pipe: installation instructions + selection tips
Do you want to protect your water supply from freezing in cold weather by installing a heating cable inside the pipe? Agree that preventing a problem is much cheaper and easier than eliminating the disastrous consequences later. Have you decided to do all the work yourself, but don’t know where to start?
We will help you figure out how to install the cable. The article provides detailed instructions on this process, accompanied by step-by-step photos. The nuances of preparing materials for work and the features of placing the system inside the pipeline are discussed.
Thematic videos have been selected containing expert recommendations on the proper preparation and connection of a heating system at home. There are also tips to help you choose the best cable.
The content of the article:
Types of cables for heating pipes
A properly selected heating system is the key to long-term protection against freezing of any type of pipeline. Therefore, before settling on a specific product, let's take a closer look at the range offered by the market.
Cable products available for sale are divided into 2 types depending on the type of installation - intended for placement outside and inside the pipe.
Let's take a closer look at the second option, which in turn is divided into 2 types depending on the purpose of the pipeline:
- for food purposes;
- for household needs and other tasks.
In the first case, the cable has a protective coating made of a food-grade polymer that does not affect the composition and quality of water, for example, polyolefin, fluoropolymer.

In the second case, there are no strict requirements for the type of coating, but such a system cannot be used to heat food pipelines. Another difference between the cables is the operating principle.
All options offered to the user heating cable are divided into two main groups:
- resistive;
- self-regulating.
In the first case, we are talking about a single or two-core product. The manufacturer, as a rule, immediately produces a ready-made system for installation, which has a certain length. The cable is often equipped with a plug for connecting to the network. The resistive system additionally includes a thermostat and a temperature sensor.
And in the case of a self-regulating product, additional sensors and regulators are not needed. In it, a semiconducting matrix is responsible for the heating level, capable of turning the system on and off automatically when certain temperature values are reached.

What to look for when choosing a cable?
Before purchasing, you should immediately decide who will perform the installation work. If in plans self installation, then it’s better to stick with a simpler option. Let's take a closer look at what criteria are important when choosing.
Criterion #1 - purpose of the pipeline
If you need to heat the pipe that supplies drinking water to your house, you should buy a food-sheathed cable. All manufacturers and stores must indicate this characteristic in the accompanying documents. The cable sheath requirements for systems transporting wastewater and process water are not as stringent.

Don’t be surprised, but a product in a shell safe for drinking water will cost more.
Criterion #2 - cable type and system length
Before purchasing, you need to determine the length of the area that needs heating. The length of the cable will depend on this.
You should immediately decide what type heating cable do you prefer resistive or self-regulating. The first option is cheaper. But its service life is shorter and installation is more difficult, especially for a beginner in this matter.
Another significant difference between resistive wire is that you can only buy a heating product of a certain length - the manufacturer has prepared various options. Therefore, you will have to choose from what is available. Moreover, a resistive system is most often equipped with a plug for connecting to the power supply.

The second option is more expensive, but easier to install. Self-regulating cable sold in a coil if the buyer cuts a certain length, or there are ready-made heating system options equipped with a power cable.
Regardless of the chosen option, you should be extremely careful - do not hesitate to demand accompanying documents from the manufacturer, a warranty card and a product quality certificate.
Criterion #3 - preferred product power
In order for the installed cable to heat the communications, you need to select the right power. This characteristic is also indicated by the manufacturer.
For plumbing systems, pipes with a diameter of up to 32 mm are used, for which it is recommended to use heating systems of 9-16 W. Moreover, this is the power of one linear meter. To calculate the total value, you need to multiply the specified parameter by the entire cable length.

Moreover, experts do not recommend buying a resistive type of product in order to save money, considering the latter to be less reliable for installation inside a pipeline.
Criterion #4 - cost of the heating system
As for cost, this criterion is also important: you cannot buy a cable that is too cheap. The rule “good things can’t be cheap” when choosing a cable fully confirms itself.
If the price is very low for the cable system you like and there are documents from the manufacturer, then you must definitely pay attention to the expiration date - an unscrupulous seller may offer an expired product, or the expiration date will expire in 6-12 months.
It is better to refuse such a “profitable” offer - at the end of the warranty, the cable may no longer perform its functions and will have to be replaced, which threatens repeated costs.

Also, when choosing a cable for internal heating, it is better to give preference to well-known manufacturers:
- German – Eltherm Gmbh (Germany);
- American – Raychem and Heat Trace Products, LLC;
- Korean – Caleo;
- French - Eltrace;
- Danish – Devi;
- Finnish – Ensto.
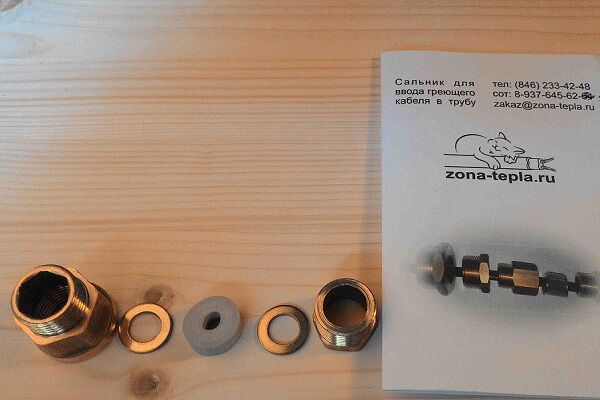
There are many Japanese-made products on the market designed for heating the water supply. Here you should also be careful and not buy a cheap Chinese counterfeit. In addition to wires and seals, you need to choose high-quality ones.
Pay attention to the cross-sectional shape inside the sealing rubber - it can be round and rectangular/square for different cable cross-sections. It is very important to buy reliable coupling elements - their price should be no less than 5 m of cable. When it comes to heating the pipe, you should not save too much.
Stages of installation of a heating system
Let's consider the arrangement of a pipeline heating system from the inside using the example of water supply. For such a pipe, it is best to take a self-regulating wire in a food-grade casing.
Stage #1 - purchasing the necessary materials
When purchasing a cable, we immediately determine the required footage, which is equal to the length of the pipe that needs heating. Along with the cable, it is better to purchase the consumables necessary for installation: a set of couplings, a gland and a section of wire with a Euro plug.
Additionally, a tee may be useful if it is not located in the intended installation location, and RCD at 10 mA. A tee is needed to correctly enter the cable. The latter should not be allowed through a pipe that bends at a right angle. Therefore, it is better to first install a tee at the site of the intended entrance and then enter through it.
The self-regulating cable requires power to operate. Therefore, a separate line is allocated for it. And, despite the presence of double insulation on the heating wire, the connection diagram must turn on the RCD And circuit breaker, protecting this line in case of accidental damage to the shell.
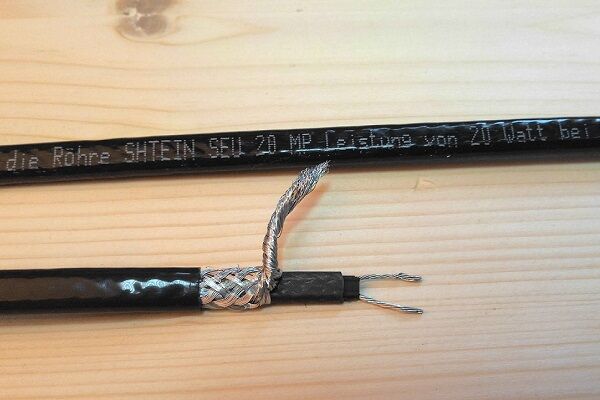
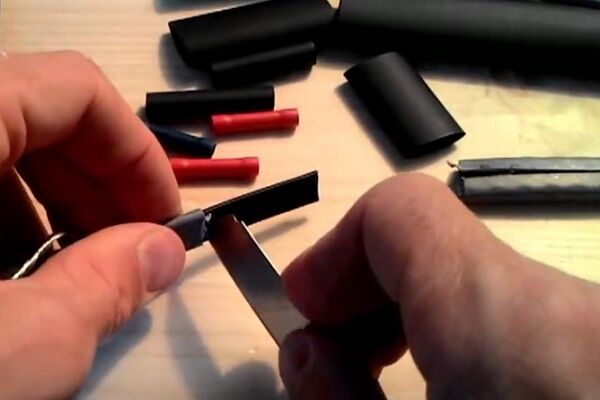
Stage #2 - preparing the cable for installation
It must be remembered that self-regulating cable systems die not only from frequent cable connections and disconnections. No less evil is incorrect splicing with the power cable and poor-quality termination, which can lead to a short circuit.
It is necessary to properly insulate using good consumables. There are bad couplings when the manufacturer did not provide enough glue. Another reason lies in the hands of the master, especially if he has no experience and connected everything incorrectly.
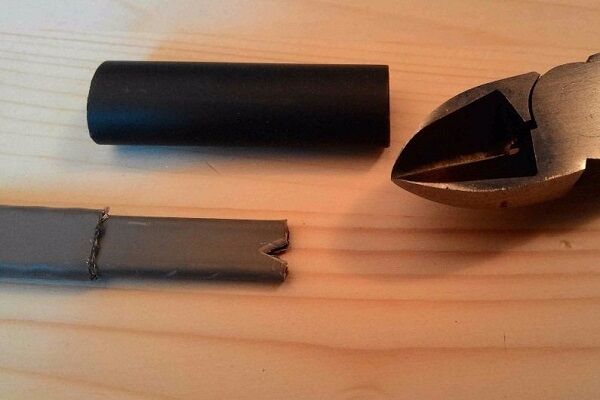
To prepare the heating wire for insertion into the pipeline, you need:
- perform end sealing;
- put the pass-through kit on the cable;
- splice the supply wire with a plug with a self-regulating section.
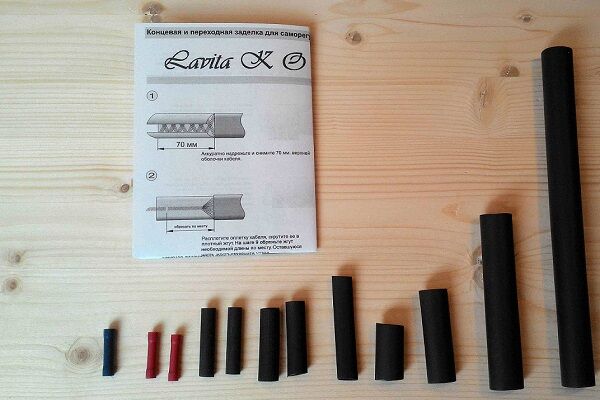
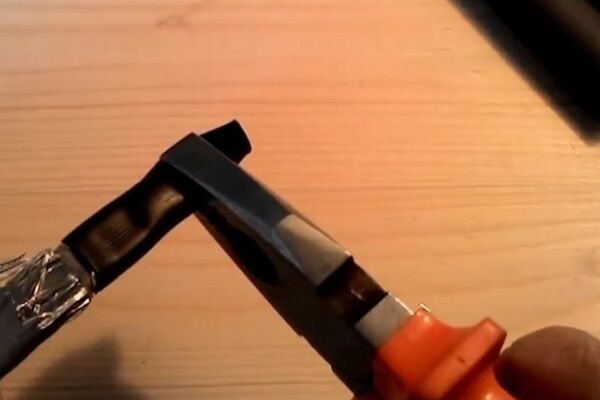
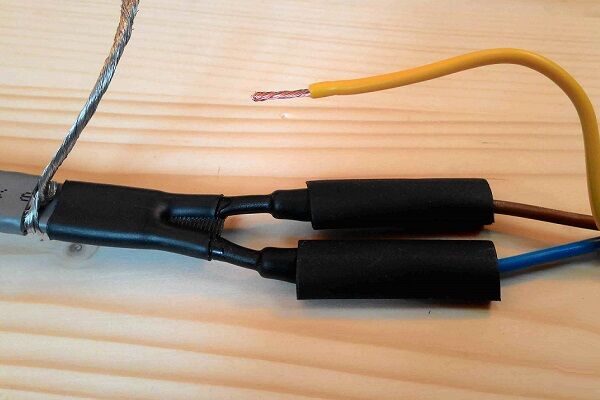
Let's take a closer look at how to properly insulate the end of a wire.
If each step of the end seal is carried out carefully, the tightness of this assembly will be ensured. True, provided that you use a reliable adhesive coupling kit from a trusted manufacturer.
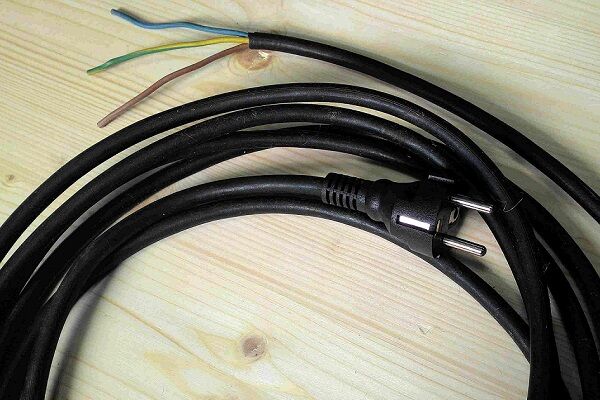
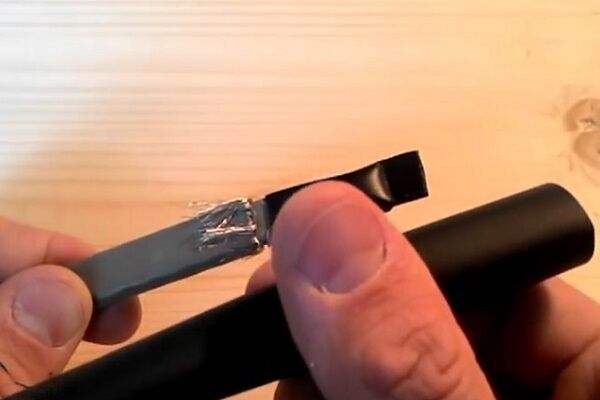
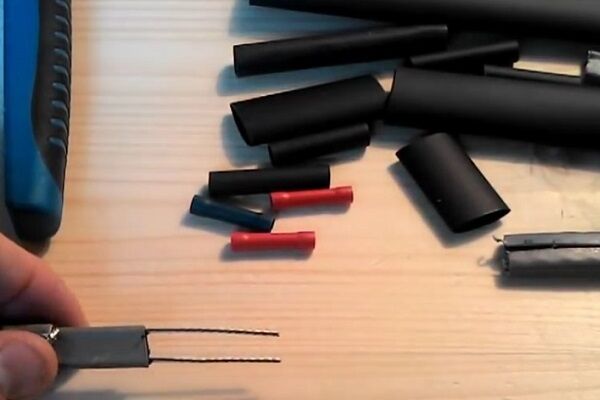
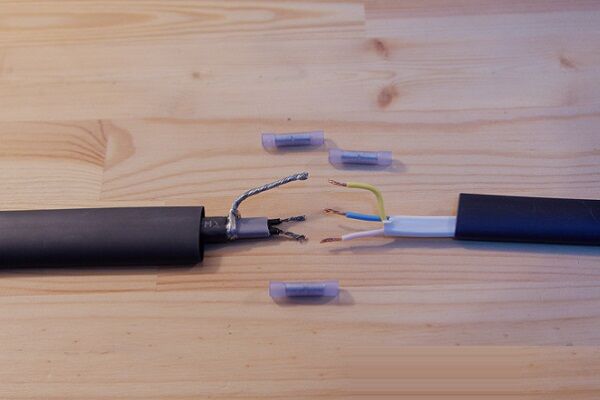
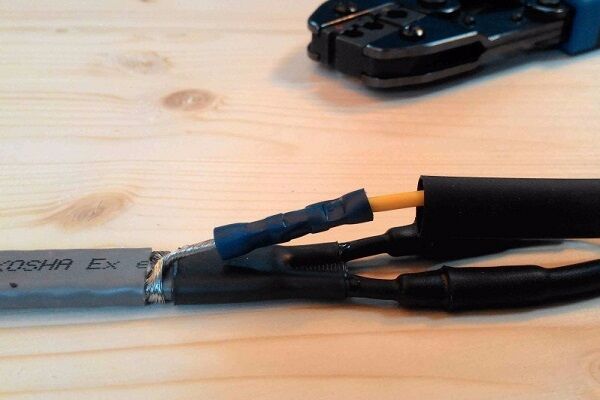
Now we have to splice the power cable with the heating cable in order to provide the latter with the power it needs to operate.

But at this stage it will be more convenient to put on the oil seal or it is also called a penetration or a passage kit. Each part should be put on strictly following the instructions provided by the manufacturer.
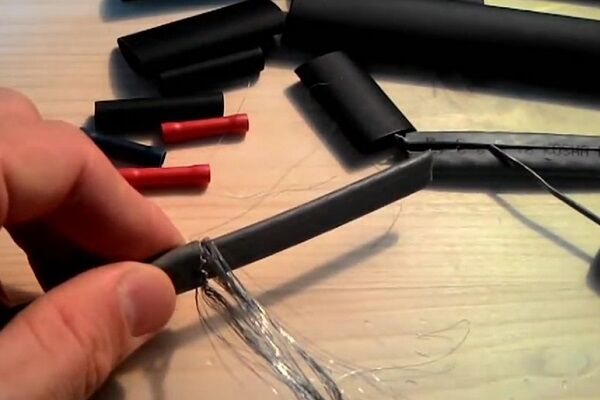
Having placed the penetration on the wire, you can begin splicing with the power cable. If you purchased a ready-made kit in which a piece of cable with a plug at the end is already connected, then you do not need this step.
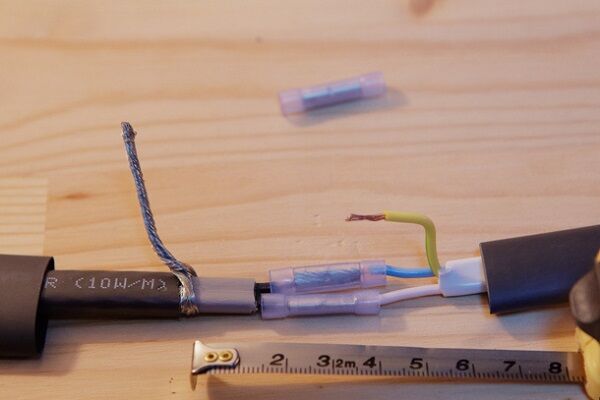
After waiting for the heat shrink sleeves supplied to insulate the connection to cool, you can proceed to the next step.
Stage #3 - placing the system inside the pipe
When the preparation of the heating system is completed, it can be introduced into the pipeline.
To do this, you must adhere to the following rules:
- lead the cable only through a tee;
- avoid areas with straight and sharp corners;
- Do not jerk sharply or use force.
Entry begins by pushing the insulated end through the tee into the water pipe. After pushing the entire length of the heating cable into the pipe, you need to ensure tightness at the entry point.

At this stage of cable installation, the penetration is useful to ensure the tightness of the system. You need to carefully tighten all the fasteners, screwing the clamping sleeve first with your hands, and then tightening the connection with a wrench.
The rubber seal inside the oil seal will flatten, thereby ensuring a tight seal.

Before placing the heating system, you need to make sure that the cable will not pass through the shut-off valves, which is strictly prohibited.
Stage #4 - connection to the power supply system
Having completed the installation work, all that remains is to connect to the electrical network. It is advisable to use a separate line for this.
Here it would be a good idea to take care of safety and equip this line with a 10 mA RCD. This solution will protect against current leakage if the wire is accidentally damaged. The RCD will simply de-energize the line, preventing damage to the home owner and all family members.
The connection process is extremely simple - you need to plug the Euro plug located at the end of the power wire, which we connected to the heating wire, into the socket. Moreover, there is no need to monitor the temperature and periodically turn off the heating system - thanks to the self-regulating matrix, this process will take place automatically.

This completes the connection. But in order for the system to last a long time, it must be operated correctly. It is highly undesirable to unplug the cable from the outlet unless necessary - these actions will significantly shorten its “life”. The self-regulating matrix will fail before it has time to work for the allotted time.
In order to save money, it is better to provide additional heating of the pipeline, especially if a section of the pipe runs along the surface. It is desirable additionally insulate from the outside, wearing a special casing made of heat-insulating material.
There are many options for insulation for external pipes - here you can choose the one that is most preferable for yourself.Yes, and installation can be done on your own. With a self-regulating wire power of 10, 16, 24 W per linear meter, the heating filament of the cable from the GWS line can have a length of up to 100 m.
But in practice, they often use a system up to 20 m long. What manufacturers have noticed is that they offer ready-made heating systems, both resistive and cable with a self-regulating matrix, 5, 10, 20 m long.
Conclusions and useful video on the topic
Detailed installation of the heating cable system inside the pipeline is discussed in the following video:
Features of various types of cables from manufacturers and recommendations for a future buyer:
Information about end insulation and detailed instructions on splicing with the supply wire in the following video:
If you choose good materials and follow the installation technology, you can independently install the heating cable inside the pipe and connect it. It is important to carefully perform each step, securely connect the wires and ensure tightness.
And the above expert advice and video instructions will help home craftsmen who have no experience in performing such work to understand the installation process in detail. If you doubt your own abilities, then it is easier to turn to an experienced master who is praised and recommended by friends and other grateful clients.
Please write comments in the block below, ask questions, post photos on the topic of the article. Tell us about how you installed a heating cable yourself or how someone you know installed their pipeline. It is possible that your information will be useful to site visitors.


We wintered for a year with a cable in Siberia - the flight was normal.The water was first turned on as a dacha water (for the summer season), the depth was 70 cm. Then they decided to stay at the dacha and began to “modify” everything. An internal cable is a great solution.
I just didn’t understand what was wrong with the matrix, and how does the service life of the wire depend on it? Is the number of on/off switches limited? Last year it was on from December to April. I wanted to start saving on this and only turn it on at night; during the day there is a lot of water flowing - it won’t freeze. Apparently you can't do that?
I have encountered water pipes freezing more than once. It is always a problem to determine the location of the ice plug. Then you need to heat the pipe with a hairdryer for quite a long time. Therefore, the thought of a heating cable comes every time. Plugged it in and the problem was solved. But in my opinion, such a system is needed precisely as an emergency system. It is somehow not economical to heat water constantly. At what temperature does the self-regulating cable operate? And at what time does it turn off?
Good afternoon. The self-regulating cable has no shutdown temperature. The standard temperature of a heating cable is 65ºС. In principle, at sub-zero temperatures it always tends to this value. At a temperature of -30º its power almost doubles for every meter. And at +10º and above, the power begins to decrease. Almost the same at +30º: the power per meter drops almost twice. But the cable always works.
Therefore, if you want to save money, you should always consider installing a thermostat that starts the cable at certain temperatures (usually +2/+5º) and turns it off when the required parameters are reached, for example +15º.
It is unprofitable to sit at home without water in winter or then change the pipeline due to the fact that it was simply torn apart due to icing. So, after such bleak prospects, the constant operation of the heating cable will not seem so expensive.
The heating cable does not have an activation or shutdown temperature, since it constantly operates in the same temperature regime. Of course, as the ambient temperature decreases, the power consumption will increase and vice versa.
When to turn the heating cable on or off depending on weather conditions, you decide for yourself. But it is better to do this as rarely as possible; constant operation is easier than frequent switching on and off modes.
Thank you, I understand)
What do you recommend for a bath? We use it once a week. In winter, the water freezes. For almost half a year we carry water in buckets from home. From the house to the bathhouse 5 meters. Any inexpensive heating cable is not afraid of freezing.
Is it possible to use a set of heating cables in a steel pipe with water for seasonal (spring, autumn) heating of greenhouse air? A pipe with water is used as a heating device, and the water in it will not be running. The air temperature in the greenhouse is controlled using a thermostat. This is only for periods with short-term night frosts. The main thing is that the air temperature in the greenhouse does not fall below 0 degrees during these periods. Is this solution possible in principle? If possible, to what temperature can the water pipe heat up?