How to make a drill for a well with your own hands: diagrams of the best homemade products
Do you want to install a water supply system on your property by drilling a well yourself? Agree that the presence of water supply and sewerage significantly increases the level of comfort when living in a private house or country house. But calling specialists to install a well or borehole will not be cheap.
Have you decided to make a drill for a well with your own hands and are looking for a simple homemade option? We will help you in this matter - the article contains useful information about the process of making a homemade spiral drill and a spoon drill.
A list of necessary tools and materials is provided, thematic photos and useful video recommendations for constructing a homemade drill are selected.
Our detailed instructions, equipped with step-by-step photos, will help even a beginner make a simple and uncomplicated drill.
The content of the article:
Drills for rotary hand drilling
For self-drilling a well Under water you will need a simple device. It includes a detachable pipe, which can be expanded as the depth of the structure increases, a handle, with the help of which rotation will be carried out, and a drill - the main element of the structure.
There are two types of drills that are widely used to perform rotary manual drilling of wells:
- spiral (auger) drill;
- spoon drill
Both of these tools have design features that allow drilling work to be performed without the use of additional equipment.
At its core, a twist drill is a very large drill. It cuts into the ground with its sharp carbide cutting edge, the edge of which is sharpened in the form of a cone.
Above, the cutting surface of the tool is twisted in a spiral along the rod. The largest diameter of this spiral determines such an important parameter as the size of the future well.

During the rotation process, the cutting edge digs into the soil and cuts it, after which it moves along the spiral strips and is pushed out with their help.
This creates additional emphasis in the direction of drilling. During the work of drilling a well, residual soil removed from the shaft accumulates between the turns of the auger. The auger drill must be periodically removed to the surface to be cleaned.
To make your own spiral drill, you can use a cylindrical rod to which a cutting spiral made of a steel strip is welded at the bottom. You can carry out excavation work with such a tool even on crumbling and hard soils.

The spoon drill includes a metal rod, the end of which is equipped with a cylinder of a certain diameter.This cylinder has a longitudinal or spiral slot in its lower part. The method of grasping soil served as the basis for the name of the drill with a spoon.
Relative to the axis of the metal rod, the spoon is shifted to the side by approximately 10-15 mm. Thanks to its displacement, this tool drills a hole whose diameter exceeds that of the spoon itself.
Increasing the diameter is necessary for installing casing pipes into the excavation, the diameter of which must be greater than the diameter of the drill.
When performing drilling operations using a spoon, the casing pipes should be installed at the same time. It is most effective to use such a tool on plastic soils - sandy loam and loam.
Option #1 - making a spiral drill
Making a drill yourself at home, the rod of which will be welded with a spiral, is not an easy task. But anyone who has the skills to work with a welding machine, grinder and other tools can build a simpler model.
Let's prepare everything we need for work in advance:
- welding machine;
- grinder (angle grinder);
- tape measure or other measuring device;
- steel rod of the length we need;
- steel disc.
We will carry out all stages of work in order. First you need to cut the steel disk into two identical semicircles. Now both parts of the freshly sawn blade need to be sharpened.
This part of the work would be well done by someone who knows how to sharpen tools, because the quality of sharpening will determine how easily the tool will enter the ground. This means the overall speed of work.

Theoretically, a spiral drill can be made using a steel spiral for this purpose. To do this, you need to take a strip of tool steel, heat it, and then twist it into a spiral with a pitch corresponding to the diameter.
The strip should then be hardened and finally welded to the rod. But it is almost impossible to perform such work efficiently outside of factory conditions.

Option #2 - assembling a spoon drill
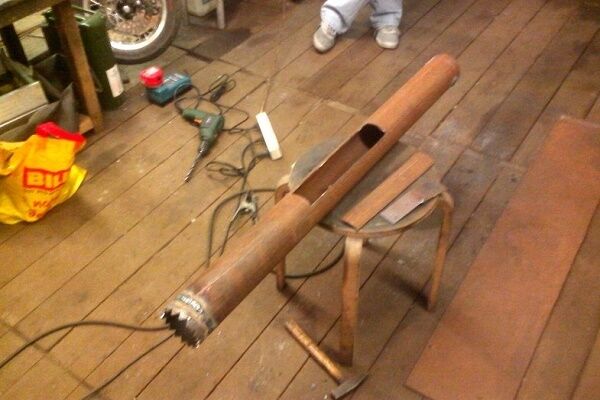
If the soil on your site is resistant to crumbling, then it is better to use a spoon drill to drill a well. It, as already mentioned, has the shape of a cylinder with a longitudinal slot in the side and a spiral-shaped catching spoon at the bottom.
The length of such a cylinder usually does not exceed 70 cm, and the diameter of the tool can be different: it depends on the parameters of the well that we want to obtain in the end.
The soil that the driller is to bring to the surface must penetrate the cylinder through the cavity and be held inside by adhesion and compression.
Before making a slot in the cylinder, you need to evaluate the quality of the soil on your site: the higher its flowability, the narrower the slot in the spoon will be.
You can make a drill spoon yourself in two ways:
- take sheet steel and twist it along a given diameter, giving the workpiece a cylindrical shape;
- use a piece of pipe that already initially has the shape we need.
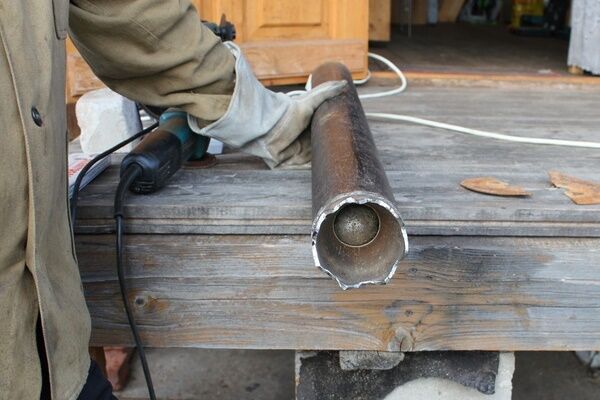
Using a ready-made steel pipe for work is, of course, much easier. To make a drill, you need a small piece of it. All that remains is to make cuts at its end, bend them and sharpen the edges. Instead of a pipe, you can use a used cylinder.
To complete the work we will need:
- hollow steel cylinder;
- Bulgarian;
- welding machine;
- steel rod or rod;
- metal drill.
Using a grinder, cut a slot in the bottom of the cylinder. To make it easier for the drill to penetrate the ground, you can weld a regular metal drill to the rod strictly along its axis.

The method with sheet steel is more labor-intensive. The steel blank will need to be welded along the seam, and the cutting edge sharpened so that it fits into the ground more easily. The drill must also be secured with a weld, placing it in the lower part of the cylinder.
If there is no suitable drill for metal, you can replace it with a narrow steel plate, having previously sharpened it on both sides. In this case, drilling efficiency will not be lost. The length of such a plate is approximately 15 cm.
The finished cylindrical spoon remains to be welded to a metal rod, which is shifted to the side by 10-15 mm from the axis line of the tool.
When operating the drill, this displacement will make it possible to make the well of a larger diameter. This occurs because the longitudinal cutting edge of the spoon drill scrapes soil from the side surfaces of the shaft.

Due to the fact that the diameter of the projectile is smaller than the diameter of the casing pipes, such a drill can easily be used inside the casing being constructed, which will greatly facilitate their installation procedure. The pipes themselves will protect the well from collapse.
The loads during operation of the spoon drill are very high, so high-strength tool steel must be used for its manufacture.The elements reinforcing the drill should ideally undergo heat treatment and hardening processes.
You may also find information about popular well drilling options, discussed in our other article.
Bringing the rotary drill into working condition
It is not enough to learn how to make a drill for a well yourself. It is necessary that the finished drill can be used to perform the work. To do this, it is necessary to equip it with a handle or handle, as well as a detachable drill pipe.
Making a comfortable handle
The handle is an important structural element. It is necessary so that the drill can be rotated comfortably. The design of the handle is also not as simple as it seems.
It can be envisaged that it will be operated by one person, but sometimes more people may be involved in drilling operations. The complexity of the process depends on the quality of the soil and the depth of the future well.

The handle is made of rolled metal, which has a decent margin of safety. After all, this part of the drill needs to withstand significant loads without springing or damping the applied forces. Welding is used to connect the handle and the upper edge of the split pipe.
Construction of a detachable drill pipe
The drill is a multifunctional tool. With its help, you can not only build a well, but also, for example, dig a pole. If you use it for gardening, you can do without a drill pipe. A one and a half meter base will be enough to dig shallow holes.
But we need a drill in order to drill a deep enough well with it.What to do in this case? There is no point in leaving the barbell in one section and simply lengthening it.
The length of the rod and the ability of the metal to resist torsional forces are inversely proportional. It will be impossible to work with a long single-section rod.

There is only one way out: you need to make a drill pipe that will consist of detachable sections. The length of one section, a detachable rod, should be 1 meter or a little more. There are so many such sections that need to be built in order to eventually reach the planned well depth.
You may also find the information on choosing a pipe for a well, set out in our article, useful: Which pipes are best for a well: types, which one to choose and why.
The length of the string of rods attached to the drill will be increased gradually as the drill moves deeper.
There are several options for connecting rods into a long drill rod, these are:
- Threaded coupling. To create such a connection, a thread is cut inside each section that will correspond to the dimensions of the connecting element. The threaded coupling is made to the required length. All we have to do is exclude the possibility of spontaneous unscrewing of the connection. For these purposes, a cotter pin clamp is used. This method is simple and reliable.
- Nut and bolt. Welded to rods made from small diameter pipes. This is a fairly simple, but not reliable option. You will have to weld on a thin-walled pipe, on which such a connection is unlikely to be strong.In addition, in order to fix such a threaded connection of the rods, additional efforts will have to be made.
- Welded couplings. Cut from a pipe whose diameter is larger than that of the rod. Then tightly weld the coupling to the pipe at one end of the section. Insert the next section freely into the same coupling on the other side. Now you need to secure the sections so that they do not rotate. To do this, you can insert a bolt across the pipe and secure it with a nut on the other side.
To make a drill for a deep well with your own hands, several rods are connected. Moreover, it is better if their connection is extremely simple. After all, during the drilling process, the tool will rise to the surface so that it is freed from the ground.
Each rise of the drill is accompanied by its division into its component parts, and each subsequent descent is accompanied by new assembly and extension.

In addition to the drill itself for creating a well manually They also use other tools, which are worth mentioning in this article.
For example, if the well is already ready, but pulling the tool to the surface of the earth is not so easy, you can use a lifting mechanism that works on the principle of a lever.

When the drilling procedure is delayed, and the drillers themselves lose strength, they would be greatly helped by devices that help turn the drill inside the well and screw it in as it deepens.
Drill for percussion-rope drilling
You can drill a well on a site not only by rotating the drill, but also by the percussion-rope method. This type of work requires a special installation, which can also be made independently from scrap materials.
Having such equipment, all work can be performed without any assistants at all, so we will also consider the process of making an impact drill.

To understand what and how we will make, let us consider in general terms the essence of shock-rope work.
A projectile pipe is dropped from a great height into the location of the future water intake point designated with a shovel or auger - well bailer. An eye for the cable is welded to the drill at the top.
A hole is cut in the top side to extract the drilled rock.
The lower edge is sharpened or equipped with teeth that optimize soil loosening. At 5 - 7 cm above the nominal bottom, a ball or petal valve is installed inside the pipe to capture and hold loose rock.
A bailer is an indispensable tool when digging through loose sand, pebbles, and gravel deposits. It is often used in combination with other drills. They alternate with an auger or glass, which is not capable of removing loose and water-saturated deposits.
Loose soil particles are retained inside the bailer thanks to a valve located at the bottom of the housing. The auger, bell, and glass do not have such advantages.

The procedure for dropping the drill is repeated many times. The result of the process is a body that is one-third filled with soil and a hole in the ground that increases by 30-40 cm.
The filled bailer is removed from the barrel using a winch, turned upside down with the hole and cleaned with blows of a heavy hammer.
Then the process of percussion-rope drilling is resumed and repeated until a well of the depth that was planned to be obtained is formed at the site where the drill fell.
It is not necessary to buy a ready-made installation - you can make your own bailer for drilling and cleaning.

In this case, there is no point in creating one drill, so we will tell you how to build the entire drilling rig along with the projectile.
- Choosing a place, where, according to our calculations and assumptions, the well should be located. We mark it out by making a small depression using a regular shovel.
- Install a tripod over the hole 2-3 meters high. We equip the top of the tripod with a well-fixed block for the rope. You will also need a winch, which we attach to the supports. It's good if you have an electric winch, but a manual one will also work.
- Preparing the impact drill itself. For this purpose, we will need a thick-walled pipe, the diameter of which corresponds to the size of the shaft of the future well.
To make a drill, we take a strip of thick metal and weld it to the upper end of the pipe, placing it perpendicular to the longitudinal axis of the projectile.
Along the center line of our pipe, in a welded metal strip, we drill a hole corresponding to the thickness of the rope on which the projectile will be attached.
The lower end of the pipe also needs processing: you can make a serrated or ring sharpening on it. If you have a muffle furnace, you can harden the drill in it after the sharpening procedure.
The drill for percussion-rope drilling is not so easy to clean from the soil that has accumulated in it. To speed up this routine operation, you can make not a window-hole, but a vertical slot passing through almost 2/3 at the top of the pipe.

The heavier the drill, the faster you can achieve the desired result, but it is also necessary to take into account the power of the winch, which will have to pull the drill with soil from the wellbore.
So, if its power still allows, the projectile can be made heavier by placing removable metal weights in the upper part of the pipe.
You may also be interested in information on well development, flushing after drilling And insulation for the winter, discussed in our other article.
Conclusions and useful video on the topic
This video clearly and clearly explains how to make a reliable and functional spiral drill using available materials and easy-to-use tools.
Obviously, a person who has skills in working with a welding machine and the most common plumbing tools will be able to make a drill with his own hands.
Using a homemade projectile, you can manually perform drilling work on your summer cottage. Which will significantly reduce the total costs that were planned for providing water to your territory.
Have you made a homemade drill of a different design? Or do you know the secrets of improving the projectile? Perhaps you do not agree with the theory and recommendations outlined in our article? Please write about it in the comments below.


I've been working with this setup for many years. Everything is very compact and quite completely collected in one place.
I wouldn't choose between an auger drill and a spoon drill. If possible, you should have both. Under different conditions, penetrations will come in handy. Well, I made the three-legged frame wooden. Still, a couple of logs are easier to find in any holiday village, and the material is quite structurally resistant!
Just maybe you can tell me what kind of drill I need or not to start
Strictly speaking, this auger drill is actually good, but it is quite inconvenient to use it in sandy, crushed soils, gravel and pebbles. It is difficult to lift drilled, non-cohesive rock to the surface. I can tell from myself how much I suffered when drilling holes for the racks. The depth is only 50 cm, but considering that I needed to drill 23 holes, it all took me up to 17 hours.
But this is due to the fact that there was a lot of crushed stone and pebbles. Drilling in clayey soils is much easier and simpler.
I need a drill for underground rock, what would you recommend?
that's how you say it for clay and what to do with the rock what kind of drill is needed how much I looked everywhere like bread and butter and I mostly have limestone and crushed stone with sand how much time do I need to drill up to 7 meters and which drill is not self-made here will go
He holds the angle grinder incorrectly, and even without a casing...
The Bulgarian does not forgive mistakes!
whether it’s correct or not is his problem, it’s better to answer than to drill such rock or all this fitness is only in black soil