Do-it-yourself ventilation in an apartment: an overview of the nuances of arranging a ventilation system
Regardless of whether the ventilation in the apartment is done with your own hands or with the help of specialists, it should help create a healthy microclimate in the room.
You can independently calculate the required volumes of air exchange and perform most of the work, which will lead to significant cost savings. We will look at how to do this in detail in this article.
We will also analyze the nuances of arranging a hood and organizing the flow of fresh air.
The content of the article:
Regulatory requirements for apartment ventilation
Since air exchange directly affects the quality of life, scientific research was carried out to determine its optimal parameters, the results of which are reflected in regulations.
The main document regulating the rules for organizing ventilation of residential premises is SP 54.13330.2016 “Residential multi-apartment buildings”, updated edition SNiP 01/31/2003.
Rules for calculating the minimum volume of air exchange
The minimum air volume for various types of premises can be calculated using the data in Table 9.1. SP 54.13330.2016.
When calculating, you cannot simply sum up the resulting numbers.For living rooms, air exchange means the flow of air from outside and its outflow into the kitchen, bathroom, etc., and for technical rooms - the influx from living rooms and its release outside the apartment.
Therefore, it is necessary to separately calculate the required volumes of inflow and exhaust in order to obtain the maximum value of these two quantities as a result.
There is one caveat here. The designer of an apartment building is required to calculate the inflow value to calculate the heat balance, and the exhaust value to calculate the parameters of the ventilation units.
Residents of apartments have the right, at their discretion, to implement ventilation with a lower capacity, which is what happens in the vast majority of cases.
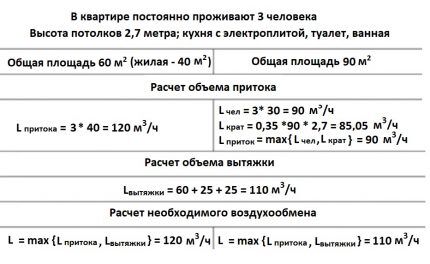
It is possible to independently determine the volume of air exchange with good accuracy only when using forced ventilation.
We reviewed a detailed calculation of ventilation with formulas and real calculation examples for specific premises in another article.
With natural air circulation, it is necessary to pay attention to the following indicators:
- excess moisture in the air (can be measured using a hygrometer) - is expressed in the appearance of fungus on the walls and ceiling, as well as fogging of window glass in the winter;
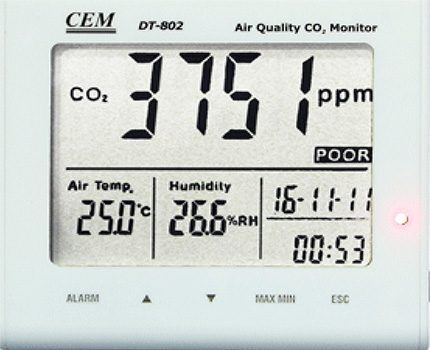
- lack of oxygen or excess carbon dioxide (can be measured using a gas analyzer) - is expressed in difficulty breathing for all people who are in the apartment.
If such effects can be observed throughout the apartment, this means a lack of general supply or exhaust ventilation.If they occur in separate rooms, then this indicates local air exchange problems associated with the formation of zones of air stagnation.
How to ensure air circulation?
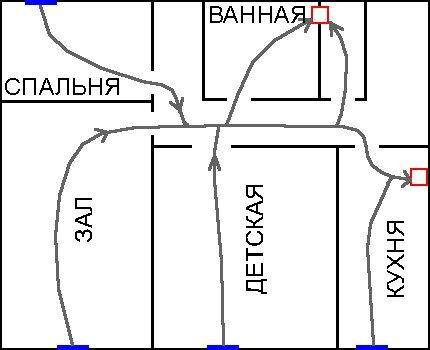
According to clauses 9.6 and 9.7 SP 54.13330.2016 The influx of outside air must be ensured in living rooms and the kitchen, and removal - from kitchens, bathrooms and restrooms.
At the same time, it is unacceptable for air to enter other parts of the apartment from technical rooms. It must be ducted directly into the ventilation shaft.
Thus, it is quite easy to draw up a diagram of air movement depending on the layout of the apartment, when its intake from the outside will take place in rooms with windows, and the outflow will occur at the exit points of the ventilation shafts.
The movement of air between the rooms of the apartment should also occur with the doors tightly closed.
To do this, you can do the following:
- installation of special ventilation holes, which are ordinary holes in the door, closed with special decorative elements;
- using a door frame without a threshold, which allows you to leave a 5-10 mm high gap between the floor and the closed door;
- owners of domestic cats are often forced to install holes in interior doors, which also serve as ventilation holes.
The procedure for organizing ventilation in doors made of solid wood, chipboard or MDF is quite simple. To do this, you need to use a drill or jigsaw to cut holes into which special rings will be placed on glue.
Or you can make one window and cover it with a decorative grille, which must be attached to the door with self-tapping screws.
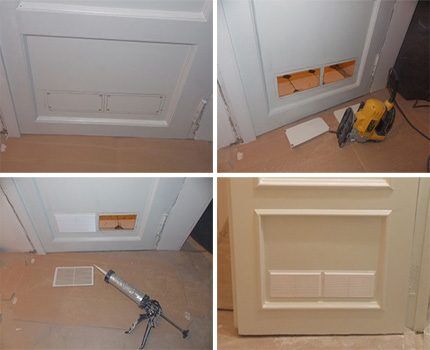
Cutting ventilation holes in a plastic or even glass door yourself is quite difficult. This requires skill and a special tool, otherwise there is a high risk of damage to the door, as well as possible serious injury.
Creating conditions for the hood to work
If air exchange is poor, it is impossible to create a positive microclimate in the room. Therefore, in any house there are special ventilation shafts for the outflow of air from the apartments to the outside.
Most of the work related to ensuring the proper functioning of exhaust ventilation can be done independently without the involvement of specialists.
Checking the functionality of the ventilation shaft
The influx of fresh air into the apartment can occur in different places, and removal - through one or two openings leading into ventilation shafts. Therefore, the strength of the flow through them is the easiest way to judge the intensity of air exchange.
To do this, you need to attach a sheet of plain paper to the ventilation grille, completely covering it.
With normal air flow, the paper will stick to the exhaust vent. Otherwise, we can state the fact that there is no normal air exchange in the apartment.
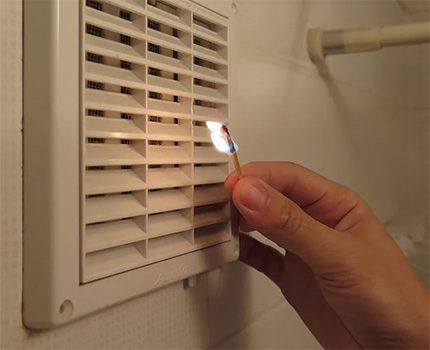
To find out the main cause of poor draft, open the window or entrance door closest to the hole and again attach the sheet to the grille.
In this case, there are two options:
- if the paper “sticks” to the grille, this means insufficient air flow with the windows closed;
- if the flow remains so weak that it is unable to hold the paper, then the problem is in the ventilation shaft or in the branch that leads to it.
If a lack of air exchange occurs due to problems with the ventilation shaft, then you need to contact the management organization responsible for the apartment building.
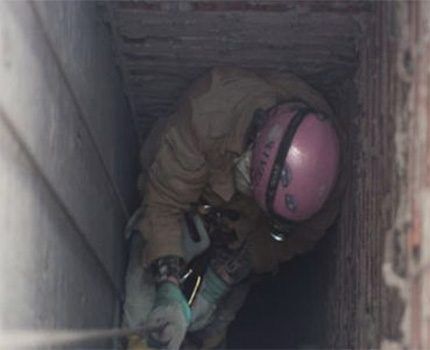
Despite the fact that there is a lot of advice on the Internet on how to clean the mine yourself, there is no need to do this for the following reasons:
- there is a lot of dust, mold and harmful microorganisms in a contaminated mine, so cleaning work is carried out in special equipment;
- even if it is possible to detect a blockage, it will be impossible to clear it with a household hair dryer or vacuum cleaner, and if you try to break through the obstacle, you can damage the shaft box;
- the mine may be inhabited by rats, spiders, wasps and other living organisms, a conflict with which can bring trouble to a person;
- unauthorized change in the configuration of a mine (for example, expansion or removal of an exit) is an administrative offense.
The management organization is obliged to monitor the condition of ventilation and immediately eliminate any problems that arise. The mine is community property, so all work must be carried out at the expense of common funds.
On our website there are other articles with detailed instructions on checking ventilation in an apartment and reviews of ways to fix the problem:
- How to check ventilation in an apartment: rules for checking ventilation ducts
- Ventilation cleaning: cleaning ventilation ducts in an apartment building
- Restoring ventilation: reasons for decreased efficiency and restoration of air ducts
Arrangement of exhaust openings
The openings leading to the ventilation shaft are covered with special plastic grilles, which have decorative and functional purposes.Typically, dowels are inserted at the installation site and then the structure is secured with self-tapping screws.
When tiling a wall, you can glue a lightweight grille using silicone sealant, minimizing the risk of damage to the tile.
If the air outflow rate during natural circulation is insufficient, purchase and install a grille with a built-in blade (axial) type fan. Installation of such a device on the wall must be done only using self-tapping screws.
When purchasing a fan, you should pay attention to the power, noise level and compliance with the cross-section of the exhaust duct.
If the ventilation hole will be tiled, it is better to run the power wire in advance, even if there are no plans for installing a fan. Otherwise, you will then have to install the power cable externally, which will negatively affect the design of the room.
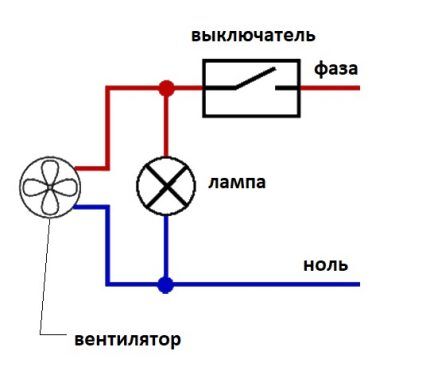
Since there is no need for constant operation of the fan, a separate switch is installed for it. For bathrooms, a popular scheme for connecting a fan to the network is when it turns on together with the lamp.
There are also more complex options, when the switching occurs according to a timer or according to the readings of humidity sensors.
We recommend that you read the step-by-step instructions connecting the fan to the switch.
Any opening leading into a ventilation shaft must be fitted with check valve. It protects the room from changing the direction of the air flow and the entry of air from the shaft, which often does not meet sanitary and hygienic standards.
Reversal of flow can occur for the following reasons:
- gradual decrease in the live cross-section of the mine channel as a result of clogging;
- a sharp decrease in the open cross-section of the mine channel as a result of the entry of a foreign object;
- increasing air flow from neighboring apartments.
The check valve can be installed separately, but it is easier to purchase it complete with a fan and grille.
Organization of fresh air supply
The latest house-building technologies, as well as the active use of plastic windows, reliably protect modern housing from freezing and drafts. At the same time, the problem of lack of fresh air arises, the supply of which is necessary to create a favorable microclimate.
You can do fresh air ventilation in your apartment either independently or order a ready-made solution from specialists.
Reduced tightness of window units
In old houses, air enters the rooms mainly through cracks in the window frames. Therefore, one of the most common ways to create sufficient supply ventilation is to organize the passage of air through the elements of plastic windows and balcony doors.
For windows, the best solution is to install supply ventilation valve when installing a window block.
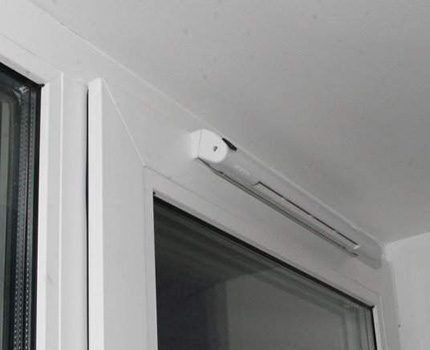
Installation of the supply valve is discussed at the order stage. If the window is already installed, then you can install the air passage device yourself, however, this procedure is quite labor-intensive and specific, which is why it is better to entrust it to professionals.
There are also several methods for reducing the tightness of a window based on partial removal of the seal:
- Make part of the seal removable so that in strong winds you can put it back.
- In the lower part from the outside of the window and in the upper part from the inside, remove small fragments of the seal (5-7 cm long). This will allow air to penetrate between the frame and the window frame, heat up and escape into the room.
However, these are extreme measures: they cannot be used often in winter due to the formation of condensation, its freezing with the formation of ice and failure of the mechanism for fixing the window position.
Installation of wall-mounted supply ventilation
From the standpoint of ventilation efficiency and ease of self-installation, the best solution is to install a wall supply valve. This device allows you to regulate the rate at which outside air enters the room.
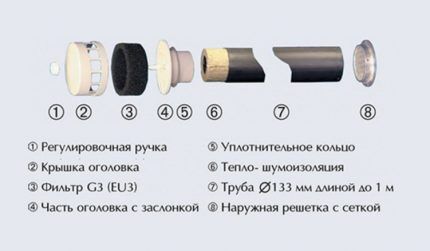
The procedure for installing a wall valve is as follows:
- It is necessary to drill a hole in the wall with a slight slope outward. For brick walls, an ordinary drill is suitable, but for panel houses you will have to use a diamond drilling procedure. In this case, it is advisable to use a vacuum cleaner with a water collection ring.
- Insert the air duct and properly insulate it, otherwise the valve may freeze. Mineral wool and polyurethane foam can be used as materials.
- Attach the valve body, mark the mounting points, drill holes and insert dowels. After putting the case on, screw it to the wall.
Finally, install the outer grille. Safety precautions must be observed here.
We also recommend that you read our other article containing a step-by-step process installing a ventilation valve into the wall.
When choosing a valve installation location, the following points must be considered:
- ease and safety of installation of external grilles for apartments not located on the ground floor;
- correct placement of the internal valve head from the point of view of room design;
- possibility of heating incoming air from stationary heating devices.
Therefore, the most popular location for installing the valve is the space between the window and the radiator.
For more intensive air supply, valves with built-in fans are used. However, they require an electrical supply and produce some noise, especially audible at night.
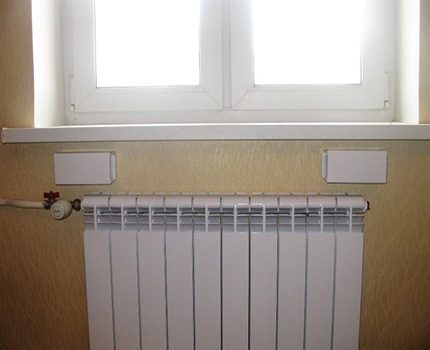
In addition to the supply valve equipped with a fan, you can connect a humidifier and heater to maintain a favorable microclimate in a residential area.
However, they must be correctly integrated into the design of the room, since the entire structure will take up much more space than the head of an ordinary device.
Installation of duct air exchange systems
When installing duct ventilation systems or kitchen hoods, special boxes or flexible corrugated pipes are used.
They are also needed to move air from technical rooms to a remote entrance to the ventilation shaft. You can carry out the installation work of such an air duct on your own.
Basic rules for duct design
For apartments there is no need to use metal ventilation ducts designed to pass air flow at high speeds and to operate at sub-zero temperatures. Plastic boxes are easy to install and easily fit into the design of any room.
You can find many offers plastic air ducts for ventilation, differing in color, cross-sectional area, shape, method of connecting sections and method of fastening to walls and ceilings.
The presence of a large number of shaped elements allows you to create a ventilation duct of any geometry. The choice between a round and rectangular cross-sectional shape is not fundamental from a technical point of view.
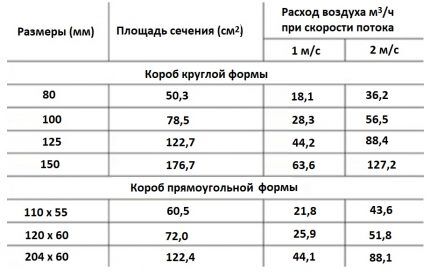
The cross-sectional area should be selected so that the flow velocity does not exceed 2 m/s. Otherwise, noise will occur in the channel, and an increase in resistance will lead to rapid wear of the equipment.
When designing duct geometry, it is desirable to minimize the number of turns, narrowings and transitions that increase aerodynamic resistance to flow, generate noise and accumulate grease and dust deposits.
Features of installation of plastic boxes
The plastic parts of the ventilation duct are lightweight, so they do not require any special actions during fastening.
Depending on their location, installation proceeds as follows:
- Inside the cabinets, the elements are secured to the cabinet walls using clamps. Foam or foam inserts are introduced into places where they pass through walls and partitions to prevent rattling during system operation.
- Above the cabinets, the elements are secured using any holders and screws.
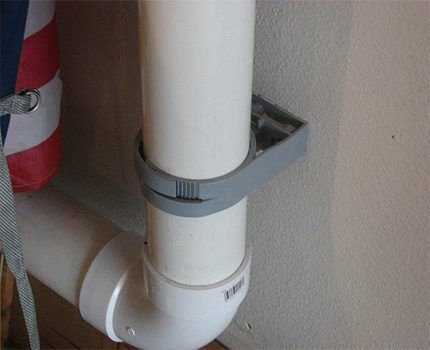
- The structure is fixed to the wall and ceiling using special clamps, which can be purchased for any channel size. The distance between fasteners should be no more than 1 meter.
Immediately after installing the ventilation duct, which will subsequently be hidden behind a suspended or suspended ceiling, it is necessary to check its operation at the maximum possible air flow power. Detected problems are easier to fix immediately while access to the system is not difficult.
By coating the joints of the elements with silicone sealant, you can obtain an additional guarantee of the tightness of the structural joints.
For these purposes, there is no need to use glue or “liquid nails”-type compounds, since in the future it will be almost impossible to disassemble the system for maintenance or change its configuration.
If depressurization does occur, and to eliminate it there is no way to disassemble the air duct, then in this case it is necessary to wrap the problematic joint with self-adhesive tape to match the color of the shaped elements.
Conclusions and useful video on the topic
All stages of installing a simple wall-mounted supply valve:
Procedure for providing ventilation through interior doors:
Combining natural and forced ventilation using a tee and check valve:
Checking the quality of air exchange in the apartment and most of the work related to ensuring normal air circulation can be done on your own. However, to install complex equipment or perform work associated with risk, it is better to invite specialists.
Are you involved in the arrangement of ventilation systems and are well versed in the topic? Perhaps you noticed an inaccuracy or error in the material reviewed? Please write to us about this in the comments.
Or are you having difficulty setting up your ventilation system and want to clarify certain points? Ask our engineer for advice - we will try to help you.


The reason for very poor ventilation in apartments is, oddly enough, the presence of good windows and doors. Modern windows and doors are sealed, which is why they do not let air in from the street. As a result, dampness appears, followed by mold. This phenomenon did not occur in old houses with loose fitting of the sashes to the frames, which was sufficient for ventilation to work.
You can use window valves, but they must be mounted above the windows under which the radiators are located, or above the radiators themselves, so that warm air mixes with cold air, and there is no ice or draft. The only caveat is that the supply valve cannot be installed where the hood itself is located, otherwise the air from the street will go directly into the ventilation, without ensuring air circulation throughout the apartment or house.
I tested the hood with a piece of paper. Alas, the picture turned out to be disappointing: when the windows are closed, the leaf hardly sways, that is, there is no air flow, everything is closed too tightly. I'm thinking of installing grilles with fans on the ventilation outlets. It's inexpensive and you can do it yourself. In the meantime, I ventilate the apartment every two hours.
Dmitry, in your case, as you write, there is no air flow when the windows are closed. If, when the window is open, a leaf sticks to the ventilation outlet, then fans are needed for the ventilation. there are no exits (i.e. the ventilation ducts are working). It is necessary to organize the inflow using supply valves or more functional devices - breathers.
Good afternoon. My problem is that one of the rooms in my apartment is deaf. But it has a plastic window. And the climate in this room is bad. Air stagnation. What should I do?
Good afternoon, Evgeniy. It’s not entirely clear what exactly a “dead room” means in your understanding if it has a window. There are several possible solutions:
1. Install the supply valve on the window. Details about valves are described in this article. I can assume that by saying “deaf” it was meant that there was no sash in the metal-plastic window. In this case, contact a window company in your city with a request to install a sash in a blind window. Installing the sash does not require dismantling the entire structure. The renovation of the apartment will not be affected in any way.
2. Supply ventilation valve into the wall. Details of the arrangement can be found in this article.
3. Buy an air conditioner. Here Here We recently updated the rating of the best models for every taste and budget. I recommend checking it out.
I am sure one of the proposed options will solve your problem.
Good evening, what to do in this situation - the hood in the toilet and bathroom do not work at all, even with the windows open. We contacted the housing office - they came and cleaned it several times... and in the end it still doesn’t work. Please tell me what to do?
Hello. If the housing office specialists did not identify the problem, then they did not identify it well. If I were you, I would have to file a complaint with the department. We strongly discourage you from intruding into the general building ventilation system on your own. The reason for a poorly functioning hood may be neighbors or a poorly designed system from the beginning.
The former dormitory building was converted into apartments, but ventilation issues were overlooked. From your article I understood everything about the inflow.What about the hood? Is it possible to extend the air duct from the bathroom (which is located near the inner wall) in the ceiling structure to the outer wall - it turns out through the children's room - and what happens there? Fan? And if it is not turned on, will cold air flow into the nursery? And should the air duct be laid strictly horizontally or with a slope?
Thank you in advance.
Inna, hello. What does “overlooked ventilation issues” mean? In general, it is not advisable to deal with such issues in an apartment on your own. You should contact the Criminal Code, this is entirely within their department.
We bought an apartment that resulted from the reconstruction of a former dormitory building. I don’t know who was involved in the reconstruction and for what project. But the fact is that there is not a single ventilation duct in the apartment. The building is brick. Load-bearing walls are longitudinal. Across a partition 120 mm thick (brick). You understand, there is nothing to breathe in such an apartment. What do you advise?
First of all, in order not to waste money, you need to submit an application to the management company on whose balance sheet the hostel is located (or is it now a residential building?). Submit an application or claim for the lack of ventilation ducts in the apartment. In general, this is a violation and contacting the appropriate authorities can also speed up the process.
If you do everything yourself, then there are several options and both are expensive, plus a lot of bureaucracy:
1. Make individual ventilation with separate exits, again everything needs to be coordinated.
2. Connect to existing channels using plastic or metal boxes.
As a temporary solution, I can recommend installing supply valves on the windows in the apartment.
I beg you, help, 54 sq.m. in an apartment with 5 children and 2 adults - we can’t breathe!!! We all walk around wet. Fungus in the bathroom, kitchen, room 17 sq.m. Children suffer from otitis media, sinusitis, and have no strength anymore. Advise a smart, kind person who will come, we will do everything so that my children do not suffer!!! And of course, the payment is not exorbitant sums. 916 9874767 Julia I beg and wait.
Hello Julia, our daughter had the same problem when I came to them and immediately gasped. They bought an apartment recently, the apartment is on the end... There was mold everywhere, as I saw...... the children were constantly sick... until they found a way out... they washed off all the mold and we bought a dehumidifier...and installed it in each room for a day....the dehumidifier was pulling liters of water out of the walls...we were shocked...the children immediately stopped getting sick...the humidity in the house disappeared...noooo, we'll do ventilation in the summer, it doesn't work at all for us, but for now I advise you to do this...buy a dehumidifier....
Please tell me. The house is old, we live on the 1st floor. Along one wall there is a storage room, behind it is a toilet, behind the toilet is a bathtub, behind the bathroom is a kitchen. There is ventilation only in the kitchen. This is how the house was originally built. How to ventilate the toilet and bathroom so that everything in the kitchen works.
GOST 30494–2011 contains air quality parameters based on the amount of CO2. It is best used to test air quality. In my experience, window valves are not enough to maintain acceptable CO2 levels when there are several people in an apartment, especially if the apartment is on the top floors.
good evening, please tell me, is it possible to install fresh air ventilation on the first floor of a nine-story building? and if it is possible to establish, then which companies in this profile in Moscow have proven themselves well?
Good afternoon. While everything is more or less clear about the air inflow, there is very little information about the outflow. If standard ventilation in the kitchen and bathroom does not cope with the outflow of air, then how else can it be organized? I installed a fresh air ventilation system, but in the absence of normal air outflow it is not very effective. Maybe there are compact and inexpensive systems for air outflow? Some valves, for example. Wall or window or something else?