Supply ventilation valve to the wall: design features
In an effort to protect the house from cold, noise, dust and other negative external influences, people seal building structures.Along with the improvement of insulation characteristics, the quality of ventilation decreases - the supply of clean air is reduced.
The problem can be solved in different ways. One of the most accessible and effective methods is to install a supply valve in the wall, ensuring the necessary flow of fresh air. In this material we will talk about the need to install this device, weigh the pros and cons, and also reveal the secrets of installing a wall supply valve.
The content of the article:
The need to install a ventilation valve
The main function of the supply ventilation valve is to ensure the flow of fresh air into the apartment or house.
A wall ventilator normalizes the microclimate of the room when natural ventilation does not cope with its task.
With the massive replacement of wooden window blocks with PVC products, natural ventilation has lost its effectiveness - the flow of air from outside has been significantly reduced due to the tightness of modern structures. The speed of circulation of air flows in a confined space tends to zero, which has an extremely negative effect on the quality of the microclimate.

If you do not take measures to improve ventilation, then over time minor troubles can cause more serious consequences:
- The concentration of carbon dioxide increases, which has a bad effect on human well-being. Fatigue, drowsiness, headache, decreased performance are the result of a lack of oxygen.
- High humidity and lack of air circulation are an excellent environment for the development of pathogens. Mold spores can cause allergic reactions or provoke bronchial asthma. At risk are young children and people with reduced immunity.
- Exhaust ventilation does not work effectively when the air flow is low - unpleasant odors, dirt, and harmful substances are not removed naturally.
- In conditions of constant high humidity, the structural elements of the building wear out faster.
Operating a window in ventilation mode can solve the problems listed above, but at the same time, the main advantages of “plastic” glazing are negated: heat and sound insulation.
We also recommend reading material about other ways of arrangement supply ventilation.

Design and operating principle
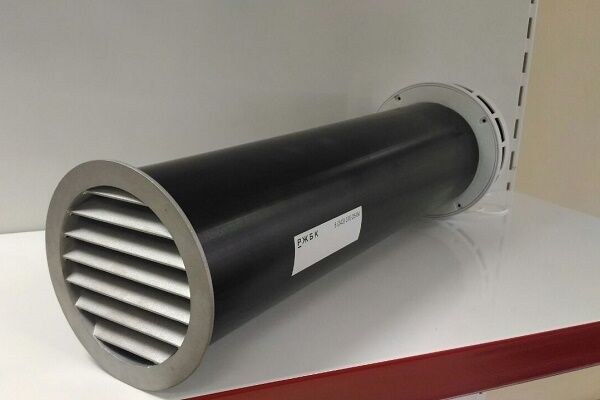
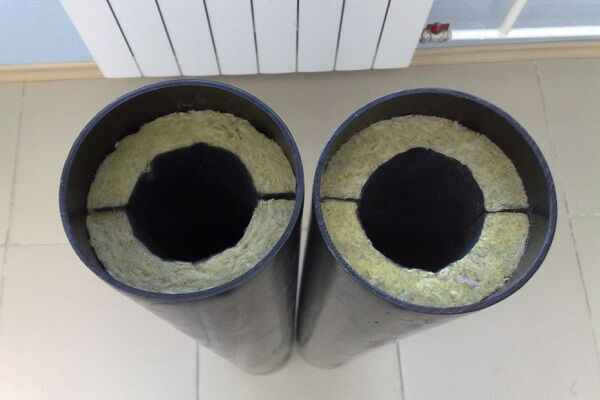
The design of the fresh air ventilation valve is quite primitive. The device consists of a cylindrical body, the diameter of which is 6-14 cm. Inside the valve there is heat and sound insulation, as well as a filter.

Individual elements of a typical valve design perform the following functions:
- Air duct. Through the pipe, air masses enter the room from outside. The diameter of the air duct largely determines the performance of the supply valve. As a rule, this element is made of plastic.
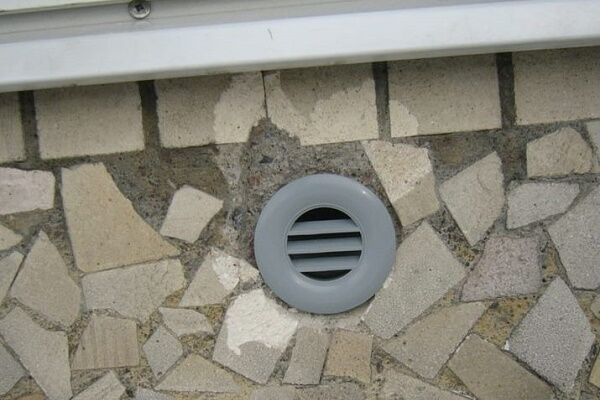
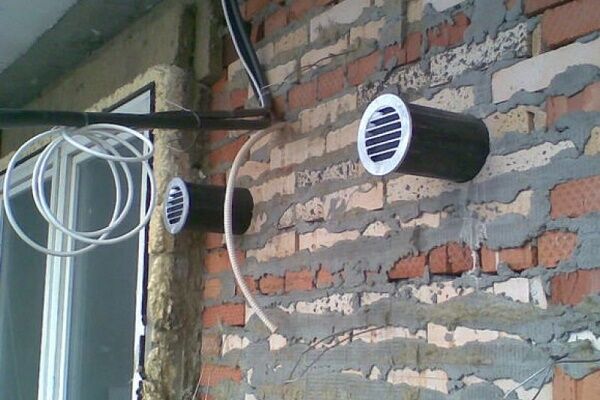
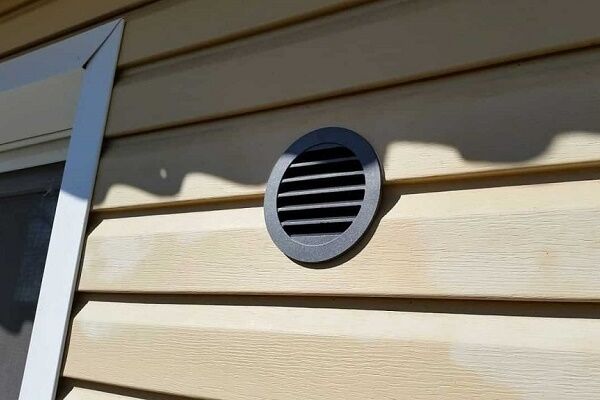
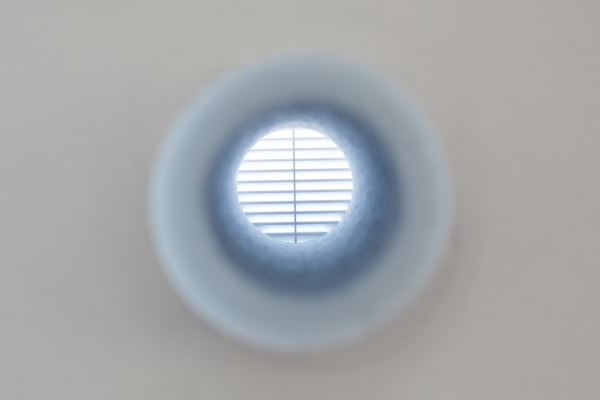
- Ventilation grille. It is placed on the outside of the wall and is intended to protect the internal elements of the device from small animals, precipitation and debris. The optimal manufacturing material is aluminum. Some models have an anti-mosquito insert made of polymer threads.
- Heat and noise insulating insert. Passes through the entire air duct and protects the wall from freezing, reducing street noise.
- Filter element. Cleans the incoming air from dust.
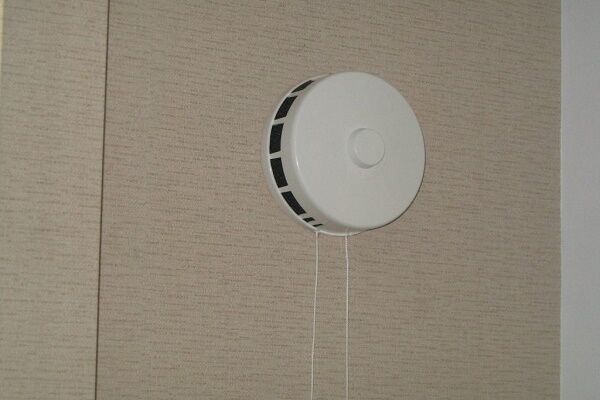
- Decorative cover. Installed on the inside of the wall. The plastic head is equipped with a handle for adjusting the air flow.
Many manufacturers equip the valve with an O-ring with a flapper. Both parts are placed on the inside of the wall and restrain gusts of wind.

The system operates on a simple principle. The air, passing through the grille and filter, is cleaned, moves along a heat-and-sound-insulating channel and warms up a little. In the limited space of the pipe, the air flow speed decreases, it enters the adjustable damper, and then through the technological openings into the room.
Ventilation can be carried out continuously with the windows closed.In this case, the room will not be cooled. If the room has plastic windows, then it may be worth considering the option of installing a supply valve on the window.
However, for normal air circulation the following conditions must be met:
- presence of a working hood;
- movement of air masses even with closed doors indoors - it is necessary to provide a gap between the floor and the door of 1.5 cm or install ventilation grilles.
The operation of the hood can be checked experimentally. Open the window and bring thin paper to the grille. With good draft, the sheet will be attracted to the ventilation duct.

Points for and against"
A wall supply valve, like any other device, has undoubted advantages and disadvantages.
Arguments in favor of the ventilator:
- The frequency of window opening/closing is reduced. This extends the service life of window fittings and saves time.
- The power of ventilation valves installed in the wall exceeds the capacity of window inlets and can reach 60-70 cubic meters per hour.
- The device partially removes pollution and filters street air.
- The ability to regulate air flow based on the season and the needs of a particular home.
- The device has compact dimensions - the inner box is almost invisible on the wall, it can be hidden behind a curtain.
- Compared to conventional ventilation through a window, the operation of a wall valve is not accompanied by heat loss.
- The supply device increases the efficiency of the exhaust - moist exhaust air is removed faster.
The system operates autonomously - the valve operates due to pressure differences outside and indoors.

Negative aspects of using air supply equipment:
- the need to make a through hole in the wall - the integrity of the structure is somehow compromised;
- non-compliance with installation technology can result in freezing of the wall or air duct;
- in severe frosts, forced ventilation can lead to a decrease in the temperature inside the room.
Some people refuse to install a wall valve due to the need to drill into the structure. The work requires certain skills from the performer. To ensure effective ventilation, the device filter should be regularly cleaned of accumulated debris.
Parameters for choosing a built-in ventilator
Before buying a supply valve, you need to compare the main parameters of different models:
- device performance;
- permissible operating temperature;
- length and diameter of the air duct;
- control method;
- sound insulation level;
- manufacturer company.
Supply power. On average, wall valves produce a volume of fresh air of up to 40 cubic meters per hour. When determining optimal performance, it is worth considering the volume of the room, its purpose and the number of people living.

Operating temperature. Manufacturers indicate the operating temperature range. The choice of model depends on the climatic conditions of a particular region.If a ventilation valve for a “warm” area is used in frosty winter conditions, then condensation may constantly form on it. The frozen liquid forms an ice plug, and the operation of the supply channel is blocked.
Air duct dimensions. The length of the pipe is selected based on the width of the wall. The diameter of the channel determines the throughput of the valve - the larger it is, the more productive the device. When choosing the size and shape of the air duct, you need to focus on the installation location of the “inlet”.

Control method. There are manual and automated models on the market. The first ones are affordable, the ventilation intensity is controlled by a manual switch.
Automated devices are equipped with a hygrostat - a device that controls humidity level in room. The user independently sets the humidity level (40-60%) and if this value rises higher, the valve damper will open. After the humidity normalizes, the air supply from the street will stop.
Level of noise and thermal insulation. When installing a ventilation valve into a thick wall, it is highly desirable to have a sound-insulating insert. Basic thermal insulation is provided in all models, but for northern regions it is better to choose a device with an additional insulating casing.

Manufacturing company. The ventilation equipment market offers wall valves from foreign and domestic companies. The following brands and brands received positive feedback from consumers: Flakt Woods (Riv, Kiv125), Vents (PS100), Aereco (EHT, EFT), Helios (ZLE100, ZLA 80-160), Domvent, etc.

Supply and wall valve installation technology
The installation process of the device is quite simple, but specialized equipment is required for operation. It is important to choose the right installation location and follow the algorithm of actions.
Determining the optimal installation location
When choosing a room to install a wall “inlet”, you should be guided by the following rules:
- Installation is preferably carried out in a load-bearing wall.
- In an apartment building, it is better to install the valve with access from the outside to a balcony or loggia.
- It is not advisable to install supply ventilation on the wall of a building facing a highway or an industrial zone.
It is not recommended to use the wall valve in rooms with a high degree of humidity - in winter there is a high risk of the device freezing. As an option, you can use “supplies” with a heating function.
Having decided on the wall, you need to choose the optimal place to insert the valve.
The most successful areas are:
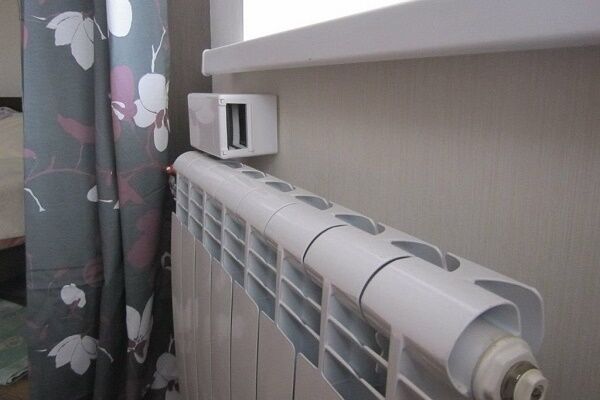
- between the window sill and the batteries – supply air is heated from the heating device and distributed throughout the house;
- at the top of the window opening (2-2.2 m) - air masses enter a warm environment, warm up to a comfortable temperature and fall down.
In both cases, the wall valve can be hidden behind the curtain.

Required tools and materials
To install the supply valve into the wall you will need:
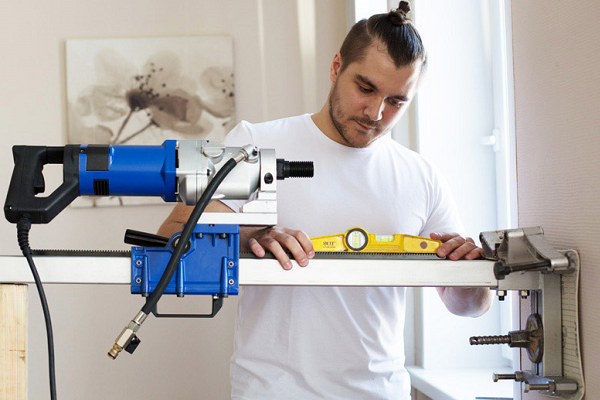
- a stationary drill or a powerful hammer drill with a diamond bit, the diameter of which should be slightly larger than the size of the air duct;
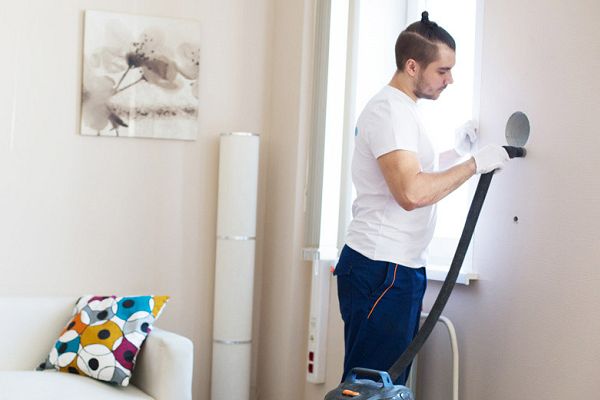
- an industrial or household vacuum cleaner - especially important if installation is carried out in a “clean” area where repairs have already been completed;
- polyurethane foam;
- plaster mixture;
- construction knife;
- curly screwdriver;
- Marking tools: measuring tape, building level, pencil.
Ventilator installation is a dusty and noisy job. Therefore, it is necessary to use personal protective equipment: gloves, goggles, construction headphones and a respirator with a dust filter.
To install a ventilation valve with a breather, a device for cleaning and heating the air mass, you will need a diamond drilling installation, because a conventional drill will not be able to drill a hole of sufficient diameter:
Sequence of work
The entire technological process can be divided into several main stages.
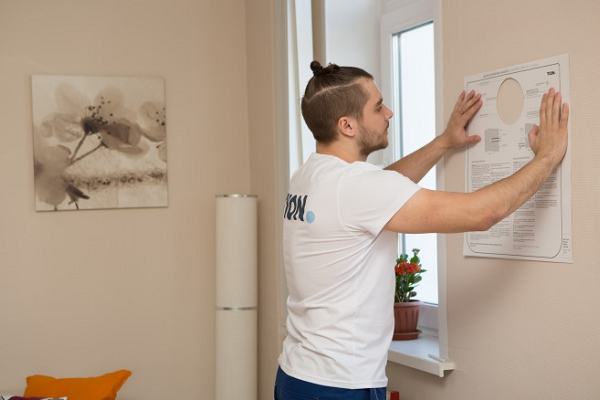
Stage 1. Preparing the wall. If the building is lined with curtain panels, they must be temporarily dismantled. On the inside of the wall, apply markings for drilling - attach the base of the valve and mark the outline with a pencil. It is advisable to organize dust removal.

Stage 2. Drilling a hole. Using a diamond bit or drill, perform initial drilling to a depth of 7-10 cm. Remove broken fragments of concrete, and use a chisel to knock out a notch in the center for more stable positioning of the drill. The entire channel must be made with a slight slope outward to prevent moisture from entering the room.

Stage 3. Channel cleaning. Insert a vacuum cleaner hose into the cut groove and remove all dust from the hole.
Stage 4. Installation of thermal insulation. To accommodate an additional layer of thermal and sound insulation, the hole may need to be widened. The exact dimensions of the channel depend on the type of insulation.

Stage 5. Installation of the sleeve.Place the air duct tube into the channel with the heat-insulating casing, pushing it outward with a screwing motion.
Stage 6. Installation of the housing and cover. Attach a protective grille to the outside of the wall. From the inside, apply markings for installing the housing, drill holes, hammer in plastic dowels and fix the panel to the wall.
We also have material that describes in more detail installation process supply wall valve.

Vent Valve Maintenance
The air supply device must be cleaned regularly. In a metropolitan area, it is necessary to clean the internal elements twice a year - dust, small particles of dirt and soot from automobile gases settle on the filter of the device.
It is better to clean the valve in warm, calm weather, so that cold air does not blow through the hole in the wall. It is necessary to remove the cover from the inside of the device, remove the filter element and sound insulation.

The air duct also needs cleaning - it must be vacuumed. If the air inlet is installed on the first or basement floor, then you can remove the protective grille from the street side and blow the debris out with a vacuum cleaner.
Conclusions and useful video on the topic
Video clip about the need for installation, design features and operating principle of the supply wall valve:
Step-by-step instructions for installing the Domvent ventilation duct:
To insert the “inlet” into the wall, you will have to cut the outer wall of the house.Despite all the labor intensity, the task at hand is technically simple. Having a drilling tool available, the owner of an apartment or house will be able to install the valve himself.
If, while reading the material, you have questions about installing a wall supply valve, or have valuable information on the topic of the article, please share it with our readers. This can be done by leaving a comment at the bottom of the article.


In the Karelian city, I noticed a rather old house; it attracts attention because small holes with bars are visible in the outer walls along the entire facade. Well done to the designers: they included these valves in the design of the house so that they look like decoration of the facade. It’s a pity that we don’t have a law requiring that houses with gas stoves and water heaters be built with such valves.
It’s a pity that we don’t have a law preventing houses from being built with gas stoves and water heaters.
Calcium silicate 1000x1250x30 (Thermal insulation board. Germany) 5 sheet
Skirt f215 2pcs
Connecting clamp d 215 4pcs
Clamp for telescopic bracket 2 pcs
Telescope bracket mod2 L155-255 2pcs
Sandwich 500mm AISI 321 / thickness 0.8mm 1 piece
Sandwich 1000mm AISI 321 / thickness 0.8mm 1
Aluminum foil on a paper base 30m2 1 piece
Ventilation valve Woodson 100mm, alder 1pc.
Angle 90* d100 galvanized 2 pcs
Pipe d100 galvanized 1 piece
Clamp d100 galvanized 3pcs
Aluminum corrugation d100 1 piece
Galvanized ventilation box 1 piece
Plugs 1 pack
Supply air valve with cable pull (Poland) 1 piece
Thermal and moisture resistant fan (Bulgaria) 150 cubic meters 1 piece
Linden ventilation grille? size
PLEASE SUPPLY PRICES