Box for an electricity meter in an apartment: nuances of choosing and installing a box for an electricity meter and machines
An electrical box is responsible for the distribution of power lines in the apartment - a kind of “control point”, in which automatic protective devices and an energy meter are installed.
If you correctly select and install the box for the electricity meter in the apartment, and then connect the devices in accordance with the established requirements, the use of household appliances, lighting equipment and electrical installations will not only be uninterrupted, but also safe.
In this article we will talk about the intricacies of choosing a box for an electric meter, and about the main stages of its installation. We also provide useful recommendations for connecting electrical appliances.
The content of the article:
How to choose an apartment electrical panel?
If street boxes for electric meter - not a new thing, boxes for apartments appeared recently. Previously, a distribution box that was installed on the site was sufficient.
It served from 2 to 6 apartments, and its content consisted of electric meters according to the number of residential premises and protective groups.
Nowadays, the number of electrical appliances has increased, which are much more powerful than outdated devices. If previously the energy consumption for one apartment was 750-800 W, today only one hair dryer or vacuum cleaner consumes more than 1.5 kW.

Accordingly, the requirements for equipment have changed, new devices have appeared that guarantee complete safety for apartment residents.
However, only a qualified electrician should select a panel for the electricity consumption meter, fill it and connect it - amateurs without permission are prohibited from assembling the box.
Purpose of the box for the electric meter
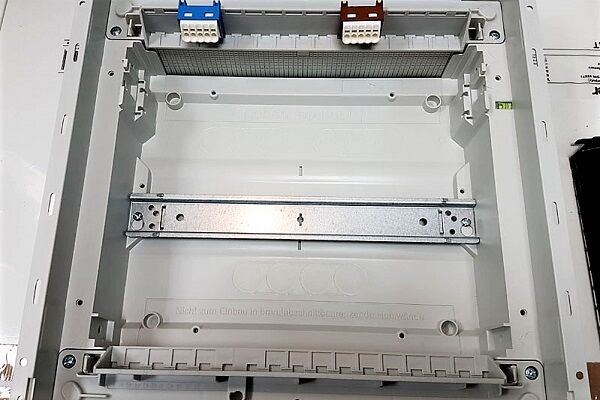
Electrical installation devices are placed in a special, sized box that performs several functions at once:
- serves as the basis for fastening protective devices and other equipment;
- groups equipment in one place, making operation and maintenance easier;
- protects devices from accidental pressing;
- protects the internal filling from environmental influences.
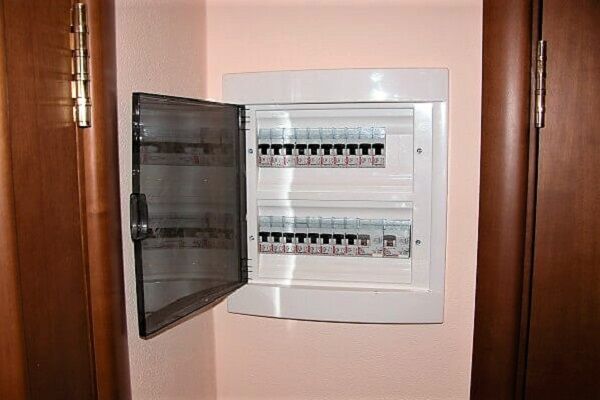
Apartment electrical panels differ both in size and in the material of manufacture. They are made from plastic or metal. Some resemble cabinets, others resemble small boxes.
The most popular are plastic models with the ability to install an electric meter and 6-24 machines.

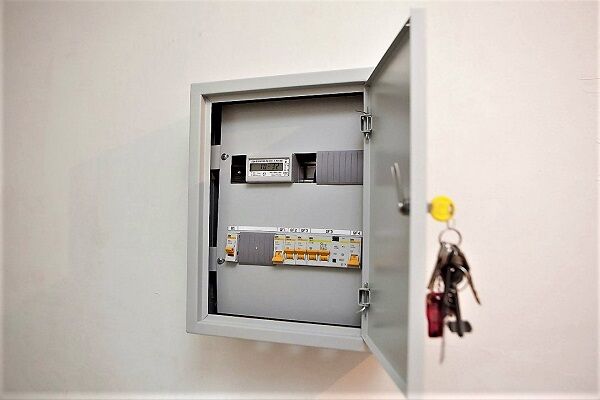
There are two types of electrical panels: built-in And external. The choice depends on the installation and connection conditions, as well as the underlying surface.
To install an internal box, it is necessary to create a niche in the wall, that is, to carry out additional construction work.

The most suitable installation location is a corridor or hallway. On the one hand, the shield is installed near the entrance of the electric main into the apartment, on the other hand, it is easier make circuit layouts throughout all premises. It is not recommended to install the box in a bathroom or kitchen due to high humidity.
What to look for when choosing?
First of all, the box is selected based on its planned content - the number of electrical installation devices. But it is important to take into account other nuances, including the design and the possibility of increasing the number of machines over time.

There are many manufacturers producing all kinds of box models. It is better to focus on those that are intended for an apartment, that is, exclude, for example, large metal industrial cabinets or panels with special fastenings for additional equipment.
For household boxes, you should pay attention to the following characteristics and design features:
We recommend working with companies that sell only certified equipment. Responsible sellers usually offer not “naked” boxes, but boxes with a set of fasteners.
It is better if the frame for the DIN rails is removable to make assembly more convenient.

You should not rely on good quality of cheap products. An electric box usually lasts for years, so it is better to purchase an expensive but reliable model from one of the brands: ABB, Legrand, Schneider, Makel, Electric, Hager.
Popular Russian manufacturers include RUCELF, IEK, Era, and Master.
Features of drawing up a diagram
Assembling an electrical panel is a crucial moment, so it is important to take into account all the nuances, especially the draft wiring diagram, installation method and correctly selected equipment.
In addition, you should definitely keep in mind a number of factors, including:
- type of connection;
- total power of electrical appliances;
- maximum power;
- type of electrical appliances.
The choice of equipment, and therefore the box, depends on the listed points.
The type of connection refers to the wiring of conductors "trail", "star", using distribution boxes or a combination of different types. The number of wires suitable for the box depends on the choice - 3, 10 or more than 20.

It is necessary to determine the total power in order to choose correctly rated parameters of automatic protection devices, as well as cable section – these values are interdependent.
Let's assume the cable cross-section is 2.5 mm. This means that it is designed for a current of 25 A, and the rating of the machine installed on the line is 16 A.
For the most powerful appliances, such as an air conditioner, an oven, a washing machine, there are separate power lines and separate machines.
Instructions for installing a box for an apartment
The sequence of work for installing electrical wiring may be different. If a hidden wiring method is chosen, then the first step is construction work to cut grooves for the wires. At the same stage, you can prepare a niche in the wall for installing an electrical panel.
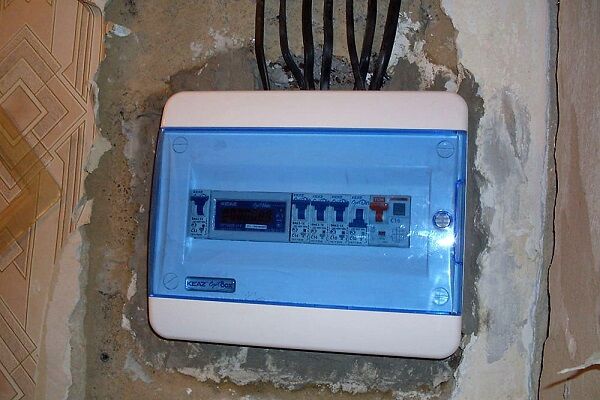
If a hanging box is selected, then this item should be skipped.
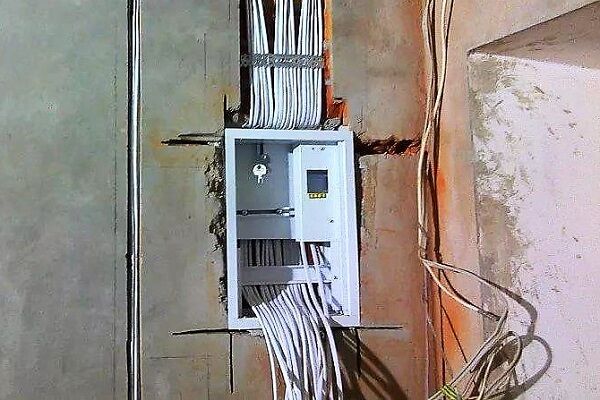
Stage #1 - preparing a niche and installing a box
The built-in box is suitable for walls made of materials that can be easily processed. For example, in a plasterboard partition it is enough to simply cut a niche exactly to the size of the box.
But a reinforced concrete wall requires a lot of effort to hollow out even a small recess, so it is more rational to take a wall-mounted model and hang it on dowels.

Niche cutting is done in the following order:
- Marking. The distance from the floor is 1.4-1.7 m; for cutting accuracy we outline the outline of the box.
- Using a hammer drill, circular saw or jigsaw (depending on the material), we cut out the outline of the niche.
- We take out the cut pieces of drywall. If the wall is brick or concrete, we hollow out the middle with a perforator or drill.
- We clean the edges and remove debris.
- We install the box according to the instructions so that only the front panel with the door protrudes from the outside. If the kit contains special fasteners, we use them.
There are several mounting options; most often, the box is fixed in a recess behind the back wall. If there are small gaps at the edges, we cover them with plaster or alabaster. When there are no gaps, we perform additional reinforcement with glue.
It is important to remember that violation of the structure of the walls of the apartment can be fraught with problems. So, if the concrete wall is load-bearing, then cutting the reinforcement without an agreed upon design is prohibited!
In such situations, it is easier to install a mounted model - fix the body on the mounts intended for this. Self-tapping screws or dowels usually come with the box.

Assembly is usually carried out after completion of construction work, when all the holes and grooves are sealed and the body is installed in place.
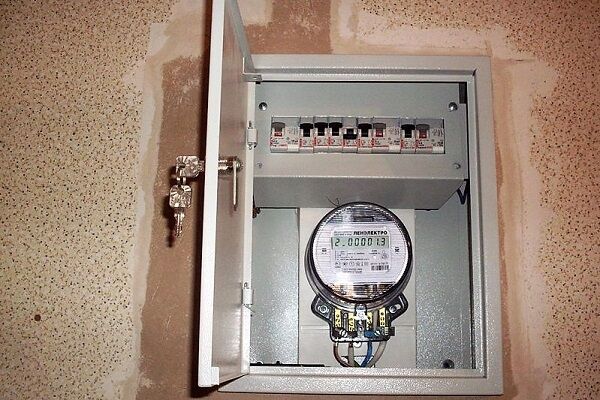
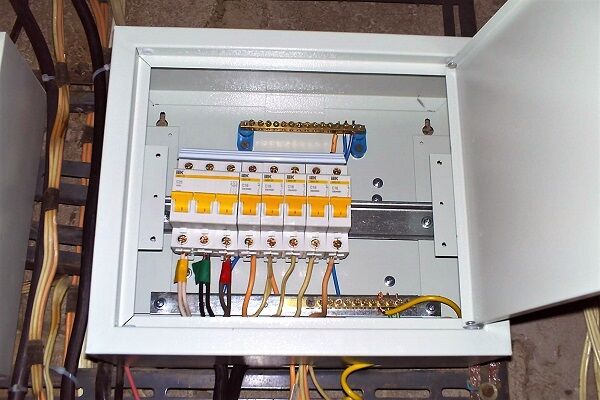
Stage #2 - assembling and filling the box
We offer step-by-step instructions for assembling an electrical panel for a standard 2-room apartment.
As an example, the initial assembly kit includes:
- 2 circuit breakers 40 A - at the entrance and after the meter;
- electricity meter “Mercury 50 A”;
- voltage relay Zubr D340t;
- 3 RCD at 40 A;
- 7 automatic machines 16 A - for socket groups, separate - for the oven and for the bathroom, where the water heater and washing machine are located;
- 2 10 A circuit breakers for lighting circuits.
If any of the listed devices are missing or, on the contrary, their number is greater, then the number of machines can be reduced or increased.
For the listed devices, a box for installing an electric meter and machines with 3 DIN rails is suitable.

First we fill the top DIN rail:
- Installation of the input machine in the upper left corner, that is, in the first position. It is advisable to use a two-pole 40 A device. According to the marking, we connect the phase to one pole, and zero to the other.
- Electric meter installation. We fix it to the right of the input machine. It is better to entrust the choice of metering device to a specialist from the management company, who is informed about the maximum energy consumption.
- Installation of a second machine at 40 A. It duplicates the functions of the input device and serves for additional insurance.
We fix the following devices on the second DIN rail - first voltage relay, and then RCD.

RCD installation involves the installation of three devices with a rating of 40 A and a shutdown threshold of 30 mA, which serve three separate zones. However, for the bathroom it is recommended to use an RCD with a shutdown threshold of 10 mA.
Let's move on to the third DIN rail:
- Installation of single-pole circuit breakers. Kitchen outlet lines are usually overloaded, so we recommend dividing them into 2 groups and installing a separate protection device for each group.
- Connecting devices in the electrical panel between themselves.
In the free space we install two buses: one for connecting neutral conductors, the other for grounding. The space around the busbars must be free for the distribution of connected wires.

It is important to take care of your own safety - before starting work, be sure to remove the voltage from the network, that is, turn off the power supply to the apartment!
Lighting circuits may not have grounding conductors if the lighting process does not involve fluorescent lamps equipped with grounding contacts.
Next, we carry out the final connection work:
- Connecting the input cable and all operating lines, leading to the food areas in the apartment. Testing of protective equipment, indication of conductors.
- Marking of machines. Indicating which group each device belongs to will make it easier to maintain the network in the future and allow you to quickly disconnect circuits in an emergency.
At this point, the installation of the apartment box can be considered complete.
Tips for connecting devices
The assembly of the electrical box should be carried out by a qualified installer, but sometimes there is simply no opportunity or time to call a specialist.
In this regard, everyone who independently installs protective devices must know the following rules:
- The electrical box must be “with reserve” - slightly larger in size than is currently required. Perhaps in the future the number of devices will increase, and the extra modules will prove useful.
- It is recommended to separate the RCD connection by service area: bathroom + toilet, kitchen, bedrooms. There is no need to combine groups from the bathroom and living room, nursery and kitchen into one RCD.
- RCD does not protect against short circuit, it is placed after the machine, and the rating of the RCD should be one step higher or at least equal. For example, if the machine is 16 A, then it is better to install a 25 A RCD.
- Correct connection order: input circuit breaker – electric meter – RCD. Installing an RCD at the input instead of a machine is considered a mistake; an automatic protection device can only be replaced difavtomat.
Typically, groups of machines are connected to one RCD for two reasons: either because of the saving of modules, or because of the high cost of the equipment. Ideally, an RCD should be installed after each machine.
Experts recommend not installing RCDs or breakers on outlet lines to which you plan to connect a PC in the future. If the response threshold is incorrectly calculated, the devices will erroneously respond to the computer and turn off the line.

Conclusions and useful video on the topic
Electrical panel assembly option:
The importance of design and preliminary calculations:
Electric box for one-room apartment - professional advice:
How equipment is transferred from a common area to an apartment:
It will not be possible to assemble and connect an electrical panel with a meter yourself - a qualified specialist, a representative of the management company, must select and install an electricity meter.
There is permission for installation of some models by the owner of the apartment, however, to check the correct connection, sealing and start-up of the meter, you will still have to invite an electrician from the management company or housing office.
Are you professionally engaged in electrical installation work and want to supplement the material we have presented with useful recommendations? Please write your comments under this article.
If you did not find the answer to your question in our article, ask our experts in the comments block - we and other visitors to our site who understand the topic of electrical installation will try to clarify controversial or difficult issues as much as possible.


An electric meter in an apartment has one big advantage - it is much safer to put different magnets on such a meter so that less energy is generated) When the meter is located in the entrance, even in a common vestibule, there is a danger that neighbors will notice that something is wrong, or inspectors , and no one will check the meter at home without your presence, and you can always remove everything that is wrong)
Immanuel, today this is a very dubious advantage. Disk counters, on which the magnet trick worked, are extremely rare today, but this does not work with electronic counters. Well, in the end, doing so is simply unethical.
And the advantage of individually selected boxing is precisely that it is individual. You can install additional RCDs, you can sign which machine is responsible for what, you don’t have to worry that when replacing the socket, vigilant neighbors will turn on the machine.
For some reason, during the construction of our house, our electricity meter was placed in the living room. It is very uncomfortable.Now we are going to move it to the hallway. I think we’ll install it externally so we don’t have to drill into anything.
Good afternoon, Ivan.
I think the electrician chose the location for installing the meter based on the shortest distance from the 0.4 kV overhead line support that runs in front of the house - I mean that the windows of the hall face the street where the line runs, and the hallway is located behind the hall.
In any case, when moving the electric meter, follow the requirements of the PUE and other regulatory documents. I have attached screenshots of the relevant items to my answer.
Do we need double circuit breakers or is it enough to just disconnect the phase wire? With the input it is clear: you need to disconnect both wires. At the dacha, there are times when the fuzz wire falls to the neutral wire due to the wind.