Do-it-yourself toilet cistern repair: instructions for troubleshooting typical breakdowns
Have you discovered that your toilet flush tank is refusing to do its job? Agree that the toilet has long been one of the most necessary types of plumbing equipment for a comfortable human life, so its breakdown can hardly be called a joyful event. Do you want to repair the toilet cistern yourself, but don’t know where to start or where to look for the problem?
We will show you how to detect the source of trouble and fix it on your own - the article outlines ways to eliminate common malfunctions. The procedure for dealing with all common breakdowns is discussed in detail.
Repair tips are provided with photographs that will help you understand in detail the structure of the drain mechanism. To help the home handyman, video recommendations are provided for disassembling the tank, eliminating leaks and replacing fittings.
The content of the article:
Types of cisterns
Before you start repairing equipment, you need to get acquainted with its structure and operating principle. The toilet itself consists of a bowl and a container filled with water. It is the container that is called the cistern.
The water in it enters the bowl, where it washes its contents into the sewer system.The drain system is activated by pressing a lever or button. This depends on the equipment model.
You can find various types of cisterns on sale. There are several classifications of such equipment. Based on the location of the tank relative to the bowl, there are two main categories.
Completely separate designs. It is assumed that in this case the tank and bowl are separated. This is the very first existing toilet option. The height of the tank can have different modifications.
A high position assumes that the cistern is located a meter or more away from the bowl. The elements are connected to each other by a pipe. This option was relatively recently the most common.

This is explained by the fact that the high location of the flush tank guarantees high speed and good pressure of water entering the flush. Today such models are used less frequently.
Modifications with a cistern hidden in the attic or under a false ceiling are popular.
Another variety - built-in tanks, which are equipped with wall-hung toilets. They are fixed in a special installation.
The low location of the tank suggests that it is mounted on the wall at a short distance from the bowl. They are connected by a short pipe. The drain fittings are located on the tank body.
Since the height from which the water drains is smaller, its speed and pressure are somewhat lower.
cistern compact toilets fits directly on the bowl. For this purpose it is equipped with a special shelf. Such models are very convenient to install and operate, but the water pressure and its speed during flushing are minimal.
Compacts are produced with tanks of trapezoidal and triangular shape. Such toilets are called corner toilets. They fit very well into the corners of rooms, it is especially convenient to install them in small bathrooms.
Monoblock toilets. The design is a toilet with a flush cistern built into the body. Such equipment is very easy to install. All you need to do is supply water and connect the device to the sewer.
This can be considered the main advantage of the candy bar. If serious damage occurs in any part of the monoblock, it most often has to be replaced, since the monolithic design most often prevents a full repair.
You can read more about the different types of toilets in this material.
Design of various drain mechanisms
A water release mechanism is installed inside each drain tank.
Today there are several varieties of this design:
- Lever. It is a lever that, when pressed, activates the release of water into the bowl. Mounted in separate toilets, in tanks with an upper and lower location.
- Pneumatic. The trigger mechanism is activated by pressing the button of the pneumatic chamber, which is connected to the release valve using a flexible air duct.
- Stock. To open the drain valve, it is necessary to lift the vertical rod, which is located on the top of the tank lid.
- Push-button. The drainage mechanism in this model is started by pressing a button on the lid of the drain tank. There are two-button variations, in which one of the buttons is responsible for draining half of the tank, the second is responsible for draining all the water in the tank.
All tanks are filled with water strictly to a certain level, after which their filling automatically stops.

Depending on the method of supplying water to the tank, valves of different types can be built in. Floatless valves can be bottom or side.
In this case, the design contains a special chamber, which in appearance resembles an inverted glass.
The operating principle of the device is based on Archimedean force. It changes its value depending on the degree of filling of the tank and changes the position of the chamber that shuts off the water supply.
The side float valve is either a diaphragm or a piston type. In any case, it shuts off the water when a certain volume of liquid enters the tank.
All reinforcement can be presented as independent interchangeable elements or as a single structural set.

According to the type of connection of the water supply fittings, all drain tanks are divided into two groups.
- Lateral. The liner is connected on the right or left. The tank is usually equipped with two holes. The non-working part is covered with a special plug. The main disadvantages of such tanks are considered to be noise when filling the container with water and an unaesthetic connection to the water pipe, which cannot be disguised.
- Lower. The water supply pipe is connected from the bottom of the tank. This way you can hide the water fittings. In addition, when filling the container with water, minimal noise is created.
Each type of flush cisterns finds its consumers and is used in various models of toilets.
Basic elements of a drain tank
Structurally, all variations of flush cisterns are designed approximately the same. Each of them has three main mechanisms.
Drain or shut-off valves designed to regulate the flow of water into the toilet bowl. Prevents liquid leakage from the reservoir.
During the process of filling the container, the water in it causes the shut-off valve to be pressed as tightly as possible against the drain hole, which prevents water from flowing into the bowl.
If there is constant water leakage, this may be due to a problem with the shut-off valve. Read more about shut-off valves for the cistern Further.
filling valve combined with a water supply device. Designed to control the liquid level in the drain tank. Stops water supply as soon as it reaches a certain level.
To determine the amount of liquid in the tank, a float is used, connected by a rod to the filling valve.
Regardless of where the fill valve is located - the valve is on the side or below - the float is placed vertically in the tank. In older models - horizontally.
Overflow and drain mechanism represented by fittings equipped with a start button or lever. Designed to prevent water from overflowing from the tank if the float valve breaks.
The overflow system is connected to the drain; when you press the start button, it is activated. Excess water is discharged to the sewer. An important element of the mechanism is float valve. Water leaks from the tank are most often associated with its functioning.

You need to understand that all common malfunctions of the drain tank are associated with these mechanisms. And to eliminate the problems, it is these elements that will have to be replaced or adjusted.
If chips or cracks appear on the surface of the tank, most likely it will have to be replace. Despite manufacturers' statements, most modern adhesives used for repairs cannot cope with this task.
Troubleshooting common problems
Practice shows that malfunctions of the drain tank are very diverse. We will consider only those that happen most often.
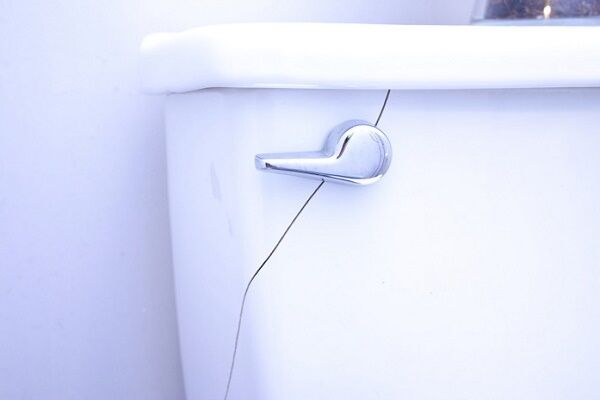
Problem #1 - water leaking onto the floor
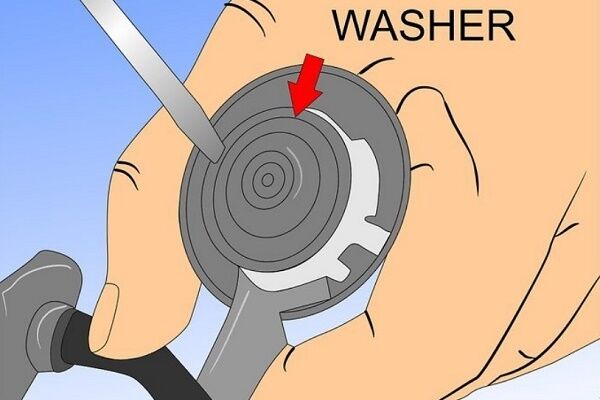
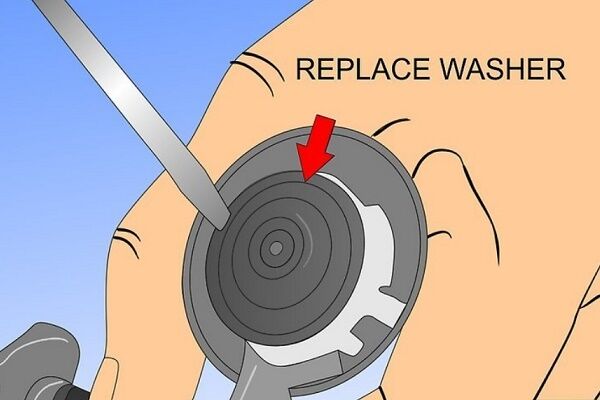
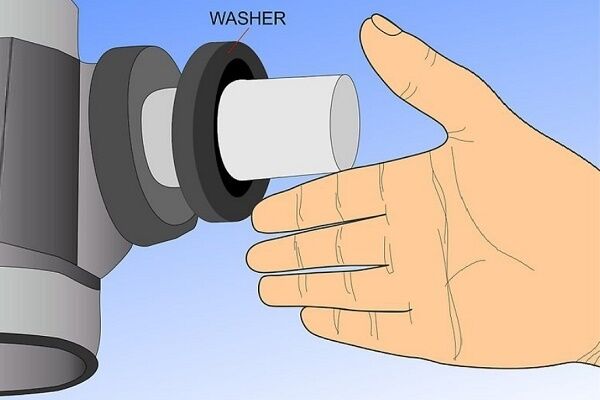
Sometimes clean water begins to appear near the toilet. The reason for this phenomenon is most likely the wear of the sealing ring, which is mounted between the bowl and the tank in compact toilets.
Alternatively, leakage may result from a defect in the gaskets of the mounting bolts. It is very easy to detect these faults. A careful visual inspection is sufficient.

If diagnostics show a problem, you can try tightening the fasteners. This must be done very carefully so as not to destroy the gaskets. If no positive effect is observed, remove the tank and replace the seal and gaskets.
This is done like this:
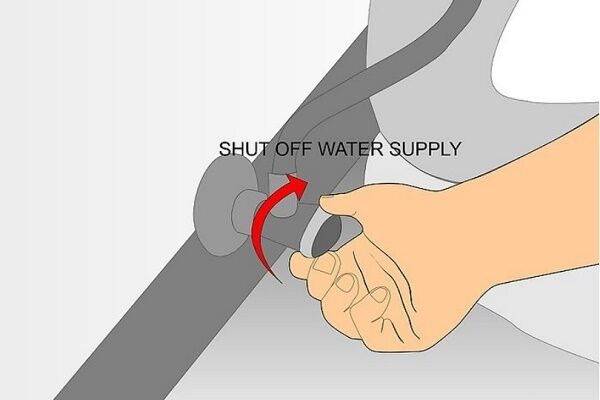
- Turn off the water supply and completely drain it from the tank.
- Remove the flexible water line.
- Remove the tank cover, find the fasteners and carefully unscrew them.
- We remove the drain tank.
- We remove the old seal and clean its seat on the tank and on the toilet.
- We put a new seal in the prepared place, with a drain tank on top.
- We insert the fasteners into place and carefully tighten them.
- We connect the flexible hose, and then turn on the water.
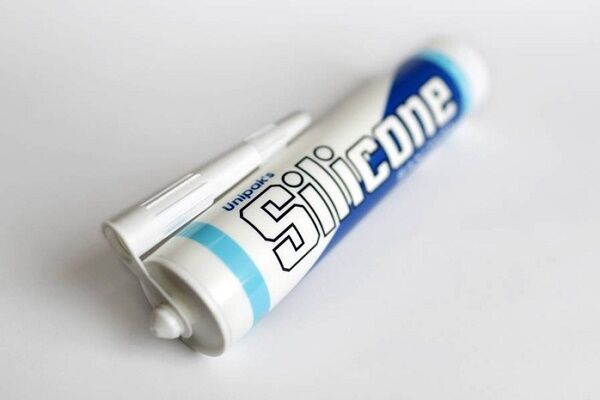
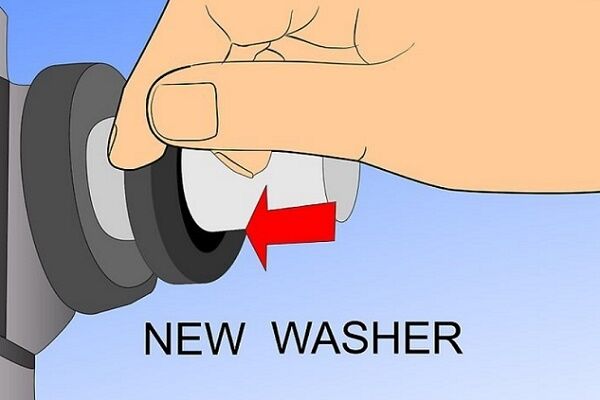
The gaskets are replaced in the same way. In this case, after the tank is removed from its place, the old gaskets are dismantled.
Their seats are also cleaned, after which new ones are installed. To seal the joints, experts recommend additionally lubricating them with silicone.
Also on our website there is a whole article devoted to the problem of leakage toilet cistern. We recommend reading it.
Problem #2 - no water flows into the drain tank
A frequent breakdown is the case when water flows into the container very poorly, or even does not enter it at all. There may be several reasons. We offer instructions on how to properly repair the toilet cistern in this case.
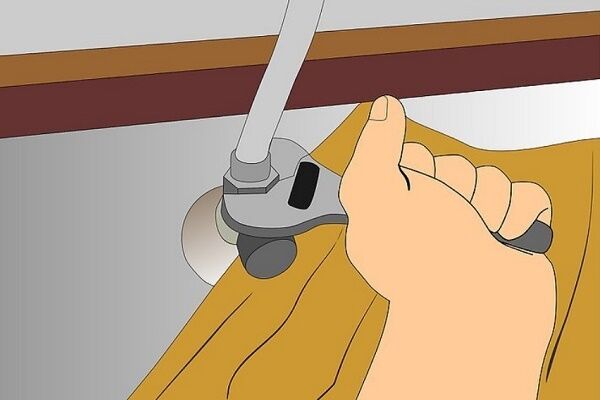
First of all, you need to check the condition of the flexible supply hose. If it fails, water will not be able to flow into the tank. To do this, turn off the water supply, and then disconnect the water line from the toilet.

We do not disconnect the hose from the tank. Now we direct the hose into the toilet and slightly open the shut-off valve on the water supply. If everything is in order with the liner, water will flow into the toilet. If this is not the case, we continue to look for the problem.
If the water does not flow, turn off the water, completely disconnect the hose and replace it with a new one. Another reason why water does not flow into the drain tank is that the narrow part of the inlet valve is clogged.
To get rid of the blockage, you need to clear the lumen with a thin wire or needle.Then unscrew the valve on the inlet pipe and wash out the remaining blockage.
After water begins to flow freely into the tank, tighten the valve and put the float and valve with the lever in their original position. It happens that it is not possible to clean the valve. In this case, it must be removed and replaced with a new one.
The following selection will familiarize you with the sequence of work to eliminate violations in the operation of the float mechanism:
Problem #3 - constant leakage of water into the bowl
Sometimes water constantly flows into the bowl.The cause of this malfunction is a breakdown of the float device, which does not turn off the water supply when the tank is filled.
If this happens, it can be assumed that the water inlet valve into the container is broken, the float is not working properly, or the lever that turns on the drain mechanism is in the wrong position.
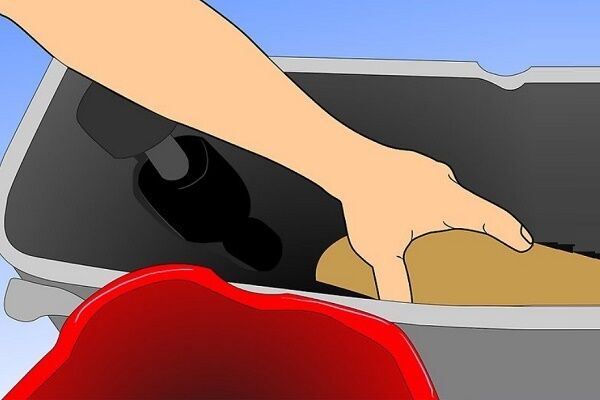
If the tank is an old model, repair work should begin with inspecting the float. This is a plastic hollow container. Very often, as a result of long-term use, cracks appear on it, through which water penetrates into the float and it begins to sink.
If so, the unit requires replacement. To do this, unscrew the fastening screw on which the float is held and install a new part.

More modern models of tanks do not have floats. An assembly called a drain column is used to close the inlet valve. It can be equipped with a mechanism that regulates the filling level of the tank.
Such a column is most often unrepairable. If the unit fails, it requires complete replacement.
To eliminate a leak in the flush valve area, do the following:
Water leakage is possible if the inlet valve is faulty. His work needs to be meticulously checked.
We perform the following operations:
- We carefully inspect the lever located next to the valve for damage and malfunctions.
- We drain the water and watch how the container fills.
- We move the rocker arm. It should be in such a position that it closes the inlet valve. If the lever is bent, we correct its configuration.
- If the lever does not move, it means that the unit responsible for its movement is jammed. We are replacing this unit.
Another reason why water constantly leaks into the bowl. This is a malfunction of the intake valve itself.It can break due to pressure surges in the water supply. In this case, it will have to be replaced.
To do this, the unit is dismantled, after which a similar part is purchased from the store. It is installed in place. The same applies if the exhaust valve fails. It also needs to be dismantled and replaced.
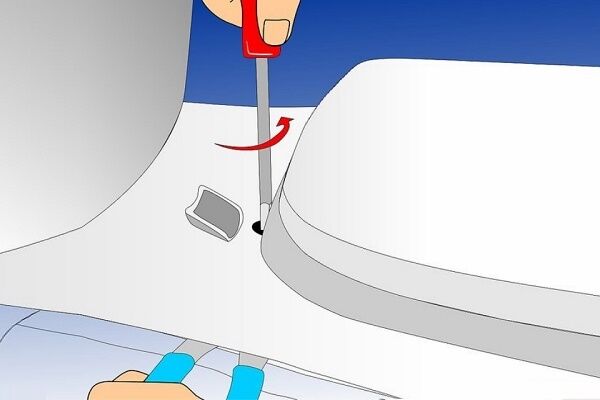
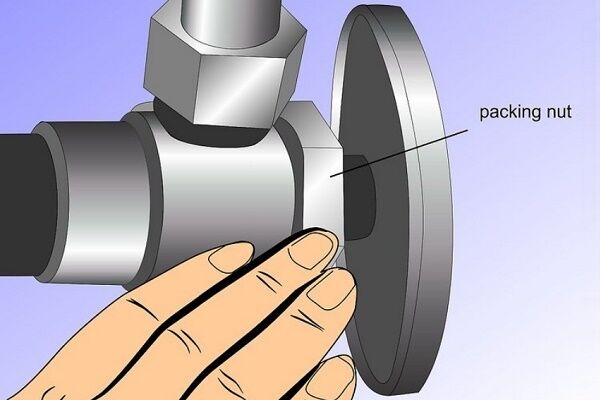
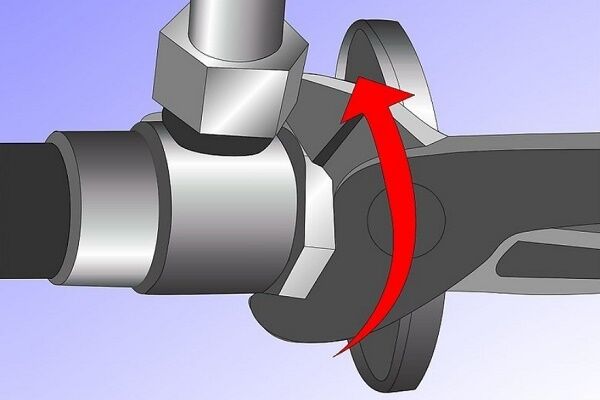
To fix a leak from the shut-off valve, you should first try to tighten the packing nut. It is located in the center of the valve, seal here by turning 1/8 of a full circle clockwise. If this does not help, then proceed to cleaning the unit from sediment:
If the manipulations done with the shut-off valve did not lead to the desired result, then this device will have to be changed.
You can read more about why the toilet tank does not hold water in this material.
Problem #4 - wear of internal fittings
It happens that several faults appear at once or the components are already very worn out. In this case, the easiest way would be to change the fittings - the insides of the toilet cistern. You should start by studying the structure of the tank.
As we already know, despite the general principle of operation, drain containers have a large number of modifications. We will consider in detail the replacement of the internal fittings of a drain tank with a bottom connection.

Before starting work, let's prepare pliers and wrenches. Next, we perform the following operations sequentially:
- Shut off the water supply to the tank and drain the water from it.
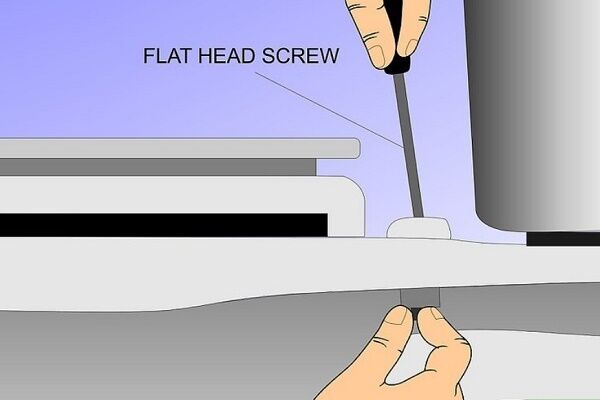
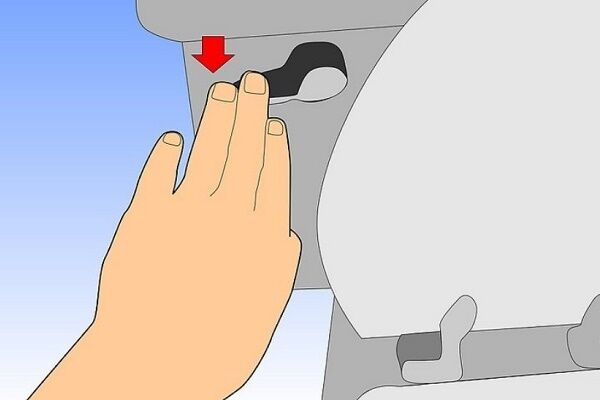
- Open the tank lid. If it has a button, then first dismantle it. Depending on the model, for this we will need to either unscrew it or remove special clips.
- Disconnect the water supply hose.
- We turn the upper part of the drain column at a right angle and remove it.
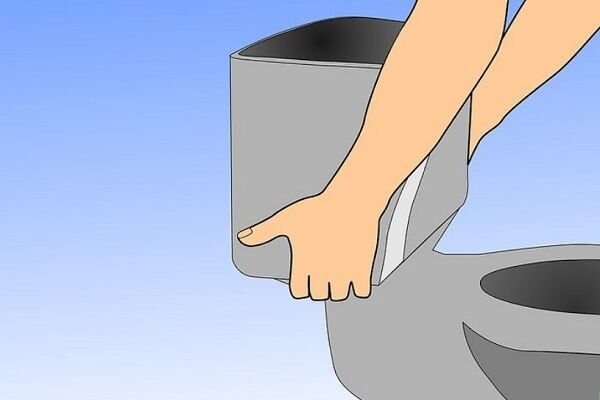
- We find the mounting bolts holding the tank to the toilet and carefully unscrew them.
- We put the tank on the toilet.
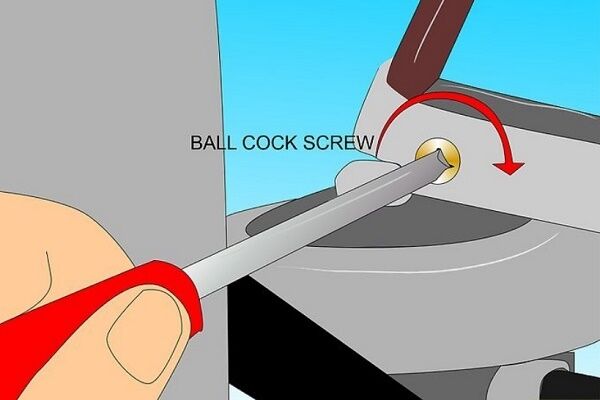
- We find the fasteners securing the drain column and the inlet valve and unscrew them.
- We take out the old fittings and prepare new ones.
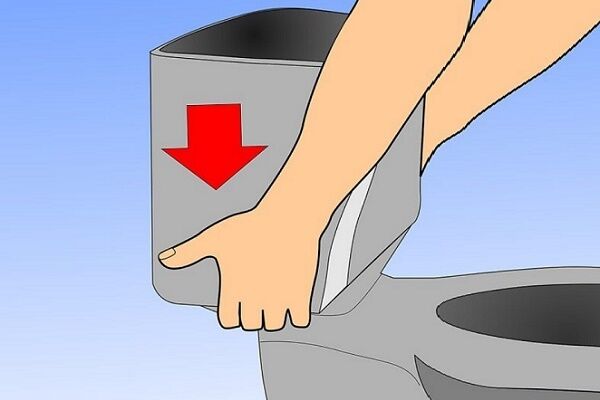
- We install everything in the reverse order and put the tank in place.
When installing a new drain column, you need to consider some points. The unit is installed above the outlet and fixed from below with a special threaded cuff.
The inlet valve, together with the mechanism that regulates the filling of the tank, is placed above the inlet, after which the assembly is fixed to the bottom of the tank with a threaded collar.
We can suggest that you familiarize yourself with other articles on the wear of cistern fittings:
- Toilet cistern fittings: how the drainage device is designed and works
- Setting up toilet fittings: how to properly adjust the drainage device
Problem #5 - noise when filling the container
This is not a breakdown, since all mechanisms are functioning properly. However, filling the tank too loudly most often causes discomfort and you want the tank to be filled more quietly.
Tanks with top supply usually make noise. To solve this problem, you first need to inspect the inlet. There are models where you can adjust its diameter.
If filling the tank is too noisy, you need to reduce the cross-section of the hole. In this case, the water will flow more slowly, but annoying loud sounds will disappear.

If the diameter of the hole cannot be adjusted, you can try to slightly modify the internal structure of the tank.
To do this, you need to find a rubber or plastic tube, the cross-section of which must correspond to the diameter of the inlet hole. The length of the part should be approximately 25-30 cm.
We put the tube on the inlet hole, secure it so that when water enters it does not rip off. Then we lower the second end of the part to the bottom of the tank. Actually, that's all.
Now water will flow into the tank through the tube, which will significantly reduce the unpleasant noise. The liquid will no longer fall under pressure from a height, but will go straight to the bottom of the tank.
Problem #6 - One or two buttons are stuck
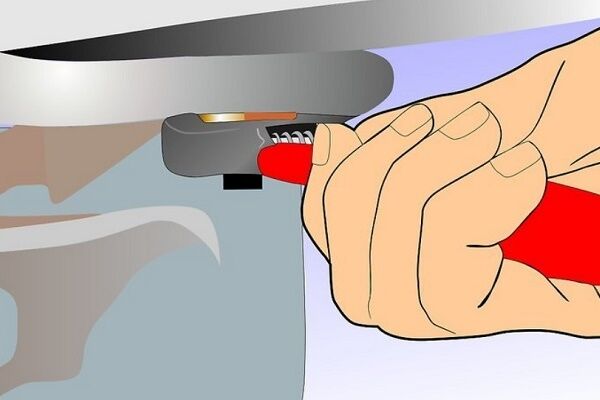
This modification is very popular because it saves water. Sometimes her buttons start to stick. In this case, you must first remove the cap from the tank. To do this, the water pipe is closed, then the tank is emptied.
Next, use a screwdriver to very carefully unscrew the plastic nut located near the buttons. The cover can now be removed.Press both buttons at once and release. Sometimes they fall into place.

If this is not the case, check the button shaft. If it is clogged, the parts will not fit into place. In this case, we clean the shaft and install the buttons. If this does not help, you may have to replace the entire assembly.
We carefully dismantle it, purchase a part from the store that has all the same characteristics and put it in place. The one-button model is also repaired.
Conclusions and useful video on the topic
Recommendations from professionals will help you avoid mistakes that beginners often make.
How to replace the cistern fittings:
Remove the lid from the drain tank with the button:
What to do if you find a leak in the drain valve:
Repairing a toilet flush tank is quite simple and accessible to anyone, even a novice plumber. There is nothing complicated about the repair work. Component failures are very easy to diagnose.
If desired, you can quickly and efficiently repair the drain tank or, if the fittings are completely out of order, replace them with a new one.
Experts advise novice craftsmen who have problems with the tank body (for example, a crack has appeared) not to engage in cosmetic repairs, but to replace the entire tank. Most likely, all the efforts spent on repairs will be in vain, that is, time and money will be wasted.
If you have already encountered a broken toilet cistern, please share with our readers exactly what problem you encountered and how you managed to solve it. Also, in the comments block you can ask a question about the topic of the article.


Yes, this “problem” has not escaped me either. By the way, I and my friends have a problem, if not with a sinking float, then with a leaking cuff. Absolutely! Some kind of misfortune. But in general, not everything is so terrible, replacing a valve is literally a matter of five minutes if you know what and how. There is only one conclusion: buy good quality plumbing equipment and use it with care! So that you don’t have to do “self-repair” later.
There was a problem of constant water leaking into the toilet after the tank was already full. First I changed the seal, tightened everything up, but the problem did not go away. A rusty path began to appear from the water, which was annoying (I’m not talking about overpaying for water). I started to look into it and it turned out that the float did not get into the desired position after filling the tank.
I decided to change it, but I didn’t have time, I accidentally split the tank and had to change it. I took a more modern model without a float. Having experience of my crookedness, I no longer took on either delivery or installation. And I won’t take on repairs again! So I have a question: why are these cisterns and toilets made from such material?! Is it really impossible to come up with anything better in the 21st century? The baths make sure they don’t split! What's the catch here?! Why are they so heavy?! Okay, the toilet should be able to withstand a lot of weight if necessary, but why not the tank?!
Hello. I will answer your question.
Wrong opinion. The toilet tank can be made of different materials - earthenware, plastic, cast iron, stainless steel, porcelain, gold, stone, bronze and so on. The cheapest lightweight option is plastic. But it is short-lived and looks unaesthetic. Therefore, it is used mainly in dachas.The remaining materials are either expensive or too heavy.
What remains is the most budget-friendly and widespread option - sanitaryware. But it is heavy, which in principle does not interfere with operation. So they sell in stores what they buy - sanitaryware. In large plumbing stores you can find different materials for tanks.
From the point of view of the Theory of Automatic Regulation (TAR), the float-fill valve system is an analog system for regulating the level of liquid (water) in a container with feedback. When positive feedback occurs in a feedback system, the system becomes a generator and begins to hum. In addition, in the analog system there are no two clear states of the filling valve: “open” and “closed”.
From a theoretical point of view, you need to add a mechanical RS trigger to such a system and turn it from analog to digital with two clear states: “open” and “closed”. In this case, the entire system turns into a mechanical-hydraulic “precision Schmitt trigger” (“Schmitt trigger with RS trigger”, “toggle switch”, “toggle switch”). The simplest way to add an RS trigger to the system is to “pull up” the float with an elastic band or tensile spring with rope or wire rods, so that in the upper position the force of the elastic band is above the “throw over” line.
By the way, that's a good question. I had never even thought about this before. On the one hand, tanks can be made of durable plastic, but in the end, this is a different production process, which means additional costs. On the other hand, you can make the toilet itself from high-strength plastic, which will probably last even longer than ceramics.Apparently, the production of ceramic toilets is the most profitable, I don’t see any other explanation for this.
On the topic, I would also like to add the following thing: if the gasket is stuck and water seeps out from under the tank, you can throw it in boiling water. This will make it a little more elastic. Although this is a temporary option, it may help someone. It’s better, of course, to immediately go and buy all the fittings entirely - much more practical. True, with the replacement, difficulties may arise, especially if you are doing it for the first time. I personally spent an hour and a half fiddling around for the first time.
Good afternoon, please advise anyone in the subject. There have been no problems in the tank with the bottom water supply for many years. The water began to pour poorly. I cleaned the inlet filter from below. It helped. Then again. What it turned out to be: water is drawn in in a thin stream, but if you turn off the water supply and immediately open it again, a normal amount of water flows into the tank. If you flush the water again, it won’t fill up again. Those. After each shutoff of the water and subsequent switching on, water is drawn normally. Then, after descent, it is again filled drop by drop (30-50 minutes into the tank). The reason is unclear!!! The intake mechanism is in the photo, I have not found analogues anywhere to disassemble and clean. There are no nuts, etc. on top. Is it non-separable? Can someone tell me what kind of mechanism this is, is it possible and how to disassemble and clean it, and how to solve my problem with water intake? I'm tired... Thank you.
Water, when flowing normally, enters the tank through the tube that comes from above in the photo.
Hello, Yuri. Judging by the symptoms described, the problem is related to the intake mechanism itself.Here, even with the naked eye, you can see that the mechanism needs to be thoroughly cleaned, as well as the filter itself.
Since after cleaning the filter the problem went away for a short time, it is obvious that the problem is clogged. That is, when you turn off the water and then turn it on suddenly, the water hammer moves the blockage from solid deposits, after which the mechanism works properly for a short time.
There are two ways out:
1. Completely disassemble the mechanism and thoroughly clean it;
2. If the first point is not feasible due to design features, then you need to buy a new mechanism and replace the old one.
But it will be easier to immediately go to the second option; for example, an Azor Combi 3/8 intake with a bottom supply will suit you, the price is 8-10 dollars. Well, or analogues.
I bought three toilets from this manufacturer for my home. The material of the plastic nut that screws the water supply nipple to the side wall of the tank is very poor. This nut breaks along the thread and water seeps through this crack. The water ends up overflowing in the tank all the time and drains into the toilet.
After some time, yellow stains form on the toilet from this constant flow. 2 pieces have already broken. I tried to glue it with different glue, but in this place there is a lot of tension and after some time it breaks again. Can't find the repair kit!
Hello, I can't solve the problem with the drain button. My water does not flow in, that is, the button works idle. But when you force a drain, water collects and does not flow anywhere... What should I do, please tell me..?
Hello Anna.You have some kind of breakdown in the fittings of the drain tank, which is responsible for draining. Most likely, there is a malfunction in the unit connecting the button and the lifting mechanism, which actually ensures normal drainage of water in the tank. In this case, repairing is not profitable and is too time-consuming; it is easier to buy new fittings.
To find the same or the most similar shut-off valve, you need to unscrew this one. Dry it and take it to the plumbing store. Finding the exact one or the right one is a matter of five minutes. The cost is about 5-7 dollars, there are more expensive options, but it makes no sense to overpay for them. I especially recommend buying spare seals for the fittings; they need to be changed every 2-3 years. Do not forget to turn off the water before carrying out work to replace the fittings.
The water drains from the tank, but slowly when you press the button, the button does not lift the cap completely.