How to calculate the number of tiles in the bathroom: installation methods + calculation procedure
Due to high humidity, it is customary to tiled bathrooms - the material is durable and not afraid of water.This is what craftsmen recommend for finishing showers, toilets and swimming pools. The choice of products is impressively diverse - you can choose the finish to suit every taste and budget.
Before you go to the store, you need to figure out how to calculate the amount of tiles in the bathroom, so that later you don’t have to look for the missing cladding element. And I don’t want to overpay for the excess either, do you agree?
In the article, we described how the method of laying tiles affects its quantity, what parameters should be taken into account when making calculations, and also presented three technologies for calculating the consumption of facing material. A detailed example indicating the actual parameters of a bathroom will help you create an accurate estimate for renovation work.
The content of the article:
Methods for laying tiles
Before you begin the calculations, you need to decide on the layout of the tiles on the floor and walls. There are several variations of the layout of this ceramic material. The presence of a pattern on the tile is also important. Individually for each, and as a whole on the created cladding surface.
Tile cladding according to the seam pattern can be:
- straight;
- diagonal;
- with offset.
- with inserts of smaller elements.
The easiest way is to calculate the volume of materials for the first of these layout options. It is also easiest to implement when gluing the tiles yourself.
But if you want something unusual, then you will have to spend extra on tiles - in terms of money, and on calculating the required quantity - in terms of time. Plus, the work in this case also turns out to be more labor-intensive and expensive.
For example, if we compare straight and diagonal laying techniques, then with the same area of the surface being tiled, the first method will require 15–25% fewer tiles in pieces. In the second case, you will have to cut more tiles, which inevitably leads to a mass of unused scraps.

Rules and calculation options
Calculating the required amount of tiles seems simple at first glance. It is not enough to calculate the square footage of the surface to be pasted and divide it by the area of one tile. In addition to the seam pattern, the consumption of the material in question is also influenced by many other factors.
When calculating the number of tiles in the bathroom, you should consider:
- presence or absence of a picture;
- layout type;
- place for laying the first tile;
- verticality of corners between adjacent walls;
- closed with plumbing or furniture and not requiring surface cladding;
- door and window (if there are in the bathroom) openings;
- The thickness of the grout joint varies from 2 to 10 mm.
The main point here is the line from which the installation will begin. Using the floor as an example, if the first row is laid against one of the walls, then the tiles will only have to be cut at the opposite wall.

But, you can start laying floor tiles from the center of the room, which often looks more aesthetically pleasing. However, then the trimmed elements will be on both sides.It’s also good if you can use scraps from one of them to lay next to the other. Otherwise, the amount of material required for cladding will increase.
Often, each tile cut ends with the remaining part breaking and making it impossible to use further. This often happens if the tilemaker is inexperienced.
As a result, the consumption of tile material increases sharply due to the need for a large volume of cutting tiles. And this inevitably affects the increase in the required volumes of ceramic tiles in pieces.
Another problem area is the vertical corners on the walls. In old panel high-rise buildings they are often inclined, which makes a significant contribution to the cutting of tiles.
Ideally, horizontal and vertical seams on wall tiles should be strictly perpendicular to each other. Otherwise, after applying the sticker, the cladding will turn out ugly and crooked.
But, if the walls are slightly inclined, then from below or above them in the corners of the bathroom you have to make thin inserts or trim the outer tiles in the row that are glued there. All this also leads to an increase in its required quantity in pieces.
You should measure the corners in advance using a level or plumb line and decide how to cover these shortcomings of the builders.

It is often better to insert decorative plastic corners on top or initially cover the walls with plasterboard or plaster. Accurate cutting of tiles due to a few millimeters of uneven wall will require a lot of time and effort.
Method #1 - by area
This calculation method is applicable only for a simple classical layout, and then with big reservations.Its main drawback is the inability to take into account the additional costs of cutting ceramics when marking lines for laying them from the center of the room.
To carry out this calculation, you must first measure the dimensions of the bathroom. To calculate the floor area, you will need to multiply the width by the length of the room. And for the walls - their width by height and add together all the resulting numbers.
As a result, you should get two values - one for the floor cladding, the second for the wall. Then these numbers are simply divided by the area of one tile chosen to decorate a particular surface.
At the same time, there is a doorway on the walls in the bathroom, and often a large mirror is glued to one of the walls. For such places, tiles are not required. This must also be taken into account by subtracting their area from the area calculated above.
If a diagonal layout is chosen, the resulting number of tiles should be increased by at least 15%. With this installation option, the consumption of tiles in the outer rows inevitably increases.
Method #2 - in rows
To more accurately calculate the amount of tiles required, it is best to use a method with an orderly calculation. To do this, you need to measure the width and length of the surface to be tiled, and then divide them by the width and length of the tile you like.

The essence of the method is simple - first, the number of slabs in a row is calculated, and then the number of these rows.In this case, you can easily take into account the inserts of a smaller border somewhere in the middle and surfaces that are not covered at all.
Dividing the above numbers usually results in a fractional number. It should always be rounded up. We need to calculate the number of whole tiles. And if in some place you need to glue a piece a couple of centimeters wide, then this is another tile product for cutting.
Method #3 - according to the sketch
The most labor-intensive and accurate result can only be given by calculations with a previously drawn up scale plan of the walls and floor. It should be done on graph paper and in strict accordance with the measured dimensions of the bathroom.

The diagram should be drawn up as carefully as possible, taking into account all glued tiled elements and furniture with plumbing, behind which cladding is not needed. At the same time, some craftsmen, in order to save material on the floor, recommend not laying tiles under the bathroom. This should not be done under any circumstances.
In addition to its decorative role, floor tiles also serve as protection for the concrete base (floor) in case of a flood in the bathroom. Leaving one section of the floor unprotected means putting the entire floor at risk of destruction by water.
If in the sketch of a doorway some tile falls completely inside the “door”, then it can be excluded from the calculations. But if such a tile is only partially located in the opening area, then it should be taken into account as a whole element.
In some such cases, it is possible to provide for cutting one tile into a pair of necessary parts.However, this must be done with caution, so that later the purchased material will definitely be enough.
It is important to take into account the additional amount of material if constructing tile shower tray booths or bathroom screen.
Calculation example for a small bathroom
Let's say there is a bathroom with an area of 2.56 sq.m and has the following parameters:
- height – 2600 mm;
- short side length – 1500 mm;
- the length of the side along which the bathtub will stand is 1710 mm.
Plus, there is a doorway - 750*2000 mm.
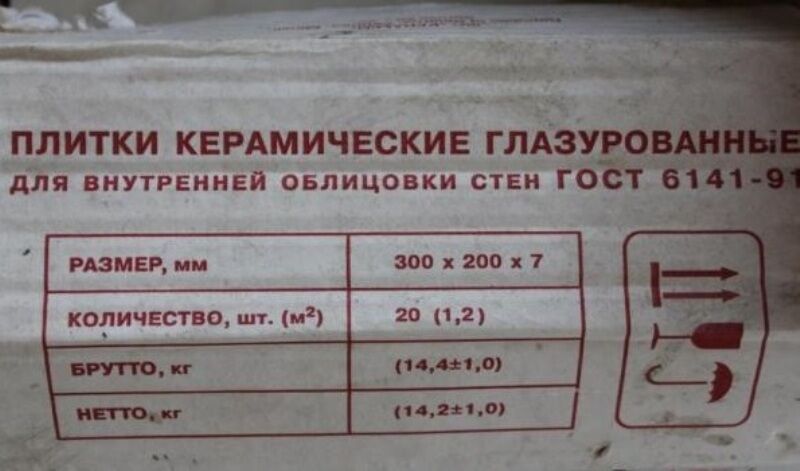
The tile chosen for the floor is square, measuring 330*330 mm, and for the walls - 200*300 mm with a vertical arrangement.

As a result, for calculations we get a bathroom with the following data (mm):
- room height (H) – 2600;
- opening height (Hp) – 2000;
- room depth (A) – 1500;
- room width (B) – 1710;
- opening width (Bp) – 750;
- bath length (C) – 1500;
- bathtub width (D) – 700.
The easiest way is to calculate the tiles for the floor. First, divide B by the width of the floor tiles 1710/30 = 5.18. Rounding up we get 6 pieces in a row. Then we divide A by the length of the same floor tile 1500/330 = 4.56. Rounding, we get 5 rows. Total: 6*5 = 30 tiles per floor.
In this case, on one side of the row we get a trim of approximately 60 mm (330 * 0.18). If the tiles are cut accurately without breaking, then instead of 30 you can take only 28 pieces.
For wall surfaces, the calculations are as follows. For a wall with a door, the top two rows have 9 tiles each (1710/200 = 8.55), and another 7 rows have 5 each (2000/200 = 5). The total is 18+25 = 43.
The number of rows is calculated as follows:
- for the top two - above the door there is a clearance of 600 mm with a tile height of 300 mm;
- and the opening itself – 2000/300 = 6.67.
For the wall opposite the door – 1710/200 = 8.55 and 2600/300 = 8.67, we get 9*9 = 81 tiles. From this number you need to subtract 21 pieces for the tiles located behind the bathroom. There is no need for cladding.
For two narrow walls - 1500/200 = 7.5 and 2600/300 = 8.67, we get 8 * 9 * 2 = 144. It will be difficult to come up with anything with scraps here.
The total is: 144+60+43 = 247 pieces for the walls and 28 pieces for the floor. Plus, just in case, it doesn’t hurt to add a spare 10% to these numbers and you can go to the store for tiles.
Conclusions and useful video on the topic
A visual calculation of the number of tiles for a room measuring 1.5 * 1.7 m:

You can learn about the rules for laying out tiles from the following video:

Preparing a bathroom project with tile layout:

There is nothing overly complicated in calculating tiles for a bathroom. However, you must be very careful not to make a mistake when calculating its exact quantity in pieces. Every bend, corner, pipe box, plumbing fixture and other interior features contribute to these calculations.
Plus, you also have to take into account the pattern of the tile and the type of its layout. In this case, the most accurate calculation option is a sketch, which consists of drawing up a floor plan in millimeters and drawing each wall and floor tile on it.
Do you have personal experience in calculating bathroom tiles? Do you want to share your accumulated knowledge or ask questions on the topic? Please leave comments and participate in discussions - the feedback form is located below.


Of course, you can count the tiles manually, but this is for the patient.I use a special computer program, pro100. You just need to enter the dimensions of the tiles, and then place them on the walls and floor. It’s even funny - in the future you can see what the bathroom will look like with this particular tile. You can add the photo yourself.
But in any case, you need to take the tiles with a reserve for cutting and breaking, because it is sometimes difficult to purchase more. It’s not that such tiles are no longer on sale, they simply may differ by half a tone in another batch. This happens often.