Toilet valve: types of valves and features of their installation
It is not for nothing that the failure of toilet fittings is recognized as one of the most unpleasant situations that occurs at home, in the office, at an enterprise, etc.Agree, neither a broken faucet nor a burnt-out lamp will create so much noticeable inconvenience.
This problem can be immediately eliminated if you know how to choose and correctly install a toilet valve. We will tell you in great detail which device is needed to close the flow of water into the tank, and which one is needed to drain it from there.
Here you will find complete information about the types of plumbing valves, the rules for their selection depending on the design of the tanks and installation methods. The article we offer contains reliable information, supplemented by useful diagrams, photos and videos.
The content of the article:
Types of toilet valves
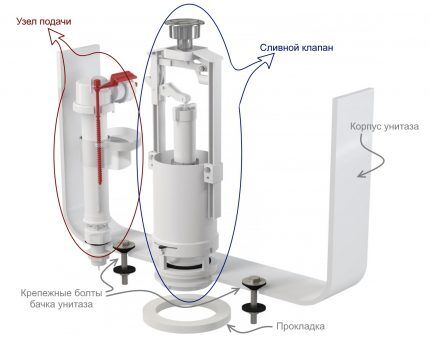
Most common type toilet fittings - separate. It is used on all the most popular models of toilet cisterns and includes mechanisms for draining and collecting water, which are installed and operate autonomously.
Exhaust valves can be divided into types according to the method of actuation:
- Push. They are activated by pressing a button.
- Exhaust. The drain mechanism is activated by lifting up the rod that locks the drain hole.
- Lever. The lever itself can be placed on the tank or below, near the toilet. The device is activated by pressing a lever.
The lever system is used mainly in public restrooms due to its budget price, simple design and maintainability.
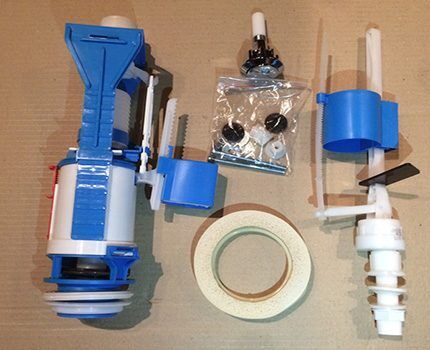
Push-type devices, in turn, can also be divided into types:
- single level exhaust valve (with single-mode drain) - equipped with one button, when pressed, all contents are drained from the tank;
- single-level valve with stop mode - in such a device, the first press leads to the supply of water to the toilet, the second stops draining;
- exhaust valve two-level (dual-mode) — the drain button consists of two keys, one of which drains part of the water, the second completely empties the tank.
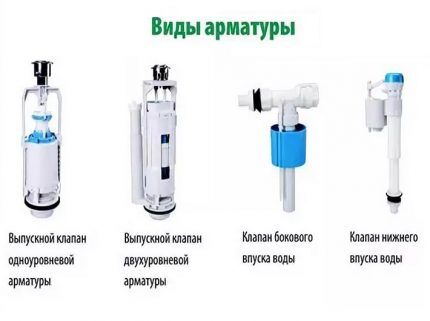
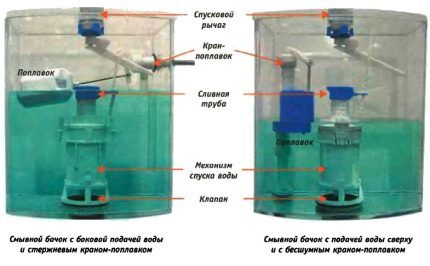
Shut-off valve models can be divided according to the method of water supply: for side connection and for bottom water inlet.
And also according to design features:
- Piston device. The intake mechanism has a piston that is driven by a lever. A gasket installed at the end of the piston stops the flow of water into the tank.
- Diaphragm valve. This is the most modern device. Instead of a piston gasket, a silicone or rubber membrane is installed in it. It allows you to silently and quickly draw water, but is very sensitive to its purity - this is the main drawback that often leads to malfunctions.
In addition to separate ones, there are also fittings of a combined design, in which two valves - inlet and shut-off - are combined into one system. The performance of one depends on the performance of the other.
Installation and valve adjustment may cause some difficulty for a non-professional. If one of the system elements fails, the entire mechanism must be replaced.
Working principle of drain and fill valve
The principle of operation of the filling valve is based on the action of a float, which, when the tank is filled with water, rises and moves the valve through a rod.
As soon as the water reaches a certain level, the valve shuts off the water.
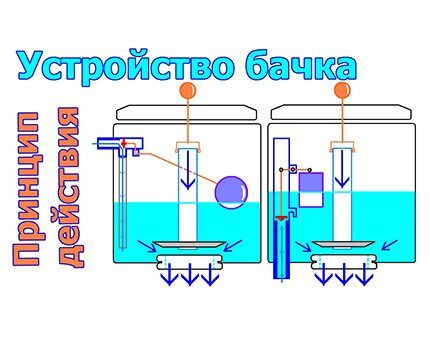
In a calm state drain mechanism prevents water from coming out, but works as soon as the button is pressed.
At the same time, its design provides protection against overflow. Protection is necessary in the event of a malfunction of the float valve for the toilet, which suddenly stops turning off the water. Then, after filling the tank, water flows out and floods the room.
To prevent this from happening, a drain tube is provided in the drain valve body. If the fittings are working normally, then the end of the tube rises above the water level.
If the inlet valve malfunctions, the top is below the water level, and then excess liquid enters the tube and is drained into the toilet.
The flush cistern fittings are a set of devices with valves designed to regulate the flow, supply and removal of tap water from the tank:
General characteristics of shut-off valves
Drainage and water shut-off valves must withstand sudden pressure changes. On average, the operating rate ranges from 0.4 to 15 atm.
The water temperature at which the device will operate normally ranges from 2 to 45 °C. The working life is about 150-200 thousand cycles.
The materials used to produce a toilet shut-off valve are:
- High pressure polyethylene. The denser this material is, the higher its strength. At the same time, an increase in density reduces its impact resistance at low temperatures.
- ABS plastic (a chemical compound of acrylonitrile-budadiene styrene). The material is resistant to mechanical stress, abrasion, aggressive chemicals, and insensitive to temperature changes.
For each valve model, the manufacturer indicates the permissible height of the tank; it can be from 295 to 500 mm.
It is also important to pay attention to the connecting size - if it does not match, use an adapter ring.
Installation and adjustment of the intake valve
The purpose of the toilet inlet valve is to regulate the flow of water into the toilet tank. The valve ensures silent and fast filling: about 7 liters in 20-45 seconds.
Equipped with a filter with a cell size of about 200 microns. If clogged, it can be cleaned and washed with water without removing it from the tank. The float in such a device can be open, or it can be located inside a protective housing.
Reinstalling the float valve is quite simple. In models with a bottom connection, the valve must be installed before installing the tank.
A rubber gasket is placed on the device tube, turning its conical side towards the hole in the tank.Then the valve is inserted into the hole for the water supply, a plastic washer is put on (if included in the kit) and secured with a nut. The nut is first tightened by hand and then tightened with a wrench.
It is very important to ensure a tight seal by installing the rubber gaskets correctly. In models with a side connection, protection against leaks is not so important; there the water supply is located above the filling level of the tank.
You also need to pay attention to float in the tank did not touch anything, otherwise it would not be able to freely rise or fall with the water level.
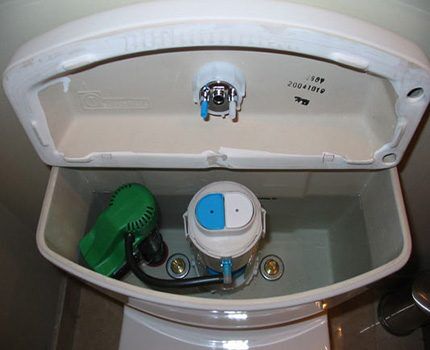
A flexible hose is connected to the water riser through a tap using FUM tape. A shut-off valve must be installed. If repair work is necessary, it will allow you to shut off the water.
Restoring the float valve is as follows:
If a leak is detected in the area of the shut-off valve, troubleshooting work is carried out in the following sequence:
Installation and adjustment of the exhaust valve
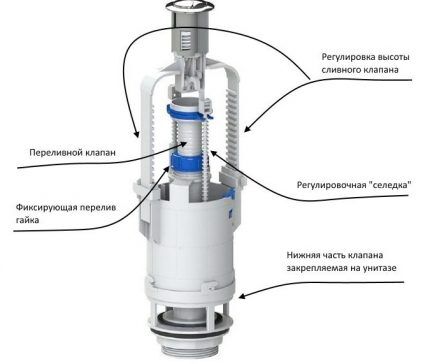
The flush valve mechanism is designed to supply water to the toilet. Manufacturers produce many different device configurations.
For example, for the economical use of water, a two-level fitting has been developed in which the drainage can be complete or partial. Single-level devices are sometimes equipped with a “stop” system, which stops the draining process as soon as the button is released.
When purchasing a device, you need to pay attention to the material from which the locking gaskets are made.
If previously domestic manufacturers used only rubber, now they are increasingly made from silicone. This material has no mechanical memory and is not deformed.
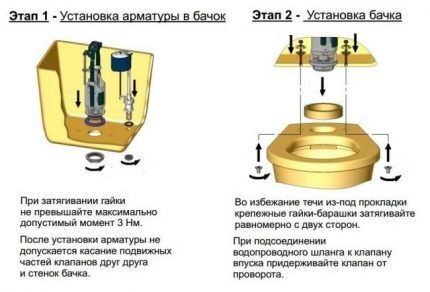
Installation of fittings step by step
If the flush mechanism is broken or outdated, there is no need to change the toilet tank - you just need to replace the faulty element.
Do you want to replace your toilet cistern with a new one? Detailed replacement instructions are provided in our other article.
Even if the toilet model is outdated, the manufacturer produces a new, but suitable device. It is better, of course, that the tank and shut-off valves belong to the same brand.
Next, the installation of a drain valve will be shown using the example of a device for a dual-mode drain with a cable. Install the tank on the toilet.To do this, put gasket 14 on the base of valve 12.
You may also be interested in information about selection and replacement gaskets between toilet and cistern.
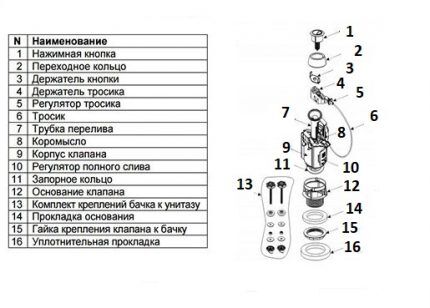
The valve is installed in the hole of the tank and the nut 15 is tightened from the outside, onto which the gasket 16 is then put on. It will ensure the tightness of the connection.
Bolts 13 are installed in the mounting holes in a certain sequence.
Install the cable mechanism. Its end is secured in the rocker arm 8 so that the plastic casing is wound in all the way.
Then lower the body of the drain valve 9 into the base 12 and secure it by turning it to the right. Check that the device does not touch the walls of the tank and the intake valve mechanism.
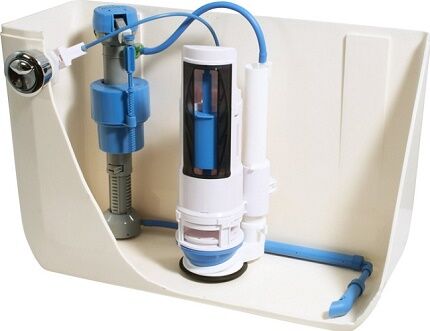
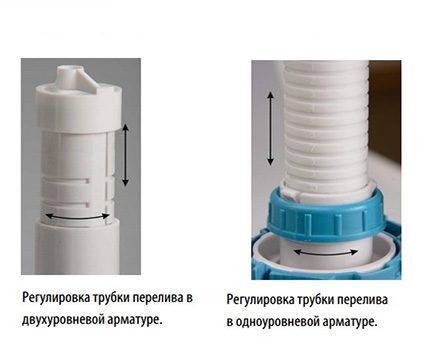
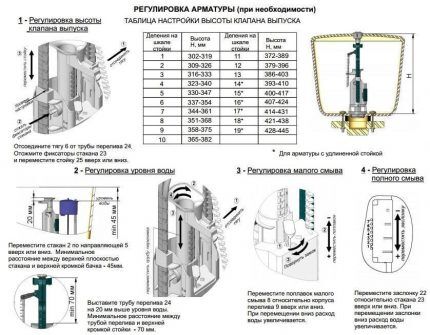
Next, adjust the height of the overflow tube 7. To do this, you must first turn it clockwise to remove it from the lock. After setting the required height, it is locked again by turning it counterclockwise.
When the tube height is correctly adjusted, the water filling level should not rise closer than 20 mm to the edge of the overflow tube.
The edge of the overflow tube, in turn, if there is a side hole in the tank (for connecting to the water supply), should be 10 or more millimeters below it.
Next, attach the push button to the tank lid.A special holder is designed for this. Connect the button to the cable so that it does not twist and does not cling to the filling valve. In tanks with a non-standard opening, an adapter ring is used.
If necessary, you can adjust the water filling level in the toilet cistern using the inlet valve settings.
Adjusting the water drain
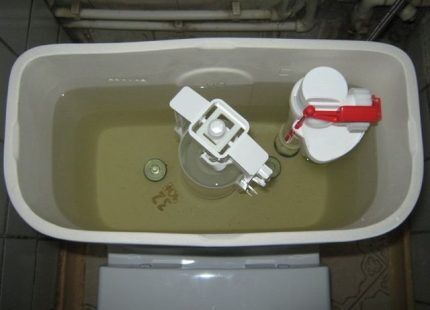
You can change the volume of remaining water after complete drainage using regulator 10 on the toilet valve body.
To increase the balance, it is raised; to decrease, it is lowered. You can adjust the valve so that the water completely drains from the tank by lowering the regulator all the way down.
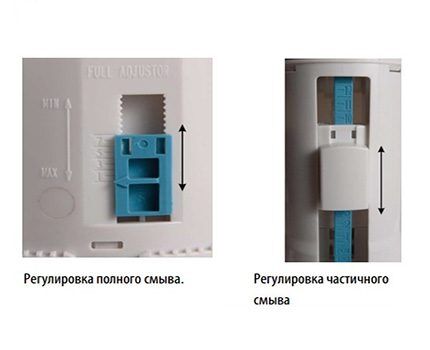
The small drain is regulated by a similar principle. But still, there are some differences. In some models, the adjustment lever is freely accessible; in others, the lever must be unlocked by turning to the right.
And then, when you raise the lever, the drain volume will decrease, and when you lower it, vice versa.
After installation and adjustment, the functionality of the system is checked - the small and large drain buttons should perform their functions.
When you press the small button, the small flush should be triggered, the large one should empty the tank almost completely, depending on the settings.
You may also find useful information on how to properly disassemble the cistern.
Maintenance of drain and inlet fittings
Since almost any tap water contains mechanical and chemical impurities, it is necessary to wash the equipment from time to time - the stop ring, the toilet fill valve filter.
Grains of sand, salt deposits and rust can damage equipment.
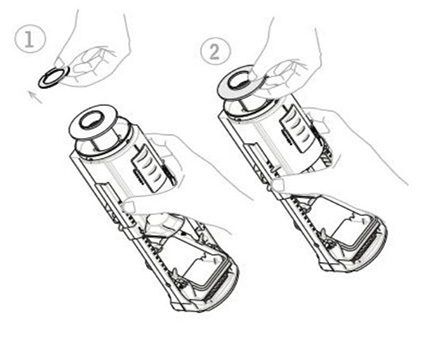
To avoid severe contamination, the ring is washed with water. To get to it, unscrew the drain button and remove the tank lid. Pull out the valve body by turning it counterclockwise.
To eliminate a leak in the area of the drain valve, it is most often necessary to replace it:
Clean parts without the use of aggressive detergents, such as those containing abrasive particles, organic solvents, alkaline or acid-containing substances.
Conclusions and useful video on the topic
How the cistern fittings work:
How to properly install the toilet, tank, drain and fill valves:
Everyone knows the truth: if you want something done well, do it yourself. This also applies to installing toilet valves. Once you understand the technical nuances, you will be able to install and configure the fittings yourself.
Have you changed the fittings of the drain tank more than once and can you give useful recommendations to beginners in this matter? Feel free to share your experience. Or do you have questions about installation or adjustment? Please ask them in the comments under this article.


I tried to change the toilet valve myself. He cursed everything in the world. Of course, the first thing I did was buy the wrong one. Okay... I took off my original one, took it to the store, and bought exactly the same one. Put! And what do you think? It's flowing! No matter how hard I tried, nothing worked out for me. In the end, I called a plumber from the housing office, who did everything for me in 15 minutes. For 500 rubles. So I don’t recommend getting involved in the epic)
Gregory! We have the same problem! So can you tell me what the plumber did and how he fixed the leak?
FUM tape or flax tow saves the day.
But lying is not good, Gregory! Boys used to beat me for this, and my father would have torn my head off! Why did I understand, yes, I see people like that here right away, and you didn’t answer the person. It must have been embarrassing. If the valve does not hold, throw away this device and buy an expensive imported one with good silicone or similar. Our rubber shrinks and shrinks from cold water and it’s finished. All my life I’ve been doing this and other things at home, even in the old apartment there was a spare valve installed, it still leaked, it apparently also became hardened by age from the air. And you guys, don’t make a fool out of the Russian man. It was your friend who wrote this call to call a locksmith—that is, his. The entire Internet is filled with such cunning people. Guys, think with your head when you're on the Internet, look for something!!!!!
I had to change the compact (tank+bowl) myself, it’s good that it was in the summer of 2018. I bought a bowl with a massive “shelf” for the tank + a tank with side water supply “cersanit”. The supply valve is a membrane valve, the drainage unit is a double button on top. The floor in the toilet is covered with ceramic tiles.I removed the old tank, the old bowl, and removed the wooden pallet under the base of the bowl (the holes for attaching the new base were beyond the dimensions of the wooden pallet).
I cleaned the place of the former pallet, prepared a 3:1 mixture of cement 400 + river sand + water = filled the void “to zero” with a thick mixture, applied a thin screed and “reinforced” it (min amount of pure cement on the surface of the screed). The completely hardened and cooled surface was painted 2 times with white PF enamel.
I marked the outline of the new “sole” of the bowl and 2 holes. for fastening. Drilled 2 holes. for plastic “new settlers” (d hole - D drill = 1mm, for density). I set “new residents” to zero. I covered the unglazed bottom of the bowl with a layer of silicone, installed it (joined the oblique drain of the bowl with the previous adapter + silicone between the holes), secured it with screws (the bowl does not wobble). Clean and dry surfaces of all joints during installation (cistern + corrugated ring + toilet; mounting holes for cistern + toilet;
Conical, cylindrical rubber, ring seals, metal. washers, complete mounting bolts and nut threads; installation location and corrugated ring; The surfaces of the connection with the “body” of the tank of the drain block and the water supply block) were coated with silicone. Adjusted the water level in the tank in the drain block. The connection of the “female” union nut of the flexible hose to the “male” “shank” of the shut-off valve was sealed with FUM tape. So far it's working. The water hardness in the city (water utility from the Seversky Donets) is high, the filter stations are weak (in the regional city where I studied at the university, the hardness was 5-8 units lower [Ca++Mg++ m.eq/l]).
THE BOWL IS NEVER PUT ON CEMENT CONCRETE TILES!!! EITHER A HARDENED SILICONE BAND AROUND THE PERIMETER OF THE HEEL OR A RUBBER LAYER along the contour of the heel of the bowl!!! why don’t I tell you - you graduated from high school and I didn’t)))) I just set it, broke it, set it, and so on for 37 years))))
gentlemen, don’t worry about your brain, call me))) I have been in plumbing for 37 years, I know all types and types of shut-off and inlet devices, believe me, they are quite complex!!! Especially when it comes to adjustment, I don’t argue, you can waste a day, but to master it, is it really cheaper? I won’t come empty-handed and zips of all stripes, but if you send a photo, then I’ll grab exactly your type))) remember - plumbing is quite complex and requires experience, both the work and the equipment, and remember the pressure in the system!!! and below are neighbors with European renovation))))