How to make a water-heated floor under linoleum: design rules and an overview of installation technology
The heated floor system creates an atmosphere of coziness and special comfort.In some rooms, such a complex can become the main heating option, allowing you to abandon traditional radiators.
However, before deciding to install it, it is necessary to calculate the system, take into account the upcoming operating conditions and a number of parameters. An important factor is the type of flooring. The material affects the heating efficiency and the heating line installation technology.
Many people prefer to install a water-heated floor under linoleum - this coating is affordable and has good performance characteristics. We suggest you understand the operating principle of the system, its components, choose the optimal connection option and pipe laying scheme.
In addition, we will tell you how to calculate a warm floor and select pipes, and also describe a step-by-step technology for installing a heating circuit under linoleum. Expert recommendations will help you design and install a reliable and efficient heating system.
The content of the article:
- The nuances of using linoleum with VTP
- General operating principle of the system
- Is it possible to “hook” the system to the central highway?
- Options for pipe laying schemes
- Calculation of heated floors
- Requirements for premises and selection of pipes
- Possible system installation options
- Valuable recommendations from experts
- Conclusions and useful video on the topic
The nuances of using linoleum with VTP
Water floors have become so popular in cottage villages and private housing construction, that their systems began to be installed in newly built suburban settlements, where special heat exchangers were already provided and installed in advance to connect this structure.
The main and significant advantage of this heating system is the economical consumption of thermal energy, eliminating the influence of such harmful factors as electromagnetic and electric fields.
The following points are considered to be the fundamentally important disadvantages of the HTP installed in homes:
- dependence on gas or other boiler equipment;
- labor intensity of installation work;
- increasing the height of the floors, which may be unacceptable in some cases;
- risk of water leakage in pipes if installation technology is not followed.
You can overcome the listed disadvantages if you carry out each stage of installing a heated floor to the highest possible quality.
Owners of private country real estate are not very willing to use linoleum as an external covering for heated floors due to erroneous suspicions about its household safety. Linoleum, unlike other coatings, is a rather demanding material for intense heating.

If you follow all the prescribed standards for regulating the temperature of underfloor heating, then the linoleum in the house will not warp, swell under the influence of excessive heat, and, accordingly, release harmful substances.

By using high-quality, certified linoleum for water flooring, maintaining the normal heating mode, you will enjoy the comfort of a heated floor. This is the case when linoleum can become no worse than ceramic tiles or laminate.

Thanks to modern technologies in the production of floor coverings, you can safely use linoleum as a finishing material for laying it on a water floor installed by you or a construction team.
General operating principle of the system
The basis of such a room heating system is two-pipe heating circuit, operating on the principle of forced circulation of water or other coolant. Pipes and manifolds will be connected to the devices.

The general scheme includes the following important components:
- boiler group - ensures uninterrupted circulation of hot water through the collectors;
- return and supply lines for feeding group "manifold + mixing unit", distribution manifolds;
- heating fittings;
- supply pipeline.
The heart of the heating group is the boiler. Its other equally important components are a safety group, an expansion or compensation tank and a pump.
If we briefly describe the principle of operation of the system, it will look like this:
- Heated water comes from the boiler. It goes to a two or 3 way thermostatic valve. As soon as the temperature exceeds a critical value, access to water from the return pipeline is opened and the temperature is equalized.
- The operation of the thermostatic valve is controlled by a thermostat. The mixed flow reaches the thermostat after passing through the circulation pump.
- When the water warms up to the set temperature, the mixture from the return stops; when it changes upward, it opens again. Thus, the temperature of the water circulating in the system is regulated.
- Directs the coolant along the circuits of the collector or distributor comb. This unit is assigned not only a distribution function, but also the task of collecting and sending coolant to the return pipeline.
By and large, a water heated floor is the same radiator, but located horizontally and protected from operational loads. If there is no control unit, the system will only work if the water temperature in the system does not exceed 50°C.

The system itself is not flawless: it has inertia, warms up the room for a relatively long time - from 4 to 6 hours. Difficulties also arise at the design stage, when water floors are the only source of heat.
Installation is expensive and reduces the height of the rooms due to the fact that the floor rises. It is not easy to repair a pipe system.
Is it possible to “hook” the system to the central highway?
This question worries a lot of people. If the answer is unequivocal, then it’s better not to. Electrical systems are usually used for heated floors in apartments due to the frequent occurrence of problems when installing a water heating option. But in general, it is possible to power a water heated floor from the central line.
So, without harm to the functioning of the central heating, you can install a heated floor in a separate apartment according to several correct schemes.
Stationary heating point
The key element of a stationary heating point is circulation pump. Pipe bends are welded to the central heating riser. In this case, the water will have a stable temperature thanks to the operation of a pre-installed thermostatic valve.
If this option is chosen, it is imperative to protect the circulation pump by installing a pressure or flow regulating relay.


When an overhead thermostat is installed, it will turn off the pump every time the temperature reaches the permissible minimum - about 20°C. The system is even better controlled by a regulator that adjusts the temperature based on the temperature in the room.
Option with vertical wiring
If the heating system is designed in such a way that there is only one exit to it, the heated floor is connected according to the principle of radiators. By choosing this solution, you can achieve 2 times more heat than with conventional central heating.
If there are 4 risers in an apartment, water is taken from the central system from two, and liquid flows in transit from the remaining ones.
The components of such a scheme are the following elements:
- risers;
- balancing valve;
- 3-way valve;
- valve drive.
Old radiators are dismantled and a “warm floor” system is installed instead. This will not affect the hydraulic mode of the system in any way, because The balancing valve settings will remain unchanged.
The floor circuit is connected in parallel. It is important to take pipes of the same length so as not to adjust the heat exchangers in the next circuit.

Options for pipe laying schemes
So, you have decided on the connection method and now it’s time to think about design. There are several schemes for laying VTP.You need to choose them carefully - the performance, reliability, cost of the system and how the heat is distributed throughout the room depend on this.
The schemes are as follows:
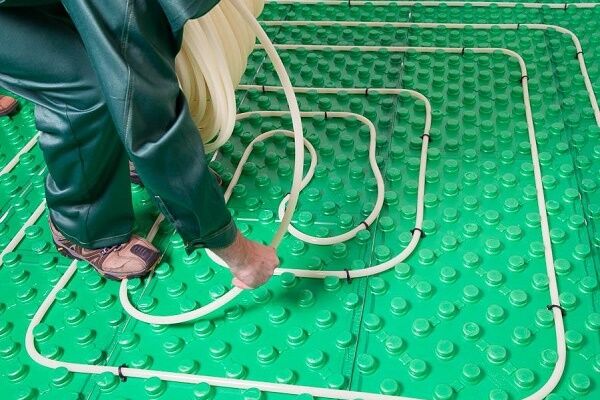
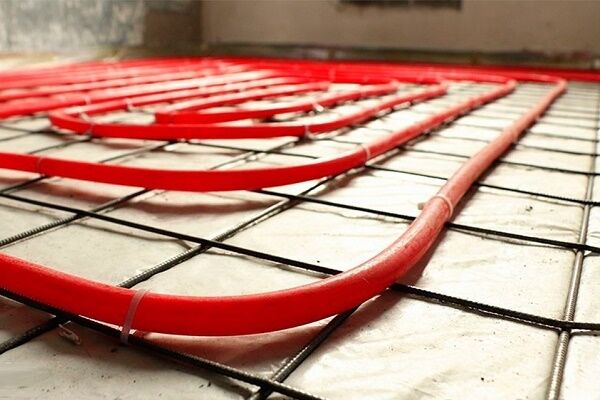
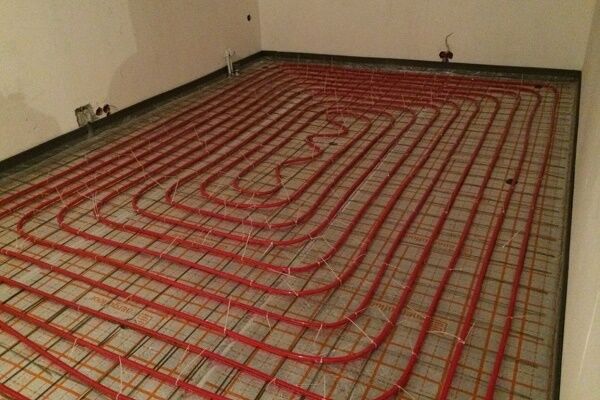
- "Snake." It can be single or double. In the first case, the pipes run along the wall and are rounded at the end of the trajectory, changing direction and covering the entire area. In the second, the installation scheme is the same, but a pair of pipes are laid parallel to each other at a distance of 3 cm. With this technology, heating of the floor surface is reduced in stages.
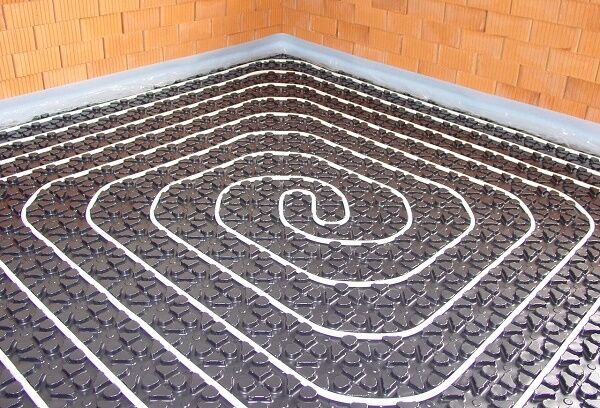
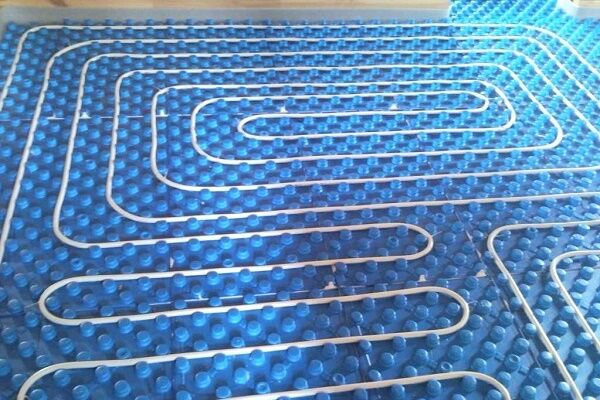
- "Snail." In plan, the diagram looks like a spiral that closes at the end point. A spiral scheme, the installation of which begins from the depths of the room to its center.
- Combined method. Several methods are used in one area, but the most effective one prevails.
Since the water temperature gradually decreases while moving through the pipes, the choice of one of them determines how evenly the heat will be distributed in the room. The starting point when laying pipes is the walls. Then they move towards the exit or the center.

Regardless of the chosen scheme, there are several general rules by which pipes are distributed. The first of them is to start installation from the outer wall. The next requirement concerns the step size - no less than 10 and no more than 30 cm. It is imperative to calculate the hydraulic resistance.

The greater the number of turns the system has, the greater the value of hydraulic resistance. The same thing happens when the length of the pipes increases. If installation is carried out in a screed, pipes cannot be joined using couplings.
The choice of installation scheme is influenced by the following circumstances:
Experienced installers do not recommend laying pipes in those areas of the house where plumbing fixtures or cabinet furniture will be located.
Calculation of heated floors
The required amount of pipe is calculated using the formula:
L = k×S/H,
Where:
- L — length of the water floor;
- S - area covered by the contour;
- k — increasing coefficient, usually it is taken in the range from 1 to 1.1;
- H — laying step.
To the final figure, 4 m are added, 2 of which will be used to connect the direct pipe, and the other 2 will be used to connect to the return manifold.
Knowing the loop pitch, the pipe flow rate can be taken from the table:

For the efficient operation of the system, the maximum possible length of the circuit is of great importance. If it is exceeded, the circuit may stop functioning as a result of statistical equilibrium in the pipe.
Professionals recommend choosing a length of no more than 70-80 m for a pipe with a cross-section of 1.6 cm. On both sides of the pipe, the floor is heated on both sides by approximately 100 mm. For a pipe with a cross-section of 2.0 cm, the maximum length is 100-110 m.
If the calculation results in a length that exceeds the maximum permissible, the room is divided into 2 or more zones and several similar circuits are installed. In the latter case, installation of a manifold cabinet will be required.
To calculate a pump for a heated floor, use the formula:
Q = 0.86P/(t1 -t2),
Where:
- P is the power of a separate circuit in kW;
- t1 And t2 — flow and return temperatures, respectively;
- 0,86 — correction factor for water.
Having calculated each circuit, the results are summed up and the required performance is obtained.
Additional information on calculating pipes for heated floors is provided in this article.

The pressure is calculated using the formula:
H = (R*L+K)/1000,
Where:
- R — hydraulic resistance;
- L — length of the longest contour;
- N - pressure,
- K— power reserve factor.
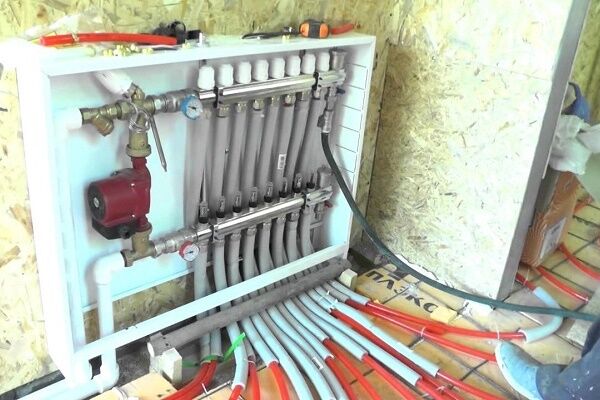
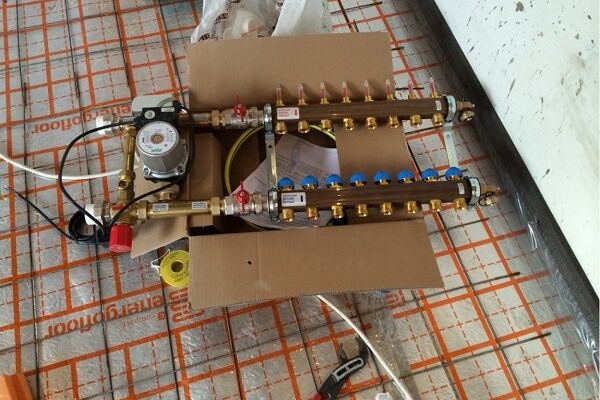
When choosing a boiler, you should focus on the temperature adjustment range - it should start from 30°C. To distribute heat along the circuits, a collector is installed, selected according to the number of circuits. The number of pins on it should ensure the connection of all circuits.

The budget type manifold has shut-off valves, but there are no regulators that allow you to adjust the system. In equipment belonging to the middle price segment, there are regulators with the help of which the water flow in any circuit is adjusted. The most efficient and expensive collectors are automated.
Here, each valve has a servo drive, mixing units with a two- or 3-way zone valve. In such systems, it is possible to regulate the temperature of the supplied water and mix liquids with different temperatures.
A manifold cabinet of the correct dimensions must be selected in accordance with the dimensions of the manifold group.
Under it there should be free space necessary for bending pipes. It is installed at a certain distance from the surface of the heated floor. It can also be installed in a wall, but not in a load-bearing one.
Requirements for premises and selection of pipes
Water floors can be laid in ready-made rooms.
They must meet the following fundamental requirements:
- Taking into account the rather large thickness of the heated floor (8-20 cm), the design height of the ceilings of such premises should allow property owners to install the selected heating system.
- The height of doorways is at least 210 cm.
- Total heat loss in the premises should not exceed 100 W/m2. If they are actually higher, then you should first think about better insulation of the building, so as not to heat the street in vain.
- The surface of the base is smooth and clean, unevenness is no more than 5 mm. Sudden changes can negatively affect the unhindered flow of coolant in the pipes; theoretically, they can affect the airing of circuits and increase hydraulic resistance.
- The plastering and finishing work in the premises must be completed, and double-glazed windows must be installed in the window openings.
The choice of pipes is the most important task at the stage of preparation for the installation of a warm water floor. Their characteristics determine how efficiently the floor will transfer heat.
As a rule, one of three types of pipes is purchased:
- Copper. An expensive option, but the most durable and trouble-free to use. An alternative to a copper circuit is stainless steel pipes.
- Metal-plastic. Affordable, high-quality pipes that can hold their shape and are easy to install. Usually, pipes with a cross-section of 1.6 cm are chosen. The footage is calculated in advance with great accuracy, otherwise the pipe sections will have to be connected, and this is extremely undesirable.
- Polyethylene. With them, easier installation of the floor pipeline is possible, cross-linked polyethylene pipes they are not afraid of freezing and can be easily repaired. Their disadvantage is that when the temperature rises, the water can straighten out and damage the integrity of the structure.
Copper pipes are the best option because copper is the best conductor and coolant. Copper piping in heated floors guarantees maximum heat transfer from the water circuit. The material will be used for a long time and flawlessly, but it is too expensive, so it is rarely used.
Possible system installation options
Water heated floor without screed
There are several ways to install heated floors without screed:
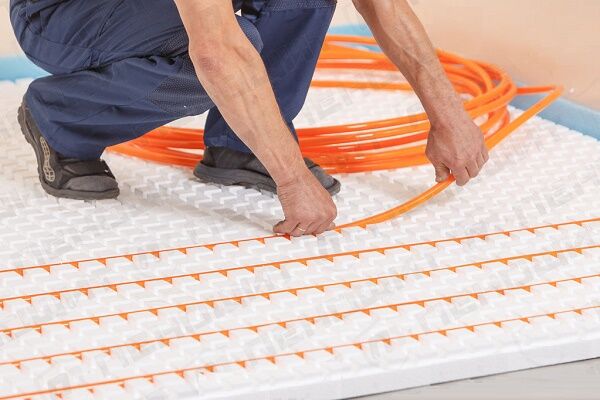
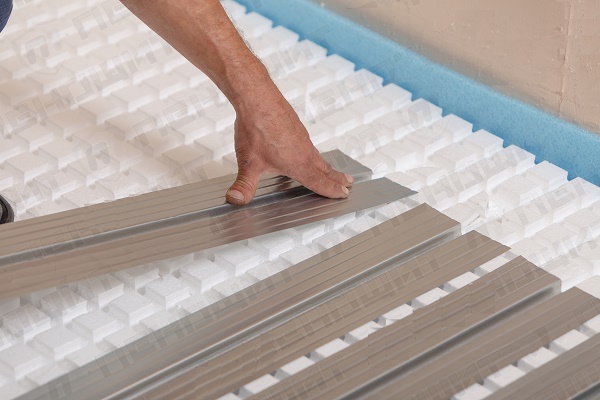
- For polystyrene foam mats. Heat distribution plates are mounted in them, having grooves into which the pipe circuit is inserted. Options for underlays for heated floors are described in detail Here.
- In the gaps in the wooden floor, which are specially left between the boards.
- Into milled grooves in a wooden base where heat exchangers and pipes are laid.
Instead of heat exchange plates, you can choose a simpler option - aluminum foil.
The technology for installing a lightweight heated floor is simple, but all standards must be met. Violations during installation may lead to the need to tear off the finished coating to eliminate the defects.

Depending on the area of the room, materials are selected. To install the circuit, you will need good quality planed boards with a thickness of 4.5 to 5 cm. Using a cutter, grooves are selected in the boards for a certain pipe diameter with the required pitch.
At one of the ends, select a “quarter”. Instead, you can use purchased mounting strips with ready-made recesses.In addition to the grooves in the boards, it is necessary to provide semicircular recesses at the turning points of the contour.

If the heated floor serves only as an addition to the main heating, you can make a laying step of up to 30 cm. If this size is exceeded, there will be both warm and cold areas on the floor. When this heating system becomes the main one, choose a step from 10 to 15 cm. Laying with a smaller step is very difficult to perform.
The beams for the logs are prepared based on the considerations that they will be laid in increments of 50 to 60 cm. In addition to the boards and beams, you need sheets of plywood or OSB 8-10 cm thick, prepared in such a way that they cover the entire area.
It is necessary to purchase foil insulation based on foam plastic with a thickness of 0.5 - 0.6 cm and non-foil insulation made of polyethylene foam with a thickness of 1-1.5 mm in such quantity as to cover the entire surface.
A warm floor, built on polystyrene mats with bosses, can be completed with a dry screed arranged in the form of a flooring, or poured with a traditional cement-sand mortar. In the second case, filling work is performed in the following order:
Installation technology on a wooden base
First of all, you need to prepare the existing wood flooring. All gaps and cracks are eliminated. A new floor, not yet painted or impregnated with drying oil, is covered with an antiseptic. Next, foil insulation made of foamed polyethylene is spread on the prepared base.
The strips are laid end-to-end with the foil layer facing out. Using a stapler, the covering is attached to the boards. All seams are sealed using foil tape. The logs are fixed perpendicular to the plank base, having previously leveled them.
Lay boards on the joists. Near the wall along which the taps are planned to be installed, a groove is cut out to accommodate the pipe supplying coolant and return. Using self-tapping screws, attach the boards to the joists.
Install pipes with taps - direct and return, then install a bypass equipped with a valve between them. This solution will make it possible, if necessary, to turn off a separate circuit, leaving the system operational, and also to perform circuit balancing.
Before laying the pipes, all recesses are cleared of dust and sawdust using a vacuum cleaner and 25 cm wide strips of foil are prepared.
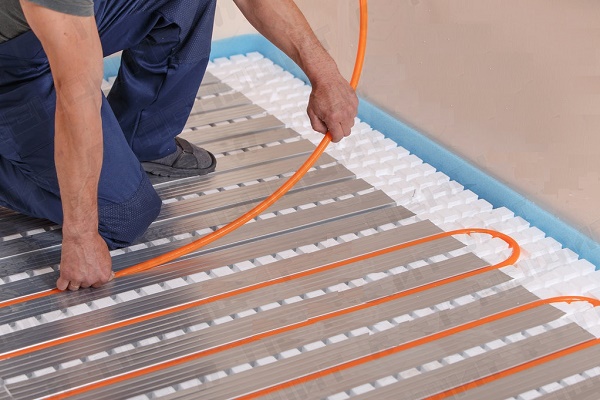
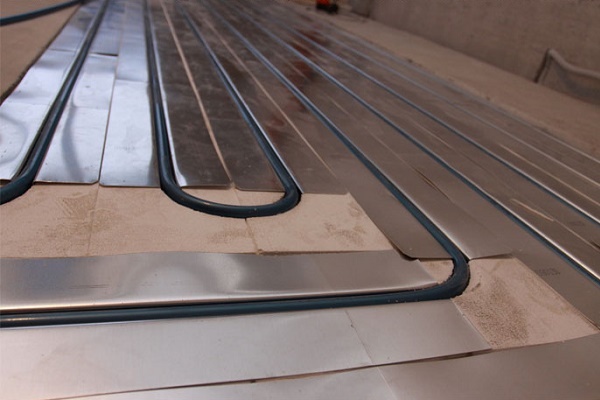
Strips of foil are laid out on top of the recesses for placing pipes in the direction from one wall to the other. The pipes are laid on the foil and recessed into the grooves.The foil will heat up and reflect the heat, directing it towards the room. The pipe is connected to the supply pipe fitting.
Fold the ends of the foil protruding beyond the groove, bending them so that they lay on the previous board, then secure them with a stapler. The pipe is fixed to the floor along its entire contour using plates - metal or plastic, placing them at a distance of 60 to 70 cm from each other.
Particular attention should be paid to those places where the pipe makes a turn.

The entry and exit assembly will be located above the floor, so it must have an aesthetic appearance. You can’t deepen it into the wall, but you can build a beautiful box with a door that makes it possible to freely use the control taps.
After performing these operations, the heated floor circuit is checked for leaks, for which water is released into it, and an excess pressure is created that is one and a half times higher than the working pressure.
If no leaks are observed, proceed to the next stage of installation: the entire surface is covered with thermal insulation, covering the walls with the material to a height of 10 to 15 cm. This will protect the coolant from rapid temperature loss.
Next the plywood is laid. The ends of the sheets should not touch the pipes, because When fixing the material with self-tapping screws, they can be damaged.
Having finished installing the plywood sheets, the entire surface is scraped. The seams are sealed with sealant or epoxy mixed with sawdust. Next, cut off the ends of the foil that protrude beyond the plywood, and clean off the seal if it protrudes above the floor level.Lay out the linoleum, trim it so that the edges of the canvas cover the walls by 3.5 centimeters.
When the linoleum has rested and straightened out for a day, and sometimes more, cut off the excess using a metal ruler. A gap of 0.8 to 1 cm is left between the linoleum and the wall. After trimming, it is advisable to leave the coating in this position for another 24 hours and then secure it with glue, tape or another method.
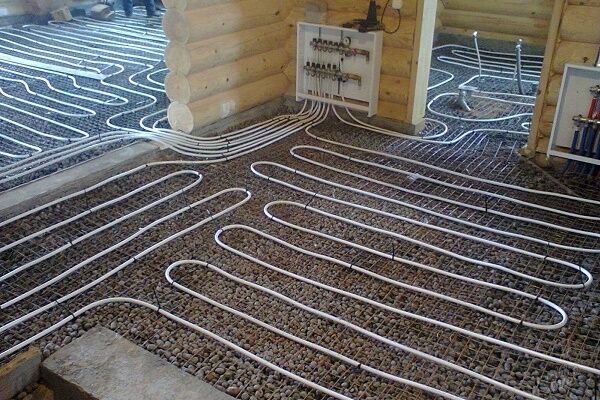
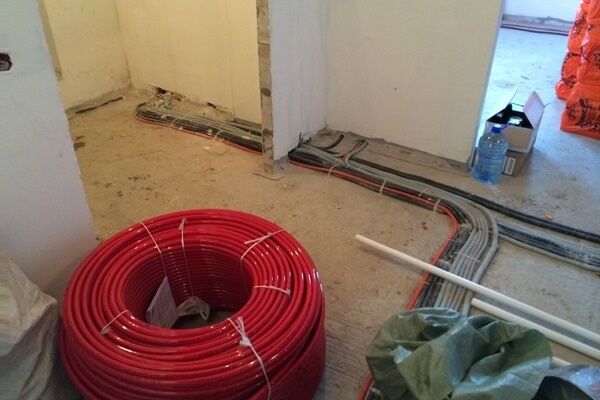
Water floor in concrete screed
The cake, obtained using wet technology or by laying it in a screed, includes several layers. The first is the insulation, then the mesh or tapes - the so-called fixation system, then the pipeline and the screed itself. Completes the entire floor covering.

In apartment buildings where there is a risk of flooding in the rooms below, a waterproofing layer is also placed under the insulation.
Before starting installation work, you should select a location for the collector box. It contains not very aesthetically pleasing valves, pipes, and drainage outlets. The range of cabinets is very large, so you can make a choice based on dimensions and other important parameters.
The installation process itself consists of the following steps:
- Clean and level the surface. Check the horizontal level. A maximum difference of 10 mm is allowed; if more, leveling is carried out.
- Lay a waterproofing film.
- Edge insulation in the form of a damper tape is laid and secured around the perimeter of the room.
- Lay out the insulation in a layer of 10 to 50 mm.
- A vapor barrier layer is placed on top.
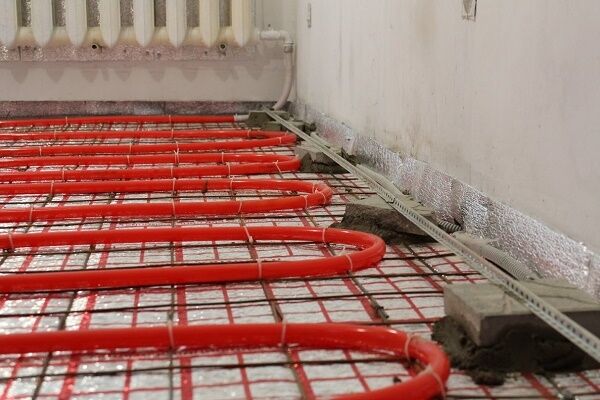
- Reinforcement is performed with mesh with cells from 150 to 200 mm.There is one interesting nuance at this stage: most often the reinforcing layer is spread before installing the pipes, but experts recommend doing this after so that the load on the pipeline is distributed evenly.
- Start installing the floor, for which:
- connect the pipe to the outlet pipe of the supply manifold;
- fix the pipes to the reinforcing mesh in increments of about 100 cm, using special clips, ties or strips, and after installation is completed, connect the pipe to the outlet on the comb.
- Test performance by turning on the floor for several hours. A well-executed installation is indicated by a decrease in pressure of approximately 003 MPa/h. at approximately the same water temperature.
- The screed is poured taking into account that it should rise 20-30 mm above the reinforcing layer or pipes.
- A layer of sound insulation and coating are laid, but only after 30 days, when the screed is guaranteed to dry under natural conditions.
In the process of installing a water underfloor heating system, standard steps are performed:
Now everything is the same, only in more detail.
Stage 1: waterproofing the base
The initial steps are to form a waterproofing layer, which is laid under the insulation. You can lay 2 waterproofing layers (on both sides of the insulation). The second option is more preferable.
When laid in 2 layers, the film will prevent cement laitance from the screed from penetrating between the seams of the insulation and will hold back moisture coming from below.
The waterproofing material can be any of the materials offered on the market. The most affordable and popular is considered to be ordinary polyethylene film.

The base of the floor is covered with film. At the joints the fragments are placed inoverlap about 15-20 cm, for better sealing they are glued with tape. If you attach the film to the bottom of the insulation, then the pipes on the heated floor can be attached directly to the heat-insulating sheets.
Waterproofing laid on top of the insulation will require laying a mounting grid onto which the heated floor pipes will be attached. If you use EPPS as insulation, the laying of the waterproofing layer can be excluded from installation.
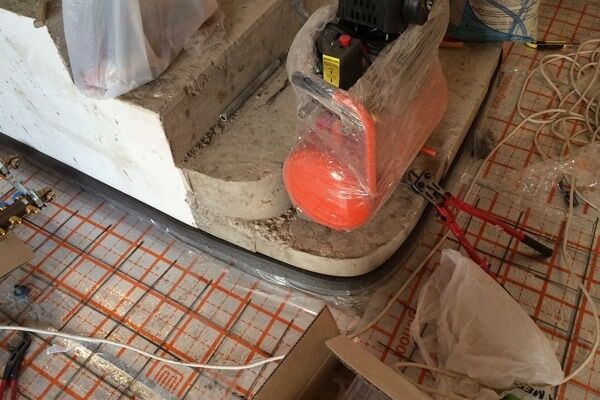
Stage 2: laying damper tape
Damper tape is a mandatory element for preparing the base of the floor for a concrete screed. The linear expansion of concrete when heated to +40°C is 0.5 mm per 1 m2. The tape laid around the perimeter of the room will become an obstacle to the negative influence of such a factor and will prevent possible cracks in the body of the screed.

In a budget option, you can use strips of foam rubber or improvised thermal insulation materials up to 2 cm thick. Such strips need to be glued to double-sided tape or screwed with screws or self-tapping screws. Subsequently, the excess damper tape should be carefully trimmed with a knife.
If the room has a fairly large floor area or a non-standard shape, then it should be divided into rectangular or square zones.This is convenient for distributing expansion gaps between them and laying expansion joints. Incorrect position of the gaps will cause destruction of the screed.
Here it is necessary to lay damper tape around the perimeter of the seams, at the site of which the reinforcing mesh will be separated. At its base, the deformation gap should be 10 mm thick, and its upper part should be treated with sealant.
If the pipes are laid along the screed in expansion joints, they must be placed in a corrugation, 50 cm in each direction. This is a requirement of the building rules SP 41-102-98.
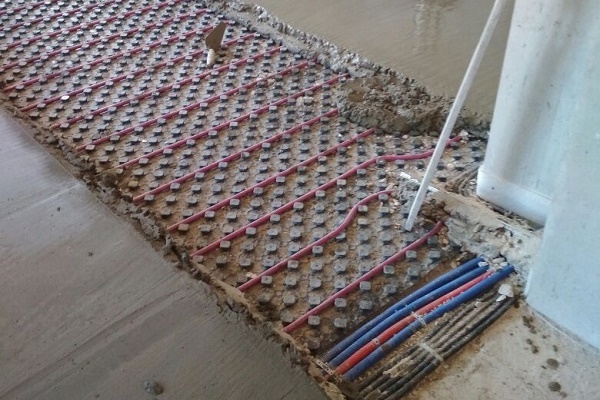
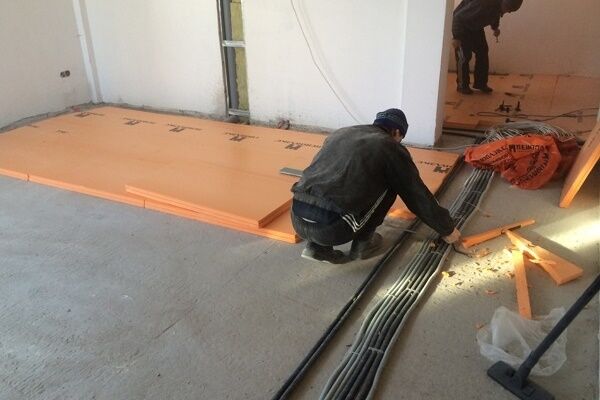
Stage 3: laying thermal insulation material
The further operation consists of laying insulation. The construction market is saturated with a huge variety of options.
The most popular and inexpensive option is the popular 10 cm thick sheet of polystyrene foam. It has low thermal conductivity and high strength, and is not afraid of moisture, which it does not absorb at all. There are special grooves on the side surfaces of the material.
A more expensive option is functional profile mats.

These materials are designed to prevent heat from passing down from the pipes to the ground and direct it upward into the interior of the house.

If you plan to place a water-based heated floor above the basement of the house, then the insulation must be laid at a thickness of at least 50 mm.
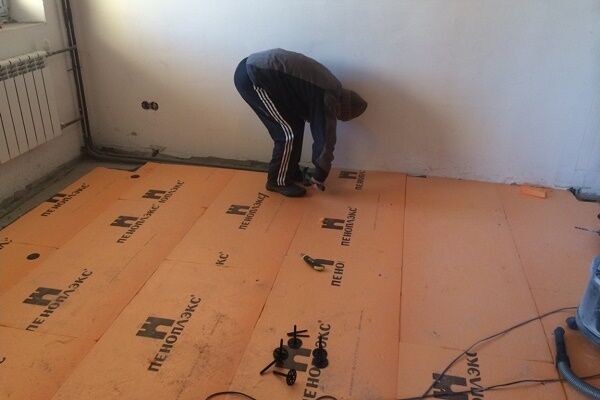
The insulation is laid on the floors in such a way that the joints between the sheets are carefully moved together. When installing a warm water floor, insulation is a mandatory element of the preparatory base for the finishing screed.
It is extremely important to ensure reliable fastening of the slabs EPPS to the rough base, otherwise they will float when pouring the concrete screed. The ideal choice of fastening is disc-shaped dowels, with which you should fasten the heat insulation slabs at the joints and in the center.
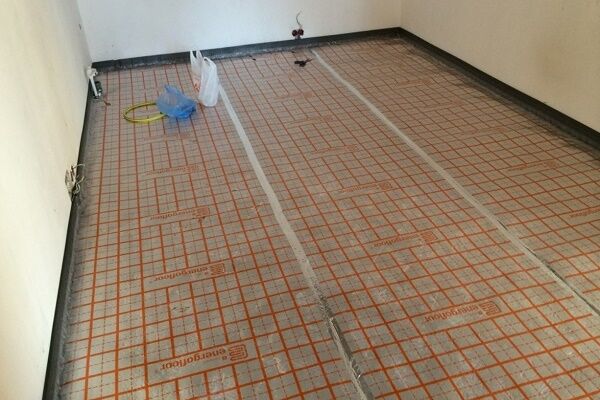
Stage 4: reinforcement and fastening of pipes under the screed
The first layer of reinforcing mesh is laid on insulation sheets. The mesh in this case is used as a basis for attaching water circuits and for consistent heat distribution over the entire surface of the future heated floor. The pieces of mesh are tied with wire, then the pipes are secured to the mesh using nylon clamps.

The metal mesh for reinforcement can be replaced with plastic. It reinforces the screed well, saving it from dangerous cracking. Laying this material is quite simple. Plastic mesh is sold in rolls, its price is not high, and damage to pipes is absolutely excluded.
After the reinforcing mesh is laid, the question of protecting the pipes will arise. When you walk on a metal mesh, you can damage the pipes and the mesh itself, so it is recommended to walk only on pre-installed boards or pieces of plywood.
In construction practice, there is a competent solution, using which when installing a water floor, you will prevent potential damage to the pipes at the time of pouring the concrete screed.
The following sequence of work must be followed:
- Prepare a cement mortar at the rate of 1 part M400 cement + 3 parts sand.
- In the process of laying the reinforcement, patches of mortar are formed; they should partially protrude beyond the edges of the mesh, approximately 2 cm.
- "LJapanese» are placed at intervals of 30-50 cm, this will then allow you to lay boards and other available material on them and safely move around the entire pouring area.
An additional advantage of this solution is the fixation of the grid. As workers walk on the floor, it bends, which can damage the welds.
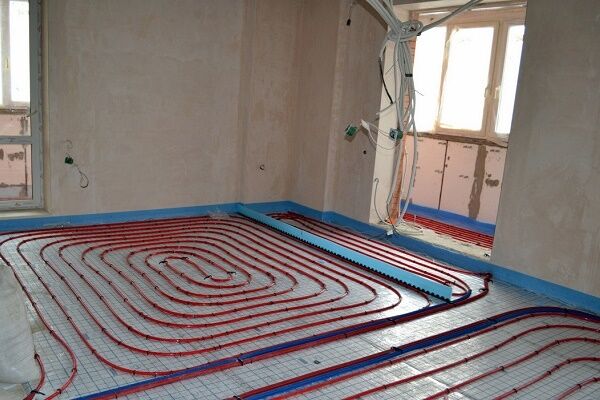
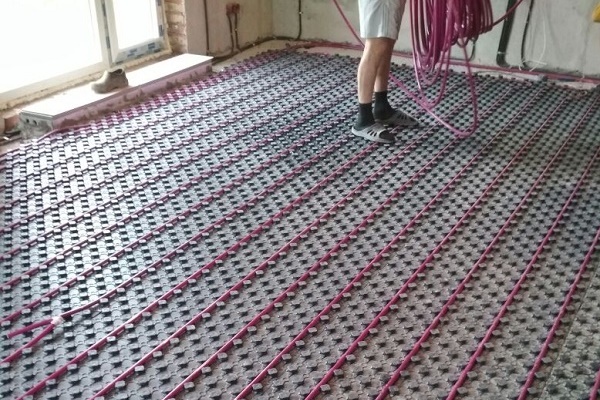
Stage 5: laying the contours of a warm water floor
As we already wrote above, the arsenal of modern methods for installing a water floor contains 2 popular schemes pipe layingwhich are used in practice:
- "Snake". A simpler wiring diagram. Its disadvantage is that at the beginning and end of the floor there will be a temperature difference of 5 to 10°C. The water, moving from the supply manifold to the return manifold, begins to cool.
- "Spiral" or "snail". The scheme is quite complex to implement, but with it t ̊ of the entire floor will be the same, since the supply and return will take place together. In 90% of installation cases, specialists use this method of laying pipes.
There are combined methods for laying pipes. In particular, the outer zones can be laid as a “snake”, and the central part as a “snail”.

Each of the pipe laying methods described above allows the use of a variable laying step. This is a method where the step at the edges will be 100-150 mm, and in the center of the room - 200-300 mm. That is, in one room you can heat the edges of the room more intensely.
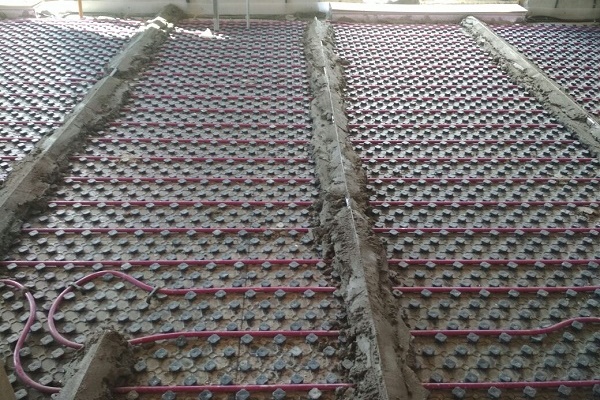
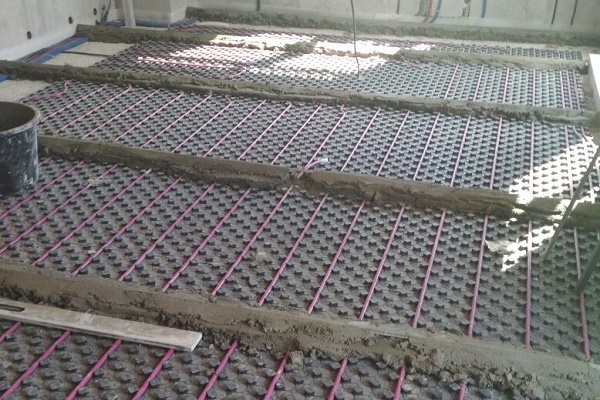
Stage 6: arrangement of the screed
To fill the screed, choose a concrete solution of grade M-300 or more.
Composition of the M-300 solution:
- cement, M-400;
- sand;
- crushed stone fraction 5*20.
The working proportion of the solution is as follows: C/P/Sh (kg) = 1/1.9/3.7.
The screed should rise 3-4 cm above the pipes so that the thermal energy of the warm water floor is distributed evenly over the entire floor area.
The screed must be poured after installation work on all circuits and mandatory hydraulic tests. If the thickness of the screed is more than 15 cm, then an additional recalculation of the thermal regime of the water floor will be required.

If you have done all the operations correctly, then a well-mixed concrete screed solution will not release water and delaminate. At an air temperature of +20°C, the screed will begin to “set” after 4 hours.
After three days after pouring, the screed will gain only half its strength; it will finally harden only after 28 days.The warm water floor heating system cannot be turned on until this moment. Linoleum should be laid after it is completely ready.
Valuable recommendations from experts
When connecting a heated floor to a central heating system, some points are very important. Experienced craftsmen advise paying attention to them. Any connection scheme to the central heating system requires fastening to the end input of the comb using fittings. The screed must be made as thin as possible and must be reinforced.
After a test run, the system is fully warmed up within 2 days. When passing through walls, use corrugated pipes. The distance from the pipes to the top of the screed is at least 30 mm. You should never use coolant supplied directly from the central heating system; the hydraulics of the house may suffer significantly from this.

If the heated floor is connected to an electric boiler, the batteries can be connected to the heated floor system directly, and each circuit can be combined into one through a manifold.
Since in the central heating system the pressure reaches 16 atm. This point should be taken into account when selecting structural elements - they are mainly designed for 1-2.5 units.
You need to choose a scheme taking into account the area of the apartment. If it is more than 30 m², it is better to connect it to different collectors.
The specifics of arranging a warm water floor on different bases are described in the articles:
- How to make a heated floor under linoleum on a concrete floor: detailed instructions
- Warm floor under linoleum on a wooden floor: step-by-step installation instructions
Conclusions and useful video on the topic
After watching this video, you will master the basic principles of installing a water-heated floor and will be able to do everything yourself:
Professional recommendations for choosing pipes:
Nuances of installation using a collector circuit:
To create a water-heated floor yourself, you need to arm yourself with patience and high-quality building materials, as well as certified equipment. Entrust the adjustment of balancing valves, installation of the boiler and pump to experienced specialists.
The main advantage of a “warm” floor is the cost-effectiveness of this system. In addition to reducing your heating bills, your home will always have a comfortable atmosphere. The process itself is not very complicated, and any home craftsman can master it.
Do you have anything to add, or do you have any questions about installing a water-heated floor under linoleum? Please leave comments on the post. The contact form is located in the lower block.


Of course, a lot has been written and in detail, but I ask for specific advice. It is required to install a “warm floor” in a children’s room in an entertainment center. The area is 40 m2, there is central heating, the budget is limited, but I want to do it well. Is it worth getting involved with central heating or installing a boiler like with a screed in this case - is it necessary or not? Well, and a laying scheme, otherwise every master here advises his own in order to get more money.
Maxim, a specific answer can only be given on the spot; you have written too few introductory notes. In general, I’ll tell you this: installing a water heated floor is not a cheap thing, even at the stage of obtaining documents you will have to spend money.
It is difficult to combine “quality” and “limited budget”. On 40m2 you will need to install a collector and make several circuits for uniform heating. The estimate for the pipe alone will be impressive. Not to mention the pump, automation, mats, screed, etc. You can, of course, save on materials, hire China, hire simpler installers, and all that. But that comes later!
First you need to find out whether you can connect to the central center, or whether the technical center does not allow it. And as for installing “your own boiler”, this also cannot be done without permission, will the gas office give you the go-ahead? Start by getting permits.
We chose a water heated floor for ourselves in a house under linoleum based on economic considerations. I won’t say that it’s cold in our house; we did more of a warm floor for the comfort of the child, who plays and crawls - and everything is on the floor. We didn’t regret choosing this system - there is a gas boiler, the gas consumption is not much more. Everything was installed strictly according to the standards, the linoleum did not swell in 2 years, and there was no foreign smell in the house. But we also have linoleum of good quality and high density.
I bought a gas boiler with an internal combustion chamber and a pump, which is suitable for heated floors. I’m thinking of using metal-plastic pipes, they seem to bend well and are durable, I’ve already dealt with them. How long will the connections last? Or should we not connect the pipes under the screed, but bend them to the minimum step so as not to burst? Maybe there is a more acceptable option?