Laying a drainage pipe with your own hands: step-by-step instructions + analysis of the nuances
Drainage will protect the underground part of the house from inevitable destruction, protect plant roots from rotting, and get rid of stagnant puddles.Numerous advantages are somewhat offset by the price, the size of which is justified by a large amount of work. However, they can be fully or partially completed with your own hands, don’t you agree?
We will tell you how to install a drainage pipe with your own hands, and what system components still need to be installed. For those wishing to make their own drainage, we offer reliable information about the principles and rules of its construction. The information presented to you is based on regulatory requirements.
The article describes in detail the types of drainage systems. The organization technology is outlined, recommendations are given on the selection of pipes and related materials to ensure groundwater drainage. To help interested visitors, a selection of photos and video guides are included.
The content of the article:
Prerequisites for organizing drainage
Drainage is an expensive system, even if you don’t have to pay for the services of specialists and the owner of the site is ready to do all the work himself. Therefore, you should figure out how much it is needed at all.
The need for a system cannot be determined by eye, because groundwater may lie close to the surface, which becomes a real problem only during floods or heavy rains.
Many areas are located in lowlands.Waterlogged soil causes roots to rot, which creates many difficulties when caring for your garden. Plants are often affected by fungal diseases and are “eaten” by mold. Some crops do not take root in wet soil, and the crop rots on the vine.
Dense clay soils do not absorb water well. This leads to frequent flooding of underground parts of buildings. Due to the high degree of mineralization, flood and atmospheric waters negatively affect buildings: they destroy building materials and provoke corrosion.
Even high-quality waterproofing is not 100% capable of preventing flooding of basements and erosion of foundations and plinths. As a result, buildings last much less than they could.
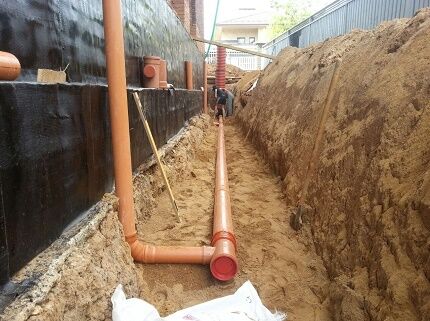
You can determine whether drainage is needed on a site based on several signs:
- Terrain. Areas located in lowlands and on steep slopes require a drainage system. Otherwise, fertile soils may be washed away or flooded during rains and floods.
- Puddles. Flat terrain is convenient for construction, but puddles can appear on it and remain for a long time. This is a clear sign that water is poorly absorbed into the soil. A drainage system should be installed throughout the site.
- Rotting of the root system of plants. If excess liquid remains in gardens, flower beds and lawns, the plants become damp and become sick.
- Moisture-loving plants. If one or more species of moisture-loving plants grow on the site, this clearly indicates waterlogging of the soil.
- Flooding of basements and cellars. An obvious “symptom” of the need for drainage is flooding of foundations and underground building structures.
- Hydrogeological studies and observations. If experts have determined that the site has a high groundwater level, or similar conclusions can be reached during excavation work, care should be taken about soil drainage.
Correct laying drainage pipes on site - the only way to inexpensively and effectively get rid of excess water.
If you contact a specialized company, the system will cost significantly more. It is better to understand the features of drainage arrangement and do everything yourself.
To build a drainage system with your own hands, you will need a perforated corrugation or a rigid plastic pipe with slot-like or round holes, which you can drill or cut with your own hands. You will need gravel backfill and geotextiles.
The principle of the drainage system
Soil drainage on a site can be closed, immersed in the ground, or open, which is a network of open grooves.
The work is performed in the following order:
In the first case, the system is designed to drain groundwater if it floods the area. In the second, drainage ensures a decrease in soil moisture during the flood and rainy season.
Both types of systems can be designed and installed in-house.
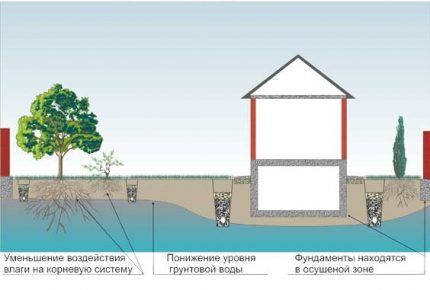
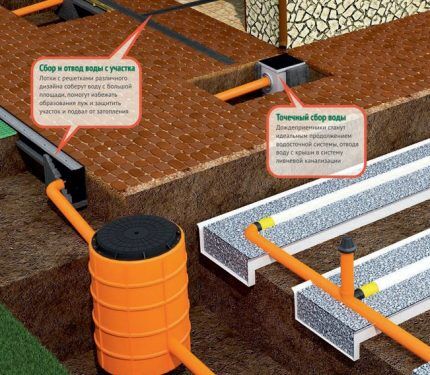
Depending on whether it is necessary to collect moisture from the entire site or only from individual zones, in addition to drainage, storm sewer systems with linear and point water intakes are installed.
Systems of the first type require careful design; when arranging them, it is necessary to strictly adhere to the installation technology and slope angle of drainage pipes.
Linear options become necessary if you need to drain areas around buildings, paths, entrances, improve the surrounding area, or remove excess moisture from the garden.
Such drains are shallow ditches into which water flows and then moves to special receiving tanks, storm drains, or to a discharge point off-site.
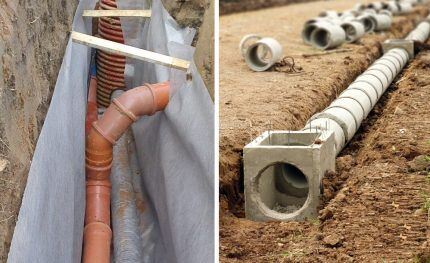
Point water collectors must also be accurately calculated and designed in advance. They serve to collect water locally, but are connected to a similar linear system of ditches or pipes.
Through the indicated drainage channels, the collected water is discharged in the same way into the collector well and further into absorption well, drainage ditch or pond. Therefore, work on installing systems with point water intakes is not much different from systems with linear options.
Open systems are very simple to implement and cheap, but they spoil the landscape with an unaesthetic appearance. Another disadvantage is that the walls of the ditches have to be constantly adjusted, because they crumble under the influence of moisture, and the system ceases to perform its functions (water stagnates at the bottom of the trenches and does not move to the discharge point).
To solve the problem of crumbling ditch walls, you can use the crushed stone filling method: coarse material is placed on the bottom, and fine material is placed on top, after which the entire drainage pad is covered with turf.
This option allows you not to trim or strengthen the walls of the trenches, but it is suitable for areas with relatively low humidity, because The capacity of the ditch is greatly reduced.
The use of polymer and concrete trays in the construction of open drainage greatly facilitates and speeds up the work.In order to improve the landscape and protect systems from clogging, such open systems are covered with cast iron gratings.
For arrangement drainage system around the house special perforated pipes are used - drains, laid to the depth of the foundation. They are placed in pre-formed ditches and covered with material with excellent filtering properties, gravel, small crushed stone or GPS.
To monitor the operation of the system and carry out periodic cleaning, install inspection wells. They are located at each turn and every 20-25 m of the linear route of the drainage pipeline.
Determining what is right lay a drainage pipeTo protect plants from excess moisture, you can use average values. As a rule, the optimal depth is 0.6-1.5 m.
Moreover, for flower beds, lawns, beds, it does not exceed 0.9 m, and to protect the rhizomes of trees, you need to dig the deepest trenches, especially if the site is located on peat soils.
Types and parameters for choosing drainage pipes
Of all the materials for making pipes, polymers are the most popular. Their undeniable advantages are durability, resistance to chemicals and smooth internal walls to which dirt does not stick. Stormwater and groundwater flow into the pipeline and move freely to the reservoirs by gravity.
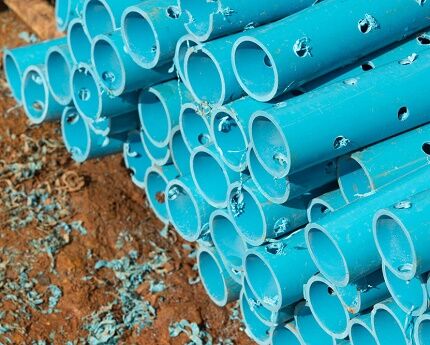
A drainage system assembled from modern materials can last up to half a century.The main thing is to install it correctly, carry out technical inspections on time and not ignore the need for repairs.
Another advantage of polymers is their relatively low cost, because the finished drainage is inexpensive, practical and durable.
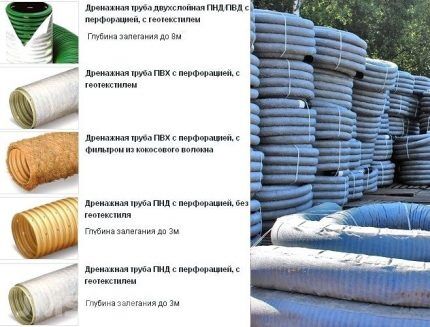
An excellent solution is a pipe covered in geotextile. The outer material filters water, trapping dirt. Thanks to this, the pipelines do not become silted.
An alternative to factory-made drainage pipes is conventional sewer pipes. You can easily make drainage components from them yourself. To do this, simply drill holes in the products and wrap them with geotextile fabric on top.
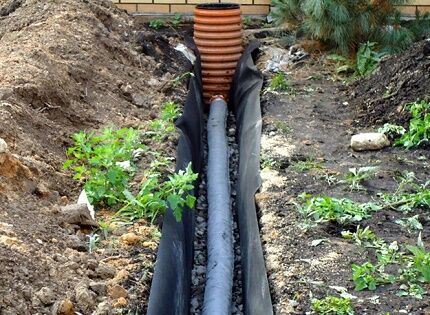
If a local drainage system is required, you can get by with pipes with a diameter of 100-200 mm, and if you need to remove moisture from a large area or there is too much water, it is better to choose products with a diameter of 300-400 mm. The best choice is a special drainage pipe with a filter shell.
Pipeline laying technology
When arranging drainage, the topography of the site is of fundamental importance. The system must be built so that there are no problems with the outflow of liquid into the ditches.If there are no results of geodetic research, you should draw up a diagram yourself, marking on it the places where rainwater drains.
When creating a diagram, you need to be careful, because mistakes will result in ineffective drainage. Based on the finished drawing, they outline how to lay and tilt the drainage pipe and where to install the catch basins. After checking the data, they mark the area and begin work.
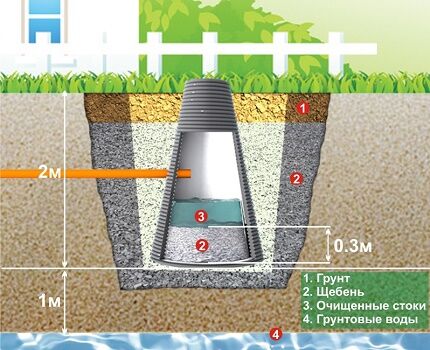
The pipeline is led to drainage well. If it is long and located on a flat area, inspection wells are installed at each 50 m section. They are also needed in places where the pipeline turns and bends, where the slope changes.
You can also build a drainage well with your own hands. It consists of a bottom, a shaft with a neck and a hatch. The dimensions of the well must be large enough so that a person can go down into it and clean it of silt. If it is not possible to equip a large well, then it should be equipped in such a way that you can wash the walls with a hose and scoop out the dirt.
Concrete, plastic, and brick can be used as materials for making wells.
The strongest and most durable structures are made from reinforced concrete well rings. They have a large diameter and are easy to maintain. The downside is that it is difficult to install due to its large mass. As a rule, it is necessary to attract assistants or use special equipment.
Conclusions and useful video on the topic
When developing a scheme and during the construction of drainage, some difficulties may arise. To prevent them from becoming an obstacle to the quality drainage of water from the site, check out the useful video materials.
Video #1. Features of the arrangement of the drainage system on the site:
Video #2. How to arrange drainage in a dacha using improvised means:
Video #3. Features of arranging drainage in the garden:
Video #4. Design of a drainage well made of polymers:
Video #5. How to properly lay drainage pipes:
Laying a drainage pipe with your own hands will require time and effort, but the costs will only be for materials. Don't skimp on them: buy good quality pipes and wells.
An effective drainage system will protect crops, houses, and outbuildings from moisture and will last for many years. The main thing is not to forget to inspect and clean wells and drains in a timely manner.
Would you like to talk about the construction of a drainage system on your site and share step-by-step photos? Do you have useful information not covered in the article? Please write comments, express your opinion, and post pictures in the block below.


The drainage pipe was made and laid by my husband around our site the spring before last, just before the traditional flood. When I showed him this material, I heard that he had done some of the work incorrectly, so the flood water was drained rather slowly. Perhaps this spring he will correct the shortcomings that have arisen.
Very useful article. In fact, it is cheaper to arrange drainage on the site in advance and then have fewer problems with “walking” soil and unexpected flooding.
What diameter is better to take for a dacha?