How to properly connect an RCD: diagrams, connection options, safety rules
Creating a modern indoor electrical network is a responsible undertaking associated with calculations, selection of wires and electrical installations, and installation work.At the same time, one of the main tasks remains to ensure the safety of residents and the safety of property. Do you agree?
If the protective devices are correctly selected and the connection diagram of the RCD and circuit breakers is thought out, all risks are reduced to a minimum. But how to do that? What to consider when choosing? We will answer these and many other questions in our material.
You will also be able to understand the principle of operation of an RCD and its connection options. Expert advice and installation nuances are collected in this material. In addition, the article contains videos from which you will learn about the main mistakes when connecting and see how an RCD is connected in practice.
The content of the article:
Purpose and operating principle of RCD
Unlike a machine that protects the network from overloads and short circuits, the RCD is designed to instantly recognize the presence of leakage current and respond by disconnecting the network or a separate electrical line.
Since these two protective devices differ functionally, both must be present in the assembly diagram.
The operating principle of an RCD is simple: it compares the incoming and outgoing current values and trips when a discrepancy is detected.

Inside the body of the automatic device there is a transformer with a core and windings with uniform magnetic fluxes directed in different directions.
When a leakage current occurs, the output magnetic flux decreases, as a result of which the electric relay operates and opens the power supply. This is possible if a person touches a grounded device and electrical circuit. On average, this takes from 0.2 to 0.4 seconds. More information about the design and principle of operation of RCDs we talked here.
There are various types of devices designed for networks with direct or alternating current. One of the important technical characteristics that must be present in the marking is the leakage current strength.
To protect the residents of the house, devices with a rating of 30 mA are chosen. Where there is an increased risk, for example, bathrooms with high humidity, children's playrooms, install a 10 mA RCD.
A higher rating, such as 100 mA or 300 mA, is intended to prevent fire, since large current leaks can cause a fire. Such devices are installed as a general incoming RCD, as well as in enterprises and large facilities.
Detailed information on choosing a suitable RCD outlined in this article.

An RCBO is more compact than a bunch of protective devices and takes up less space in the electrical cabinet, but when it is triggered, it is more difficult to find the cause of the shutdown.
The installation diagram is selected in accordance with the task and the type of network - 1-phase or 3-phase. If it is necessary to protect an entire house or apartment from current leaks, an RCD is installed at the input of the power line.
Protection options for single-phase network
Manufacturers of powerful household appliances mention the need to install a set of protective devices. Often in the accompanying documentation for a washing machine, electric stove, dishwasher or boiler indicates which devices need to be additionally installed on the network.

Considering the number of different circuits serving sockets, switches, equipment that load the network to the maximum, we can say that there are an infinite number of RCD connection schemes. At home you can even install socket with built-in RCD.
Next, we will consider the popular connection options, which are the main ones.
Option #1 – general RCD for a 1-phase network.
The location of the RCD is at the entrance of the power line to the apartment (house). It is installed between a common 2-pole circuit breaker and a set of circuit breakers for servicing various power lines - lighting and socket circuits, separate branches for household appliances, etc.

Suppose that a current leak occurs due to contact of a phase wire with a metal device connected to the network.The RCD trips, the voltage in the system disappears, and it will be quite difficult to find the reason for the shutdown.
The positive side concerns savings: one device costs less, and it takes up less space in the electrical panel.
Option #2 – general RCD for 1-phase network + meter.
A distinctive feature of the scheme is the presence of an electricity meter, the installation of which is mandatory.
Current leakage protection is also connected to the machines, but a meter is connected to it on the incoming line.

The advantages of this arrangement are the same as the previous solution - saving space on the electrical panel and saving money. The disadvantage is the difficulty of detecting the location of a current leak.
Option #3 – general RCD for a 1-phase network + group RCDs.
The scheme is one of the more complicated variations of the previous version.
Thanks to the installation of additional devices on each operating circuit, protection against leakage currents becomes double. From a security point of view, this is an excellent option.

To prevent both devices (private and common) from triggering at once, it is necessary to observe selectivity, that is, when installing, take into account both the response time and the current characteristics of the devices.
The positive side of the scheme is that in an emergency one circuit will turn off. It is extremely rare for cases where the entire network goes down.
This can happen if the RCD installed on a specific line:
- defective;
- out of order;
- does not match the load.
To avoid such situations, we recommend that you familiarize yourself with RCD testing methods for performance.
Disadvantages - the electrical panel is overloaded with many similar devices and additional expenses.
Option #4 – 1-phase network + group RCDs.
Practice has shown that the circuit without installing a common RCD also works well.
Of course, there is no insurance against failure of one protection, but this can be easily fixed by purchasing a more expensive device from a manufacturer you can trust.

From the point of view of economy, wiring several devices loses - one common one would cost much less.
If the electrical network in your apartment is not grounded, we recommend that you familiarize yourself with the diagrams connecting an RCD without grounding.
Schemes for 3-phase network
In homes, industrial premises and other structures, there may be a different option for arranging power supply.
Thus, for apartments, connecting a 3-phase network is uncharacteristic, but for equipping a private house this option is not uncommon. Here other circuits for connecting the protection device will be used.
Option #1 – general RCD for a 3-phase network + group RCDs.
For a 380 V network, a 2-pole device is not enough; a 4-pole analogue is needed: you need to connect 1 neutral wire and 3 phase wires.

The type of wires is important.For a 1-phase network, a standard VVG cable is suitable, while for a 3-phase network it is recommended to install the more fire-resistant VVGng cable. We wrote about choosing the appropriate type of wire in our other article.
Option #2 – general RCD for 3-phase network + meter.
This solution completely repeats the previous one, but an electricity meter is added to the circuit. Group RCDs are also included in the system for servicing individual lines.

There is a nuance that applies to any of the presented schemes. If an apartment or house has several lighting and socket circuits, several powerful household appliances that require the installation of separate power lines, then it makes sense to install double protection with a common RCD.
Otherwise, either a common device or one for each circuit is sufficient.
RCD installation instructions
First you need to choose a place to mount the device. There are 2 options: panel or cabinet. The first resembles a metal box without a lid, fixed at a height convenient for maintenance.
The cabinet is equipped with a door that can be locked. Some types of cabinets have openings so that you can take meter readings without specially opening the door and turn off the devices.

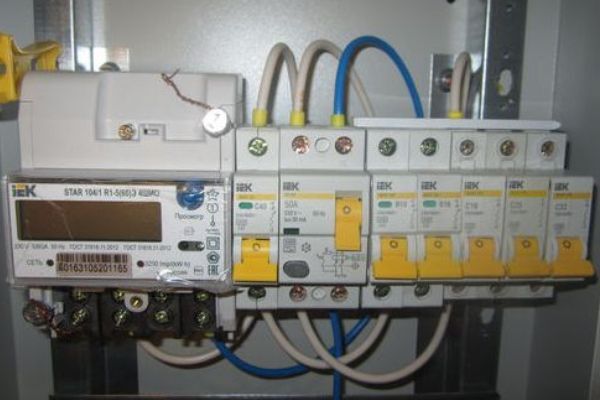
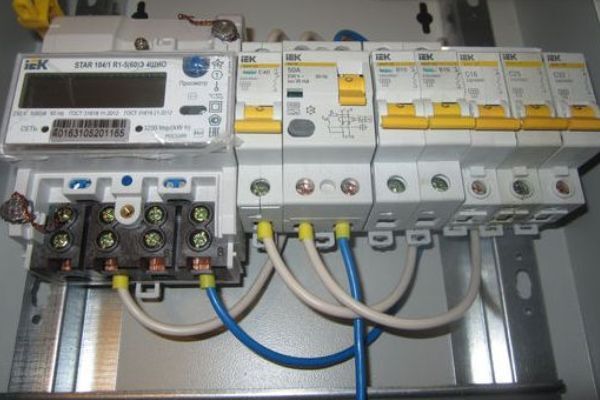
The neutral wire is always connected to the left terminals at the input and output, and the phase wire to the right terminals. One of the options:
- input terminal N (top left) – from the input machine;
- exit N (lower left) – to a separate zero bus;
- input terminal L (top right) – from the input machine;
- output L (lower right) – to group machines.
By the time the protective device is installed, circuit breakers may already be installed on the panel. To organize the arrangement of devices and wires, you may have to rearrange the devices in a certain order.
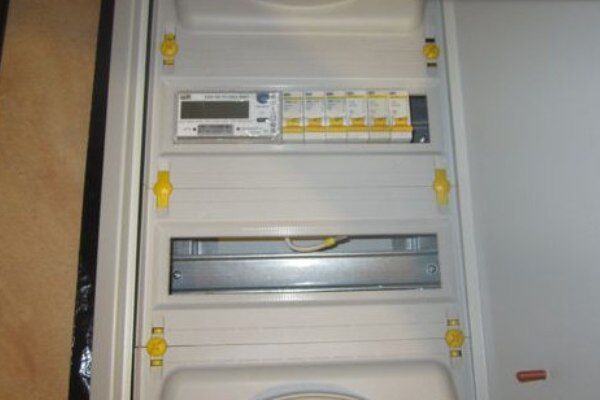
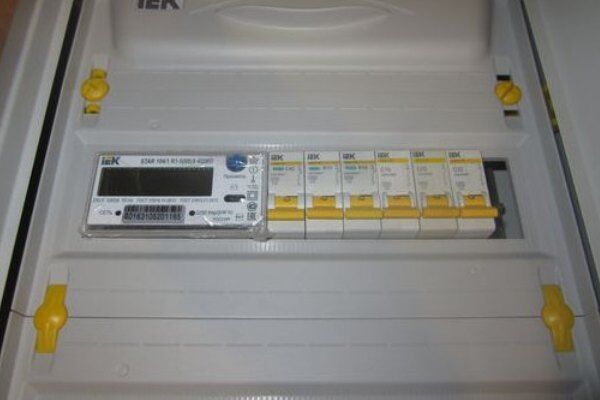
We present an example of installing an incoming RCD in an electrical cabinet that already has a meter, an incoming circuit breaker and several circuit breakers for individual circuits - lighting, socket, etc.
Never connect an RCD at the input - it always follows the general input circuit breaker. If a counter is used, the residual current device moves to the third position from the input.
Description of the connection process:
- We install the device on the DIN rail to the right of the machine - just touch it and press with a little force until it clicks;
- we stretch the cut and stripped wires from the machine and the zero bus, insert them into the upper terminals according to the diagram, tighten the fastening screws;
- In the same way, insert the wires into the lower terminals and tighten the screws;
- testing - first turn on the general circuit breaker, then the RCD, press the “Test” button; When pressed, the device should turn off.
To make sure the connection is correct, leakage current is sometimes simulated. Take two working wires - “phase” and “ground”, and simultaneously connect them to the base of the electric lamp. A leak appears and the device should work immediately.
What mistakes should you avoid?
Before connecting, be sure to double-check the technical specifications of the devices. The rated current must be equal to or higher than the same parameter for the input circuit breaker. The values can be easily determined by the markings.
Electricians recommend choosing a protective device one step higher, that is, for a 50A circuit breaker, a 63A RCD is suitable.
You can correctly calculate the parameters select machine and an RCD with the correct rating, but make a small mistake during installation, as a result of which the system will be useless.
For example, beginners often confuse tires. It should be remembered that I use different buses for the neutral conductor and the ground wire. In addition, each device requires a separate bus: for 5 RCDs - 5 buses.

In no case should the poles N and L be confused. They have letter designations on the body, and the wires differ in color, so you need to be careful.
If a false alarm occurs or, on the contrary, the device does not respond, the reason may be the following:
- “phase” and “ground” are connected after the RCD;
- incomplete connection - conductor N is not inserted into the corresponding terminal;
- “zero” and “ground” are connected in the socket;
- confusion between connecting two or more RCDs to electrical installations.
In practice, there are many more errors, since different schemes are used. The more devices are involved in assembling the electrical panel, the more careful you need to be when connecting.
Safety rules during work
Most of the rules are of a general nature, that is, they must be applied in the process of any electrical installation work.
If you decide to equip the electrical distribution panel yourself, before installing and connecting the RCD, do not forget:
- turn off the power supply - turn off the machine at the entrance;
- use wires with appropriate color coded;
- do not use metal pipes or fittings in the apartment for grounding;
- First of all, install an automatic input switch.
If possible, it is recommended to use separate devices for lighting lines, sockets, washing machine circuits, etc. Otherwise, installing a common RCD is sufficient.

In addition to the characteristics of the devices themselves, the parameters of other electrical wiring elements are also important, for example, electrical wire cross-section. It should be calculated taking into account the constant load.
It is better to connect the wires to each other using terminal blocks, and to connect to devices, use specially designed, marked terminals, as well as a diagram on the case.
Conclusions and useful video on the topic
Several practical tips and explanations will help beginners figure out how to choose and connect the RCD correctly in a house or apartment.
Errors when connecting sockets:
About the need and nuances of installing protective devices:
It is not always possible to call a qualified specialist to install electrical distribution boards. Sometimes you have to install automatic devices or RCDs yourself.
Due to an oversight during installation, an electric shock may occur, so it is important to use connection diagrams, make correct calculations and follow safety regulations.
Are you a professional electrical worker and want to add useful tips or other RCD wiring diagrams? Maybe you would like to supplement our article with recommendations on electrical safety? Write your comments in the block below - your comments will be useful to many home craftsmen.


To check the RCD at the same time, as you advise, you cannot connect phase and zero to the lamp base. This will be a short circuit, and the RCD does not protect against short circuits and overloads. And yet, in the photo with a socket or RCD, it is not connected correctly, or the colors of the wires do not match. Zero should be blue.
The article states that you need to connect a phase and GROUND to the lamp base, read more carefully! And the photo shows everything correctly by color. Zero is blue, and GROUND is removed from a separate bus!!! Or you don’t understand the difference between EARTH and ZERO!
I understood that they meant __different__ contacts on the lamp base. This would be worth noting (otherwise, yes, it sounds like a shortcoming). In total, the lamp as a load will limit the current, and the RCD will see the leak “by”.
The wires must be connected by twisting, followed by welding or soldering.
Is it necessary to separate the zeros with different buses at the output of three RCDs in a three-phase network? And the zero entering the RCD should not sit at its output to the zero bus?
To connect an RCD, does the direction of the current matter? Those. if I connect the power cable to the bottom contacts and the load to the top. Will the effectiveness of the RCD change with such a connection?