How to install and connect a grounded outlet: learning to ground outlets
The use of grounded sockets ensures the safety of household members when using electrical appliances.But home craftsmen are in no hurry to update electrical wiring, considering the process of installing grounding outlets difficult. Although the standard scheme of work is quite simple.
We will help you understand this issue. Before connecting a grounded outlet, you need to study its design features and find out the type of wiring in the house. The information in the article is supplemented with visual photo and video instructions for a better understanding of the electrical installation process.
The content of the article:
Why is grounding needed?
The instructions for any electrical appliance clearly state that it is prohibited to use it without grounding. The main purpose of grounding is to ensure stable operation of complex household devices and protect against electric shock.
According to the PUE clause 1.7.6, grounding is a deliberate connection of one of the elements of an electrical installation with a grounding loop. It is constructed with the purpose of draining currents of values that are damaging or not damaging to humans through the grounding protective conductor into the ground.

In the outdated system, the “neutral” partially served as grounding.The zero was connected to the metal body of the device, and in case of overload it took over it.
The calculation was that if the load was exceeded, current would flow through one of the phases, resulting in a short circuit and, as a consequence, disconnection of a section of the network by an automatic circuit breaker or fuse.
This solution simplified electrical installation work, but carried the risk of electric shock.

It is unacceptable to connect devices whose housing is made of metal without grounding. For example: a slow cooker, microwave or electric stove. Indeed, if there is a short circuit, thinning or partial destruction of the insulation of the wires on the housing, a current breakdown may occur.
If voltage hits a conductive element, the protective conductor will conduct it further to the ground.
No less dangerous is the use without grounding of devices that come into contact with water during operation, for example: a dishwasher or boiler.
The type and design of the grounding contact depends on the model. In sockets of American brands it is presented in the form of holes with side slots. For French analogues, this is an additional third pin.

But most often you can find the German type of grounding sockets on sale. They are equipped with protruding metal parts on the sides.
The design of an electrical outlet with grounding assumes the presence of three contacts: “phase”, “zero” and “ground”. At the moment of switching on, in the first fractions of a second the grounding terminals come into contact, and after them the “phase” and “0” contacts are connected. This sequence guarantees complete protection.

Criteria for choosing the right outlet
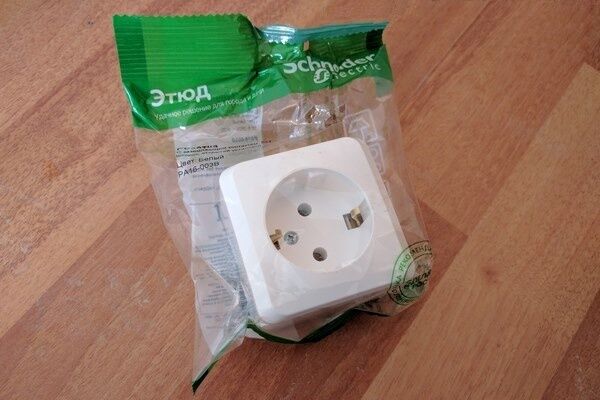
When choosing a grounded outlet, you should focus on products from manufacturers that have proven themselves well in the electrical market.
You can safely trust the following manufacturers: Schneider Electric, Legrand, VIKO, Bticino. Among the budget options, but at the same time not inferior in quality, it is worth considering the following products: ANAM, Lezard, Makel, Wessen, DKC.
When purchasing accessories from little-known manufacturers, it is easy to get into trouble when the actual value of the rated current does not correspond to the declared one.

Based on operating conditions, products with a certain degree of protection. Thus, for installation in kitchens and bathrooms, connection points must have a protection level of at least IP44. The first digit of the IP marking, according to international standards, indicates protection from dust, the second – from moisture.
Grounded sockets are available in a wide range on the market.
On sale you can find:
- Models with mechanical protection. They are equipped with curtains that cover the sockets and protect from direct contact with the contacts.
- Products with leakage current protection. As soon as a foreign object penetrates the holes for the plug, the protective shutdown device is triggered - the point is turned off. Such models are often chosen for furnishing homes where there are small children.
- Devices with overcurrent protection, including from short circuit. The products are equipped with a built-in fuse, which simply burns out if a short circuit occurs.
- Models with surge protection. Devices equipped with a built-in switch automatically turn off when the permissible network values are exceeded.
- For connecting devices whose power exceeds 4 kW. The products, most often surface-mounted, are equipped with a special power plug and are designed for a current of 20-25A.
For indoor connections, you should choose “internal” sockets. They are mounted in specially made niches in the wall.

Detailed information on choosing waterproof sockets for a bathroom is presented in this article.
The recommended rated disconnecting current for household devices varies between 30-100 milliamps. Models of domestic brands are designed for 6.3 and 10A, and imported models are designed for 10 and 16A.
When choosing products, pay attention to the size of the inlet holes for the plug and the distance between them. Models from European manufacturers have slightly larger diameters and distances between holes.To avoid mistakes, choose universal models that come with connectors for different types of plugs.
Determining the wiring type
Installation of a grounded socket is carried out in those houses where three-wire wiring is laid. In homes with wiring that includes only two cores, there is no point in installing such a grounding outlet, since it will not perform its intended task.
Therefore, the first thing to do is determine what type of wiring is in the apartment. If the electrical wiring in the house is outdated two-wire, it will have to be replaced with a three-wire analogue. Modern three-wire wiring meets all safety standards in all respects.

You can find out whether the electrical panel has a grounding bus from the electrician servicing your entrance or house. The type of wiring is also determined by the number of wires. If a two-core cable is connected to the connection point, then only “phase” and “neutral” are available.
If the socket line is laid from the switchboard with a two-wire cable, you only need to connect a third grounding wire from the electrical panel to each point. But this procedure can only be performed if the shield is equipped with a grounding bus.
Clause 1.7.127 of the current PUE clearly states that the grounding conductor must be made of insulated copper wire with a cross-section of at least 2.5 sq. mm.

Lay the cable with a cross-section of 1.5 mm2 from the junction box to the outlet is not practical.Indeed, in this case it is impossible to “power” a powerful device from it. For a single-phase network, it is better to take a cross-section with a margin of 2.5 mm2.
For organizing electrical wiring in apartments And private houses choose VVG marking cable, for wooden buildings and fire hazardous premises - VVGng.
The main requirement for a protective conductor is that there should be no disconnecting devices in its circuit. Therefore, it is installed in addition to any fuses, circuit breakers and circuit breakers.

Serial grounding is fraught with the risk that in the event of an emergency, electromagnetic incompatibility may occur. Connected electrical installations will create interference, which can lead to undesirable consequences in which the protective circuit will not cope with its task.
Installation of the overhead option: step-by-step instructions
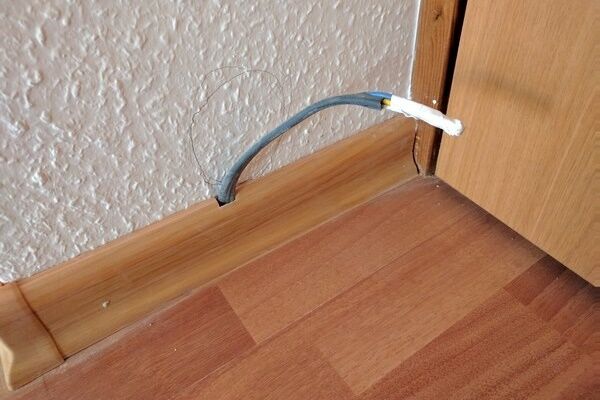
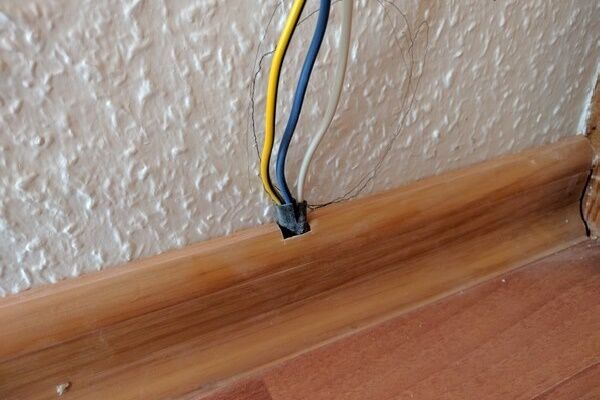
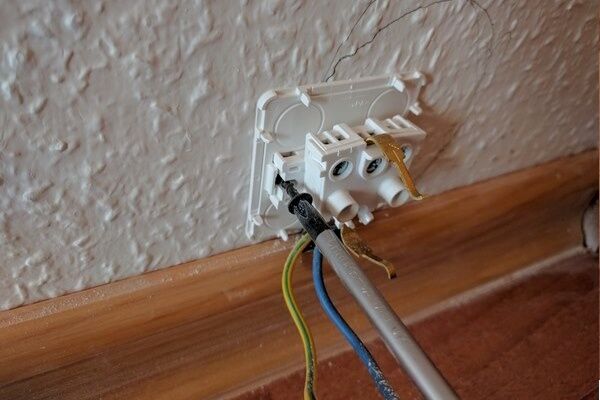
First, let's look at the process of connecting a surface-mounted socket to a cable hidden hidden in the baseboard box.
After completing the preparatory steps, we can safely begin connecting the socket mechanism to the grounded wiring.
Closed socket mounting technology
Connecting a grounded outlet does not require any complicated manipulations. Anyone with only basic electrical installation skills can complete the task.
Preparing the necessary materials
In addition to the socket itself, it is also necessary to purchase a socket box in advance to install the “core”. The socket box for the future connection point is selected based on the type of building materials that will have to be worked with.

The main difference between models created for installation in plasterboard walls and their counterparts for installation in brick and concrete surfaces is the presence of spacers.
Fixation of standard socket boxes into the cavity of a concrete wall is carried out by applying gypsum or alabaster mortar into the prepared hole.

Installation and connection of a grounding socket cannot be performed without a set of tools.
For installation you will need:
- test screwdriver or multimeter;
- perforator equipped with a crown;
- side cutter or cross-cutting knife;
- chisel.
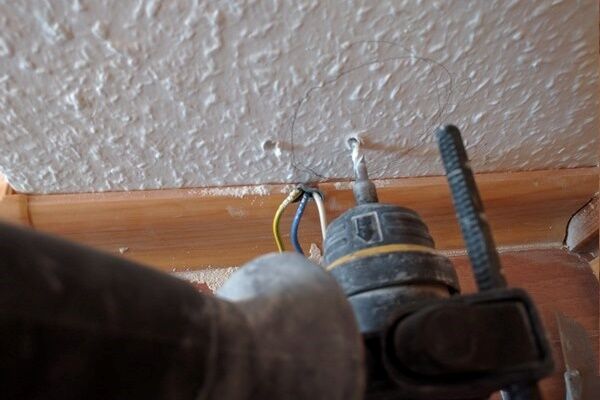
To install the socket box, a hole is drilled in the wall using a D70 mm crown. The space under the “glass” is cleared of remnants of building material.

After the socket box is installed, begin wiring.
Step-by-step technology for installing a socket box in walls made of plasterboard and concrete is described in this article.
Determining wire ownership
Before installing and grounding the outlet, the first step is to turn off the power to the electrical panel. The technician’s task is to remove voltage from the distribution box feeding the lines with the socket to be replaced.
Wires laid from the electrical panel in an open or closed way are led into the cavity of the socket box. Using an electrical tester, they determine where “phase” is and where “0” is.

But when working with electrical wiring equipped with a grounding wire, it is still better use a multimeter. This multifunctional device, even of the simplest design, will become an indispensable assistant in detecting a broken wire and determining the integrity of radio and electrical components.
Using the device is not difficult. On the multimeter, set the alternating current measurement range to above 220 Volts. After which one tentacle is applied to the phase contact, and the second to the “ground” or “0”. When contacting “0”, the voltage of 220V will be reflected on the device; on “ground” the voltage will be slightly lower.

If you do not have an indicator screwdriver or a multimeter at your disposal, standard markings will help determine the identity of the wires.
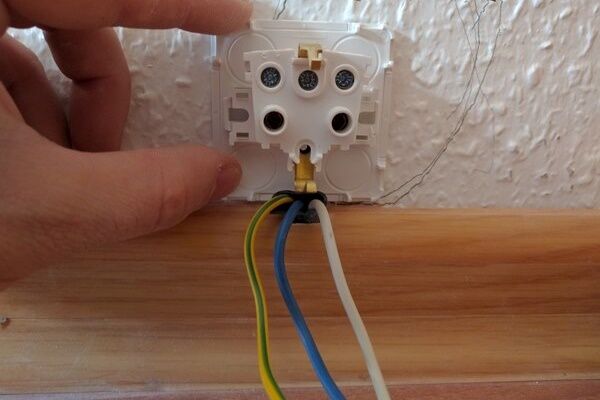
In order to create safe conditions when performing electrical installation work and to facilitate the process of connecting contacts, the rule has been adopted that each wire core has a characteristic insulation color.

According to the current PUE in a three-phase electrical network, wire insulation is distinguished by color:
- zero working contact "N" has a blue or light blue braid;
- phase "L" most often has a bright color (brown, black, white, orange);
- grounding "PE" are colored yellow-green.
When dealing with non-standard markings, it will be a little more difficult to determine the “phase”, but the color “0” will not change in any case.
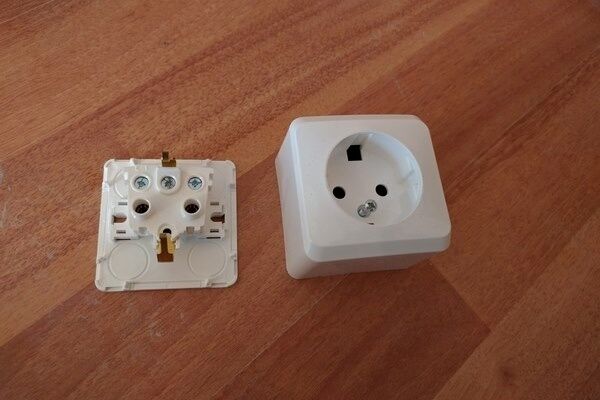
Device connection diagram
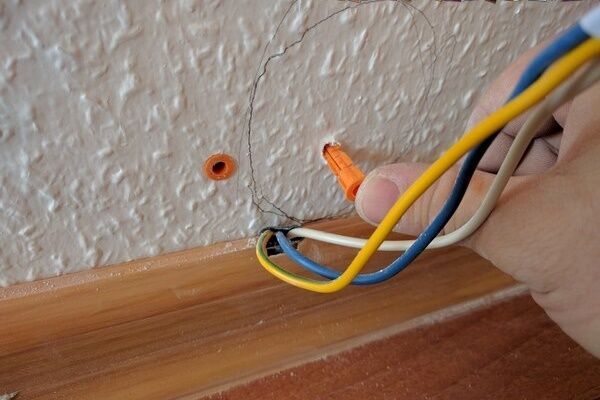
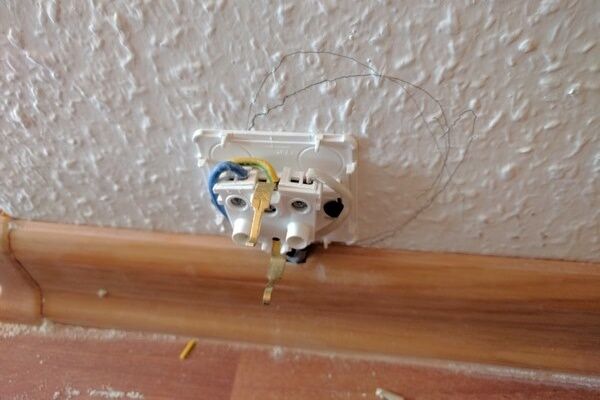
The main core of the cable laid from the shield to the socket is stripped to a height of 7-8 cm from the edge. The ends of the wires placed inside it are cleaned with a knife from the braid to a height of 10-12 mm from the edge.

The work should be carried out as carefully as possible, since the slightest damage to the insulation of the neutral core can provoke a “phase” short circuit to the device body. As a result, if the neutral wire breaks, the electrical appliances connected to the point do not work, and the outlet appears de-energized and seems safe at first glance.
The protective wire is connected to additional contacts located separately from the power ones. The neutral and phase wires are connected to the power contacts. The order of their installation does not play a significant role.

When connecting all three conductors, it is important to ensure high reliability of the contacts. This is explained by the fact that weak contact can cause an increase in current, as a result - heating of the cables. The occurrence of such a situation may lead to an emergency.
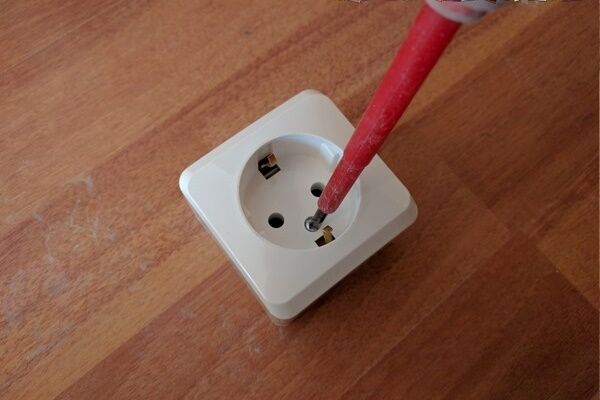
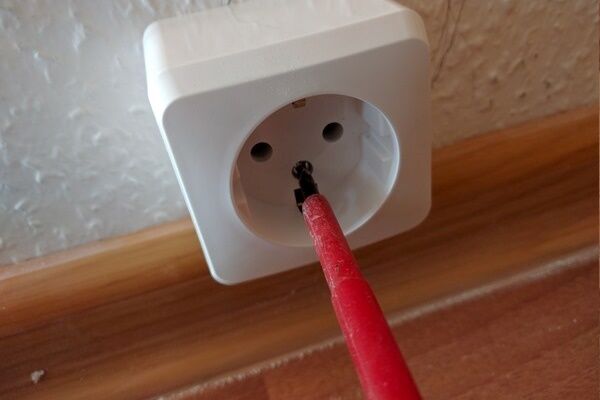
Checking the correct connection
Checking allows you to verify the quality of the grounding. It is performed using the same multimeter or test screwdriver. The end of the tester is immersed one by one in the holes of the socket and observed: when it touches the “phase” it should light up.
If the tester also reacts when it touches the ground, this indicates that the socket is connected incorrectly.

Lack of voltage may indicate:
- between "phase" and "N" indicates the presence of a break in the latter;
- between "ground" and "phase" indicates a lack of voltage;
- between "ground" and "N" indicates that the wires have been connected through a jumper installed in the socket.
Carrying out grounding check using a multimeter, apply one probe to the “ground” - the top or center of the socket. In parallel with this, the second probe is alternately immersed in the holes.
If an incorrect grounding is detected, do not rush to correct the error yourself. It is best to consult a qualified electrician.
Grounding and zeroing: what is the difference
One of the common installation mistakes is when connecting an outlet with grounding is done by using the “0” two-wire network. This method is called “zeroing” in the language of electricians. When implementing it, “0” is used as both a protective and zero working contact.

But grounding is not an equivalent alternative to grounding. After all, a line cannot protect itself from itself.
So, for example, if “0” disappears as a result of the same cable break on the input panel or rash actions of an unqualified “craftsman,” the circuit is closed at the moment the device is turned on. But at the same time, the same voltage appears on the neutral wire, which is essentially not connected to the ground, as on the phase wire.
As a consequence: an electrical installation that is grounded by grounding and becomes energized transmits it to a person. The most favorable outcome in this situation is if a short circuit occurs, which causes the machine to “knock out.” Otherwise, the price of such zeroing can become deplorable.
It is also worth considering the fact that according to the technology for installing indoor electrical wiring, packets or two-pole circuit breakers are installed at the input, which switch both “phase” and “0”.
According to accepted standards, in a circuit where there is a switching device, it is prohibited to use the neutral conductor as a protective conductor.
Conclusions and useful video on the topic
Connection Guide:
How to ground a wall outlet:
Where to get grounding in the floor panel:
By knowing how to ground an outlet, you can improve the safety of your home's electrical system and minimize the likelihood of accidents.
If you have experience in connecting grounded outlets, please share the information with our readers. Leave comments on the publication and ask questions on the topic in the form below.


In general, here we need to start with recommendations to change the wiring in apartments of old buildings, where grounding has not yet been discussed at all. Indeed, our modern devices need to be grounded, not grounded. At the very least, this allows you to use the technology much more calmly. Also surprising are those who stubbornly install simple sockets on three-wire wiring, ignoring grounding.
Good afternoon. Being determines consciousness, Igor – remember this philosophical conclusion? The desire to modernize wiring will be realized with income that exceeds the subsistence level many times over.
Those who want to “resist” economic circumstances can live with a two-wire system (with grounding) and make do with a diverse arsenal of outlet RCDs. I have attached a screenshot with an example of the cost of alterations - check out the price tag.
When replacing electrical wiring in my apartment, I encountered a grounding problem. The house is old, there was no ground loop. Electricians offered grounding as an alternative. This approach did not suit me. I made the grounding system myself. I laid a copper busbar along the entrance panels leading out to the street. The bus was grounded to a reinforcement driven into the ground (driven to a depth of 2.5 meters).Additionally, I installed an RCD for more reliable protection against damage to equipment and devices when the load is exceeded.
I have a similar problem, but no solution in sight yet. I looked into the panel at the entrance, and there the neutral wire was screwed to the body of the panel. Pulling yourself from the 8th floor is not an option.
Good day, Sergey. The absence of visible elements of the grounding system does not always mean its absence. The role of grounding can be performed, for example, by the sheath and armor of the cable through which power is supplied to your 8-story building. Are the floor panels themselves connected by pipework?
In any case, the management company should be concerned about the problem - it is advisable to sign the “petition” by the residents. The grounding system is a common house device. As long as there is no grounding, you can get by with socket RCDs. Read the articles in the section “UZO and automatic machines”.