How to move an outlet: instructions for moving an outlet to another location
Comfortable operation of electrical appliances largely depends on how conveniently the electrical outlet is placed.It often happens that when the interior changes and new equipment appears, the previous layout of connection points is no longer satisfactory.
You can solve the problem on your own. Let's take a closer look at how to move an outlet to another location and what to consider when connecting it. To help the home craftsman, the material contains thematic photographs and videos.
The content of the article:
Safety precautions when moving the socket
The work of moving sockets does not present any particular difficulty either organizationally or technically.
But when dealing with the elements electrical wiring It is important to ensure the maximum level of security.
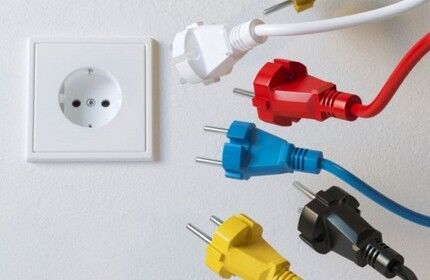
When connecting yourself, it is important to follow four main rules:
- Connecting an apartment electrical outlet can be done using a VVGng power cable with a cross-section of at least 1.5 mm2.
- According to NBP and GOST, cable laying is allowed only in vertical and horizontal directions.Horizontally laid routes are placed at a distance of 200 mm from the ceiling level and 100 mm from beams and cornices, and vertical routes are placed at a distance of 100 mm from door and window openings, as well as room corners.
- The devices are located at a height from the floor level within 50-80 cm. It is not allowed to place them closer than half a meter from radiators, steel pipelines and gas stoves.
- All connections and branches of the electrical cable must be made through cables designed for this purpose. boxes, or in the housings of electrical installation devices, which include sockets.
Before moving the outlet to another location, you need to decide where the distribution box is located, from which the “old point” is powered. The type of metal the cores of the old electrical wiring are made of is also of key importance.
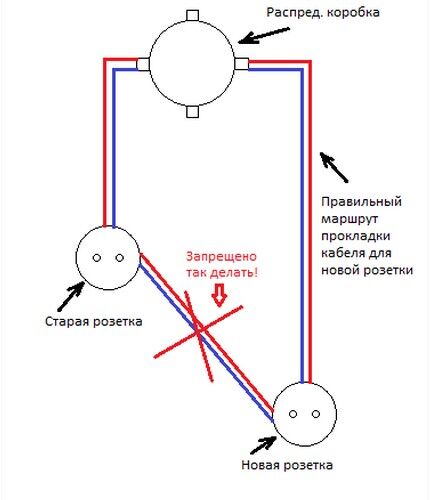
To simplify installation, before starting work, experienced craftsmen recommend drawing up preliminary scheme. This will allow you to determine the most rational option for placing the connection point. Based on the diagram, it will be easy to determine the area within which hidden wiring is not laid.
Knowing the layout and basic operational parameters of indoor electrical wiring, installation work can be completed with minimal financial and labor costs.
Methods for transferring a connection point
There are two simple methods that allow you to transfer sockets without destroying the wall finish:
- By creating a loop – involves creating a jumper from the old “point” to the new connection point.
- By extending the wire – involves extending the electrical line in the cavity of the new groove.
If the new chosen location is much further than the previous one, you can make a complete replacement of the entire line by laying a separate wire from the distribution box located at a slight distance. But, unlike the two methods described above, laying a new line requires large-scale repair work.
Choosing loop method When connecting a new outlet, keep in mind that such a connection is very unreliable for installing three or more power points. If one section or socket is damaged, the entire sequential chain of devices will be inoperative.And, according to the rules of the PUE, it is not allowed to be used to power powerful electrical appliances: microwaves, electric stoves, refrigerators, washing machines, etc.
Another negative side is that when two sockets are connected with a single cable, the current load sequentially passes from one device to another. Therefore, when several devices are plugged into sockets connected through jumpers at the same time, there may not be enough voltage for their operation.
Wire extension options
When extending a new wire, the ends can be connected using one of several acceptable methods. The choice of installation method depends on the material from which the cores are made, their cross-section and the number of conductors.
Option #1 - using terminals
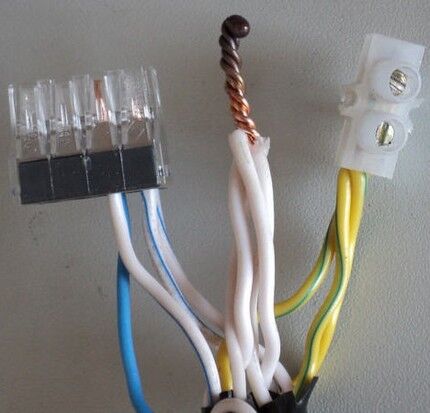
The two easiest connection methods involve using spring terminals and terminal blocks. Spring terminals are equipped with a lever type mechanism.
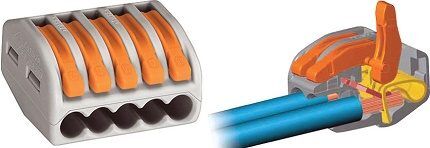
Spring terminals can be used for both copper and aluminum conductors. On sale there are disposable pads that cannot be restored, and reusable spring plugs, with the help of which you can repeatedly disconnect the contact without hindrance.
Terminal blocks should be selected with an inlet hole whose diameter corresponds to the specified cross-section of the cores.
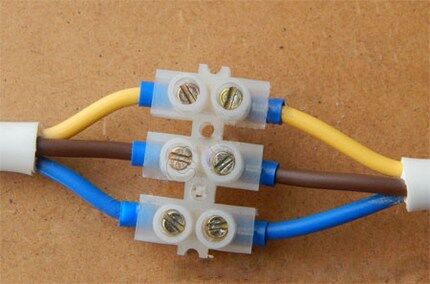
Terminal blocks should not be used to connect aluminum cables.Aluminum is a brittle metal that can become damaged when tightening screws.
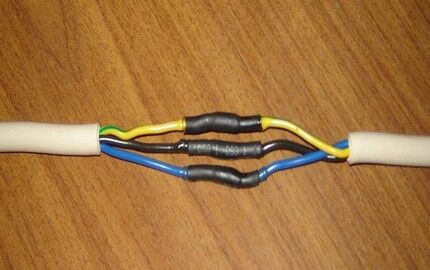
Option #2 - fixation with plastic caps
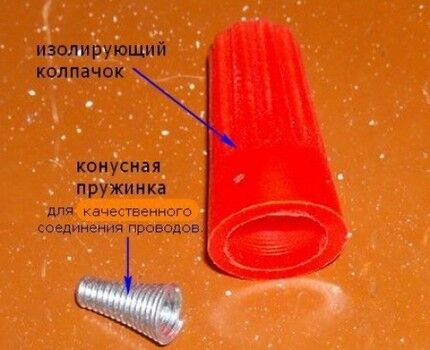
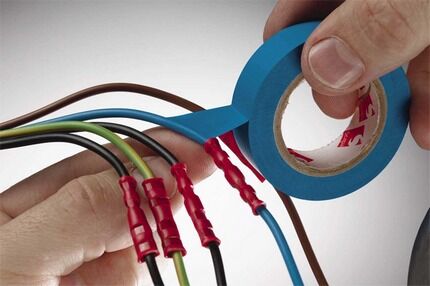
This method involves installing connecting wires at the ends of the cores. insulating clamps (PPE). Plastic caps are made of non-flammable material, which eliminates the possibility of spontaneous combustion of the wiring at the point where the wires are twisted.
The use of caps of different shades is convenient for creating color markings when connecting the “phase”, “zero” and “ground” conductors.
Option #3 - by twisting and soldering
The highest quality of all methods of connecting cores is welding. But to implement it you need to know how to work with a soldering iron.
To do this, strip the ends of the cable to be connected, twist them together and immerse them in molten solder. The intertwined ends are lowered into the soldering bath, and after they cool, they are wrapped with insulating tape.
Some “craftsmen”, in order to speed up the cooling process of the solder, immerse it in cold water. This should not be done for the reason that when a temperature difference occurs, microcracks appear on the metal surface, which deteriorate the quality of the bond.
Loop creation technology
The loop method is the safest of all options. It involves not simply moving the old outlet up or down, but creating a new “point” in close proximity to the old one.
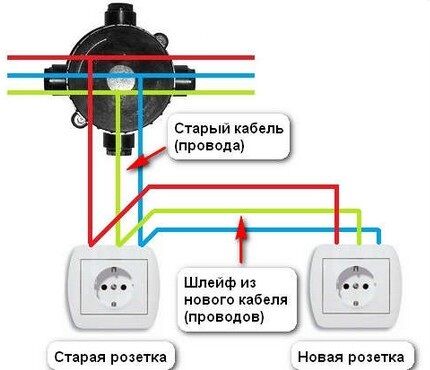
The only drawback of this connection is that the cable from socket to socket is laid horizontally. Knowing that traditionally the branching to the same switches and sockets is laid in a vertical route, due to your forgetfulness you can inadvertently damage the wire.
In addition, if one of the cores is damaged at the switching point, then all the elements following it will stop working. Therefore, the fewer connection points the system includes, the more reliable it will be.
Selection of required materials
When using this method, material costs are minimized.
In addition to purchasing the newest outlet for work, you need to prepare:
- wire of the appropriate cross-section;
- plastic socket box;
- hammer drill with crown D70 mm;
- indicator screwdriver;
- pliers;
- hammer;
- flat screwdriver;
- braid removal tool.
The wire itself is not necessary at all lay in a groove, or you can lay it in an open way using a cable channel.
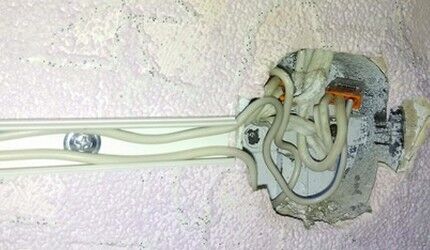
The choice of socket box model depends on the base material into which it is supposed to be buried. For concrete and brick walls, ordinary plastic “glasses” are chosen, and for plasterboard bases – models equipped with spacer legs.
Making a niche and installing a socket box
Before moving the hidden socket to another place, you need to prepare a place for installing a socket box and make a groove for laying a section of the electrical network. Having outlined the location of the future connection point, use a crown to drill a hole.
In the absence of one, you can use a hammer drill equipped with an impact drill or a grinder. In this case, holes are first drilled along the marking contour, and then individual fragments of the wall material are chopped off using a chisel.

A “glass” is immersed in the prepared niche. The electrical cable coming from the junction box is inserted through its back wall.
The socket box is fixed in a concrete wall using gypsum mortar. After the mixture has hardened, the product is cleaned of gypsum residues, and its inner walls are wiped with scraps of fabric. To secure the socket box into a plasterboard or wooden base, the “glass” is immersed in the made niche and fixed using the side spacer tabs
Connecting a new point
Having measured the cable of the required length to power the new point, one end of it is connected to the terminal blocks of the old socket, and the other to the contact part of the new “point”. The neutral, phase and ground wires are connected in parallel directly to the socket contacts.
To prevent short circuits between conductors, each core is insulated with a plastic braid. When connecting the cable, it must be removed. To make the task easier, use a crossing knife, which can easily removes insulation without damaging the core.
The work of stripping the braid should be done as carefully as possible, because if the core turns out to be damaged or defective, it will certainly “prove” itself very soon.
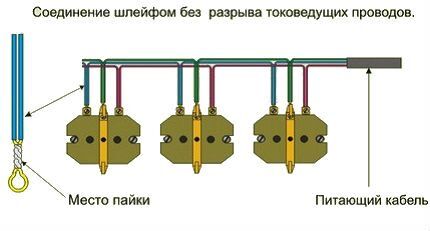
When dealing with a PE conductor, keep in mind that according to the PUE, it is important to maintain its continuity. After all, if the grounding conductor on one of the sockets breaks, all other devices will be ungrounded.
Having connected the neutral, phase and grounding conductors, all that remains is to fix the working part of the product in the installation box and install the decorative cover.
Moving a socket by extending the wire
In an effort to simplify the work of moving an outlet, a method is often used in which the wire is extended to the required length, and the “glass” of the old outlet is used as an auxiliary distribution box.
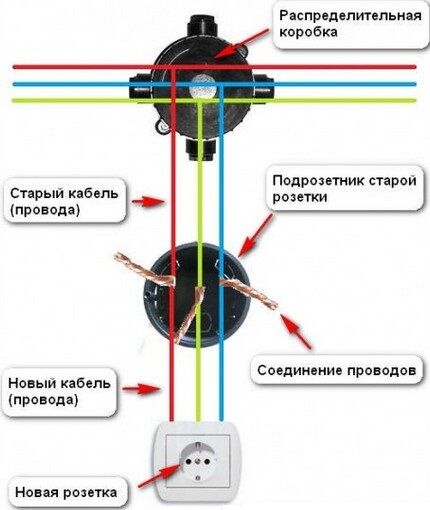
Aluminum wiring is used in older houses. But modern requirements dictate the laying of cables with a cross-section of 1.5 mm2 with copper conductors, including grounding.
Extension of the electric line in a new groove cannot be carried out without partial destruction of the wall. But even under this condition, this option for moving the socket is more preferable than the daisy chain method.
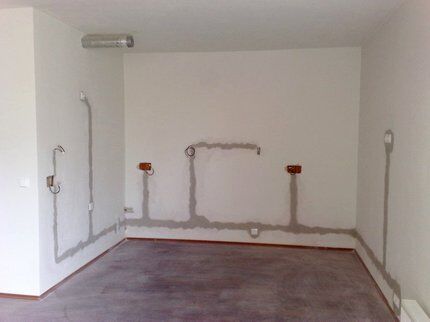
Sequence of actions when extending the wire:
- Disconnect the socket group from the network by turning off the circuit breaker on the apartment panel.
- Using an indicator screwdriver, check the absence of current in the terminals.
- The decorative cover is removed from the old socket, and the body is pulled out of the groove.
- Using a simple pencil, mark the line for laying the grooves.
- A groove is made along the intended line using a hammer drill or grinder.
- Using a crown, a hole is drilled out for installing a socket box.
- By connecting wires, the line is extended.
- In place of the old mounting block, a distribution box is installed, into the cavity of which the places of fastened conductors are placed.
- A socket box is installed in the hole made.
- The free ends of the extended wire are connected to the terminals of the socket block.
- The connected socket block is buried in the “glass”.
- A decorative panel is mounted on the installed socket.
When using an old socket box as a distribution box for extending wires, avoid contact of the connection with the putty material.
For this purpose, some craftsmen cut a plasterboard overlay to the size of the “glass”. First, it is attached to the front edge of the socket box using liquid nails, and then a liquid layer of putty solution is applied on top.
The main mistake that novice craftsmen make is when the “extended” conductor is placed back into the old groove, and then covered with gypsum mortar or alabaster.But by blocking access to connections, they do not take into account that if a section of the network breaks down and becomes inoperable, it will not be possible to quickly correct the situation.
If a situation arises when the connection point needs to be moved closer to the junction box, the work is even easier. After all, the wire will only have to be shortened. To do this, a hole is made in the wall for installation of the mounting block. Using a knife, shorten the previously laid line. Installation of the product is carried out in accordance with the recommendations described above.
Output of a new branch
This method requires more time and effort, but allows for the safest transfer of an electrical outlet.
The method, which involves installing a new line, is often used in panel houses, where the wires are literally walled up in a concrete wall, and therefore it is not possible to remove them. In this situation, they are simply de-energized and left in place, and a separate groove is laid to power the new outlet.
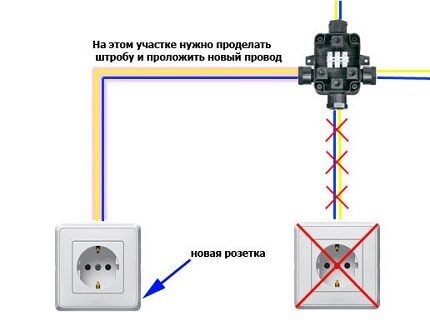
Wall chipping and installation of “glass”
To install a new line, the first step is to turn off the electricity in the room where the work will be carried out. On the wall, using a ruler and pencil, mark the route along which the new groove will be laid.
Using a hammer drill or grinder, a groove is cut out in the wall along the intended route. The depth of the groove is made such that the wire laid in its cavity does not protrude above the surface after installation is completed.
To install a new connection point in the intended location, using a hammer drill equipped with a crown, hollow out a “nest” 50 mm deep.The walls of the niche are thoroughly cleaned of construction chips and dust.
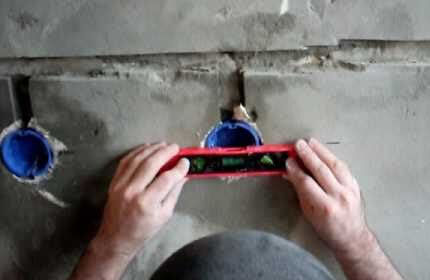
The installed “glass” should not protrude above the surface. If the depth of the niche is not enough, you can carefully cut off the back wall of the socket box.
Cable laying and terminal connections
The cable is laid in the created recess, fixing it every 5-7 cm with plastic clamps or alabaster.
Having opened the junction box from which the “old point” was powered, they find the junction of the output cable with the wire going to the former outlet and disconnect the wires. After this, the old line is dismantled along with the socket. If the old groove was opened, then after removing the wire it is sealed with gypsum or alabaster mortar.
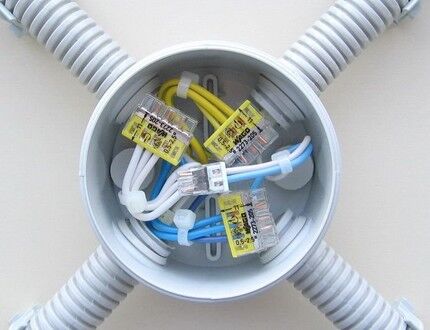
The connected unit is buried in the mounting box and secured with bolts. When installing the socket, it is important not to allow even the slightest play. Otherwise, over time, it will fall out of the “socket” along with the plug.
Since it is difficult to ensure a tight fit of the wires inside the box, it is advisable to connect the wires not by twisting, but by installing terminal blocks, spring terminals or plastic caps.
When laying a new conductor, you need to ensure that there is a small margin left at both ends. It will be needed in order to create a high-quality electrical connection.
The free stripped ends of the conductors are connected to the socket block of the new “point” through screw or spring terminals. When connecting via terminals, they are guided by the rule that the phase wire is installed on the left terminal, and the neutral wire on the right. The grounding conductor is connected to a terminal equipped with antennae, which is located on the device body.
The connected working unit is installed in the socket box and fixed using spacer tabs and clamping screws. A decorative panel is mounted on top.
Conclusions and useful video on the topic
The video will talk about how to move a socket without dust:
What to consider when moving a connection point:
There is nothing complicated about moving an outlet to a new location. The main thing is to adhere to the recommendations of experienced electricians listed in the article and observe safety precautions.
If, while reading the information, you have questions or have recommendations that will help a novice master cope with moving the socket, please write them in the block below.


We recently moved to a new apartment. Interior partitions are panels, except for the bathroom with toilet, there is something else there (we haven’t figured it out yet). It is clear that not all sockets are in place, and in some places there are catastrophically few of them. I was going to move a couple of pieces and make a few extra ones in the kitchen. But a representative of the management company, from whom I asked for a diagram of the wiring in the apartment, told me that it was absolutely forbidden to tap the walls to run wires! I couldn’t refer to regulations, but said that he would inform management about my plans, and there might be trouble.Tell me, is it really impossible to cut channels and sockets for sockets in panel walls? Or was I misled into ordering this work from a UK electrician?
If you have a panel house, then he is right - you can’t ditch the walls in such a situation. The panels are load-bearing and if every tenant makes holes, it will be bad. In Moscow this is directly prohibited by the government decree “On the procedure for reorganizing premises...” clause 11.11, in other regions, I think, too.
Good day, Sergey. The company representative is rightly concerned about maintaining the load-bearing capacity of the walls. Instead of verbal negotiations, you will have to obtain official permission. You should make a preliminary design for moving or installing additional outlets.
When preparing the project, keep in mind that there is a set of rules 256.1325800.2016, which stipulates the conditions for laying wires. Moscow rules are even stricter - they prohibit touching, for example, horizontal seams of internal panels. You can read the details in the screenshot attached to my answer.
Useful material. I myself have been working in this field for several years now, but I didn’t know many things. It’s interesting to read and learn something new for yourself. For example, the daisy chain technology for moving electrical sockets is presented very competently, so that even a schoolchild can understand and implement it. Nowadays there are many sites with similar topics, but I will still take this one as a pencil.
In general, for example, I never liked the location of sockets in the apartment. True, I don’t really understand this myself, so I didn’t bother to change it somehow. Yes, I heard that electrician services are expensive these days.After reading this material, I took a lot of notes. Maybe someday I'll get around to it and reinstall it. I think not everyone is satisfied with the way they are standardly located.