Installing electrical wiring in an apartment: overview of basic diagrams and work order
Almost all equipment in a modern apartment runs on electricity.The location of light switches and sockets for electrical appliances, the correct installation of electrical wiring in the apartment is the key not only to comfort in everyday life, but also to a guarantee of safety from short circuits and fires.
Any renovation in an apartment must begin with planning the location of the main electrical appliances, creating diagrams and then laying wires. This article will discuss various options for electrical wiring diagrams, the pros and cons of one or another solution, and step-by-step instructions for proper wiring.
The content of the article:
Creating a Wiring Diagram
In new apartment buildings, the general building electrical network is connected only to the apartment. The entire layout of the electrical network inside the apartment is already carried out by the owner, depending on the developed plan for the arrangement of furniture and electrical appliances. This is convenient, because owners of apartments with a ready-made network will have to partially or completely dismantle the old one to change it.
Compose wiring diagram in the apartment and install it yourself, or entrust this task to specialists. The second option requires a fairly expensive investment, but it is worth remembering that working with electricity is life-threatening.
If you do not have certain skills, then it is better to entrust the installation to specialist electricians, and you can draw up the wiring diagram yourself.
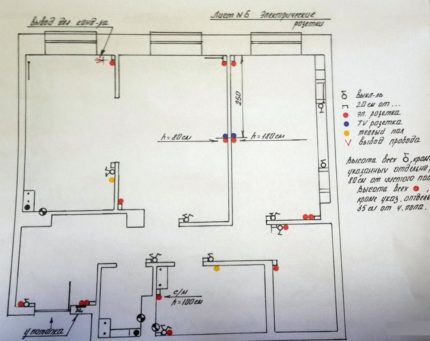
Any installation begins with the development of a diagram of the future electrical wiring.
But before that you need to:
- think in detail about the placement of all electrical equipment and appliances in the apartment;
- choose the optimal locations for the location of switches and sockets;
- depending on the location of windows and natural lighting, select placement points for chandeliers and other lighting fixtures;
- calculate the required footage of the electrical line and the number of electrical points throughout the apartment.
The planning process should not be rushed; it is a very important step and must be taken seriously. Indeed, in case of miscalculations at this stage, in the future it will be necessary to install furniture not so conveniently, but because it will correspond to the location of the sockets. Or use extension cords, which will litter the apartment with their wires and interfere with free passage.
After deciding the issue with the location of furniture and electrical appliances, you can begin to create an electrical circuit. The drawing must be as detailed as possible and drawn up to scale. To do this, you can take a plan diagram of the apartment, on which all the main parameters of the rooms are indicated, or using a ruler and pencil, you can independently transfer the apartment plan to a sheet of paper. In this case, in addition to the intended location of objects, the diagram must indicate door and window openings.
When the plan of the apartment itself is drawn up, we proceed to the next stage - the location of electrical points and wiring lines.It is worth noting that all output elements from the general network are considered electrical points, that is, sockets, switches, light sources operating directly from the network, distribution boxes.
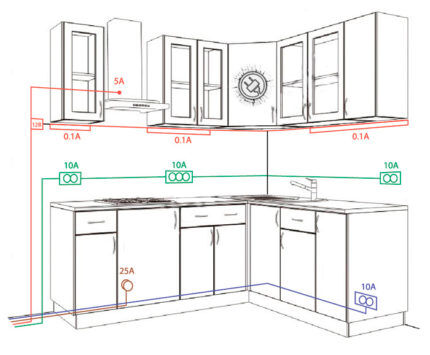
From the point of view of everyday operation and convenience in the event of malfunctions, the best option is to distribute electrical points along separate electrical wiring lines. The type of such distribution is called a “trail”; it will be discussed later in the article.
The following must be marked on the diagrams with extreme accuracy:
- Shield, from which the main core of the electrical wiring line is routed into the apartment.
- Cable routes. The basic rule that must be followed when laying cables is its strict horizontal and vertical location. Also, the distance from ceilings and openings should be at least 20 cm.
- Distribution boxes - are considered the main connection point for cables inside the apartment. With proper distribution of the electrical network inside the apartment, they should be located on each branch of the network line. Thus, distribution boxes should be in each of the living rooms, hallways, and kitchens.
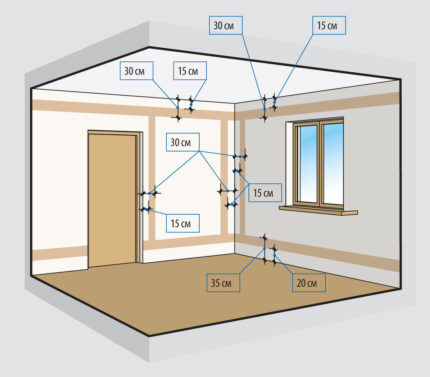
- Sockets - there can be any number of them. The law does not limit the number of sockets that can be located in an apartment. However, when calculating their location, it is worth taking into account their location relative to doors, windows, batteries and pipes, gas pipelines.So, they can be located in any convenient place, but not less than 20 cm from door and window openings and 40 cm from gas pipelines, radiators and heat pipelines.
- Switches. Their location is also not regulated by the legislator in any way and depends entirely on the wishes of the designer. It is most convenient to place them no higher than the level of the head (on average 150-170 cm from the floor), or in the area of the hand with the arm lowered down (50-70 cm from the floor). The location relative to the doorway does not matter and can be either on the right or on the left, depending on whether the owner is left-handed or right-handed and how it is more convenient for him to turn the light on and off.
- Sources of light, which can be located in any convenient place, both on the ceiling and on the walls. Their number is also not limited and depends on the illumination of the rooms and the desire of the designer to illuminate one or another corner of the apartment to a greater extent.
A well-executed diagram of the location of electrical points and wiring lines will allow you to freely navigate in the future when laying apartment electrical wiring.

Tips for properly connecting electrical points
To create effective wiring in an apartment, it is necessary to distribute different directions and combine groups of electrical points in these directions.
So, for laying electrical wiring from the electrical panel, it is worth highlighting the following lines:
- lighting for living rooms, kitchen and corridor;
- electricity supply to living rooms;
- separate power supply to the kitchen;
- lighting and power supply for the bathroom and toilet;
- separate power line for electric stove and devices that consume high power.
For each group it will be necessary to install a special residual current device, which will promptly disconnect a specific line, which will protect the wiring and the equipment powered by it from damage.
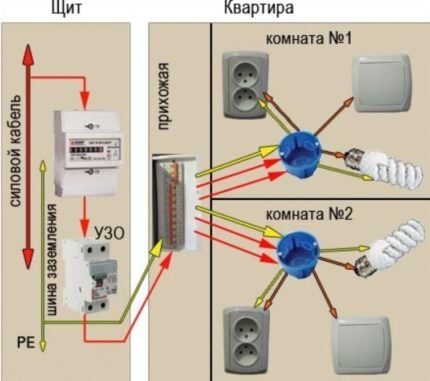
It is worth noting that the connection of the electrical panel to the power lines in the apartment should be entrusted to the electricians of the management companies, since this work must be performed exclusively by specialists in accordance with the requirements of legislative documents.
Instructions for laying electrical wires
Before drawing up a diagram and starting installation work, you need to familiarize yourself with a number of documents regulating the location of electrical wiring in the apartment from the point of view of fire safety and safety for human life during operation.
Step #1 - study the requirements for circuits
Basic requirements and prohibitions when laying wiring in an apartment:
- it is prohibited to connect the grounding of sockets to the neutral wires or to water supply and heating systems - the grounding connection must be made only to the grounding bus;
- mandatory compliance with the vertical and horizontal arrangement of power line routes;
- avoid crossing wire lines relative to each other; the laying path should be made as convenient as possible from a household point of view, so as not to accidentally break the wires in the future when carrying out minor repairs or installing any equipment on the walls;
- the distance between parallel wires must be at least 5 mm;
- conduct wires to sockets from below, and to switches - from above;
- mandatory installation of a machine with a nominal value of 63A for apartments in which electric stoves are installed. Read more about choosing slot machines in this article.
The height of electrical cable routes relative to the ceiling or floor is not regulated by law. However, from a domestic point of view, it is better to place them closer to the floor or ceiling in order to free up most of the wall surface for further use.
Step #2 - Wiring
There are several basic options for creating working electrical wiring in apartments.
They are used depending on the type of apartment:
- star wiring;
- “loop” type wiring;
- wiring using distribution boxes.
Let's look at the features of each of these options.
Option #1 - star wiring
“Zvezda” is convenient for laying electrical wiring in studio apartments or one-room apartments. Its peculiarity is that a separate cable line is connected to each electrical point, which is connected to the central electrical panel.
The disadvantage of such wiring is the high cost of the length of the electrical cable used and installation of electrical panel big size. A plus is the ability to control the operation of each element of the home electrical network.

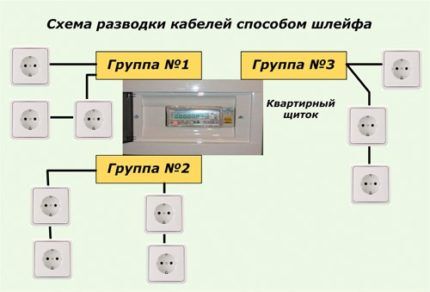
Option #2 - “loop” type wiring
The “loop” is similar in principle to the previous circuit, but in this case several outgoing electrical points can be connected to one line of the electrical wire.This wiring format will be more economical and can be used in apartments with any number of rooms.
Also, this type of wiring makes it possible to quickly find faults in the event of a failure of one of the electrical points, since they are divided and each connected to its own line. But, it is worth understanding that the load on the machine will increase depending on the number of electrical points connected to one line.
Option #3 - distribution boxes
The use of distribution boxes is the most modern method of installing electrical wiring in an apartment. The principle is to conduct powerful electrical wiring strands from the main electrical panel to each of the rooms, where the electrical wiring lines are redistributed point by point in the distribution box.
To create an optimal electrical network inside the apartment, it is worth using all types of wiring simultaneously. So, for example, it is better to make connections for high-power electrical equipment and electric stoves in the “star” version, electrical appliances in the corridor are provided with a network supply through a “loop” type wiring, and lights, switches and sockets in living rooms can be made using distribution boxes.
Step #3 - marking the apartment
After creating the diagram, several steps will follow for wiring inside the apartment. Each of them has features that must be strictly observed.
The second stage after drawing up the diagram is considered to be “marking”. This is a very important stage, the essence of which is to accurately transfer the developed electrical wiring diagram directly to its place in the apartment.That is, it will be necessary to apply marks on the surface of the walls, which, in accordance with the diagram, will later be the locations of electrical points and electrical wiring lines.
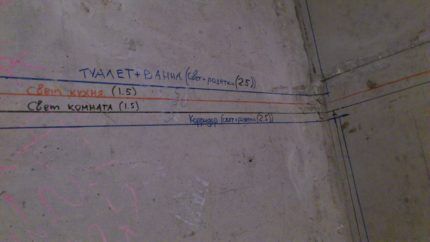
The markup should be done as follows:
- designate the places where sockets and switches, light sources will be located;
- select places where cables will be routed for TVs and wi-fi routers;
- designate the locations of distribution boxes;
- determine and mark the locations of the cable laying lines from the distribution boxes to each of the electrical points (the walls will be chipped along them later during installation);
- determine the location of cable routes from the main apartment electrical panel to each distribution box.
Carrying out markings allows you to “on the spot” determine the correctness of the calculations on the diagram and finally confirm the decision on this arrangement of electrical wiring in the apartment.
Step #4 - laying electrical cables
There are several ways to lay the electrical cable:
- hidden;
- open.
Let's talk about each option in more detail.
Method #1 - hidden wiring
The first method is considered more labor-intensive, but it will allow you to hide all the cables inside the walls, which looks more aesthetically pleasing and will not be conspicuous by the presence of boxes or open cables. For its implementation it is necessary ditch the walls, making grooves for cables in them.
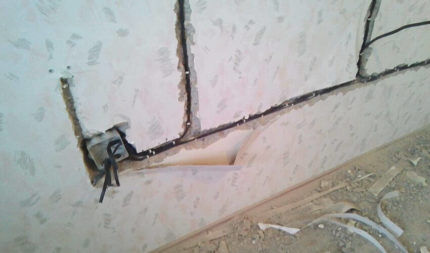
Laying and further applying plaster will hide the electrical lines from view. It is worth noting that caution must be exercised when using this method, as damage to the cable can lead to loss of electricity in a section of the network.
A more acceptable option for laying cables this way is to install electrical wiring under the floor covering. In this case, it is necessary to enclose each wire in a corrugated tube, which gives it additional protection from damage.
It is important to remember that before finally sealing the walls and floor, you need to use a tester to check the proper operation of all electrical outlets.
Method #2 - open option
Open installation is suitable for apartments and premises where it is technically prohibited or impossible to install wires inside walls or floors.
This is a simple installation, which is often carried out along the upper part of the apartment at the junction of the wall and ceiling. The cables are enclosed in special boxes or cable channels.
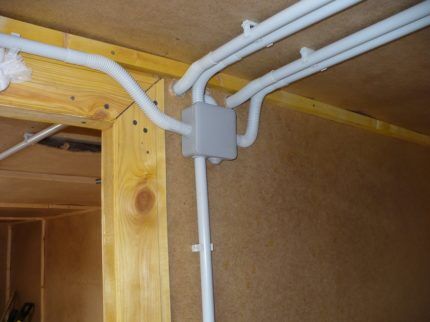
The main advantage of open installation is considered to be easy access to cable networks.
We talked in more detail about installing wiring from the panel in next material.
Conclusions and useful video on the topic
The creation of various electrical wiring diagrams, as well as features, can be seen in this video:
Independently completing the circuit and installing electrical wiring in an apartment is a solvable task, but requires careful study of the basics of electrical engineering. It is also advisable to study symbols and rules for laying power cables.And it is better to entrust the work itself on installing electricity in the apartment to professionals.
Creating a wiring diagram for an apartment is a creative process that must be done with special care and precision. The finished diagram should be sufficiently visual and understandable so that any builder can understand and subsequently implement what is shown in the diagram.
When drawing up a diagram, it is worth using generally accepted designations for electrical points and color identification of power lines and lighting and grounding wires. It is also mandatory to mark all distances and sizes, which will help you better navigate when applying markings directly in the apartment.
Do you still have questions about the topic of this article? Or do you want to share your personal experience in drawing up a diagram or installing electrical wiring? You can ask questions to our experts and other site visitors or leave recommendations in the comments block located below this publication.


