Construction of a summer water supply system from a well: the best options and construction plans
Having a source of water at your dacha makes it easier to both live in the house and regularly care for your garden plot.However, carrying water in buckets or dragging hoses from place to place is impractical, so to increase the degree of comfort it is necessary to establish a water supply system for key places.
Let's try to figure out whether it is possible to independently make a summer water supply from a well, the use of which is especially important in the warm season.
The content of the article:
- Well as a permanent source of water
- The difference between a summer water supply system and a winter one
- Basic summer water supply schemes
- Drawing up a water supply system project
- How to make a capital version with your own hands?
- How to achieve good water pressure?
- Conclusions and useful video on the topic
Well as a permanent source of water
Dacha communities, remote cottage communities, villages are often located outside the “comfort zone” - centralized heating networks and water supply systems, so we will talk about autonomous methods of providing and delivering water.
Rivers and lakes are under state jurisdiction, therefore they cannot be adjacent to an individual plot according to current legislation (the territory 25 m from the water cannot become private property).
Water is sometimes collected for watering a vegetable garden or garden from a permitted natural source - a pond. But to purify the water to drinking level, multi-barrier filters will be required, and this is unprofitable.
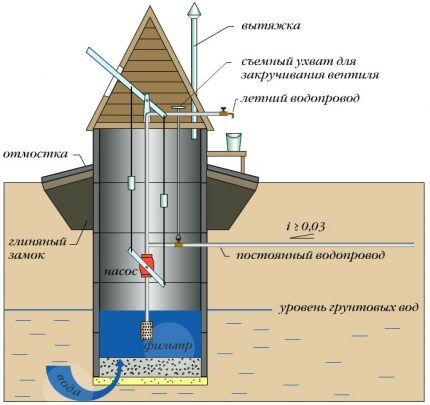
Thus, the well remains - a traditional source of drinking water for most domestic regions. The well method of providing water has developed historically; moreover, it is functionally well Convenient for both automatic and manual use.
In addition to this, tubular water intake sources are popular, but not everyone can afford to equip an expensive well for seasonal use.
If you are the happy owner of a well (wooden, concrete, brick) with a sufficient flow rate, then for the water supply device you will need install the pump and lay communications connecting the source with the house.
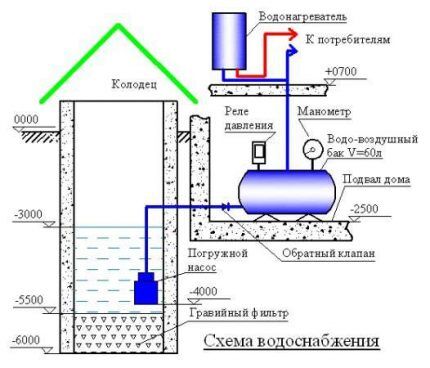
The work can be done on your own or with the help of specialists who will help you calculate the amount of building materials, select a pump, correctly lay pipes and make internal wiring.
The difference between a summer water supply system and a winter one
If you visit your dacha exclusively in the summer, during the holiday period, then the summer system will be the best option. Winter is suitable for those who constantly live in the country or often travel outside the city, regardless of the season.
Peculiarities summer water supply relate to its performance characteristics and installation conditions.
Here are a few nuances that you need to know:
- with the lightweight summer version, the pipes are buried to a depth of 0.5 m to 0.8 m, that is, the freezing horizon is not taken into account (for comparison, the winter pipeline is laid in deep trenches, from 1.5 m and deeper, depending on the region);
- pipes for temporary use do not require additional insulation (permanently used communications require additional thermal insulation or electrical heating with a special cable);
- installation of the pump does not require large investments - it is enough to put on a casing or install a canopy (a constantly working mechanism is usually installed in a specially designated enclosed room or in a caisson);
- a stationary water supply system needs a drainage device, just like the winter capital version, however, for dismountable systems this nuance is not relevant, because the drainage occurs during the dismantling process;
- for lightweight installation, wiring with a serial connection is used, for permanent installation, with a collector connection;
- the operation of a seasonal system is often ensured by submersible or surface pump, the functioning of a permanent network occurs thanks to a pumping station, if necessary - with a storage tank and a water heater.
It is clear that the installation of a winter version is a more serious undertaking that requires sufficient material investments. The status of a summer water supply largely depends on its type: you can choose either a permanent permanent structure or a collapsible “temporary structure” for 2-3 months.
Basic summer water supply schemes
Specific construction activities (for example, the need to dig a trench), pipe installation methods, choice of technical equipment, etc. depend on the choice of scheme.We must not forget that summer landscaping includes communications leading to a summer kitchen, beds or garden plantings - places that are not included in the winter water supply project.
All types of seasonal systems can be divided into two categories: collapsible (removable) and permanent (stationary).
Collapsible surface system
This structure can be safely called ground-based, since all its parts lie on the surface of the earth. In some cases (for example, due to terrain), pipes and hoses have to be lifted above the ground.
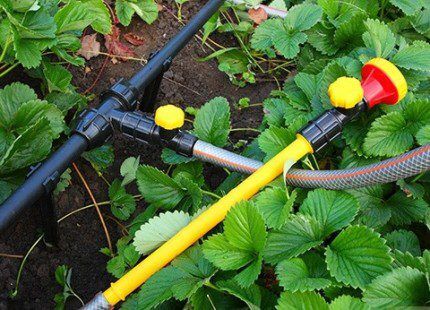
The longest part of the system consists of interconnected pipes or hoses made of elastic materials that can withstand exposure to bad weather and ultraviolet radiation. To connect individual sections, steel or plastic fittings, coupling fastenings, adapters, tees.
Given the demand for collapsible structures, manufacturers of plastic pipes began to produce products with snap fasteners that are secured with light pressure. During disassembly, no cutting is required at the joints - the muffs are removed as easily as they are put on.
The advantages of the temporary system are obvious:
- simple, quick installation and dismantling that does not require special knowledge;
- lack of excavation work;
- the ability to quickly repair faults and eliminate leaks, since the entire system is visible;
- low total cost of pipes, hoses and pumping equipment.
The main disadvantage is the need for assembly and disassembly, which are required at the beginning and end of the season, but difficulties arise only the first time. Reinstallation is much easier and faster.
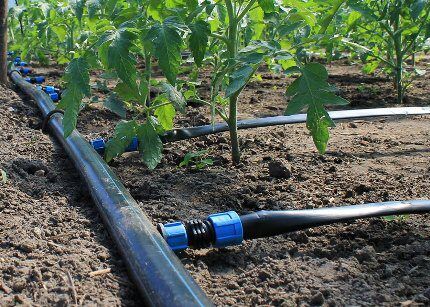
When laying ground communications, it is necessary to monitor their location relative to pedestrian paths, platforms, and places for active recreation, since pipes can interfere with movement, and people, in turn, can accidentally damage the pipeline.
And another unpleasant moment is the risk of losing convenient equipment. Try to position the net so that it is not visible from the road or neighboring property.
Stationary underground communications
Anyone who is not interested in the hassle of assembling and disassembling chooses a permanent option - a water supply system buried in a trench at a shallow depth (0.5 m - 0.8 m). There is no goal to protect the structure from the effects of winter frosts, since at the end of the season the water is drained through special taps installed at the lowest points. To do this, pipes are laid with an inclination towards the source.
Ideally, during draining, the water should go back into the well or into a drain hole installed near it. If you forget about the drainage procedure, in the spring you may encounter trouble - water frozen in cold weather will rupture the pipes and joints, and the water supply system will have to be completely replaced.
To connect polypropylene pipes, welding with a special apparatus or fittings is used. In difficult areas, if bending is required, thick-walled flexible hoses can be used (they are intended for indoor use, so to perform “outdoor” functions, the elastic fragments must be protected from moisture and insulated).
Advantages of a stationary design:
- laying of pipes and installation of equipment is carried out once, only consumables (gaskets, filters) must be replaced;
- communications do not interfere with the movement of vehicles and people around the site, and the soil provides additional protection for them;
- underground pipes are difficult to steal;
- If necessary, the conservation process occurs quite quickly.
The only disadvantage of the underground network is the additional work and, accordingly, increased costs. If you rent equipment or invite a team of workers to dig a trench, even more money will be spent.
Drawing up a water supply system project
Planning work related to arranging a home or cottage always saves time, money and your own effort.
Before purchasing the necessary equipment, be sure to draw up a site plan indicating all important objects (house, bathhouse, well, pond, vegetable garden, garden), make a sketch of the future water supply system, and calculate the exact distance from the source to the water collection points and taps.
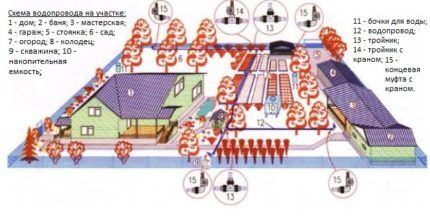
To collect current data, you will have to use a tape measure to walk along the route of the future water pipeline, marking each turn, node or proposed tie-in.This will help calculate not only the length of the pipes, but also the number of connecting elements: adapters, fittings, couplings.
Decide how to arrange consumption points:
- inside the house – installation of plumbing equipment, connection of a hydraulic accumulator;
- outside — installation of several hydrants for ease of watering;
- separate communications with taps leading to a bathhouse, summer kitchen, etc.
For a ground-based system, consider the safest route - along paths, storm drains, fences. An underground structure requires additional calculations related to excavation work.
It is necessary to determine not only the length, but also the depth of the trenches: on a flat area (under a lawn, path), a depth of 30-40 cm is sufficient; under beds or flower beds it is better to lay deeper paths - up to 80 cm.
The diagram must indicate the location of the tap for draining the water. Usually this is the lowest part of the laid communications. You need easy access to it, since draining will be required every time you preserve the system for the winter.
Having outlined all the nuances in the drawing, you can begin practical activities - digging a trench, purchasing the necessary equipment.
How to make a capital version with your own hands?
The temporary structure is easy to assemble, since no trenching, welding or gluing of pipes is required. You will need a simple submersible pump and a set of PP pipes. For cold water, products marked PN-10 (with a blue stripe), for hot - PN-20/25 (with a red stripe).
Connections are made using fittings with metal threads, adapters and couplings with dimensions depending on the range of pipes. No drain tap needed.
Let us dwell in more detail on the design of a stationary system, which requires the installation of additional equipment.
Installation of pumping equipment
Let's assume that the condition of the well is satisfactory and the volume of water is sufficient to install a pump. Otherwise, additional repair work will have to be carried out or well shaft thermal insulation.
Consider which equipment is suitable specifically for your site:
- submersible pump – depth up to 20-25 m (Patriot, Baby, Rucheek, Gilex Vodomet, Belamos, Caliber);
- surface pump – depth up to 10 m (QUATTRO ELEMENTI, Belamos, Gilex Jumbo, Metabo, Marina, Gardena);
- pumping station with hydraulic accumulator (Gilex Jumbo, Caliber, Belamos, Topol, Parma, Elitech).
To install surface pumps, you will need a level area and protection from precipitation. This could be a dry place under a canopy next to the well, a small work area in the basement (if the well is close to the house), or a utility room. Sometimes a strong protective casing or a specially prepared box is enough.
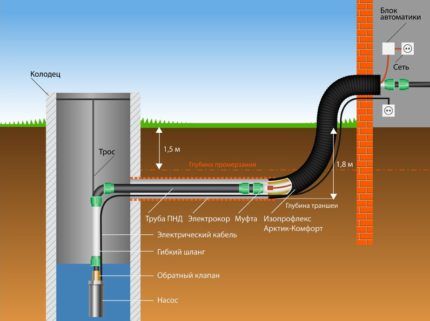
The submersible pump is completely lowered into the water, leaving fasteners, tubes and a power cable outside. Due to the installation features (0.5-1 m from the bottom of the well) and the absence of external working parts, the pump pumps water almost silently. A separate trench for laying the cable is not required; it is usually laid in a ditch with pipes.
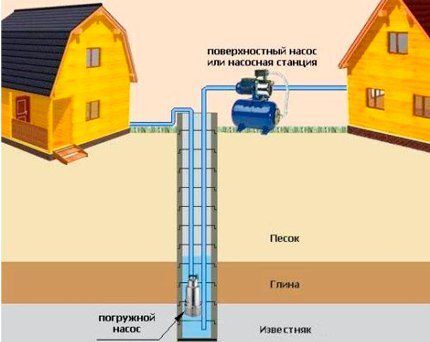
The pumping station has a more complex design and consists of a surface pump, a hydraulic accumulator, an electric motor, a pressure switch, a pressure gauge, and a check valve.
When choosing a model, focus on factors such as:
- performance;
- storage capacity volume;
- required pressure;
- suction height;
- source flow rate.
For example, the volume of the storage tank is calculated based on the needs of the family in case the system stops working. Detailed characteristics can be found in the technical data sheet of the unit.
Pipe supply from house to well
Having decided on the technical side of the issue, you can start digging trenches and connecting pipes to points of consumption. The main underground highway will lead from the well to the house.
You will need the following materials:
- set of polypropylene pipes PN-10;
- tees and fittings corresponding in diameter;
- compression threaded couplings and angles;
- ball valve ½;
- fum tape.
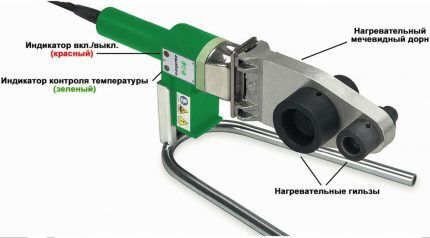
In addition to marking tools (tape measure, marker), you should have wrenches (No. 17-24), gas and adjustable wrenches, a hacksaw, and a construction knife on hand. If the pipes are connected by welding, then instead of a gas wrench you will need a special welding machine (it can be rented).
The trench is dug with an ordinary shovel, the digging depth is no more than 80 cm. Pre-prepared pipes are laid with a slope towards the well, the slope must be at least 3 cm per 1 linear meter of pipeline. Connections are made using threaded couplings or soldering.
Additional thermal insulation of the pipeline is not required, since water is not left in the pipes and, before leaving, is drained into a well or a specially provided hole equipped with a tap.
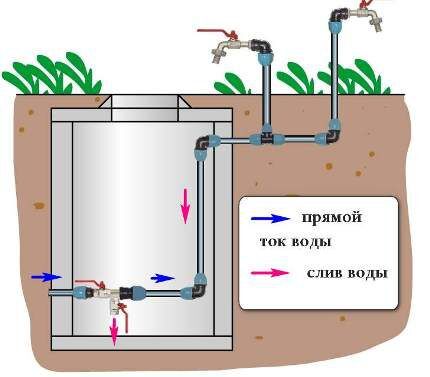
When connecting individual network elements, you must carefully monitor the tightness of the joints. Threaded connections are usually reinforced with fum tape, wound in several layers for density and carefully tightened with a gas wrench.
Couplings are often equipped with rubber seals, so when inserting the end of the pipe into the connecting element, you need to push it all the way so that it is inside the rubber ring.Only then tighten the clamping nut.
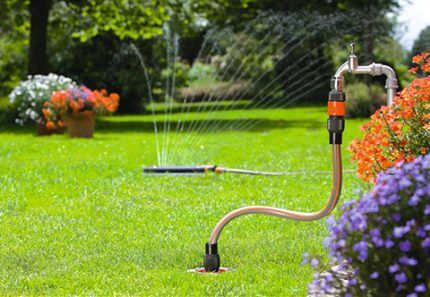
To water lawns, beds, and flower beds, several outlets are installed on the surface so that the hoses (or watering devices) reach the extreme points. Irrigation efficiency can be increased by using sprinklers, sprayers, watering guns connected to a timer and automatically turning on at a given time.
Internal wiring device
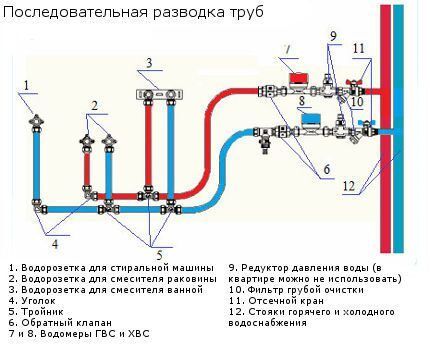
For summer water supply, a sequential internal wiring scheme is used. It is also suitable for a permanent winter system if 1-2 people live in the house.
A larger number of residents require the installation of pipes using a collector system in order to maintain water pressure and provide the required amount of liquid to all distribution points at the same time.
The sequential circuit consists of a common line (riser), from which pipes go to mixers, shower equipment, etc. If hot water supply is necessary, then it is necessary to run two parallel lines - with hot and cold water. Tees are used to connect outlet pipes.
Although the sequential wiring diagram is not complicated, it is necessary to take into account the requirements of SNiP.
For example, each branch is equipped with a separate tap so that it is possible to carry out repair work without disconnecting the common line. To avoid rapid equipment breakdown, filters are installed on the pipes.
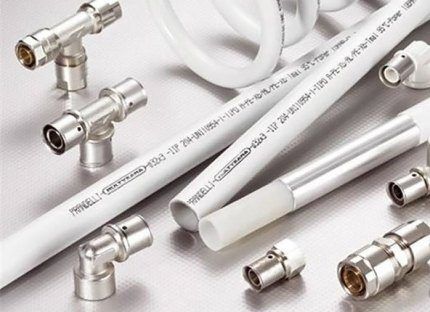
When choosing a material, they usually focus on the service life of the products and cost. Steel and copper pipes are practically not used; they have been replaced by inexpensive polypropylene products. A more durable and expensive material is metal-plastic.
Connecting elements, corners and plugs must match not only in diameter, but also in material of manufacture.
It is better to start arranging the wiring from the water supply point - for example, a pumping station. The work is carried out according to the instructions. If you are not technically savvy and doubt your skills, it is better to invite a specialist to connect the automation - perhaps from a company that sells pumping equipment.
How to achieve good water pressure?
Using some installation tricks, you can achieve higher performance of your water supply system.
For example, to stabilize the pressure in pipes and provide the necessary water pressure, hydraulic accumulator or the storage tank is installed in the upper part of the house, for example, in the attic.The pump must be powerful enough, protected from a decrease in pressure in the network.
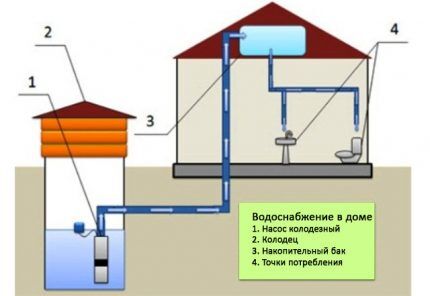
To ensure there is enough water for everyone, you should select a tank of sufficient volume. When calculating, use the amount of daily water consumption per person, which equals on average 50 liters (for permanent residence).
The water supply device, on the contrary, is mounted in the lower part of the building - in the basement or basement, to make it more convenient to conduct communications to the pumping equipment located in the well.
Conclusions and useful video on the topic
Overview of water supply system for summer use:
Budget option for installing an irrigation system:
Recommendations for installing a pumping station:
As you can see, the installation of a stationary summer water supply system resembles the equipment of a permanent water supply system. You can do it yourself or with the help of experienced plumbers.
After installation, do not forget about the need for maintenance: mandatory drainage of water when storing for the winter, as well as regular checking of the tightness of pipes and operation of pumping equipment.
Do you have practical skills in installing a water supply system from a well? Please share your accumulated knowledge with visitors to our site. You can also ask questions about the arrangement of summer water supply in the block located below.


Wow, so much useful information. I think I found what I was looking for. Summer plumbing with water intake from a well is a very complex system that requires maximum effort and a huge amount of knowledge.I'll have to call my friends, I certainly won't be able to do this on my own, even after watching all these videos. I hope this process will not take a huge amount of time, I would like to do it all faster.
For summer watering we use a long flexible hose of standard diameter. To avoid having to build it up, we immediately bought 28 meters in one skein. For 12 acres of land, this is the most economical option, given that the beds sometimes change position even in one season. For a house from a well with a pump, we are planning to install a permanent pipe system with full automation.
We decided simply. We installed a “Malysh” pump and a storage tank in the house. The pumped water goes both to the house and to the garden for irrigation. Very convenient and functional. We wanted to buy an expensive pump, but the specialist said that this type of equipment is quite sufficient, since it is quite affordable, and my husband and I are state employees and do not live richly. And you? so we recommend it.