How to install ventilation pipes: installation technologies for attaching to walls and ceilings
Air ducts are the transport networks of the ventilation system.Their design and installation are regulated by strict regulations and technological maps. Compliance with regulatory requirements during construction is a guarantee of flawless operation of the network, ensuring stable air exchange.
We will tell you how to install ventilation pipes in accordance with building requirements. Every developer must know the basic rules for laying and fastening air ducts. The information will also be useful for owners to understand the cause of the problem and decide how to fix it.
The content of the article:
Air duct design and requirements
The movement of air flows inside and outside the building is carried out through vertical and horizontal ventilation ducts. Installation of ventilation pipes is carried out according to the design marks indicated in the working drawings. Installation rules are given in the regulatory collections SP 73.13330.2016 and SP 60.13330.2016.
Ventilation ducts can be laid inside the main walls or located in the premises of the house under the ceiling or along the walls.Often circumstances dictate the design of air ducts outside the building.

Separation of channels by functionality:
- supply air - through them fresh air enters the house;
- exhaust - to remove contaminated air masses.
With natural ventilation in a private house, all exhaust ducts can pass through one shaft. For this purpose, designers try to locate rooms with high humidity, unstable temperature and characteristic steam formation, from which used air is removed, next to each other.
There are a number of requirements for ventilation ducts:
- tightness;
- noiselessness;
- compactness, location in hidden parts of the house;
- strength, durability.
During installation, a spatial structure of air ducts is created from individual standard parts. For its construction, in addition to straight elements, additional shaped parts are used.

According to the external configuration, round and rectangular air ducts are used. Pipes with cylindrical shapes have optimal data for the unhindered movement of air masses. Rectangular boxes save space and are easy to hide behind false walls and suspended ceilings.
Air ducts can be rigid or flexible.Rigid lines are manufactured in both round and rectangular versions according to VSN 353-86, TU-36-736-93.
For the hard version the following materials are used:
- cold-rolled galvanized steel - 0.5 - 1.0 mm;
- hot-rolled sheet steel - 0.5 - 1.0 mm;
- polymers - 1.0 - 1.5 mm.
Suitable for wet areas plastic air ducts or stainless steel with a thickness of 1.5 - 2.0 mm. In chemically active zones, pipes made of metal-plastic, aluminum and its alloys are used.
Flexible channels are made in the form of pipes made of soft material. They are often used as convenient inserts for connecting rigid ducts to ventilation equipment.

Curved ventilation ducts are suitable for moving air at low speed and pressure.
They are often installed in residential buildings PVC ventilation pipes with high heat and sound insulation properties.
Typical polyvinyl chloride parts are connected using:
- permanent contacts - butt welding or welded couplings;
- detachable elements - flanges, couplings, sockets.
Fastenings to PVC air ducts are used both suspended and support.
Thermal insulation protects ventilation ducts from condensation. This mainly applies to industrial and unheated premises. For private homes and offices, thermal insulation is used when insulation of ventilation in the attic. Soundproofing of pipes is carried out in living rooms.
Metal ventilation pipes must be grounded to remove accumulated static voltage.
Connection options when assembling ventilation ducts
Air ducts are assembled from individual parts. Docking is carried out using flanges or other connecting elements.
Angular flanges are installed at the ends of the sections being connected. Holes for mounting bolts are drilled on them. Sealing gaskets are placed between the flanges.
To ensure the strength of the flange connections, the bolts are carefully tightened using nuts and a suitable wrench. The nuts are on one side of the connection. When installing vertical pipes, the nuts are located on the side of the lower flange.
The disadvantages of such a connection are the significant weight of the structure, high consumption of metal, and high labor intensity of the work.

Lighter flanges are made from galvanized profile strip. The Z-shaped flanges are connected using a C-shaped rail and a seal.
The connecting rail resembles a collapsible flange. It is made of a galvanized metal profile in the shape of the letter G. The length of the larger side is from 20 to 30 mm. The kit includes a seal and a corner. The advantages include low labor intensity and low financial costs.
Among the wafer connections used for assembling round air ducts, the most commonly used are:
- nipple;
- bandage.
The thickness of the nipple should not be less than the thickness of the pipes.
The nipple is inserted inside or put on top of the joining elements so that its width covers both sides of equal length for the pipe diameters:
- 100 - 315 mm - not less than 50 mm;
- 355 – 800 mm – not less than 80 mm;
- 900 - 1250 mm - not less than 1000 mm.
Instead of the name nipple, the term coupling is often used.

The bandage connection is considered a connection with a high degree of strength and reliability. The edges of the straight and shaped parts of the air ducts are folded back and combined. Then a bandage filled with sealant is applied to the pipes at the seam and tightened.
When connecting air ducts, the seams are sealed:
- elastoplastic tapes such as “Guerlain” at temperatures up to 40 degrees;
- non-hardening mastic based on synthetic rubber (for example, Buteprol), silicone and other sealants that can withstand heating up to 70O WITH.
The seam of the pipe or box is located at the top.
When moving an air mixture with a temperature above 70O Elastic strands made of polyisobutylene, bitumen mastic (PMZ) and other fire-resistant non-combustible materials are used as a sealant.
Before joining the channel elements with thermal insulation, carefully bend the insulation at both ends. The sections are hermetically connected and the insulating layer is returned to its place. The seam in the thermal insulation is sealed with aluminum tape or clamps.
Attaching ventilation pipes to the wall and ceiling
Metal air ducts without insulation with banded connections are attached to ceilings and walls using various structures: supports, brackets, hangers, clamps.
Features of installing rigid ventilation ducts
The distances between fasteners are strictly standardized:
- for round pipelines with a diameter of less than 400 mm - no more than 4 meters;
- for diameters equal to or greater than 400 mm - no more than 3 meters;
- for boxes with a cross-sectional side of less than 400 mm - no more than 4 meters;
- with a cross-sectional side equal to or greater than 400 mm - no more than 3 meters.
To remove the condensate that forms, horizontal sections of air ducts are laid with a slope of 0.01 - 0.015. Water drops roll down an inclined surface into drainage receptacles.

Laying a ventilation pipe with a diameter of up to 630 mm with flange and coupling (nipple) connections in a horizontal position is carried out using various fasteners. The distance between them does not exceed 6 meters.
In other options - no more than 4 meters. At points of insertions or turns, the stability of the air duct is enhanced by additional supports.
Suspensions and supports of horizontal sections of metal rectangular boxes with a perimeter of up to 1600 mm with flange or busbar connections are placed at a distance of no more than 6 m from each other. For other joints, the distance is no more than 3 m, and the tie-ins and turning angles are also additionally strengthened.
The installation step of fasteners for metal air ducts of any cross-section and dimensions with insulation, as well as for pipes without insulation with a diameter of more than 2000 mm or ducts with a side of more than 2000 mm, is indicated in the working drawings.
Vertical fasteners ventilation pipes carried out every 4.5 m. In multi-storey buildings with a floor height of up to 4.5 m, air ducts are fixed in the floor ceilings. If the height of the premises from floor to ceiling is more than 4.5 m, the ventilation pipes are fastened to the walls in accordance with the instructions of the design documentation.
Vertical deviation of ventilation pipes is allowed within 2 mm per 1 meter of air duct length.
Uniform distribution of tension across the pendants is achieved by adjusting their length. It is prohibited to attach guy wires to the connection flanges. The mounting clamps should not dangle loosely on the duct, but should fit snugly around its circumference or perimeter.

All non-standard fastenings are calculated and displayed in working drawings.
The distance from the plane of the house wall to the outer surface of the round ventilation duct is at least 50 mm, from the ceiling surface - 100 mm.
For rectangular ducts, this parameter depends on the dimensions of the sides of the air duct section:
- for side 100 – 400 mm – 100 mm;
- 400 – 800 mm – 200 mm;
- 800 – 1500 mm – 400mm.
The minimum distance to water, gas, and heat supply networks is 250 mm. At least 300 mm to power supply lines.The smallest interval between two round air ducts is 250 mm.
When passing through walls and ceilings, flanged and other types of air duct connections are placed at a distance of at least 100 mm from their surface. Fasteners are installed no closer than 200 mm from the detachable connection point.
Rigid Duct Fasteners
Below we will describe: with the help of what devices and how to attach the ventilation pipe to the ceiling.
Among the fastening elements used for these purposes are:
- The stud and shaped profile in the form of the letters Z or L provide additional support for the air duct from below. The method is suitable for installing heavy structures. The connection is fixed with self-tapping screws and a rubber gasket between the stud and the profile.
- A clamp with a pin is the best choice for ventilation ducts in the form of pipes.
- The cross-beam with two studs is suitable for main ventilation passages with a side rectangular cross-section of more than 600 mm. The air duct is laid on a traverse, which can be metal plates and profiles.
- Clamp without pin - used for short sections of flexible air ducts.
- Perforation tape - fastening for light pipes and rectangular channels with a diameter and side of up to 200 mm. To cover a round surface, a loop is made from the tape; in boxes, the punched tape is secured to bolted connections.
The opposite ends of the above fastening devices are connected directly to the ceiling of the room in the form of an anchor element or attached to metal beams using bolts or clamps.

The ventilation pipes are fastened to the wall using embedded parts and cantilever structures.
To produce fixation use:
- Brackets. They are embedded in the walls of buildings or attached to them with dowels using a mounting gun PTs-52-1. Horizontal air ducts are laid on angle steel brackets.
- Tractions. They are used for hanging air ducts from building structures. Using adjustable hangers, the tension of the braces of the ventilation ducts is controlled. The standard is 1 fastening per 2 meters of air duct length.
- Clamps. Designed for fixing pipe air ducts on rods, grips, hooks. The width of the steel band of the clamp for a ventilation duct diameter of up to 400 mm is 25 mm, for a diameter of 450 - 1600 mm - 30 mm. Secure with anchor bolts or dowels.
Different types of fasteners are used in one ventilation system. How to properly fix the ventilation pipe to the wall is shown in the photo below.

Since extremely light-weight media are transported through air ducts, there are no special requirements for the strength of the brackets. The main thing is that they can support the weight of the highway itself.
Fixing flexible ventilation ducts
To connect air ducts to fans, inserts made of vibration-isolating soft materials are used, ensuring flexibility, tightness and durability of the connection.
Air ducts made of polymer film on straight sections can have bends of no more than 15 degrees. Metal liners help them cross building structures.
Flexible pipes are placed on wire rings with a diameter of 3-4 mm at intervals of 2 meters. The diameter of the air duct is 10% smaller than the diameter of the fastening ring.
A supporting cable made of metal wire with a diameter of 3-4 mm is stretched along the axis of the pipe, which is attached to the house structures every 20-30 meters. Steel rings are hung on the cable using wire or steel plates with a cutout.

Flexible pipes are used to connect:
- hard ducts to ventilation equipment;
- complex shaped parts;
- noise suppressors and other devices.
For main ventilation pipelines flexible corrugated pipes prohibited to use. Soft ducts cannot be used in vertical ducts longer than 2 floors.
The procedure and methods for installing air ducts
Before installation of the ventilation system begins, a work plan is developed. It outlines the individual stages of assembling large units. Depending on the dimensions of the structures, their masses, installation methods and the sequence of steps are chosen. Mark the fasteners and check their completeness. In the graphic part of the PPR, parking places for lifting mechanisms: winches, blocks, etc. are marked.
Only rigid ventilation lines are installed in basement and ground floors.
To pass through walls and partitions, special inserts and metal cartridges are used.
In order to minimize speed losses, the turning angles of the route are rounded with a circle radius of at least 2 diameters of the air duct.
For individual hidden areas of ventilation pipe distribution (in shafts, under ceilings), work acceptance certificates are drawn up for installation of air ducts, where the main characteristics and connections of the mounted structures are recorded. A sample document preparation is given in Appendix B of the set of rules SP 73.13330.2016.
According to Appendix A of the same joint venture, the dimensions of the holes in the walls and ceilings of the building for laying ventilation ducts must be 150 mm wider than the corresponding diameter or side of the air duct.
Installation of horizontal channels inside the building
Ventilation pipes are laid in accordance with the TTC regulations, section 07.33.01.
Work order:
- checking the presence of all necessary parts and fasteners;
- marking of fastening means;
- embedding anchors into the floor slab or support beams in the form of corners, channels;
- assembly of individual parts into larger units;
- installation of lifting mechanism;
- slinging the first knot;
- securing guy wires at both ends of the knot;
- trial hanging to clarify the center of gravity of the structure;
- lifting to the design location and securing with hangers;
- control of the accuracy of placement and unslinging of the block;
- repositioning the winch to install the next unit.
At the last stage, the accuracy of the block placement is checked, the slings are removed and the winch is rearranged for installation of the next unit.

Assembling vertical air ducts using the “build-up from below” method
The installation process is carried out according to TTK 07.33.05 and consists of a sequence of the following technological operations:
- Installing a lever winch above the installation opening.
- Slinging the first part by the head attached to the flange.
- Raising the first element slightly higher than the height of the second element.
- Connection of the second and first parts of the ventilation pipe with a flange connection with gaskets.
- Raising connected elements No. 1 and No. 2 to the height of the third part.
- Attaching the bottom of part No. 3 to elements No. 1 and No. 2.
- Building up the structure in a similar way until the parts are completely used.
- Installing the ventilation pipe in the designed position.
At the end, the correct location is checked, secured to the consoles using clamps or flanges, and lifting devices are removed.
Installation of vertical channels “by extension from above”
The algorithm of actions is described in the TTK 07.33.08. This method is used to connect heavy units created using the “build-up from below” technology.
A support beam is attached to the top of the shaft, on which a lever winch is attached. Individual links are assembled into large blocks using the “building up from below” method. The air ducts are raised to the top floor and located next to the ventilation shaft.
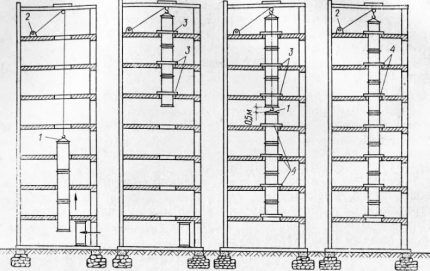
The first element is lowered down to the design location and finally secured to the supports. Then such operations are repeated for the remaining blocks until 100% assembly of the standing air duct is completed.
Installation of vertical air ducts by “extrusion”
The installation of the ventilation duct in the design position according to TTK 07.33.06 is carried out using two winches fixed in the lower part of the building. A support plate with brackets for slinging is bolted to the lower flange of the lower assembly, assembled using the “extension from above” method.

Using two winches and blocks, tighten the slings and push the ventilation pipe 0.5 m above the roof. An umbrella is installed on the top flange from the roof and guy wires are secured. Then the air duct is lifted to the design level using winches, fixed with permanent fastenings, and the base plate and lifting rigging are removed.
Flexible air duct hanging
Bendable pipes are often used in ventilation systems of apartments or private houses, offices, and small retail premises.
Sequence of installation work:
- determination of the actual location of the channel with reference to building marks;
- installation of fasteners in the ceiling in the direction of laying the air duct, install dowels every 400 mm and hang clamps;
- stretching the flexible sleeve to the maximum and cutting pieces of the required length.
The soft sleeve is placed on a rigid pipe with a minimum overlap of 5 cm on its surface. Installation of flexible air ducts is carried out taking into account the direction of moving air flows.They are guided by marks on the surface of the pipes. The attachment points of such a channel are located at a distance of 1.5-3 m from each other. Sagging of the sleeve is allowed no more than 5 cm per 1 meter of total length.

If a flexible hose is laid behind a suspended ceiling parallel to its surface, the supporting clamps are placed at a distance of 100 mm. When laying vertically, the free areas between fasteners can increase up to 1800 mm. Flexible ducts need protection from direct sunlight.
Elastic pipes have the ability to accumulate static voltage; it is important to ground the channel. To do this, the grounding wire is fixed at one end to the metal frame of the sleeve.
Safety precautions during work
Most installation work is carried out at height. Lifting mechanisms are required. It is mandatory for installers to undergo safety training.
For the successful outcome of the work at height phase, it is required that:
- Work was carried out only by trained, qualified installers.
- The work site was fenced, and the passage of people near the site was limited.
- To reduce the degree of danger of installation at height, all preparatory processes were carried out at the zero level.
When performing work in private homes, reliable, strong scaffolding and inventory scaffolding are used. Work on laying ventilation pipes with thermal insulation is carried out wearing protective gloves and goggles.
Will familiarize you with the specifics of arranging the passage of ventilation pipes through the roofing pie next article, which we recommend reading.
Conclusions and useful video on the topic
The process of assembling and installing a ventilation system with fastening air ducts to floor slabs is shown. The viewing speed and volume can be adjusted in the video settings. Installers use a hammer drill, fasteners, sealant, scaffolding, and scaffolding.
The video material in two parts will introduce you to the specifics of the air duct network design:
Continuation of the video tutorial:
Properly laid and secured air ducts will ensure an unhindered supply of fresh air and removal of waste from the treated premises. The ventilation ducts will not become clogged with dust deposits and cause inconvenience to the owners of the house or apartment. Carrying out installation work in accordance with construction requirements will eliminate disruptions and damage to the system.
Do you have information on the topic of the article that is worth sharing with site visitors? Would you like to supplement the information presented for consideration? Please write comments in the form below, post photos and ask questions about unclear and controversial issues.


