Connecting the roof to the ventilation shaft: arranging the passage of the ventilation unit through the roof
Any ventilation system that was used in the construction of a private house needs two main elements - a point of intake of clean air and a hole for the emission of contaminated air. Agree that without these elements the entire ventilation system loses any meaning.
There are many options for arranging these points, but most often they are located under the roof or directly on the roof itself.
This article discusses the main options for the design of a ventilation unit through the roof, the variety of which depends on the type of ceiling on the roof. Practical advice is also given on how to properly connect the roof to the ventilation shaft in order to prevent precipitation from entering the house.
The content of the article:
Ventilation pipe installation requirements
Compliance with the requirements put forward to installation of ventilation unit – a guarantee that there will be no mold or high humidity in the house. One of the tasks of the roof is to protect the room from precipitation, as well as maintain an optimal temperature regime that is comfortable for the residents of the house.
A ventilation pipe is a through hole passing through the roof. That is, in order to ventilate through the roof, it is necessary to make a through hole that will allow precipitation to enter the house.

That is why the ventilation entry point needs additional insulation from precipitation and melt water. In addition, it must be protected from condensation. The latter occurs due to the high difference in temperature between the one achieved indoors and that achieved outdoors. Thus, the main requirement for ventilation pipe – its complete tightness and thermal insulation.
It is also important to ensure that precipitation flows freely from the roof, that is, the ventilation pipe does not interfere with this. The task is not easy. On the one hand, nothing should interfere with the flow of fresh air into the room. On the other hand, the pipe should only allow air to pass through, but not prevent the penetration of precipitation, insects, etc.
To solve these problems, you can install special passage units. With their help, uninterrupted transportation of air flows is ensured, without significant interference with the functionality of the roof.
The basic requirements for installing a ventilation shaft are as follows:
- protection against so-called “cold bridges” - prevent the formation of places through which heat can escape from the room;
- sealing;
- a mandatory requirement is a tight fit of the ventilation pipe to the roof;
- installation of additional protective elements - after sealing, the joints are covered with additional structures (they perform both decorative and practical functions).
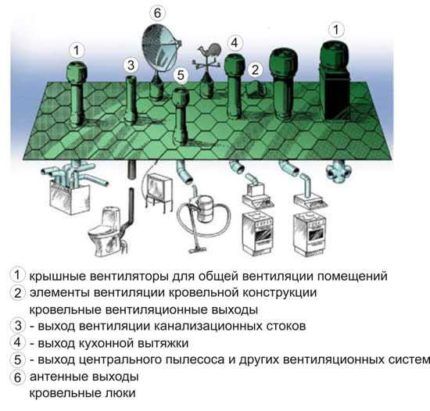
If there are several exits on the roof, e.g. chimney, television antenna or satellite, then you can create one common shaft through which they will exit.
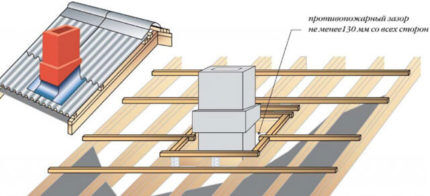
A ventilation hole can be added to all these exits, that is, the roof will be connected to the ventilation shaft through a special outlet. The shaft is constructed of metal or wood; it is advisable to think about the method of removing ventilation and other communications during the construction of the roof.
It is worth remembering that for an ideal connection of air ducts to a metal roof or a roof made of any other material, it is better to make the ventilation pipe square or rectangular.
In this case, to ensure proper connection of the air duct, use a square trim. It is placed on top of the pipe and provides its protection. The space formed between the ventilation pipe and the lining is filled with sand or any other non-flammable mixture.
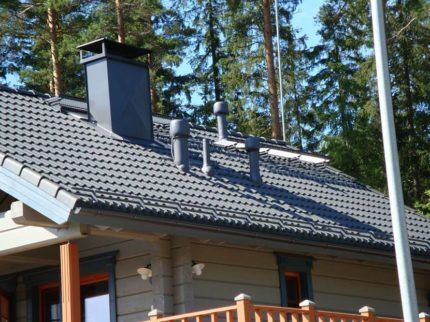
To protect the room from moisture penetration, sealant is used for joints, and in the upper part of the ventilation pipe a deflector.
Additional requirements are also established for the length of the ventilation pipe; if there is no draft in it, it may fans to be mounted.
The height of the pipe must be no less than the chimney. In addition, the distance between the joint and the deflector must be sufficient for the free movement of air masses.
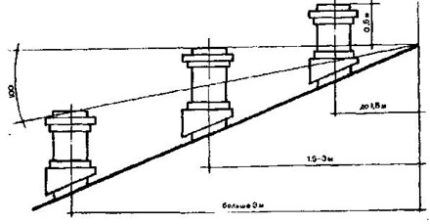
The ventilation unit can be located along the roof slope. It is in this case that the pipe will not create obstacles to the melting of snow or the free flow of precipitation from the roof.
The most ideal place is a ridge, like the top of a roof. This is the only way to ensure maximum traction, without installing additional fans.
Selection of materials for sealing
To seal the joint between the ventilation pipe and the roof, you can use sealant or special tape. Both options are suitable for this stage of installation; the specific type is selected taking into account the type of roof slab.
A characteristic feature of any type of roof is its high temperature range. In hot summers, the roof can heat up to +70 degrees, and in severe frosts it can drop to -40 degrees Celsius.
Therefore, it is important to choose a sealant that will be very elastic and resistant to such temperature changes. So, if self-leveling roofing or bitumen shingles were used during construction, then it is better to use acrylic sealants.
However, if the house is located in a cold climate, where temperatures are often below freezing, then acrylic sealant can only be used to seal internal seams. You can also use bitumen sealants to treat internal joints. Polyurethane products are more universal, as they are suitable for any type of roof and do not have special requirements for temperature conditions.
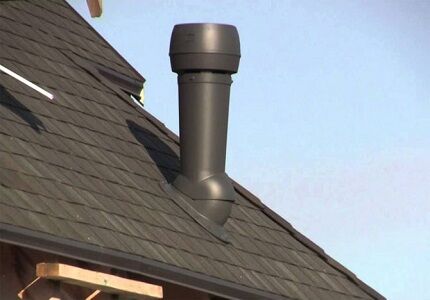
Using tape for sealing, you can significantly simplify the process of processing the joint between the roof and the ventilation pipe.
The tape is a thin strip of foil that is attached with glue or has its own adhesive backing. It completely follows the contours of the joint, thereby achieving perfect sealing.
How to bypass the pipe correctly?
Pipe caulking is a way to cover the joint and, in some cases, the air duct itself.
This is done for the following reasons:
- appearance of the roof;
- despite compliance with the requirements for the height of the pipe, there is no draft;
- there is no confidence in the quality of the material from which the ventilation shaft is made; there are fears that it will collapse under the influence of precipitation.
Various materials are used to bypass the ventilation pipe. They vary in cost, as well as in their characteristics.
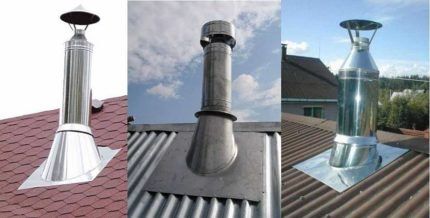
The most popular is galvanized material, which is coated with polymer. This is the cheapest way to bypass the pipe, it is durable in use and has a presentable appearance. Since the ventilation pipe is not considered flammable, siding can be used to cover it.
In some cases, it becomes necessary to bypass the ventilation pipe with soft tiles, which is reasonable to do only if the entire roof is made of such material.
The rules for laying flexible tiles do not differ when bypassing the ventilation pipe. At the same time, it is worth making sure that the joints of the tiles do not allow water to pass to the joint of the air duct, and also do not interfere with the free drainage of precipitation from the roof.
Basic options for connecting the ventilation unit
The choice of connection method for the ventilation unit depends on the material from which the roof is made.
An equally important role is played by the type of pipe that serves for air duct:
- a simple pipe made of metal or polypropylene, which does not have any additional functions;
- supplemented with a fan;
- a pipe supplemented with a valve adjustment system, with rod or manual control;
- complex ventilation systems with several additional functions.
The more functions an air duct has, the higher the requirements for installation of ventilation unit.
The simplest option for installing a ventilation unit can be done on a soft roof. To do this, you need to make a hole in the roof that has a diameter that matches the ventilation pipe laid in the house.
A flange support is attached to the hole using self-tapping screws, always supplemented with a flexible gasket. A glass (attached with self-tapping screws) and a galvanized pipe are placed in the flange. The empty space between the glass and the pipe is filled with heat-insulating material.
When using other roofing materials, it will be necessary to use more complex fastening methods, with additional waterproofing sheets.
If we are talking about the industrial version of the ventilation unit on the roof, then they are quite standard.
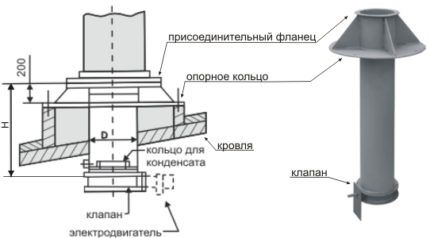
This is an air duct that has the shape of a square or circle, and around it there is a mounting washer with additional stiffeners. Passage units are produced in three types - those that are produced without a valve or with an electrically operated or manually operated valve. In addition, the passage unit may differ in shape.
In order to select the necessary materials, you need to decide on the option for passing the unit through the roof. The easiest way is to install the unit on a soft roof, which is made, for example, of flexible tiles.
To do this, you will need an elastic rubber seal, a glass and an adapter flange. Installing this structure will not be particularly difficult - you can do everything yourself.
In cases where another material is laid on the roof, for example, corrugated sheeting or slate, it will not be possible to get by with a standard set of materials. In addition, if the ventilation pipe is too high or there is a significant layer of insulation under the roof, the method described above is not suitable.
Then you will have to use a unit that consists of a steel glass, and a metal platform should be located under it. As in the previous case, work begins with determining the exact location where the pipe will be cut, as well as creating a hole of the required diameter for the pipe and platform.
The first step is to lay a layer of waterproofing, the edges of which run under the roof. In the place where the passage unit is located, its edges are treated with sealant.
In order to cope with the problem of the large height of the ventilation pipe, you can make an additional plywood cover. For particularly large or heavy structures, an additional frame is made from wooden beams. As an option, you can install a guy wire made of metal cables, which will securely fix the pipe to the roof.
If we are talking about a concrete roof, then it is rational to use a standard set of materials (plastic cup, seal and flange), since on structures of this type, outlets for ventilation or other pipes are usually planned in advance.
Conclusions and useful video on the topic
How to properly install the ventilation unit can be seen in the video:
Thus, venting ventilation through the roof is a rather painstaking and complex process. Failure to comply with the requirements for installation can lead not only to the cessation of ventilation, but also to the appearance of excessive humidity and mold in the house.
Therefore, if you are not sure that everything will be done correctly, it is better to entrust this work to professionals.
Have you ever had to arrange the ventilation passage through the roof yourself? Perhaps there were any difficulties with this? Please share your experience in arranging a ventilation passage through the roof. Leave your comments, ask questions - the contact block is under the article.


