Condensation in ventilation in a private house: causes of moisture accumulation and ways to eliminate the problem
The owner of a private house needs to take into account many factors from the very beginning of construction until the home is completely ready. If you own your own home, then you've probably found yourself in situations where you had to plan or redo communications. An important point can be missed even when working with a master. For example, frozen condensate in the ventilation of a private house or on the roof of an apartment building soon weakens the draft, up to a complete stop of air exchange.
During the cold season, moisture can accumulate in excess and destroy materials. Ventilation in a large house cannot be changed in one day, but thanks to this article you will learn all the nuances and be ready for repairs. You will not make mistakes, save time and money. We will talk about the features of condensation and methods for eliminating it.
Condensation forms due to mechanical problems with ventilation and certain external conditions. There are many options for how to get rid of it, and three methods with a more thorough approach. From the article you will understand which method will be more convenient and justified for you.
The content of the article:
Reasons for condensation accumulation
Condensation appears due to external factors and poor ventilation. Installers sometimes make mistakes and the system works poorly. Condensation also accumulates due to high humidity in the house.
Excessive humidity in the room will be indicated by drops on the inside of the windows. In summer, you only need frequent ventilation, and there will be no moisture in the pipes.In cool times, air liquefies on the walls of air channels, primarily at the junction of heat and cold.
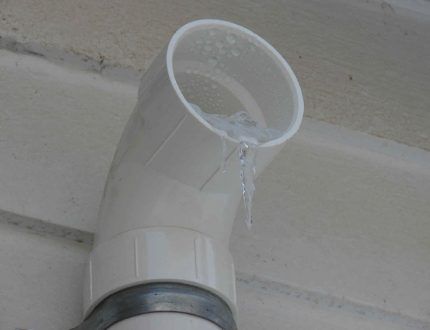
Other causes of condensation:
- ventilation leaks;
- destruction of a pipe from the street side;
- proximity of channels to the external wall;
- the pipes were not insulated;
- insufficient wall insulation;
- temperature changes in the building/outside;
- icing at home;
- water in the basement;
- the house was built on a wet foundation;
- there is a leak in the water pipe.
Ventilation ducts with condensate will gradually fill with harmful microorganisms. It will be difficult to remove them from there, and in addition there will be an unpleasant smell and the likelihood of getting sick.
Ventilation pipes need cleaning. Insects, spiders, leaves get there. Birds build nests in hatches. Due to the weakening of draft, condensate forms in even greater quantities. It doesn’t hurt to check the strength of the air inflow/outflow with a sheet of paper or a lit match. Improper circulation also reduces traction.
In winter, the external outlet can completely freeze, and if this point is not controlled, there will be excess moisture on the walls and ceilings and the finish will deteriorate.
Large bodies of water nearby also cause condensation. Sometimes the residents themselves are to blame if they dry their clothes indoors.
How to get rid of condensation in ventilation?
Condensation is the transition of gas or saturated steam into moisture. Sometimes this is called transformation immediately into a solid body (desublimation). In severe frost, moisture at the ventilation head quickly turns into ice.
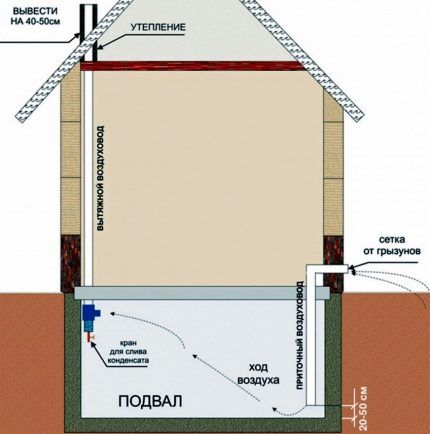
It is easier for residents of private buildings to solve the problem: it is easier to find the necessary terminals, no one prohibits changing the ventilation, and special permits are not needed. Thanks to new ventilation pipes Condensation in private houses appears later than in old high-rise buildings, under the same conditions.
In case of low flow, the channels are cleaned with a pipe brush. If there is depressurization, you will have to look for a hole. Humidity increases due to unbalanced air exchange. In private houses there are more rooms, and the ventilation system should be powerful. If it is already working, and replacement is undesirable or difficult, all that remains is to stimulate the removal of moist air and the entry of fresh air instead.
Three methods give a complete absence of moisture and ice in the ventilation and a stable result:
- Reliable thermal insulation (insulation).
- Forced ventilation.
- Changing the design of the external air duct - to remove moisture to the condensate trap.
With the second and third methods, thermal insulation will bring additional benefits. Keep in mind that with the first and third options you need to work with all organized natural ventilation: its supply, exhaust and supply and exhaust ducts.
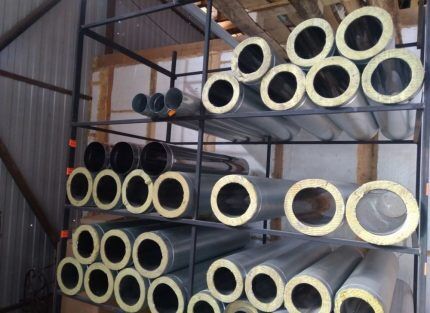
Sometimes you have to replace damaged or old ventilation elements.In the worst case scenario, be prepared to install a new system and plug the old one. The problem cannot be ignored if there is always a lot of moisture in the attic.
Method #1. Correct and high-quality thermal insulation
It is worth insulating first of all in places with the greatest temperature difference. Ducts near the ceiling of the upper floor, in the attic and roof need thermal insulation. They are insulated in exactly this order, and then insulated below, if a temperature contrast is also possible there.
Supply systems are ideally insulated not only through pipes, but also through valves. After arranging the problematic part of the ventilation, it will be possible to save on the rest.
The following insulation materials are suitable:
- polyethylene foam;
- polypropylene foam;
- foamed polystyrene;
- mineral wool;
- glass wool
Mineral wool reliably protects against cold, but quickly deteriorates from moisture and partially loses its properties. Only a layer of waterproofing will help. Glass wool is stronger than ordinary mineral wool, but otherwise is almost the same.
Polyethylene foam has good moisture resistance and low weight. Similar qualities are observed in polypropylene foam. Foamed polystyrene (expanded polystyrene) almost does not allow steam to pass through, which is considered a plus in modern design for heat retention.
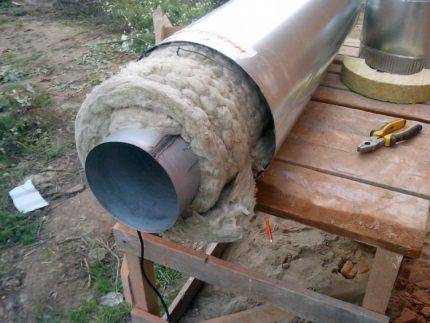
Step-by-step pipe insulation:
- We wipe the channels and remove all moisture.
- We wrap the heat-insulating material around the pipes. We start with the channels at the top of the building and problem areas. Secure with tape. We lay the adhesive tape lengthwise and additionally wrap it with transverse sections at small intervals.
- We achieve maximum tightness at the joints of insulation and pipes.
- Cylindrical seals are also suitable for channels with a round cross-section. We cut them on one side. Then we glue and secure with tape.
- You cannot leave a gap with air. Condensation can also form there, and it will ruin the thermal insulation. This will also lead to corrosion.
The distance between some pipes is inconvenient for insulation, so it is sealed. Suspended formwork is installed there, after which the space is filled with cement mortar. In places where ventilation goes behind the brickwork, it is worth sealing the seams more tightly and insulating cracks. The above will not fully protect against the cold, but the main thing is that cold air will not approach the pipes and cause condensation.
After proper work Dew point will move outside the ventilation. And as soon as you eliminate condensation, the humidity will drop significantly: in the case of ventilation of a private house, the changes will be significant - to 60% or less.
You should not insulate narrow corrugated pipes made of malleable metals. They are being replaced with plastic ones.
Insulation will simultaneously solve other issues. Fire safety will increase. Heat loss will be reduced. The owners will not be bothered by the noise in the ventilation ducts.
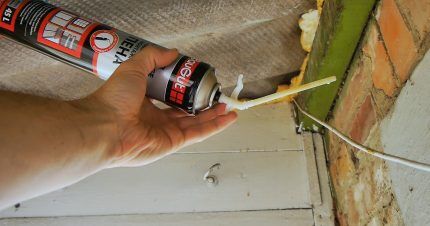
The thickness of the thermal insulation should be selected based on all needs at once. To ensure that condensation is eliminated, the outer part of the ventilation is protected with insulation with a thickness of 50 mm, or better yet, 100 mm. The pipe head is equipped deflector.
Method #2. Forced ventilation
Its arrangement begins with the kitchen.An exhaust fan is installed there. The old natural ventilation is left or covered with a plug. The new device is sometimes mounted in the window leaf, instead of a window or large sash.
A more comfortable option may be an exhaust system in a wall or pipe leading from the room to the street. The exit hole is made either away from the outer part of the chimney, or slightly lower.
An exhaust system will be installed on the street side check valves. The devices look like attachments. There is a flat version with a film partition. The film bends outward and lets warm air out of the house, but does not allow cold air to enter, even in strong winds.
There are valves with a plastic partition that rotates slightly along its axis, but only when exposed from the inside. With greater thickness, such a device is less airtight.
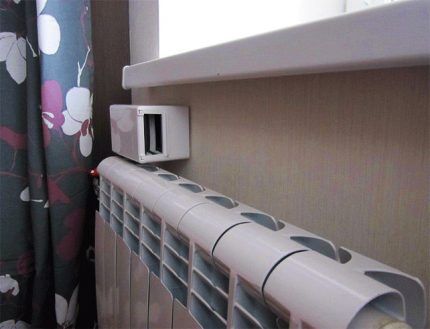
To supply air from the street, they organize supply valve. It is placed next to a battery or other heating element and adjusted if necessary. The house will still be warm, and almost all the condensation will be removed from the ventilation.
Plastic is considered the best material for an external forced ventilation pipe.
Method #3. Changing the outdoor duct pattern
Let's consider an option where the outer part of the ventilation exits the building horizontally and bends upward. Then the ventilation pipe is separated at the bend. Definitely at the lowest point - keep this in mind if the pattern is more complex.
A tee is fixed in the resulting hole.The sawn-off part is placed in the upper pipe, and the lower one is closed with a plug cone (condensate collector). Draining condensate will escape through it. This method is otherwise called condensate drainage. The resulting system is insulated. This reduces the likelihood of the outlet freezing during prolonged frost.
You can attach a tube to the condensate collector to drain the liquid, and direct the free end into a bucket. This is done if the collection is in a hard-to-reach place. Sometimes they make do with just a bucket or organize drainage into the sewer. When the amount of moisture is moderate, absorbent material is placed in the filtration zone. The cassette with it has to be removed and dried often.
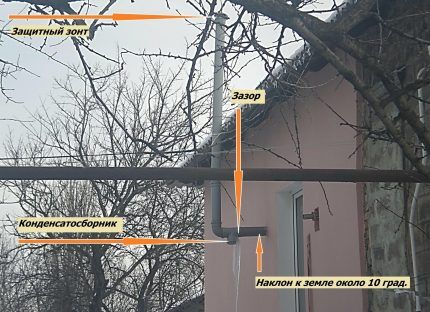
The conical shape of the plug has an advantage over a flat one, in which the water stands still and almost does not flow out, despite the holes. The liquid from the latter is drained manually.
In winter, the situation changes a little - icicles appear and cover a larger area on the cone. The air from the house melts the ice a few days after a severe frost, and they fall. The length of the lower pipe of the tee is enough so that during this time the water does not reach the branch level. Watch for ice to form and, if necessary, knock it off with a stick.
In a house with ventilation that has not yet been installed or is not completely finished, it makes sense to make a side exit through the gable. The DIY task will be easier than the idea of drilling a hole in the roof slope. Do not use this option if the pipe runs far from the gable.
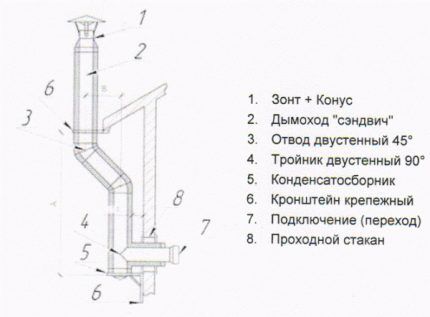
A bend with a long channel after it will noticeably reduce traction. On the other hand, the rooms below will receive better protection from moisture penetration.
If the outer part of the ventilation goes only horizontally, then you can crash into it at any point. In a strictly vertical pipe, as in a curved one, they look for the lowest point. From a smooth vertical channel, the drain usually goes inside the house.
Conclusions and useful video on the topic
Insulating ventilation with mineral wool to eliminate moisture is a clear example:
Sewer pipe as a ventilation pipe, with a special channel for condensate:
Excess humidity in ventilation is eliminated in several ways. To do this, pipes are repaired and cleaned, insulated, or an additional ventilation system is installed. If you live in a private house, then to remove condensate from the ventilation, you can somehow change the structure of the pipes. Sometimes the system is completely redone and replaced with a new one. If in your case there were few negative factors, then the condition of the ventilation will allow you to maintain it.
Ask questions and write comments about ventilation in your home. Tell us about its condition and effectiveness. Your information may be of interest to other users. The contact form is located below.


Why does the wind blow inward?