Construction of a shower cabin without a tray: detailed assembly instructions
In modern interiors, a shower stall with a large tray is often replaced with structures with thin transparent or matte walls installed on the floor. Installing a shower cabin without a tray may seem simple. But this is only at first glance.
In practice, installing a compact structure requires basic skills and strict adherence to installation rules, do you agree with this?
Do you want to install a shower stall yourself, but don’t understand what materials and components are needed for this? Let's figure out all the nuances of this process together - our article provides detailed instructions on how to build a shower without a tray.
Each stage of work was examined in detail, and visual photographs were selected to illustrate the described points. And in addition to the article, we have added videos that clearly demonstrate the installation process of such plumbing fixtures.
The content of the article:
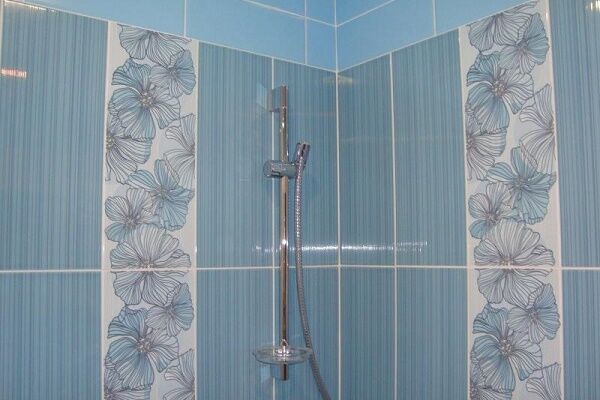
Shower cabins in the interior
Fashionable modern interiors are distinguished by ergonomics, lightness and free space. For this reason, designers have developed compact and stylish shower designs without a tray.
Thin, often transparent cabin barriers are mounted on the bathroom floor, where immediately drain arranged, thanks to which the practical shower box plays the role of an integral element of the interior.
A shower box without a tray is used to organize a small bathroom and a spacious room. The variety of models allows you to embody creative design ideas in interior design.
Since the walls of the shower cabin are usually made of the thinnest transparent plastic, the design looks airy and light. An important advantage of a shower box without a tray is that it requires minimal space to install.

Manufacturers often use transparent or organic frosted glass as shower partitions. After taking a shower, no traces of water drops remain on the glass surface.
Nuances of selection and installation glass for shower discussed in our other article.
Depending on the features of the bathroom interior, you can equip the shower stall with plastic panels, block walls, glass blocks, etc.
A shower box with partitions made of double durable glass, inside of which LEDs or lighting are mounted, will create an original interior.

To make a shower stall look stylish, you need to choose the right materials, so it makes sense to turn to designers to create a project.
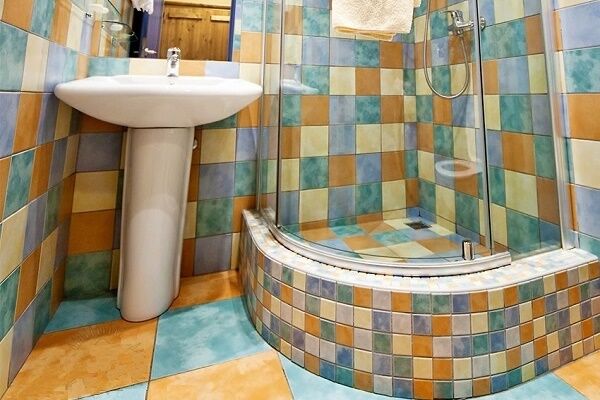
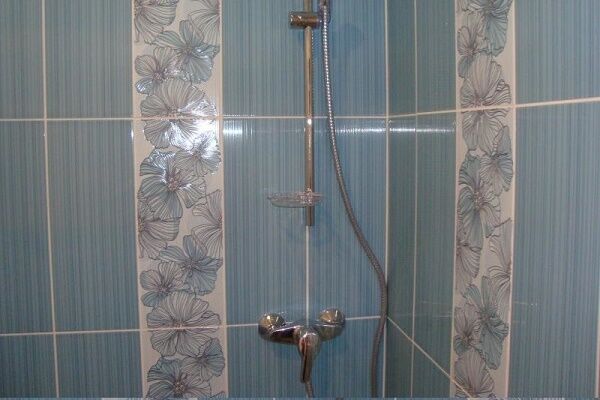
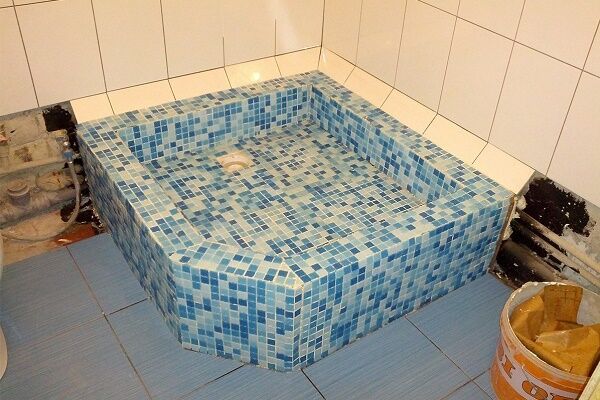
A non-standard floor covering will significantly improve the design of a shower box. The cabin floor is covered ceramic tiles, which does not necessarily have to match the style of the walls and other surfaces of the bathroom.

The floor looks original in the form of a mosaic, decorated with drawings or additional decorative elements.
Advantages of boxes without pallets
A shower installed on the floor can significantly save space and can be used in rooms of different purposes and sizes.
Before installing a compact booth, you need to evaluate its advantages and disadvantages.

Main advantages of the device:
- Small sizes. A shower without a tray can be installed in a small bathroom.
- Design advantages. The aesthetic design will allow you to stylishly decorate your bathroom interior. A shower box without a tray will harmoniously fit into the interior of a country house or city apartment.
- Easy to use. Ideal for people with disabilities, the elderly and children.
- Hassle-free care. Thanks to the simple device, maintaining and cleaning the booth will not be difficult and will not take much time.
- Possibility of self-installation. Installation can be carried out with your own hands, subject to strict adherence to the rules.
In addition, such hygienic facilities cost significantly less than shower stalls with a tray, which allows you to save your budget.
A comfortable and ergonomic shower stall without a tray is designed for installation in a workplace, apartment or private home. The compact design is also suitable for installation in a swimming pool or sports complex.
Features of the design of shower cabins without a tray
The main distinguishing characteristic of a shower box of this design is the absence of a special tray with characteristic side edges. The cabin of any model is equipped shower drain, ensuring the drainage of water from the shower head.
When you go looking for a shower box, you can choose the best option among a huge range of models. Modern cabins are divided into several main types and differ in the material used to make the elements and in the configuration.
You may be interested in the information on choosing the best shower enclosure in our other article.
Priority wall material
When choosing the optimal design of a shower box, the owner of the room must first decide on the wall material.
Plastic partitions
Partitions can be made of durable, high-quality plastic, which looks impressive and weightless.

The advantages of this material are wear resistance, ease of maintenance and relatively low cost.
Glass shower walls
Glass is the most popular material for making the walls of a shower box without a bulky tray. It can be transparent, matte or combined. Today, the market offers an assortment of original iridescent and colored options.
Glass partitions in the bathroom visually increase the space of the room. Cabin doors are made of ordinary or organic glass.

The most stable solution for decorating the walls of the box is glass blocks.
Walls made of transparent material will allow you to zone the room and conveniently fence off the corner where the shower stall without a tray is located. Using glass blocks, you can get a separate area for a comfortable shower.
PVC curtains as partitions
Shower curtains made of PVC look elegant and straightforward. By choosing this material, you will create an open shower design that closes during washing.
Curtains provide effective protection against splashes and soap suds. Inexpensive PVC curtains can be changed periodically, which allows you to transform the interior of the bathroom from time to time.

Owners of country houses sometimes refuse to install partitions. This option causes inconvenience to residents in the form of splashes and foam scattered throughout the entire area of the bathroom. This can cause significant damage to the flooring and furniture.
Choosing a drain for a shower device
An important element of a cabin without a tray is the shower drain. It is responsible for the process of discharging used water into the sewer system, and the comfort of the shower depends on its functioning.
When choosing, you need to consider where the shower and sewer drain will be located, which has several classifications. Products presented by manufacturers may differ in the material of manufacture and location in the shower stall.
Plastic shower drains are popular and are often used in bathrooms. They are resistant to aggressive environments and can withstand significant loads. They are characterized by ease of maintenance and light weight, which ensures ease of installation of the structure.
The products are equipped with a special siphon that does not allow odors from the sewer to pass into the room.
Reliable stainless steel shower drains are usually installed in rooms with special sanitary requirements. Durable structures are characterized by ease of maintenance and installation.
There are also sewer drains made of cast iron. They are used exclusively in large industrial enterprises.

Based on the type of receiving device and its location, shower drains are divided into two types:
- Spot. The water is drained into a funnel-type hole, towards which a slope is arranged. The funnel is connected to the sewer pipeline. Due to the small size of the receiving device, the waste collection point can be located anywhere: in the center of the shower, in a corner, near the wall of the stall.
- Linear. The most popular type of ladders with maximum receiving capacity.It is an elongated gutter or tray covered with a plastic or stainless steel grid. It is located mainly near one of the walls of the booth. During construction, a slope must be arranged towards the tray.
For arranging a small shower, the point type is better suited. Linear structures are installed mainly in large washing areas.

In addition to these classic types, there is also a hybrid option - a wall drain, which is essentially either a point or linear type, complemented by a drain receiver built into the adjacent wall. It should be noted that such devices are expensive.
When used correctly, the products used to install wastewater receivers and drainage channels can withstand loads of up to 300 kg, while the temperature of the outlet water can be no higher than 85ºC.
Standard designs are characterized by a drainage volume of 8-15 l/min. A drain tray is also used to remove liquid. It has a high throughput (up to 40 l/min.).

The drain tray has an elongated shape; its length ranges from 30 to 120 cm. Due to this, it receives a larger volume of liquid than a regular drain.
Installation of a shower cabin with a drain
Before you begin work on installing a shower box, you should draw up a design design. To install a shower drain and determine where to attach the walls of the cabin, you need to select an area draining water.

To install the ladder, it is necessary to raise it 15 cm from the concrete screed to the floor surface. This makes it difficult to install a shower box without a tray in a city apartment, since you will need to raise the floor level around the perimeter of the room.
If you decide to raise the floor exclusively inside the cabin, you will end up with an inconvenient step when entering the box. Raising the floor throughout the room will result in level floors, but will reduce the height of the bathroom.
Installation work for arranging a modern shower stall without a tray includes several stages.
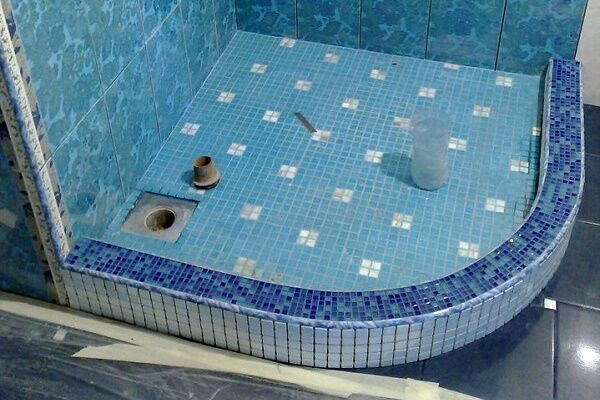
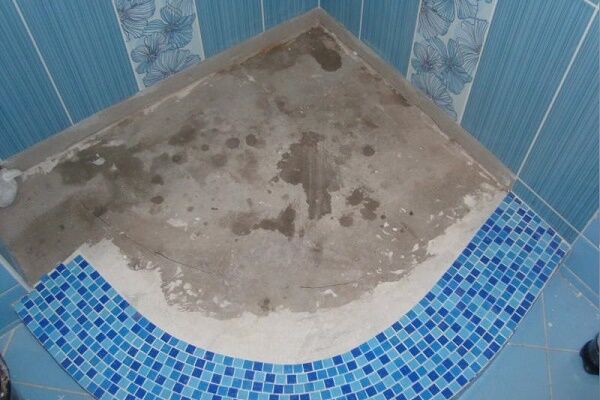
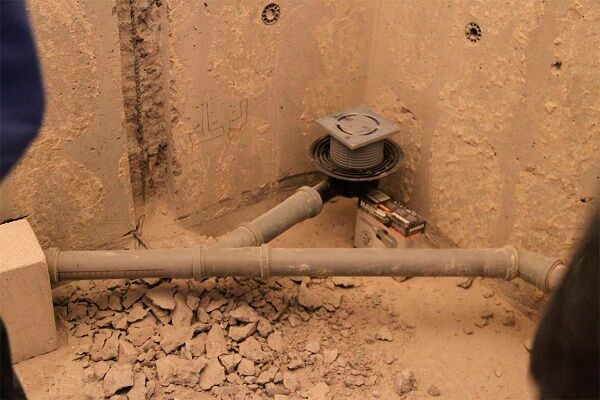
The following photo gallery will introduce you to the principle of constructing a pallet from building materials:
Stage #1 - preparation of the floor and communications
A guarantee of successful operation of a cabin without a pallet is the correct installation of the floor. To effectively drain water, the base of the floor should be sloped several degrees towards the drain.
A round or square shower drain can be installed in the center of the shower stall. In this case, the floor should have a slight slope on different sides from the corners of the perimeter to its center. If you have chosen an elongated ladder-tray design, then a slope of the floor towards the tray is created.
After installing the drain under the shower stall, you need to install the pipes. It should be noted that sewer pipes must also be located at a slope. Since the floor slope should be 1-2 degrees, it is necessary to ensure the same slope of the sewer pipes.

The concrete base should be thoroughly cleaned of dirt, then treated with a special mastic with high waterproofing properties. It is applied to the floor and walls around the shower stall (25 cm from the floor). This will protect the concrete screed from moisture.
Stage #2 - installing a shower drain
Separately from the shower cabin, you must mount the shower tray and its supports, following the attached instructions. It is necessary to connect all structural elements - siphon, supporting parts, drain and tray pipes.
After assembly, you need to check the quality of installation of the liquid drainage system by pouring water into the drain. If everything is in order, you can install the shower tray on the subfloor.
Before starting work, you need to seal the ladder grating with construction tape. This will prevent various construction debris from entering the sewer system.

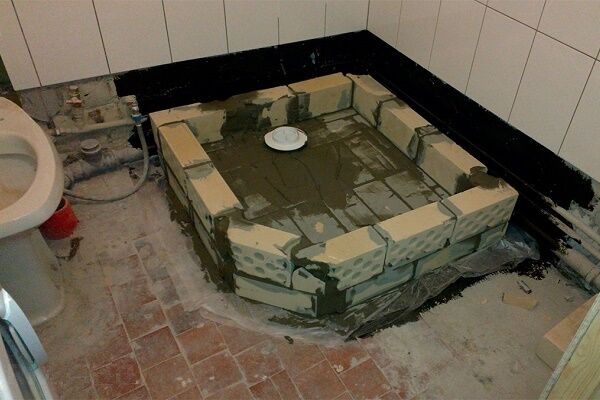
After installing the shower drain on the subfloor, all exposed areas must be filled with foam or polystyrene blocks.
Their thickness should be from 5 cm, while taking into account the slope of the floor (you can test it using a building level) and the slope of the pipe through which the water drains.
The gaps and cracks on the floor of the structure are filled with a mixture of water, cement and sand. The base of the shower stall is carefully compacted, and the level must be constantly monitored.
After completing the work, you must wait at least 3-4 days until the base of the shower stall floor hardens completely.
Stage #3 - waterproofing the cabin base
The next stage includes additional waterproofing of the base of the shower box. It is permissible to use both coating and pasting materials in the work. Waterproofing is done in 5 - 8 layers.
You may also find information about bathroom waterproofing, if the design of your shower does not include walls.

High-quality construction work will prevent flooding of neighbors on the lower floors. At this stage, mastic is used, which acts as a sealant. It is applied to the lower part of the walls and to the base made of foam blocks.
A single continuous sheet of roofing felt or fiberglass is then laid over the subfloor to serve as waterproofing. During the installation process there should be no cuts or cracks, since damaged areas may cause leaks and damage to the integrity of the structure.

The edges of the sheet should be located on the wall surface at a height of 25 cm from the floor level. The material is folded at the corners, pressed against the wall and secured with glue.
Stage #4 - installation of concrete screed
The next stage of installing a shower without a tray is to install a concrete screed on top of the hardened floor covering. In this case, the thickness of the concrete screed must be at least 4 centimeters.
This will ensure the strength and reliability of the structure. During screeding, you should control the degree of slope of the floor towards the drain.
It is recommended to think in advance about exactly how the ceramic tiles will be laid on the subfloor and to place the strips on the screed. Due to this, the concrete floor will be reliably protected from cracking due to temperature changes during the operation of the shower cabin.
The concrete screed is covered with mastic, which acts as a waterproofing material.Coat the base of the shower floor and the lower surface of the walls to a level of 25 cm.

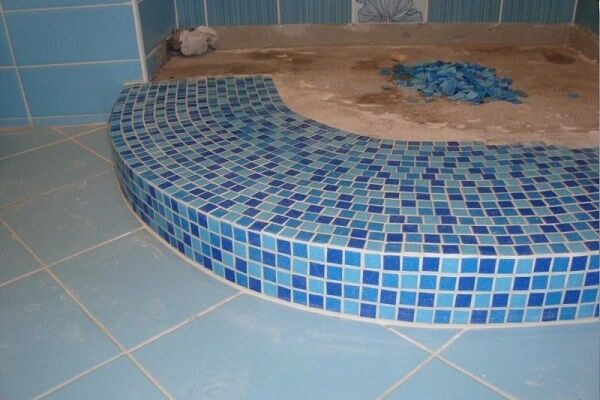
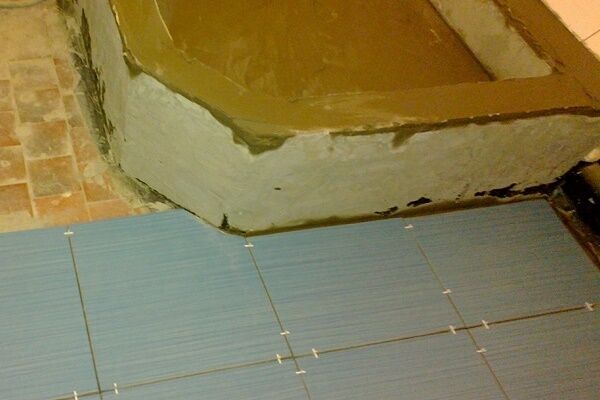
Stage #5 - finishing and decoration
At the next stage, they move on to finishing the structure. The floor and walls of the shower box are laid out with ceramic tiles or decorative mosaics.
During the finishing process, you must first tile the floor of the structure, and then the walls. Due to this, the vertical wall tiles will cover the horizontal ones below. After laying the tiles, the wall joint and all joints should be carefully treated with waterproofing film or silicone.

The last stage is the final design. The boundaries of the shower box can be in the form of a reliable partition, which is built on the basis of cinder blocks, finished with ceramic tiles or mosaics. Most consumers install glass doors.
If the base of the shower stall is made in the shape of a circle, round-shaped doors are used. When constructing a rectangular or square base of the box, the doors of the structure are placed perpendicular to each other.
To install a structure without a pallet, guards must be installed. To do this, you can use brick partitions, cinder block fences, plastic or glass doors.
The most popular material used for the manufacture of sashes is durable glass. When washing in the shower, no smudges or stains remain on it.The thickness of the glass sashes varies from 6 to 12 mm, and the material can be transparent, matte or a combination.

At the last stage, you need to install a shower head.
Prevention of installation errors
Modern shower boxes without a tray differ from other models in that the water drains directly through a drain installed on the floor of the structure. The main task when installing a shower without a tray is to correctly set the floor slope and properly waterproof the base.
If the technology is violated during the installation of the floor and shower drain, the consequences can be serious. There is a possibility of flooding of neighbors, and if the bathroom has a “warm floor", a short circuit may occur.
Therefore, laying the floor and other work on installing a shower cabin without a tray must be carried out in compliance with the technology and installation rules.
If carried out incorrectly siphon installation an unpleasant odor may appear, which usually comes from the sewer system. Therefore, it is recommended to choose a high-quality drain made by a popular manufacturer.
When assembling the structure, you must strictly follow the instructions supplied with the product.
Conclusions and useful video on the topic
Information from the videos will help you understand the design of shower cabins and better understand the installation process.
Installing a shower box according to Swedish standards - detailed step-by-step instructions:
Features and characteristics of showers without tray:
A well-installed and stylishly designed shower stall without a tray can be significantly superior to most serial factory products in its practicality and attractiveness..
As for the availability of a variety of additional options, simply installing a shower panel is guaranteed to provide the necessary functions.
Have you noticed a discrepancy between the presented material and the technical requirements? Please write to us about this in the comments.
Or did you make a cabin without a pallet with your own hands at home? Tell us about the difficulties you encountered during the installation process and please share your impressions of its operation.


A well-made shower stall (with or without a tray) looks great. I would just like for an ordinary user to really assess his needs and financial capabilities before starting the arrangement, and not just focus on a beautiful picture on the Internet. For example, installing a high-quality booth, according to my conservative estimates, will cost at least 100 thousand rubles. The use of cheap products leaves a very unpleasant taste in the soul while using them. And you need to be absolutely sure that you won’t need a bath in the future; you can easily do without it. Well, pouring the floor screed, laying waterproofing, drains and drains, although not a supernatural process, requires painstaking attention, attention and basic skills in repairs and finishing. And when hiring a team, you cannot be 100% confident in them; you must personally supervise all stages of the work. Well, you also need to remember that in hypothetical accidents you will need to dismantle, perhaps, the entire floor.
We installed a shower stall without a tray because this option fit better into the design of the bathroom. And this option looks lighter and does not overload the space. Suitable for both small and large bathrooms. By the way, you can make glass partitions to order according to your design and to any size. And the floor was tiled with the same tiles as the rest of the bathroom.
Can you send a link to the photo?
Interesting options for constructing shower boxes are demonstrated in the video. Good information, useful!